
Many Many Mods(56k Killer)


Moderator


Joined: Feb 2009
Posts: 11,732
Likes: 5
From: Leesville, Louisiana
Vehicle: 2001 Hyundai Tiburon
^^ definately. Figuring prices out it would come to $40 for just the VSR alone. not to mention the controler chips needed (astable multivibrator, up counter, 555 timer, 4 transistors, 4 relays and 4 diodes.
It makes more sence to just buy the controller and figure it out as well as the factory alarm system's activation of the trunk popper accessory.
It makes more sence to just buy the controller and figure it out as well as the factory alarm system's activation of the trunk popper accessory.

Thread Starter
Senior Member
Joined: Mar 2006
Posts: 9,172
Likes: 0
Vehicle: 2001/Hyundai/Tiburon
finally got done with the tweeters. im kind of dissapointed in them, but i needed to get the highs up front so these will have to do. i guess when i tore them apart to re-do them the angle i wanted to mount them at got messed up. oh well, for my first time working with the stuff i guess they came out ok...


Senior Member
Joined: Aug 2009
Posts: 11,992
Likes: 0
From: Washington D.C.
Vehicle: Hyundai Tiburon FX
punk ass. i'm so jealous. i just don't feel like taking my car all apart because i know one way or another i'll irreversibly f*ck something. great job man. if i ever started my car over first thing would be to buy it in manual, second would be to visit you. you need to do two things.
1. light up my dash when i get my f2 gauges
2. tell me 'bout that exhaust.
1. light up my dash when i get my f2 gauges
2. tell me 'bout that exhaust.
Thread Starter
Senior Member
Joined: Mar 2006
Posts: 9,172
Likes: 0
Vehicle: 2001/Hyundai/Tiburon
haha.
exhaust is just some cheapy aftermarket header, stock cat, and then old obx cat-back exhaust. nothing fancy, and cost me about 200 dollars shipped total. i have a big ass glasspack that will be going on very shortly, and hopefully that will quiet it down. i love the sound now, its just too loud.
exhaust is just some cheapy aftermarket header, stock cat, and then old obx cat-back exhaust. nothing fancy, and cost me about 200 dollars shipped total. i have a big ass glasspack that will be going on very shortly, and hopefully that will quiet it down. i love the sound now, its just too loud.
Senior Member
Joined: Aug 2009
Posts: 11,992
Likes: 0
From: Washington D.C.
Vehicle: Hyundai Tiburon FX
yeah i have a crap exhaust that cost me about $750 total (because i had it re-welded) that's why i want a motoria. i have to reccomend thrush, nice and throaty at full throttle. garuntee you won't be disappointed. it'll tone down the noise output by about half but you'll still be able to set off car alarms in the garages if you try at it.
love the car though man... are you in on those CF cowls?
do you have HID's?
what about window tinting?
love the car though man... are you in on those CF cowls?
do you have HID's?
what about window tinting?
Thread Starter
Senior Member
Joined: Mar 2006
Posts: 9,172
Likes: 0
Vehicle: 2001/Hyundai/Tiburon
not in on the cowls. i painted mine a nice glossy black and i think they look great. i do have 6k HIDs, and I did lay some 35% tint on the door windows and quarter glass. the hatch glass was just too much of a pita at the time.
and i do have a thrush. im eager to hear what it sounds like with it on.
and i do have a thrush. im eager to hear what it sounds like with it on.
Thread Starter
Senior Member
Joined: Mar 2006
Posts: 9,172
Likes: 0
Vehicle: 2001/Hyundai/Tiburon
so i took some new pictures. classes @ umd start on the 30th(don't know when im moving up there...if you attend or live near and need a roomate hit me up...), and i hope to have the carputer installed before then. my last day at work was today so i do have some free time.
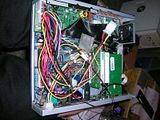
starting on the radio surround. i tore apart the cupholder and screwed the dvd drive enclosure into it to give it a good solid mounting point. now i just have to mold around the enclosure and pop the dvd drive in. also opened up the radio hole enough to hold the screen bezel. i will be ditching the touchscreens regular buttons for menu, volume, power and stuff(they are on the bottom of the bezel) and placing the IR reciever somewhere so that i can just use the remote and not have to worry about finding a spot and relocating the buttons(you have to extend a ribbon cable otherwise, and its a pita).
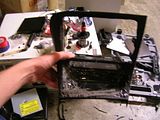
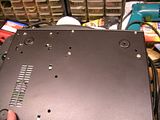
those 2 sets of 4 screws are not originally part of the case. my anal retentiveness made me want to do away with anything that is not needed, and make it completely removeable from the car without touching a screw. i fit the opus 120w power supply in the case, and mounted the cf card reader directly to the bottom of the case. originally the cf card reader is mounted underneath the power supply that came with the case, which i got rid of.
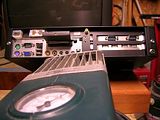
the back of the case was hacked up a lot. i am running a lot of wires into this case, and am utilizing just about everything the motherboard has to offer. the power plug on the right is the stock power supply jack for power and ground. since im not using that i will be using that jack to run power to my lilliput touchscreen. the 6 pin molex connector is for my powersupply. there is a smc coax terminal for my gps cable. i cut apart a case front panel thingy with firewire, 2usb, and audio. the two audio are on the back of the case in the middle(i will need the additional line in for my xm radio because i am using the motherboards smart5.1, which converts all the MB audio jacks to outputs). the rest are going to be in a cool little spot which you will see below. thats what the 2 cat5 jacks on the back are for. i have already extended all the cables and made all the crimp connections, which is easily the most time consuming.
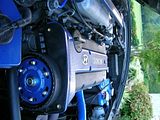
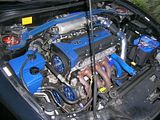
random shot of some under the hood stuff ive done. replaced timing belt, idler and tensioner pulleys, water pump. put in FAL fans. painted the PS and coolant resevoirs. swapped out the stock crank, ps, and water pulleys, along with the stock cam gear for a pretty obx adjustable one.
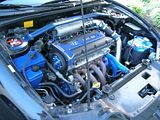
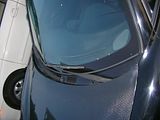
how good does that wiper cowl look painted glossy black with kspec 3way nozzles in it? prolly my 2 favorite DIYs. cheap and they look soooo much cleaner.
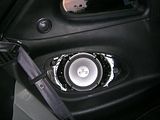
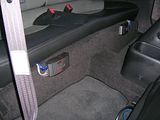
since i wont have the stock cupholders anymore, i mounted some to the door panel. bought these off ebay for like 5 bucks each and they work great. i had originally planned on putting them right behind the center console and underneath the rear seat, but the self tapping screws i had werent long enough. this spot is definately more accessible to the front seats as well. you can also get a glimpse of where my front crossovers are mounted.

you can see the rear tweeter locations and i popped the rear grills off(with a quarter!) so you can see my adapter plates i made that i am really happy with. kinda flimsy when i had them outside the car, but as soon as they were screwed down they got super stiff and arent movin at all.
location of rear crossovers.
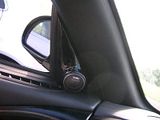
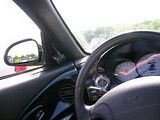
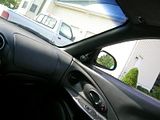
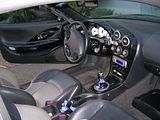
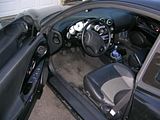
random shots of the dash and tweeter pods. also notice the pass. side kick panel gone, its where the usb and firewire ports are going. its already done, with like 5 foot cable run off of everything, i just forgot to take a picture of it.
guess thats about all. hopefully the next time i put up picutres it will be of a freshly molded and painted radio fascia with a monitor and dvd slot load drive in it! getting excited, and working on the car helps keep my mind off of other shitty life stresses. Eyecrazy.gif
starting on the radio surround. i tore apart the cupholder and screwed the dvd drive enclosure into it to give it a good solid mounting point. now i just have to mold around the enclosure and pop the dvd drive in. also opened up the radio hole enough to hold the screen bezel. i will be ditching the touchscreens regular buttons for menu, volume, power and stuff(they are on the bottom of the bezel) and placing the IR reciever somewhere so that i can just use the remote and not have to worry about finding a spot and relocating the buttons(you have to extend a ribbon cable otherwise, and its a pita).

those 2 sets of 4 screws are not originally part of the case. my anal retentiveness made me want to do away with anything that is not needed, and make it completely removeable from the car without touching a screw. i fit the opus 120w power supply in the case, and mounted the cf card reader directly to the bottom of the case. originally the cf card reader is mounted underneath the power supply that came with the case, which i got rid of.


the back of the case was hacked up a lot. i am running a lot of wires into this case, and am utilizing just about everything the motherboard has to offer. the power plug on the right is the stock power supply jack for power and ground. since im not using that i will be using that jack to run power to my lilliput touchscreen. the 6 pin molex connector is for my powersupply. there is a smc coax terminal for my gps cable. i cut apart a case front panel thingy with firewire, 2usb, and audio. the two audio are on the back of the case in the middle(i will need the additional line in for my xm radio because i am using the motherboards smart5.1, which converts all the MB audio jacks to outputs). the rest are going to be in a cool little spot which you will see below. thats what the 2 cat5 jacks on the back are for. i have already extended all the cables and made all the crimp connections, which is easily the most time consuming.

random shot of some under the hood stuff ive done. replaced timing belt, idler and tensioner pulleys, water pump. put in FAL fans. painted the PS and coolant resevoirs. swapped out the stock crank, ps, and water pulleys, along with the stock cam gear for a pretty obx adjustable one.


how good does that wiper cowl look painted glossy black with kspec 3way nozzles in it? prolly my 2 favorite DIYs. cheap and they look soooo much cleaner.

since i wont have the stock cupholders anymore, i mounted some to the door panel. bought these off ebay for like 5 bucks each and they work great. i had originally planned on putting them right behind the center console and underneath the rear seat, but the self tapping screws i had werent long enough. this spot is definately more accessible to the front seats as well. you can also get a glimpse of where my front crossovers are mounted.

you can see the rear tweeter locations and i popped the rear grills off(with a quarter!) so you can see my adapter plates i made that i am really happy with. kinda flimsy when i had them outside the car, but as soon as they were screwed down they got super stiff and arent movin at all.

location of rear crossovers.

random shots of the dash and tweeter pods. also notice the pass. side kick panel gone, its where the usb and firewire ports are going. its already done, with like 5 foot cable run off of everything, i just forgot to take a picture of it.


guess thats about all. hopefully the next time i put up picutres it will be of a freshly molded and painted radio fascia with a monitor and dvd slot load drive in it! getting excited, and working on the car helps keep my mind off of other shitty life stresses. Eyecrazy.gif
Senior Member
Joined: Mar 2002
Posts: 34,642
Likes: 0
From: Los Lunas, New Mexico, USA.
Vehicle: 2001 Hyundai Tiburon, 2004 Kia Sorento, 2010 Kia Soul
Chris, what can you tell me about putting that cam gear on? I really want to do it but I'm afraid I might mess up, I've seen no DIY's on it.
That OBX one actually look pretty damned nice. I wonder if I should get that one or the Fidanza?
When you are done with your carputer, get in touch with me, I want one. LOL
That OBX one actually look pretty damned nice. I wonder if I should get that one or the Fidanza?
When you are done with your carputer, get in touch with me, I want one. LOL
Thread Starter
Senior Member
Joined: Mar 2006
Posts: 9,172
Likes: 0
Vehicle: 2001/Hyundai/Tiburon
it wouldnt really be that bad. i did it when i changed my timing belt, so everything was off, but you would really only need to take off that upper timing belt cover(easy, like 4 or 5 bolts openly accesible). you would prolly have to loosen the tensioner pulley too, and i dont remember if you can do that without the lower TB cover off. use an impact gun to get that nut off that holds on the cam gear and then swap the gears. i would use whiteout to make a mark on the belt directly out from where the keyhole is on the stock belt, and then line it up the same way with the keyhole on the obx gear.