
My Head Has Holes In It. They Need A Port And Polish!

Senior Member

Joined: Aug 2004
Posts: 2,764
Likes: 0
From: South Korea where u car from fool
Vehicle: 2008/Hyundai/Tiburon gt
sorry about that i rearranged my photobucket..
here you go..


and this is how you do the valves you will need the following
drill press. digital scale, sand paper, lots of time,
sand paper i used was emery cloth to do the initial cutting.. 50.80.220.120.400 then paper sandpaper to polish out.. 600,800,1500,2000
when you get to 1500 and 2000 put some ALU mag Polish to get that shine. pay special attention to the intake valves.. from what i noticed with OEM valve they weight 47-50 grams. heavy just think how much mass that is at 7000rpm... dam
when you do this its normal to get one or 3 not to match.so go back with the 220. remove alittle weight, remove and weight.. it took me almost a week to redo me a new set of valves..but it all about BALANCE
the intake weigh 45.55 grams and the ext weigh 44.55 grams


here you go..
and this is how you do the valves you will need the following
drill press. digital scale, sand paper, lots of time,
sand paper i used was emery cloth to do the initial cutting.. 50.80.220.120.400 then paper sandpaper to polish out.. 600,800,1500,2000
when you get to 1500 and 2000 put some ALU mag Polish to get that shine. pay special attention to the intake valves.. from what i noticed with OEM valve they weight 47-50 grams. heavy just think how much mass that is at 7000rpm... dam
when you do this its normal to get one or 3 not to match.so go back with the 220. remove alittle weight, remove and weight.. it took me almost a week to redo me a new set of valves..but it all about BALANCE
the intake weigh 45.55 grams and the ext weigh 44.55 grams
Thread Starter
Super Moderator

Joined: Sep 2001
Posts: 10,795
Likes: 5
From: Pflugerville, TX
Vehicle: 2000 Elantra
I did something neat on the exhaust valve deshrouding. I'll take some photos, write it up, and show you later.
For now: Thanks MJ. The amount of color saturation in your pictures has always been a distraction... here they are with the saturation turned down some. The valves still look crazy because of whatever was above the head making circles on their complex-curved mirror surfaces, but a mirror is hard to shoot without a troublesome setup so oh well.


For now: Thanks MJ. The amount of color saturation in your pictures has always been a distraction... here they are with the saturation turned down some. The valves still look crazy because of whatever was above the head making circles on their complex-curved mirror surfaces, but a mirror is hard to shoot without a troublesome setup so oh well.
Thread Starter
Super Moderator
Joined: Sep 2001
Posts: 10,795
Likes: 5
From: Pflugerville, TX
Vehicle: 2000 Elantra
***Alright, here's the update***
Oversized Exhaust Valves, STOCK Hyundai Part!
If anyone wants an oversize exhaust valve, you have a new starting point. There is also a new tool for taking the exhaust side wall of the combustion chamber away from the exhaust valves.
Both are the stock intake valve. Yeah, for making a new exhaust valve, you'd need to do some work to the stem and back of the valve, but it's WAY bigger and has the same diameter stem. Anyhow, that's for someone else to fool with.
What I am interested in is the custom tool.
I was wondering how on earth I was going to get a uniform radius on the exhaust side wall of the combustion chamber. I dunno, I guess I was fooling around, but I found that one of my "gently abused, slightly bent" intake valve won't go down into the chamber.

Sooooo.... I removed enough material from the wall to let the valve all the way down.

This shot is one side done this way, one not done yet, on the same chamber. It looks like about 3/4mm is taken out of the wall but it's pretty hard to measure well. Yes you sissies I am going to make it smoother calm down.

My finger is simulating a camshaft at around .4" lift. Note the clearance difference.

The red marker is a tool. Grind enough to let the valve drop in past the cylinder head deck, then mark it with a sharpie. Push the valve down gently, and it will rub on a high spot on the wall. Push the valve back through and you will be able to grind on the newly-highlighted high spot. I left the valve stem in the guide during this whole process, trying to minimize the amount of aluminum shavings that got down into the guide. I don't know if it would have hurt the guide, but it's a dang sight easier when you don't have to clean out the guide after every cut, to replace the valve and make another mark/measure/cut.
The blue lines are the ridges on the walls that could probably stand to be removed a little more. Everything covered in red, I was checking for high points that needed to be ground off. The area around the seat I didn't need to do much with except a little by the chamber wall. I had (obviously) already given that the treatment prior to this action.

I want to mount this to an engine block and mark out where the cylinder wall lies more precisely than it is marked now (not at all, the marker rubbed off) with a scribe. Then I'll decide if I want to remove any more material. Compared to the intake valve, these things have very little clearance. When I get there, I'll think again about chamber volume (compression) vs. breathing room. Of course there will be pics.
Note: if you want the clearance from the exhaust valve to the side of the chamber to increase, grab a valve that is bent more. I wanted to see what it would look like, and so I grabbed one of my "looks pretty bent" valves and when the head was away from the wall it would go all the way in... with the head toward the wall, it wouldn't go down, just like the "looks straight" valve wouldn't. Use the same technique to achieve any clearance you want, and it's all dead-on straight relative to the axis of the valve stem. WIN!
Oversized Exhaust Valves, STOCK Hyundai Part!
If anyone wants an oversize exhaust valve, you have a new starting point. There is also a new tool for taking the exhaust side wall of the combustion chamber away from the exhaust valves.
Both are the stock intake valve. Yeah, for making a new exhaust valve, you'd need to do some work to the stem and back of the valve, but it's WAY bigger and has the same diameter stem. Anyhow, that's for someone else to fool with.
What I am interested in is the custom tool.
I was wondering how on earth I was going to get a uniform radius on the exhaust side wall of the combustion chamber. I dunno, I guess I was fooling around, but I found that one of my "gently abused, slightly bent" intake valve won't go down into the chamber.
Sooooo.... I removed enough material from the wall to let the valve all the way down.
This shot is one side done this way, one not done yet, on the same chamber. It looks like about 3/4mm is taken out of the wall but it's pretty hard to measure well. Yes you sissies I am going to make it smoother calm down.
My finger is simulating a camshaft at around .4" lift. Note the clearance difference.
The red marker is a tool. Grind enough to let the valve drop in past the cylinder head deck, then mark it with a sharpie. Push the valve down gently, and it will rub on a high spot on the wall. Push the valve back through and you will be able to grind on the newly-highlighted high spot. I left the valve stem in the guide during this whole process, trying to minimize the amount of aluminum shavings that got down into the guide. I don't know if it would have hurt the guide, but it's a dang sight easier when you don't have to clean out the guide after every cut, to replace the valve and make another mark/measure/cut.
The blue lines are the ridges on the walls that could probably stand to be removed a little more. Everything covered in red, I was checking for high points that needed to be ground off. The area around the seat I didn't need to do much with except a little by the chamber wall. I had (obviously) already given that the treatment prior to this action.
I want to mount this to an engine block and mark out where the cylinder wall lies more precisely than it is marked now (not at all, the marker rubbed off) with a scribe. Then I'll decide if I want to remove any more material. Compared to the intake valve, these things have very little clearance. When I get there, I'll think again about chamber volume (compression) vs. breathing room. Of course there will be pics.
Note: if you want the clearance from the exhaust valve to the side of the chamber to increase, grab a valve that is bent more. I wanted to see what it would look like, and so I grabbed one of my "looks pretty bent" valves and when the head was away from the wall it would go all the way in... with the head toward the wall, it wouldn't go down, just like the "looks straight" valve wouldn't. Use the same technique to achieve any clearance you want, and it's all dead-on straight relative to the axis of the valve stem. WIN!
Thread Starter
Super Moderator
Joined: Sep 2001
Posts: 10,795
Likes: 5
From: Pflugerville, TX
Vehicle: 2000 Elantra
Update: gathering information & working on other projects.
I talked to the Junior, the machinist at Performance Machine Shop in Hutto, Texas, who gave me some little cylinder head clues and tips. Also, I *may* need to replace some of the valve guides. Possibly a valve job on a machine, if the lapping compound won't clean it up.
I was at Performance Machine Shop to get the flywheel resurfaced.
The mounting adapter for which is supposed to come in today-ish at the dealership, and then the transaxle conversion should go down this weekend. I've been getting the garage cleaned out. This is one of many projects I have running. I'll update it whenever I do any work, promise. But "update: nothing's changed" doesn't seem very helpful wink1.gif
Thread Starter
Super Moderator
Joined: Sep 2001
Posts: 10,795
Likes: 5
From: Pflugerville, TX
Vehicle: 2000 Elantra
Update: FINISHED!
finished the automatic to manual conversion, that is. No news on the cylinder head.
I did make one disturbing discovery however. I don't know how long it had been going on but I found a mild case of paresthesia in my right index finger, and to a lesser extent a couple of other places where my hand interacts with the dremel tool. I'm taking a couple of weeks off from the head work to see if it's a temporary neuropathy from the pounding of the corners on the tool, or (if it won't get better) if I need to go see a physician
free to pray for me.
Super Moderator
Joined: Dec 2002
Posts: 5,735
Likes: 3
From: Vegas, Baby, Vegas!!!
Vehicle: '14 Ford F-150
QUOTE (Stocker @ Oct 31 2008, 09:51 PM)
I did make one disturbing discovery however. I don't know how long it had been going on but I found a mild case of paresthesia in my right index finger, and to a lesser extent a couple of other places where my hand interacts with the dremel tool. I'm taking a couple of weeks off from the head work to see if it's a temporary neuropathy from the pounding of the corners on the tool, or (if it won't get better) if I need to go see a physician
I get that all the time in my left hand due to the fistula I have in my left arm.
Thread Starter
Super Moderator
Joined: Sep 2001
Posts: 10,795
Likes: 5
From: Pflugerville, TX
Vehicle: 2000 Elantra
That's ok if you know what is causing it. I haven't seen a doctor since I was discharged from active duty in 2001 and potential causes range from nothing much all the way through MS and stroke so I'm not too happy about it (yet?)
Thread Starter
Super Moderator
Joined: Sep 2001
Posts: 10,795
Likes: 5
From: Pflugerville, TX
Vehicle: 2000 Elantra
Update! With pics even!
I think the numbness in my hand/arm and cheek are caused by posture pinching a nerve. If I slouch for a while at the computer it gets worse. When I hold myself straight it gets better. I'm going to try the e-cises (Pain Free, by Pete Egoscue, good for all your musculoskeletal dysfunctions!) for upper neck pain (which I sometimes have, a wicked crick in my neck) to see if the symptom is relieved.
Anywho, I am getting ready to ditch the parts car, so it is time to bolt the head on the block real quick and mark the cylinder walls on the head's deck.
Bingo: Connect the dots and you've got my scribed line, should be right at 82mm (stock bore).
The astute observer will note that the exhaust valve deshrouding has gone PAST the outside of the cylinder (DOH! ) but only by a hair, and it is still well inside the sealing area for the head gasket (WHEW! ). A 1mm overbore would cover this "over-un-shrouding" just fine. I also noticed that the Singh grooves that I thought were plenty far away from the edge of the cylinder, are right up on it.
I also saw that, true to form, the factory crosshatching can still be seen quite prominently in the cylinder bores, and there is VERY LITTLE wear on the bores from the pistons. The ring around the top is from crap getting down beside the piston; there is NO wear ridge. Remember, this is at 165,000 miles with crap oil and bad gas:
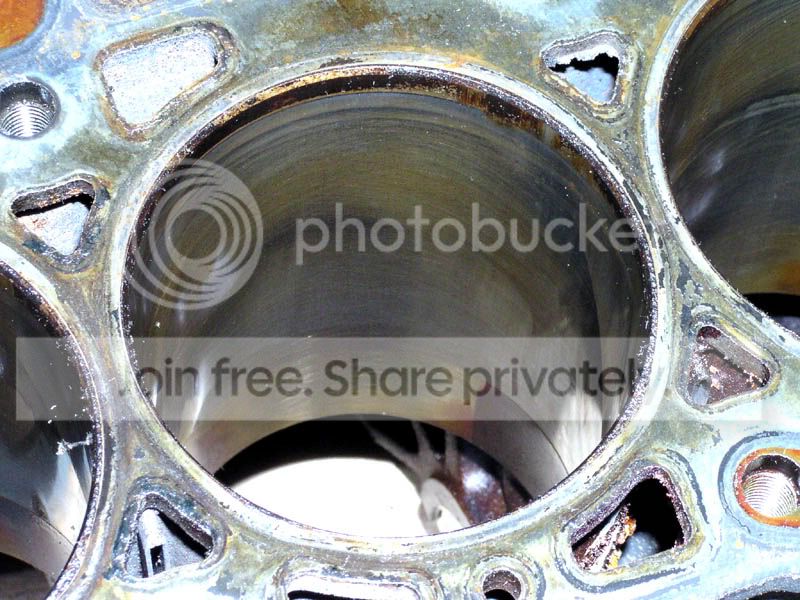
This is in line with the report I heard from RED who had factory crosshatching on a similarly high-mileage engine WAY back in the day. Whatever alloy steel Hyundai uses for the bores, is definitely the right one!
The pistons, by the way, are in similarly great condition:
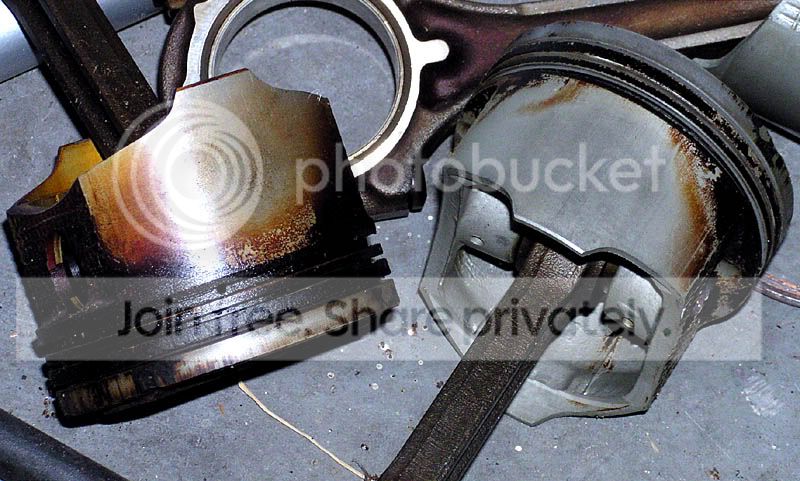
And I hope to re-use them after only cleaning the gunk off and knocking the sharp edges off the dome. The bores look so good, I'm going to go for a set of stock piston rings and hope for similarly low amounts of wear when I do the switchover.
No dremel work for me, for a while yet, but I thought you all might like to know what else I've done.
I think the numbness in my hand/arm and cheek are caused by posture pinching a nerve. If I slouch for a while at the computer it gets worse. When I hold myself straight it gets better. I'm going to try the e-cises (Pain Free, by Pete Egoscue, good for all your musculoskeletal dysfunctions!) for upper neck pain (which I sometimes have, a wicked crick in my neck) to see if the symptom is relieved.
Anywho, I am getting ready to ditch the parts car, so it is time to bolt the head on the block real quick and mark the cylinder walls on the head's deck.
Bingo: Connect the dots and you've got my scribed line, should be right at 82mm (stock bore).
The astute observer will note that the exhaust valve deshrouding has gone PAST the outside of the cylinder (DOH! ) but only by a hair, and it is still well inside the sealing area for the head gasket (WHEW! ). A 1mm overbore would cover this "over-un-shrouding" just fine. I also noticed that the Singh grooves that I thought were plenty far away from the edge of the cylinder, are right up on it.
I also saw that, true to form, the factory crosshatching can still be seen quite prominently in the cylinder bores, and there is VERY LITTLE wear on the bores from the pistons. The ring around the top is from crap getting down beside the piston; there is NO wear ridge. Remember, this is at 165,000 miles with crap oil and bad gas:
This is in line with the report I heard from RED who had factory crosshatching on a similarly high-mileage engine WAY back in the day. Whatever alloy steel Hyundai uses for the bores, is definitely the right one!
The pistons, by the way, are in similarly great condition:
And I hope to re-use them after only cleaning the gunk off and knocking the sharp edges off the dome. The bores look so good, I'm going to go for a set of stock piston rings and hope for similarly low amounts of wear when I do the switchover.
No dremel work for me, for a while yet, but I thought you all might like to know what else I've done.
Senior Member
Joined: Aug 2004
Posts: 2,764
Likes: 0
From: South Korea where u car from fool
Vehicle: 2008/Hyundai/Tiburon gt
wrong... your not looking in the right place my friend. you need to look at 12 o clock and 6 o clock in the bores that is where the wear on our engines takes place.. the force of the piston being pushed down that wear happen at the 6 o clock position and the 12 o clock position is engine braking or letting off of the gas to ether.
A. come to a stop
B. heal and toeing kicking down gears.
C. general stopping
D. first start up why> because as you know your piston are not perfectly round when they are cold in the morning.
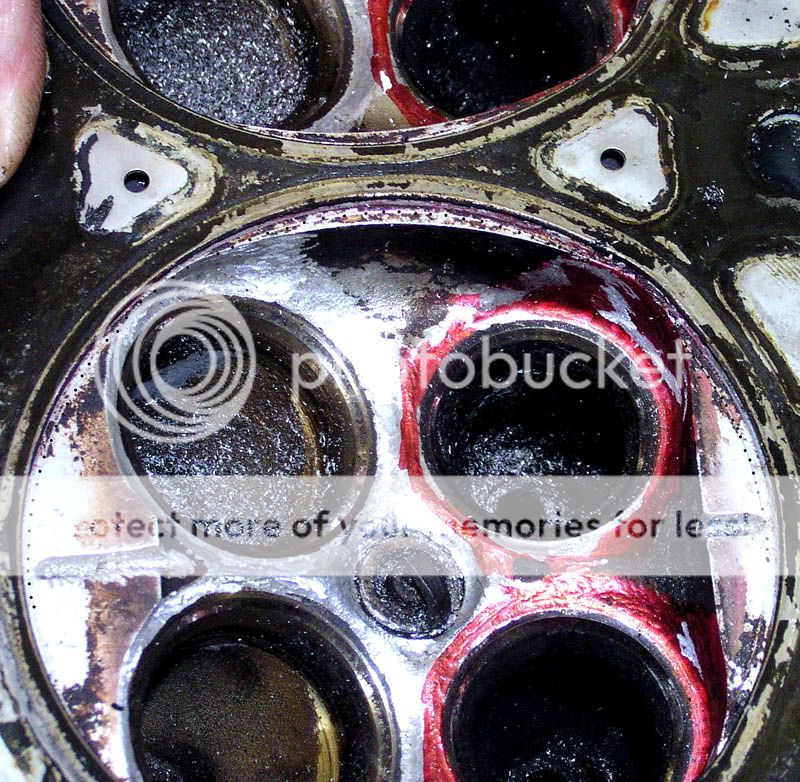
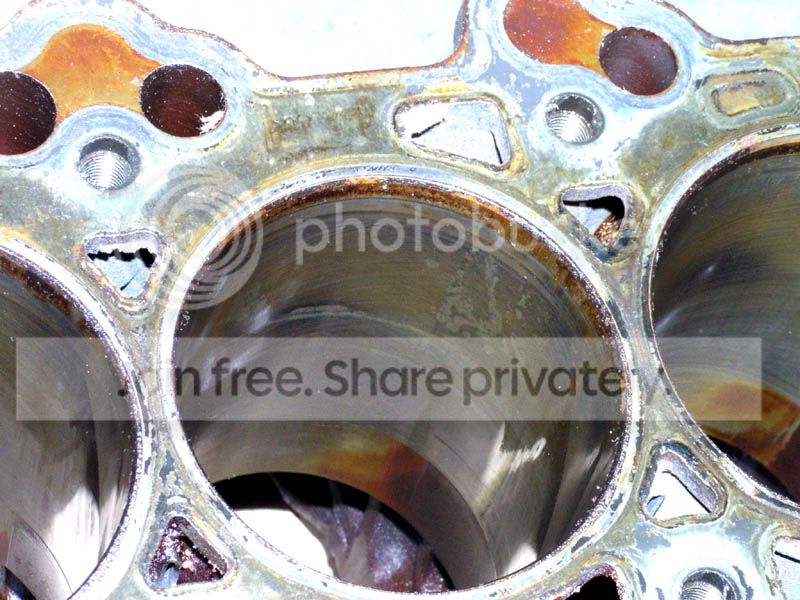
you need to get the block bored and honed. the cylianders are all glazed over and have low spots in them i have done this enuff to know what to look for, that has allot of miles and all this work will be for noting if you don't. also change out the front oil pump to one off of a XD with VVT. they have a higher flow rate then the stock rd/gk that are non-VVT
look at my old engine that was 2 year of high boost and good oil. i changed the oil every month. and i do with all my cars.

right click and save and zoom
see the scuff marks on 1 and 4. you can still even see the cross hatching what you want to is look for where is fades away. all so if you can
while you have the block out see if you can have it eddy current test done to it to check for cracks and also do it around the head bolts and do a dye penetrate test as well..
A. come to a stop
B. heal and toeing kicking down gears.
C. general stopping
D. first start up why> because as you know your piston are not perfectly round when they are cold in the morning.
you need to get the block bored and honed. the cylianders are all glazed over and have low spots in them i have done this enuff to know what to look for, that has allot of miles and all this work will be for noting if you don't. also change out the front oil pump to one off of a XD with VVT. they have a higher flow rate then the stock rd/gk that are non-VVT
look at my old engine that was 2 year of high boost and good oil. i changed the oil every month. and i do with all my cars.
right click and save and zoom
see the scuff marks on 1 and 4. you can still even see the cross hatching what you want to is look for where is fades away. all so if you can
while you have the block out see if you can have it eddy current test done to it to check for cracks and also do it around the head bolts and do a dye penetrate test as well..