How Do You Put On A Radiator Support?
 06-12-2008, 02:47 PM
#61
Banned

Join Date: Jun 2006
Posts: 1
Likes: 0
Received 0 Likes
on
0 Posts
that sounds like a really good plan. i personally would use some type of metal epoxy instead though..
Layer the epoxy on each surface AFTER you have it lined up. (DOUBLE and TRIPLE check that with it in that EXACT position everything will line up right.
Then pop rivit it in while the epoxy still wet.
i would use rivets about every 4-5" just to make it fool proof. and at the parts that are less than 6" wide, i would use two rivets.
 06-12-2008, 03:00 PM
#62
Member

Join Date: Jan 2005
Location: Lexington, SC
Posts: 98
Likes: 0
Received 0 Likes
on
0 Posts
I used an epoxy to adhere a piece of metal as a backing for when I filled my anntenna hole. It is a kind used for jewlery that will loose its bond at elevated temperature (like 588Kelvin). Holds very well and it can be undone if needs be with a heat gun.
06-12-2008, 03:32 PM
#63
Senior Member

Join Date: Mar 2008
Location: Pennsylvania
Posts: 709
Likes: 0
Received 0 Likes
on
0 Posts
Vehicle: 2000 Hyundai Tiburon
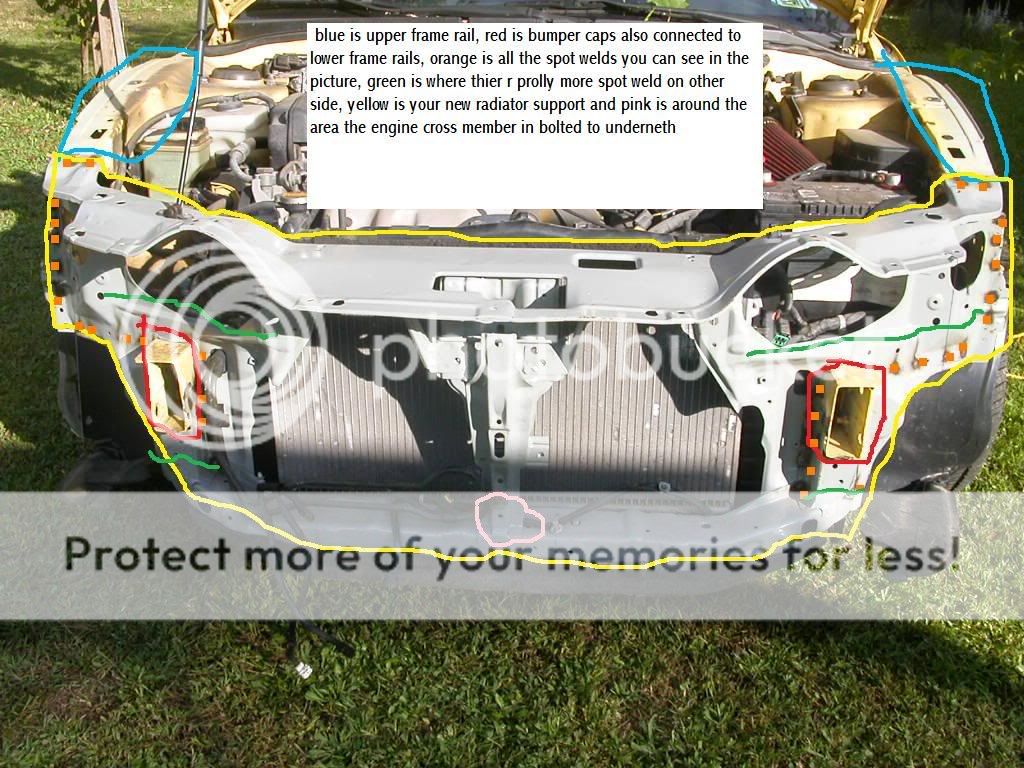
There are more spot welds on the other sides of where the bumper mounts as well other than that I think you got everything.
While it is off be sure to clean and paint inside and out of the bumper mounts (parts in red) they get pretty rusty in there.
Glad to see atleast some of my pics were helpful if you need anymore to see things before you tear into it I can get some more pics for you. Also I just did this whole thing on my car so if you have any questions let me know.
06-12-2008, 05:30 PM
#64
Senior Member

Join Date: May 2008
Location: Winchester, VA
Posts: 594
Likes: 0
Received 0 Likes
on
0 Posts
Vehicle: 2001 Tiburon
i have bought this same part off ebay and plan on doing the cut off sunday if I get back from my vactaion on Saturday. I should have this all complete by the end off the month and I plan on taking alot of pictures so I may be able to give some help. Mostly its just cutting the old support off clean and lining the new one up right before you start welding...but I wouldn't recommend anyone just mess with it. Some welding experience and metal work would really come in handy for a task like this
06-23-2008, 07:58 AM
#65
Senior Member
Join Date: May 2008
Location: Winchester, VA
Posts: 594
Likes: 0
Received 0 Likes
on
0 Posts
Vehicle: 2001 Tiburon
QUOTE (SOCKS @ Jun 12 2008, 08:26 AM)
LOL haha.gif haha.gif lmao.gif lmao.gif
this job isnt rocket science.. why pay someone 80$ an hour for labor when you could easily do this yourself in a few hours.
this job isnt rocket science.. why pay someone 80$ an hour for labor when you could easily do this yourself in a few hours.
I just want to reiterate what socks has said about this. It really isn't rocket science. I started this project yesterday around noon. By 1 o'clock I had my car gutted and ready for the spot weld cutter action. By 4:30 my brother and I had cut and pried the core support off. After getting the dented wrecked up core support off I cleaned the remaining metal and prepped it for the new core support to be installed. I took a two hour nap at this point because I got sleepy and it was pouring down rain.
At 7 I went back out and lined up the new piece. The bottom center support of our car has two 17mm bolts that hold the bottom in place and center. The two rails for the bumper support also help line the core support up as the holes are snug and there is one bolt on each rail that goes through the new core support. If you have those four bolts lined up then all you have left is the top upper rails at the fender. These need to be pushed towards the car so that they overlap the old metal about an inch or so as it was before with the old dented core support. A c clamp comes in handy to hold the two metal surfaces together. Once you have them lined up right drill a hole and throw in a rivet and this b**** will already show some solidity. The core support lines itself up pretty much on its own but just to be sure push your fender back on and see if the last bolt to hold on the front of the fender lines up on the new core support, if so you have it lined up correctly.
I stopped at this point because it was a little after 8 and I needed to get some dinner. Today all I have to do is go around with a c clamp and/or channel locks and hold the metal together tightly then drill a hole and insert a rivet at each original spot weld location. I think with the rivets this thing will be plenty sturdy. If you get in a front end accident I can promise that rivets or welds this thing is still going to bend so I don't really see the need for welding anywhere on the new piece except at the top rails near the fender. I will probably eventually put a seam along the new piece just in the middle of the overlapped edge of the new core support. I wouldn't make this seam too big because if the work ever needs to be done again it would be a b**** to get this core support off.
My camera was dead so I have no pictures but on my drive in this morning I was deeply considering doing a DIY for this as I could make a decent write-up from memory on this and maybe use some of the pictures already taken because they show all the locations really. I don't know that a DIY should be done tho because this is a simple task, the hard part is the demolition work to get the wrecked piece off.
06-23-2008, 08:15 AM
#66
Member
Join Date: Jan 2005
Location: Lexington, SC
Posts: 98
Likes: 0
Received 0 Likes
on
0 Posts
I helped DTN with some of the rivits on his. When we got done I got up on the rail that holds the crossmember and did a few jumps on it and it was solid. Rivits and epoxy FTW.
06-23-2008, 09:16 AM
#67
Senior Member
Join Date: May 2008
Location: Winchester, VA
Posts: 594
Likes: 0
Received 0 Likes
on
0 Posts
Vehicle: 2001 Tiburon
i was trying to find out about how his was coming along but he never answered my email. Glad you guys got it done, any pics by chance though? I'd like to do a DIY for those who would be discouraged from doing this work themselves.
06-23-2008, 04:41 PM
#69
Senior Member
Join Date: Mar 2008
Location: Pennsylvania
Posts: 709
Likes: 0
Received 0 Likes
on
0 Posts
Vehicle: 2000 Hyundai Tiburon
I don't like to think it was "close minded" it was just an opinion. Opinions aren't always right or wrong either.
Glad to see it worked. Let us know how it holds up.
Glad to see it worked. Let us know how it holds up.
