
Installing A Oddessey Pc 680 Battery


Thread Starter
Senior Member
Joined: Mar 2006
Posts: 1,864
Likes: 0
Vehicle: 2001/Hyundai/Tiburon
The reason for the install is for weight saving purposes, not for huge systems, I ran the tib with lights on and the stock stero all the way up with no problems fing02.gif
Difficulty: Medium/easy involves cutting and drilling, nothing you dont have in your regular garage
Time : prolly about 2 or 3 hours, took me about 4 or 5 because of thinking time
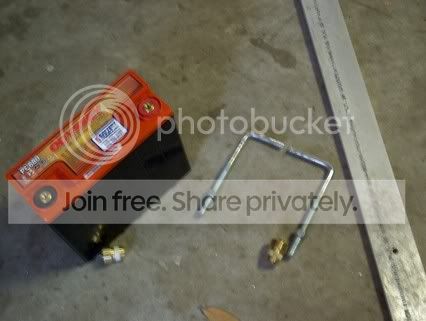
Supplies: oddessy pc 680 battery, weighs 15 lbs about, make sure to get the automative terminals as an option
some allumium, about 2 by 9 inches, i cut it 9 and a half, but 9 would be better because of the extra lenght created by the 9.5"
mothers allumium and mag pollish
i cant describe this really, in the pic, like a square cut off one one side and threads on the things sticking out
regular tools around the garage, such as allen wrench, socket set, wrenches
Optional for some better grounding
about 7 feet, maybe less I got 10 feet from a local sound shop and have some extra for future projects of 4 gauge wire, or some other big wire, and some of the ring things one the end so you can put it through a bolt
when you decide on the exact placement of the battery make sure the positive terimanal isnt grounded, that usually dosent work to good lmao.gif
if u allready havent done this remove the battery and holding plate
1 cut the 3 side thing so it is in two hooks
2 cut the allummum to the proper size
3 drill holes in it so you can put the long sides of the hooks through allumum, dont drill so the whole bit goes through, I think you have a tranny down there smile.gif so just use common sense
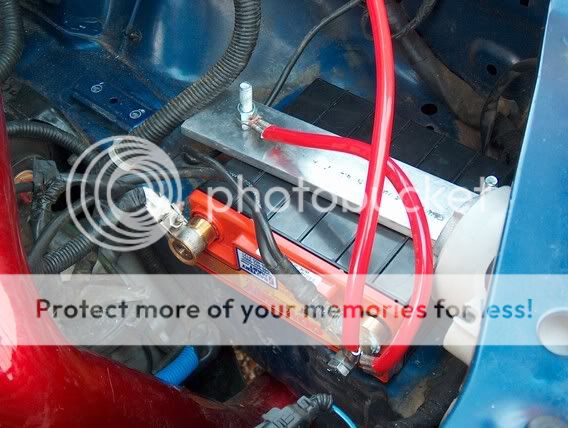
a visual where i put it, where the old battery was

4 drill holes in the car so you can put the hook side through, remember measure twice and cut once lmao.gif , you dont want a million holes there
5 put the hooks in the holes so the threaded is up to put the nut on
5.5 polish the allumium
6 place the battery, put the allum bar through the hooks
7 put the nuts on and tighten, the battery now cant move, if it does u need to tighten them more, or u messed up, use common sence when doing this
8 put the terminals on, using an allen wrench
9 put the , I just went blank, the things that go on the terminals
10 cut the wire to the right sizes and add rings, I did from block to right strut bar, left strut bar to the neg termiinal, and one of the hook things to the neg terminal, to hook it to the terminal you need to have a 3/8" less than a inch long, I did a 1 inch long with one nut to make it shorter lmao.gif , it worked but adds some weight sad.gif
when you are all done it should look like this
any questions just ask fing02.gif , and good luck
sorry 4 the blurriness, i couldnt hold still, dark out and not enough batt to use flash
Difficulty: Medium/easy involves cutting and drilling, nothing you dont have in your regular garage
Time : prolly about 2 or 3 hours, took me about 4 or 5 because of thinking time
Supplies: oddessy pc 680 battery, weighs 15 lbs about, make sure to get the automative terminals as an option
some allumium, about 2 by 9 inches, i cut it 9 and a half, but 9 would be better because of the extra lenght created by the 9.5"
mothers allumium and mag pollish
i cant describe this really, in the pic, like a square cut off one one side and threads on the things sticking out
regular tools around the garage, such as allen wrench, socket set, wrenches
Optional for some better grounding
about 7 feet, maybe less I got 10 feet from a local sound shop and have some extra for future projects of 4 gauge wire, or some other big wire, and some of the ring things one the end so you can put it through a bolt
when you decide on the exact placement of the battery make sure the positive terimanal isnt grounded, that usually dosent work to good lmao.gif
if u allready havent done this remove the battery and holding plate
1 cut the 3 side thing so it is in two hooks
2 cut the allummum to the proper size
3 drill holes in it so you can put the long sides of the hooks through allumum, dont drill so the whole bit goes through, I think you have a tranny down there smile.gif so just use common sense
a visual where i put it, where the old battery was
4 drill holes in the car so you can put the hook side through, remember measure twice and cut once lmao.gif , you dont want a million holes there
5 put the hooks in the holes so the threaded is up to put the nut on
5.5 polish the allumium
6 place the battery, put the allum bar through the hooks
7 put the nuts on and tighten, the battery now cant move, if it does u need to tighten them more, or u messed up, use common sence when doing this
8 put the terminals on, using an allen wrench
9 put the , I just went blank, the things that go on the terminals
10 cut the wire to the right sizes and add rings, I did from block to right strut bar, left strut bar to the neg termiinal, and one of the hook things to the neg terminal, to hook it to the terminal you need to have a 3/8" less than a inch long, I did a 1 inch long with one nut to make it shorter lmao.gif , it worked but adds some weight sad.gif
when you are all done it should look like this
any questions just ask fing02.gif , and good luck
sorry 4 the blurriness, i couldnt hold still, dark out and not enough batt to use flash
Senior Member

Joined: Mar 2002
Posts: 34,642
Likes: 0
From: Los Lunas, New Mexico, USA.
Vehicle: 2001 Hyundai Tiburon, 2004 Kia Sorento, 2010 Kia Soul
WOW.
Nice DIY.
I think I'll do the exact same thing and put one in the trunk too. Maybe.
Where'd you get the battery and how muchie?
Nice DIY.
I think I'll do the exact same thing and put one in the trunk too. Maybe.
Where'd you get the battery and how muchie?

Senior Member
Joined: Jul 2004
Posts: 9,041
Likes: 0
From: SOUTH Jersey
just a help... If you buy your battery from West coast batteries.. they have an aluminum box all set up for the 680. Comes in brushed or anadized black.
either way.. nice write up.. looks good. I may have to change out my 925 to this.
either way.. nice write up.. looks good. I may have to change out my 925 to this.
Thread Starter
Senior Member
Joined: Mar 2006
Posts: 1,864
Likes: 0
Vehicle: 2001/Hyundai/Tiburon
http://www.batterymart.com/battery.mv?p=ODY-PC680
The battery with shipping and terminals were 107 shipped
The wire and ring things were 20.82 form a sound shop
The battery with shipping and terminals were 107 shipped
The wire and ring things were 20.82 form a sound shop
Senior Member
Joined: Aug 2004
Posts: 2,764
Likes: 0
From: South Korea where u car from fool
Vehicle: 2008/Hyundai/Tiburon gt
i like, now that batt has me thinking i like it maybe a conclided batt maybe
mount in the spair tire well maybe" out of sight out of mind type deal
or use that in combination with the pelxglass cover
i just shooting out ideal here brothers
mount in the spair tire well maybe" out of sight out of mind type deal
or use that in combination with the pelxglass cover
i just shooting out ideal here brothers
Thread Starter
Senior Member
Joined: Mar 2006
Posts: 1,864
Likes: 0
Vehicle: 2001/Hyundai/Tiburon
I was going to origanilly relocate it but it was so light, you can pick it up with one hand, I didnt want the extra weight of the wire, my rear is kinda light, I need a cf hood to help balance the car more

