
Aem Fic Tuned And Dynoed


Senior Member

Joined: Nov 2008
Posts: 2,881
Likes: 0
From: Huntsville, AL
Vehicle: 2001/Hyundai/Tiburon
QUOTE (Bal @ Nov 13 2008, 04:54 PM)
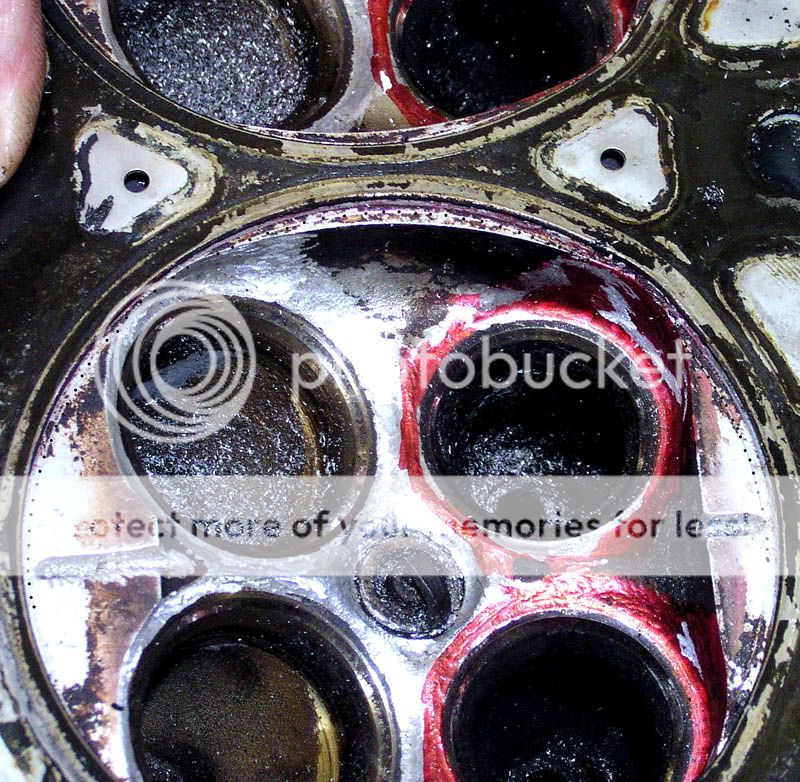
For the guys who want to singh groove their cylinder head, have a look at the album. I have put all my pictures up there.
Step 1 : Mark an outline of the gasket onto the cylinder head using permanent marker
Step 2 : Decide where you want your groove, mines are in between the valves on both sides
Step 3 : Use a small triangle file and start filling away, careful to collect any shavings
Step 4 : Smooth the groove out using fine sand paper
Step 5 : Put engine back together and enjoy!!
Careful not to get too close to the gaskets and not too deep.
It is hard to make out the little groove opposite the big groove in the pictur
Looks great man!! Couple questions:
1. How deep are your grooves?
2. How long did each cylinder take you?
3. How did you keep from getting all the metal shavings all over? Or how did you clean them up thoroughly enough?
4. Did you take out the valves? (looks like you didn't) How about the spark plugs? (sorta looks like you did, but then see question 3..)
5. Did you have the camshafts out to get all the valves in their 'up' position? Or how did you get it so they're all sealed like that?
6. Summary of 4 and 5, how much did you take apart the head to do this?
Super Moderator

Joined: Sep 2001
Posts: 10,795
Likes: 5
From: Pflugerville, TX
Vehicle: 2000 Elantra
You could do it without disassembly of the head, if you were scrupulous about cleaning the chambers and runners when you were done. There seems to be no hard/fast rules about shape and size... Singh said my grooves were "just right" and I did it very differently to how Bal cut those.
Super Moderator
Joined: Dec 2002
Posts: 5,735
Likes: 3
From: Vegas, Baby, Vegas!!!
Vehicle: '14 Ford F-150
QUOTE (Supercow @ Nov 14 2008, 03:37 PM)
^^thats the bad thing about throwing dyno numbers around they can fluctuate a lot!!
Numbers are from a 248C Dynojet with SAE correction. I did have what what probably the US's most performance modded NA Tib.
QUOTE (Blacktibs @ Nov 15 2008, 12:55 AM)
Holy Crap, I8acobra still posts?
Yep, still here. Have an '06 350Z and '06 Elantra now.

Thread Starter
Senior Member
Joined: Mar 2006
Posts: 266
Likes: 0
Vehicle: 1998 Hyundai Coupe
Answers to Questions
1. My grooves are 4-5mm deep - that is at their deepest point
2. Each Cylinder took around 10 minutes
3. I used a vacuume cleaner to suck up the shavings while I was filing - Got my kid to help (they have their uses)
4. I took out the spark plugs but left the valves in
5. I turned the cam so that each cylinders valves were closed as I was doing it. I did not take the cams off.
6. All I done was take the head off, left everything in place, used a big wrench to turn the exhaust cam so that the valves were closed, made the grooves on cylinder 1 using a triangle file and fine sand sand paper, Cleaned up. Repeated the same again for cylinder 2,3 and 4 making sure the valves were completely sealed and that the grooves were pretty much exactly the same on each cylinder.
Get your spanners out and make some grooves
If you get stuck anywhere you always got me or Stocker to help you out.
Stocker post a pic of your grooves
Super Moderator
Joined: Sep 2001
Posts: 10,795
Likes: 5
From: Pflugerville, TX
Vehicle: 2000 Elantra
I did this:
(this head is still a work in progress... chambers are almost roughed-in, then the runners, decking, valve job, THEN I can get results posted)
It would be spiffy if you posted your results on this thread.
http://www.elantraxd.com/forums/showthread.php?t=31033
(this head is still a work in progress... chambers are almost roughed-in, then the runners, decking, valve job, THEN I can get results posted)
It would be spiffy if you posted your results on this thread.
http://www.elantraxd.com/forums/showthread.php?t=31033
