Follow Along W/ My Auto To Manual Swap!


 07-21-2008, 09:17 PM
#22
Super Moderator


Thread Starter
I'll check it out. I just scored a copy of photoshop for the house...
okay, so it's v4.0LE, but it's still got most of the tools, and you can't beat f.r.e.e!
okay, so it's v4.0LE, but it's still got most of the tools, and you can't beat f.r.e.e!
 07-25-2008, 09:02 AM
#24
Super Moderator
Thread Starter
Okay, photobucket decided to stop freaking out. Here we go!
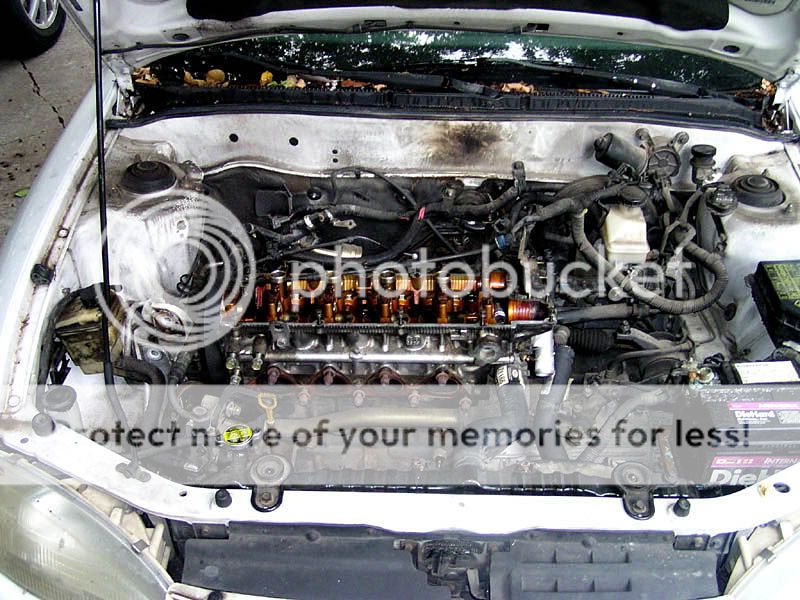
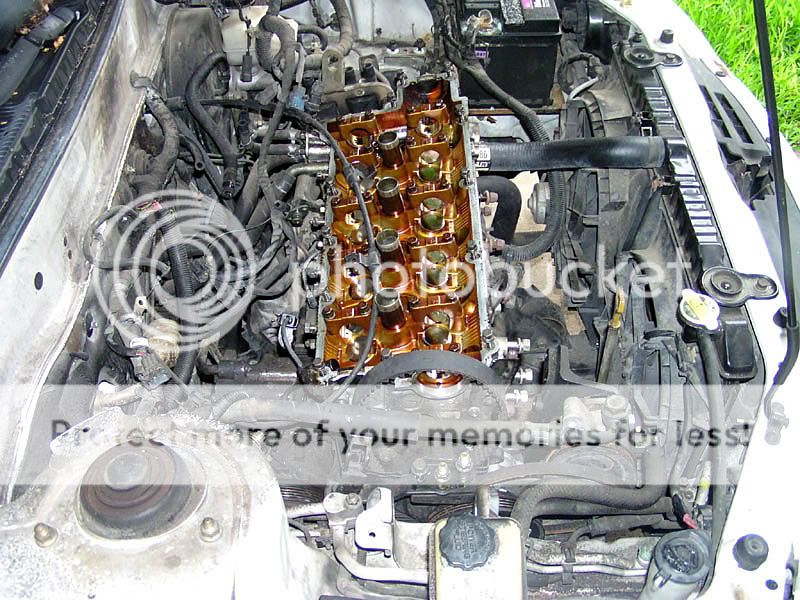
The donor engine bay, front and from the side. Do you notice anything missing?
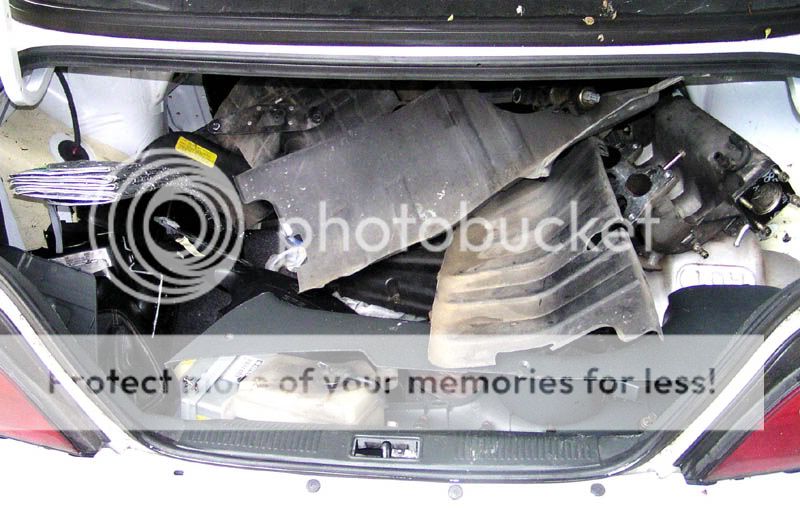
Well, yeah, that's in the trunk. I never cease to be amazed how much you can put in the trunks on these cars, even with the seats up.
Here is headache number 1: the intake manifold brace.
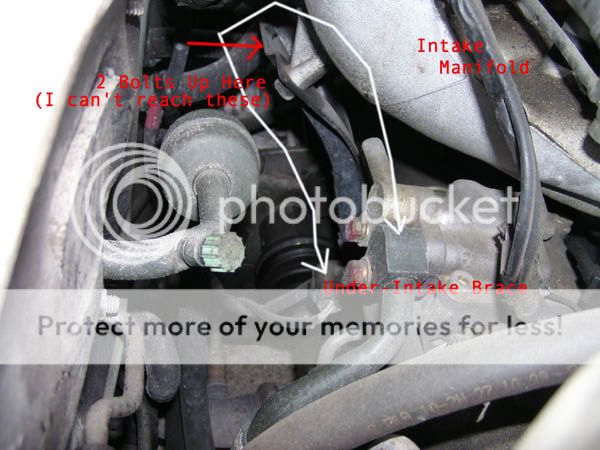
And here's where it bolts to the bottom of the block... no, you really can't reach any of these bolts, but the lower bolts are slightly less impossible to get a wrench on.
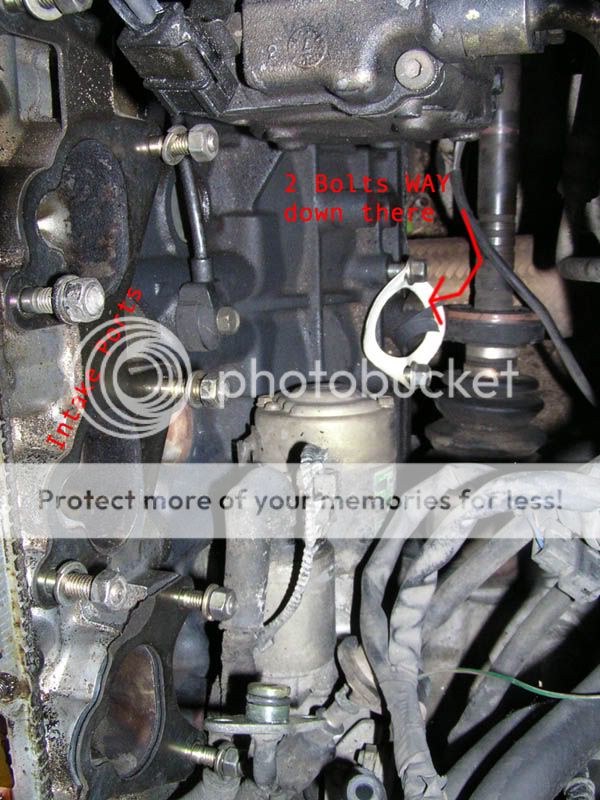
And this is one of the reasons why I want to do a *little* work on the head and slap the head on my car... the headwork may not happen.
The donor engine bay, front and from the side. Do you notice anything missing?
Well, yeah, that's in the trunk. I never cease to be amazed how much you can put in the trunks on these cars, even with the seats up.
Here is headache number 1: the intake manifold brace.
And here's where it bolts to the bottom of the block... no, you really can't reach any of these bolts, but the lower bolts are slightly less impossible to get a wrench on.
And this is one of the reasons why I want to do a *little* work on the head and slap the head on my car... the headwork may not happen.
07-27-2008, 10:57 PM
#25
Super Moderator
Thread Starter
It's getting so close now, I can taste it.
Spent another just over 3 hours yesterday, with the following progress:
Removed:
*Cylinder head (see below)(separate post on port/polish to come very shortly after this update)
*Thermostat housing (there was surprisingly almost no coolant in the head, perhaps unsurprising as the car wasn't run after the timing belt change)
*Coil packs
*Few coolant lines
*Clutch reservoir (easy)
*Clutch slave cylinder (easy)
*Reinstalled slave cylinder to hold it while removing the banjo bolt which was very tight, and then
*Clutch slave cylinder (some jerk only used 1 bolt holding it on there! oh wait, that was me...)
*Slave cylinder restrictor plate & spring (note: do NOT push the plunger into the slave cylinder if it's pointed at you, to get the restrictor out. It is full of nasty old brake fluid. It will splash all over you. Ask me how I know this.)
*Nasty, nasty, NASTY clutch fluid (see photo)
*Hard line to slave cylinder (this is right next to impossible without a) using an 11mm crow's foot on the clutch pedal side or b) bending the heck out of the nearby brake line so an open wrench will fit. Not planning to reuse the brake line, and not having a crows foot set, I chose b) and it worked, barely)(the slave cylinder fluid nipple will fall down to a hard to reach place if you don't keep a hand on it when you are pulling it out. Trust me on this one.)(There is a pad on the hard line to keep it from rubbing on the strut tower housing... take that pad when you get the hard line out.)
*Shifter cables & shifter assembly completely out (this is WAY easy to do, if the console is taken apart and the intake and head are off the engine)(soak the clips in penetrating oil and pray, and they might just pop out with a screwdriver. I was afraid they would be stuck on there but good, but they came right off)(tape the shifter cable clips back on the brackets where they came from, so they don't get lost)
*Clutch pedal (see photo below for picture of where it came from... you have to duplicate this hole layout on the auto transmission car with a big drill or something... I'm planning on taking a pencil rubbing template and measurements locating off the bolts for the brake pedal, to get it as close as possible. There is a cutout in the insulation on the automatic car where this mounts, which should help considerably when I go to locate the "new" pedal. This is inside the dashboard, and will not be much fun)(reassemble the clutch stuff outside the car, so you will remember how it all went together)
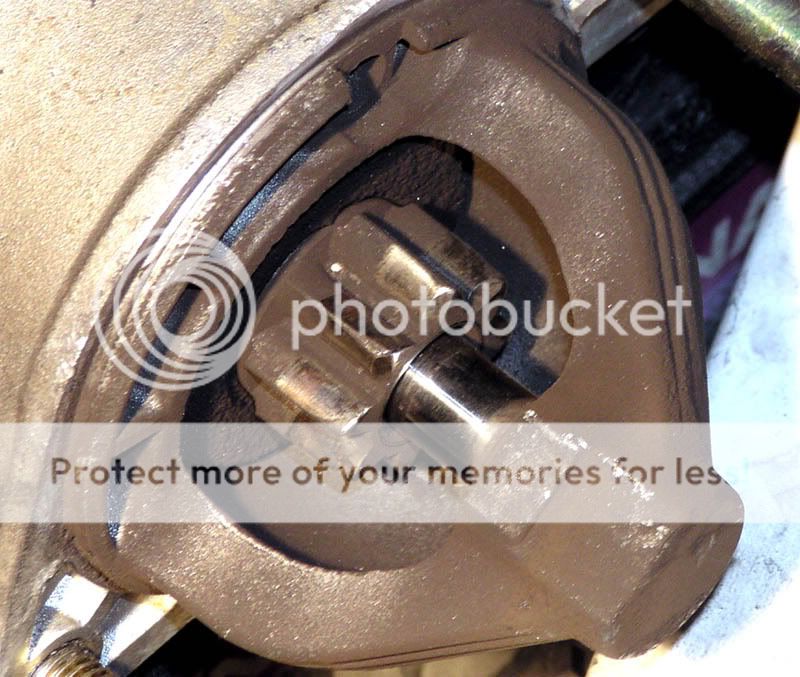
*Starter (see photo: these teeth look good enough to reuse to me, what do you guys think?
*Driver's seat (this is sooooooo the first thing you should do when you are about to spend an hour upside-down under your dash. I wish I had done it for the audio install. The amount of comfort/room you gain for almost zero effort, it is just ridiculous not to pull the seat.)
*Brake pedal (we'll see if the clutch pedal actually interferes with the automatic car's brake pedal or not. Hopefully not but we'll see. I might just hack off the left side of the auto car's brake pedal, dunno yet)
At this point, having talked to my dad who has a degree in this sort of thing (literally), I thought it would be a good idea to check on the transmission. Pulled the drain plug, and out poured some dark honey. Not burned looking or smelling, with an acceptable-to-me looking amount of very fine brass particles from the synchronizers. I pulled the end off the transmission and had a peek at 5th gear. The gears looked like they could have come off the mill last week, and the synchros were almost as nice. I could tell there was some wear, but you have to look for it. At 165,000 miles, that was a small, pleasant surprise. I'm going to call this a good transaxle for now. Sorry, no pics of this part. Maybe later if I find a taller 5th gear to put in it. Note: gear oil drains a lot slower than engine oil. Have the drain plug in your catch pan already out, or risk overflowing gear oil onto your driveway. Doh.
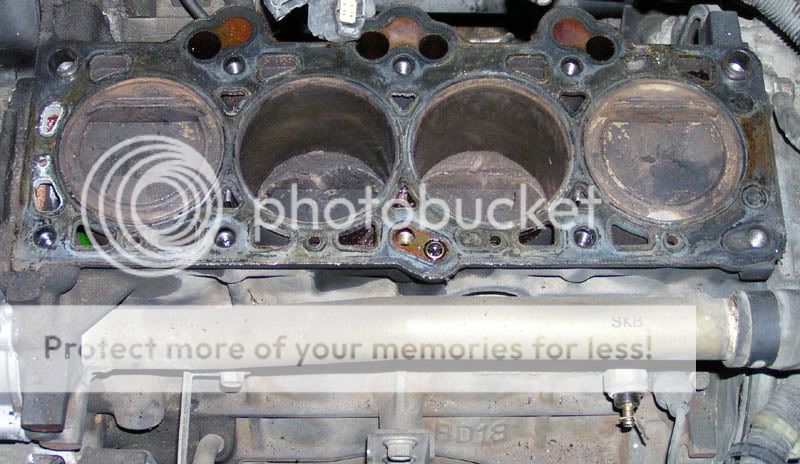
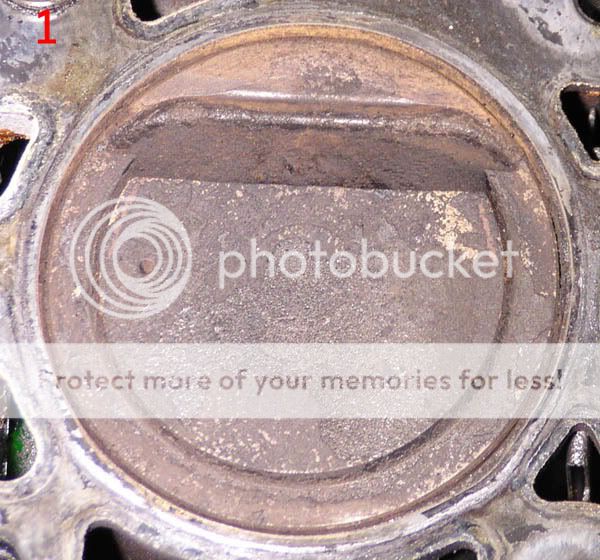
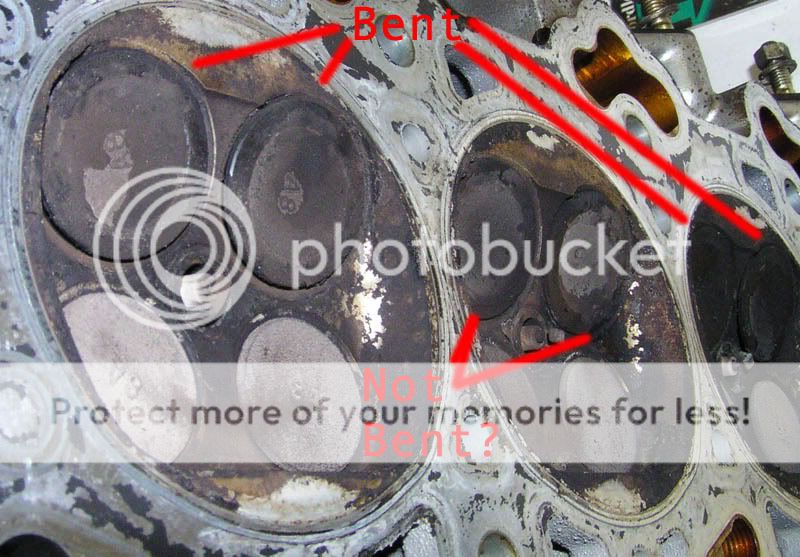
The pistons looked okay, and the bores on #2 and #3 cylinders (which were exposed) looked okay. This may be a reuseable engine block, and the pistons might just drop right into someone's 2.0L for 11:1 compression... N/A builders, does anyone want this stuff? The head looked as good as could be expected. There will have been zero compression which would explain the no-start condition, but some of the valves aren't off their seats at all, and I'm thinking they may not all have been bent. The guy was supposed to have been on MoPac going home (rush-hour traffic) so hopefully the engine was at or near idle, and just stopped dead. The valves are pretty seriously shrouded, and there is a lot of potential for better exhaust flow, at least. Also, I've seen the valve seat machining on somebody else's head and it was ugly. This is begging for a p&p job. Begging. So.... who has some intake valves for me, for-cheap-or-for-free? laugh.gif
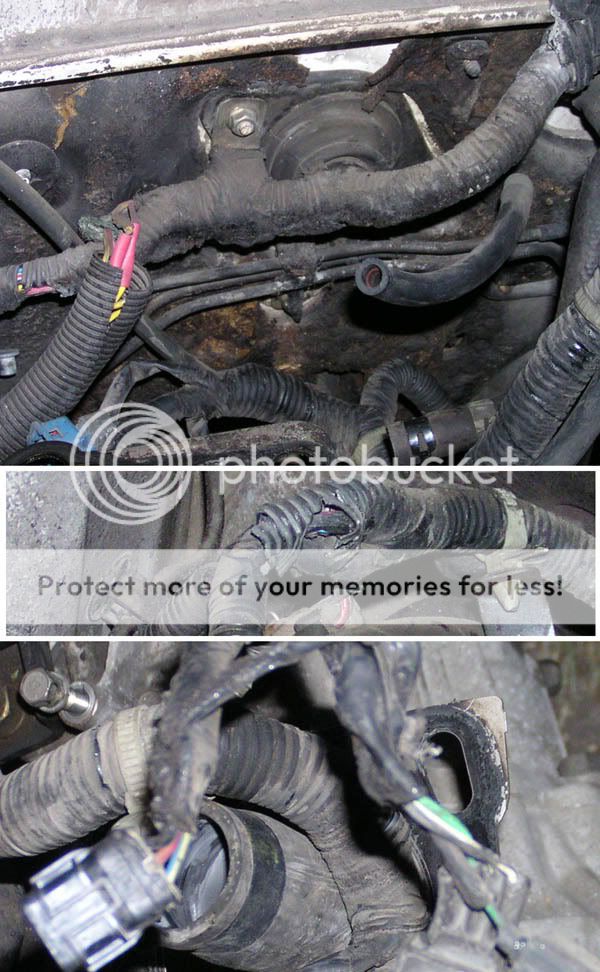
I was thinking of pulling the whole wiring harness out and putting it into my car, to avoid the hassles everyone seems to get with CELs and signals... the harness changed my mind. At some point, there may have been a minor engine bay fire in this car, or else something was screwy, because several connector shells and a bunch of spots on the wire loom are all melty, not to mention the burned firewall insulation and a few spliced-together wires in a melty spot of the conduit... This also means I am NOT going to try to get this car back together and running again. Shortly for sale: an automatic transmission and related components!
Potential ugly spot: the clutch pedal switch - it is buried in the dash harness. It would be nice of Hyundai to have used the same harness and the connector is just dangling unused on the automatic car, but I doubt it. We'll see. Those who have done it: is this connector going to be waiting for me when the clutch pedal gets to its new home?
Note: put bolts back in their holes, and nuts back on their bolts/studs if you don't want them lost or confused when you go to put it all back together. This goes for pins, washers, bushings and cotter pins as well.
It's looking like the only thing that can stop me now is a tornado or a dimensional variance on the flywheel mounting hole... if anybody has specific information about when this was changed and what the dimensions were/are, you will be saving me having to go dig it up; I think I saw it mentioned ONCE. My wife is going to be HOT mad.gif if I get all the way to pulling the auto trans and I have to find a flywheel from somewhere!
THIS was masquerading as clutch fluid.

The mounting location for a clutch pedal. On the automatic car, there is blank sheet metal under the insulation. The foam is cut, but the panel does NOT have these holes.
Partially melted wire harness
Starter teeth: unless somebody buys me another one, these teeth are going to have to be good enough.
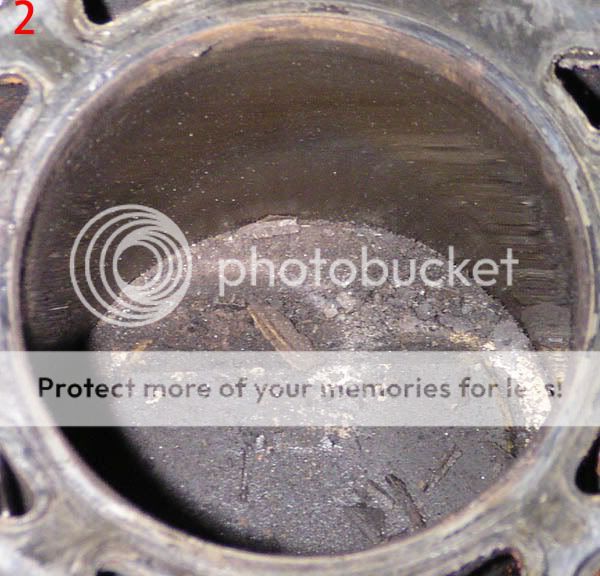
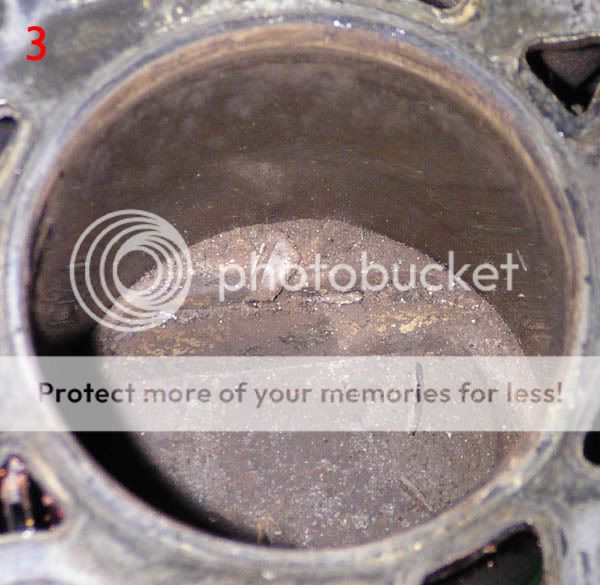
The pistons on the 1.8L donor engine: looks ok to me! There was a lot of carbon flakes in there, that probably got dislodged by the sudden stopping when the valves his the pistons.
The valves: not all bent? I'm going to have to measure these pretty carefully, but some of those intake valves look like they may be reusable!
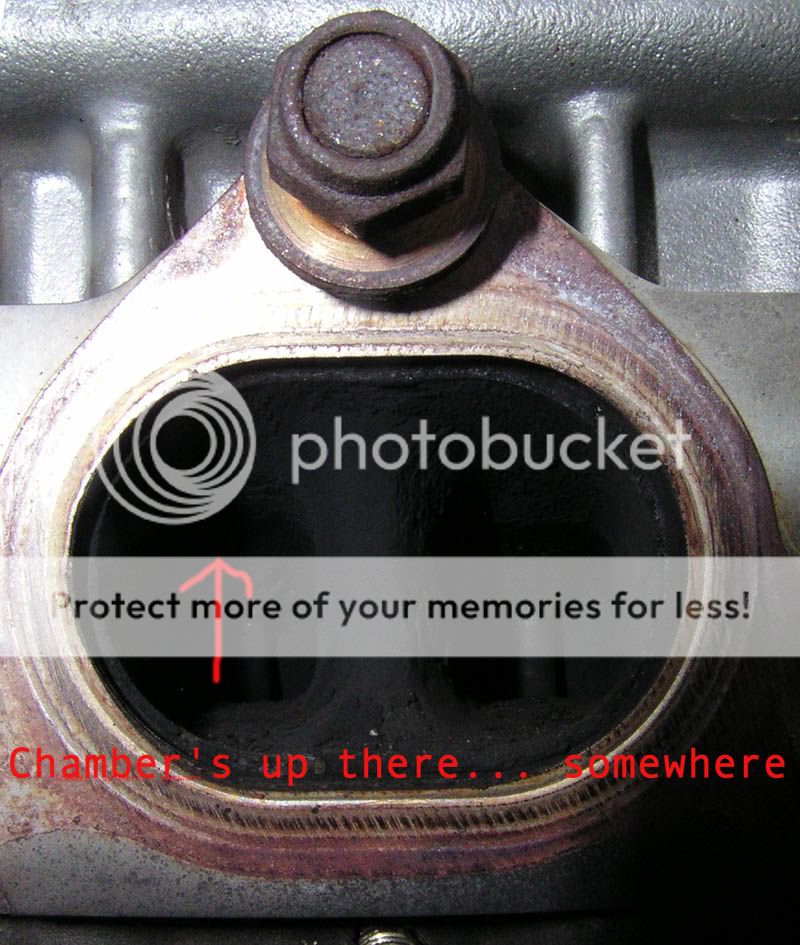
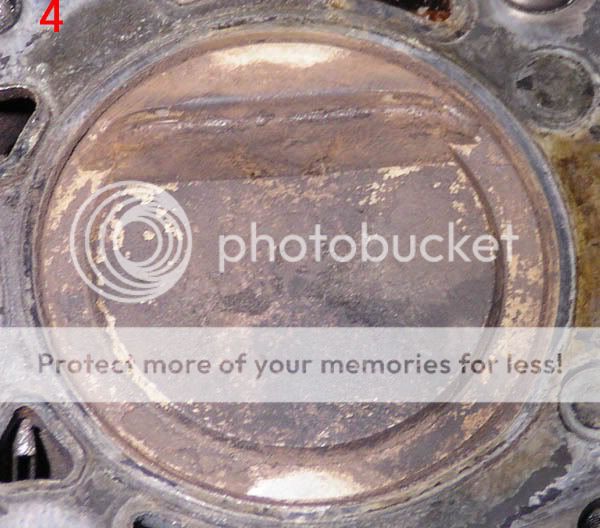
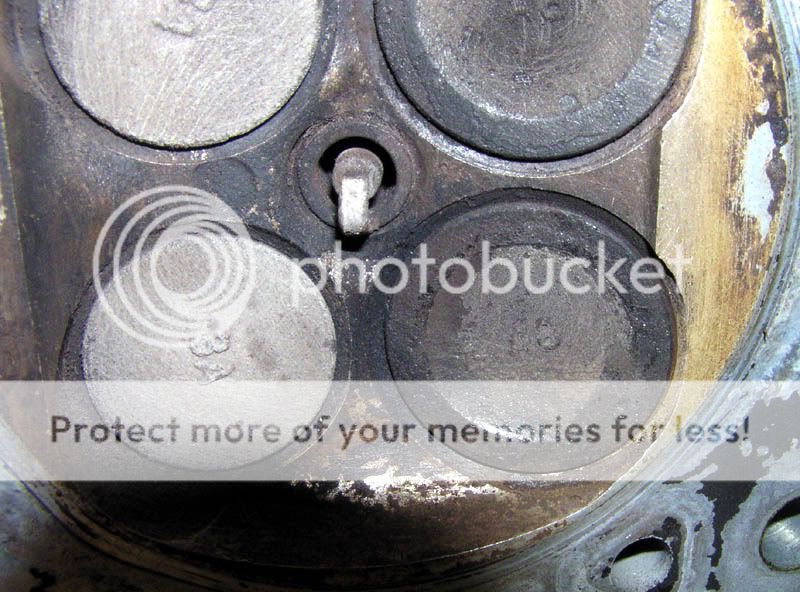
For those that don't know, this is your combustion chamber. The valves are all shrouded and there is a positive CLIFF next to the exhaust valves. Something must be done about this. Note: this is an aluminum head. Use a brass brush to scrub it, not steel, thanks. owned.gif

Close-up of shrouding action!
You who suggested photobucket are crushing the 56k'ers bandwidth. You have created a monster!
Spent another just over 3 hours yesterday, with the following progress:
Removed:
*Cylinder head (see below)(separate post on port/polish to come very shortly after this update)
*Thermostat housing (there was surprisingly almost no coolant in the head, perhaps unsurprising as the car wasn't run after the timing belt change)
*Coil packs
*Few coolant lines
*Clutch reservoir (easy)
*Clutch slave cylinder (easy)
*Reinstalled slave cylinder to hold it while removing the banjo bolt which was very tight, and then
*Clutch slave cylinder (some jerk only used 1 bolt holding it on there! oh wait, that was me...)
*Slave cylinder restrictor plate & spring (note: do NOT push the plunger into the slave cylinder if it's pointed at you, to get the restrictor out. It is full of nasty old brake fluid. It will splash all over you. Ask me how I know this.)
*Nasty, nasty, NASTY clutch fluid (see photo)
*Hard line to slave cylinder (this is right next to impossible without a) using an 11mm crow's foot on the clutch pedal side or b) bending the heck out of the nearby brake line so an open wrench will fit. Not planning to reuse the brake line, and not having a crows foot set, I chose b) and it worked, barely)(the slave cylinder fluid nipple will fall down to a hard to reach place if you don't keep a hand on it when you are pulling it out. Trust me on this one.)(There is a pad on the hard line to keep it from rubbing on the strut tower housing... take that pad when you get the hard line out.)
*Shifter cables & shifter assembly completely out (this is WAY easy to do, if the console is taken apart and the intake and head are off the engine)(soak the clips in penetrating oil and pray, and they might just pop out with a screwdriver. I was afraid they would be stuck on there but good, but they came right off)(tape the shifter cable clips back on the brackets where they came from, so they don't get lost)
*Clutch pedal (see photo below for picture of where it came from... you have to duplicate this hole layout on the auto transmission car with a big drill or something... I'm planning on taking a pencil rubbing template and measurements locating off the bolts for the brake pedal, to get it as close as possible. There is a cutout in the insulation on the automatic car where this mounts, which should help considerably when I go to locate the "new" pedal. This is inside the dashboard, and will not be much fun)(reassemble the clutch stuff outside the car, so you will remember how it all went together)
*Starter (see photo: these teeth look good enough to reuse to me, what do you guys think?
*Driver's seat (this is sooooooo the first thing you should do when you are about to spend an hour upside-down under your dash. I wish I had done it for the audio install. The amount of comfort/room you gain for almost zero effort, it is just ridiculous not to pull the seat.)
*Brake pedal (we'll see if the clutch pedal actually interferes with the automatic car's brake pedal or not. Hopefully not but we'll see. I might just hack off the left side of the auto car's brake pedal, dunno yet)
At this point, having talked to my dad who has a degree in this sort of thing (literally), I thought it would be a good idea to check on the transmission. Pulled the drain plug, and out poured some dark honey. Not burned looking or smelling, with an acceptable-to-me looking amount of very fine brass particles from the synchronizers. I pulled the end off the transmission and had a peek at 5th gear. The gears looked like they could have come off the mill last week, and the synchros were almost as nice. I could tell there was some wear, but you have to look for it. At 165,000 miles, that was a small, pleasant surprise. I'm going to call this a good transaxle for now. Sorry, no pics of this part. Maybe later if I find a taller 5th gear to put in it. Note: gear oil drains a lot slower than engine oil. Have the drain plug in your catch pan already out, or risk overflowing gear oil onto your driveway. Doh.
The pistons looked okay, and the bores on #2 and #3 cylinders (which were exposed) looked okay. This may be a reuseable engine block, and the pistons might just drop right into someone's 2.0L for 11:1 compression... N/A builders, does anyone want this stuff? The head looked as good as could be expected. There will have been zero compression which would explain the no-start condition, but some of the valves aren't off their seats at all, and I'm thinking they may not all have been bent. The guy was supposed to have been on MoPac going home (rush-hour traffic) so hopefully the engine was at or near idle, and just stopped dead. The valves are pretty seriously shrouded, and there is a lot of potential for better exhaust flow, at least. Also, I've seen the valve seat machining on somebody else's head and it was ugly. This is begging for a p&p job. Begging. So.... who has some intake valves for me, for-cheap-or-for-free? laugh.gif
I was thinking of pulling the whole wiring harness out and putting it into my car, to avoid the hassles everyone seems to get with CELs and signals... the harness changed my mind. At some point, there may have been a minor engine bay fire in this car, or else something was screwy, because several connector shells and a bunch of spots on the wire loom are all melty, not to mention the burned firewall insulation and a few spliced-together wires in a melty spot of the conduit... This also means I am NOT going to try to get this car back together and running again. Shortly for sale: an automatic transmission and related components!
Potential ugly spot: the clutch pedal switch - it is buried in the dash harness. It would be nice of Hyundai to have used the same harness and the connector is just dangling unused on the automatic car, but I doubt it. We'll see. Those who have done it: is this connector going to be waiting for me when the clutch pedal gets to its new home?
Note: put bolts back in their holes, and nuts back on their bolts/studs if you don't want them lost or confused when you go to put it all back together. This goes for pins, washers, bushings and cotter pins as well.
It's looking like the only thing that can stop me now is a tornado or a dimensional variance on the flywheel mounting hole... if anybody has specific information about when this was changed and what the dimensions were/are, you will be saving me having to go dig it up; I think I saw it mentioned ONCE. My wife is going to be HOT mad.gif if I get all the way to pulling the auto trans and I have to find a flywheel from somewhere!
THIS was masquerading as clutch fluid.
The mounting location for a clutch pedal. On the automatic car, there is blank sheet metal under the insulation. The foam is cut, but the panel does NOT have these holes.
Partially melted wire harness
Starter teeth: unless somebody buys me another one, these teeth are going to have to be good enough.
The pistons on the 1.8L donor engine: looks ok to me! There was a lot of carbon flakes in there, that probably got dislodged by the sudden stopping when the valves his the pistons.
The valves: not all bent? I'm going to have to measure these pretty carefully, but some of those intake valves look like they may be reusable!
For those that don't know, this is your combustion chamber. The valves are all shrouded and there is a positive CLIFF next to the exhaust valves. Something must be done about this. Note: this is an aluminum head. Use a brass brush to scrub it, not steel, thanks. owned.gif
Close-up of shrouding action!
You who suggested photobucket are crushing the 56k'ers bandwidth. You have created a monster!
08-02-2008, 12:57 PM
#26
Super Moderator
Thread Starter
I'm down to stuff I need new tools for, now. I don't have the hugh jass socket to take the axles out of the hubs (some folks say you can take them out of the transmission w/out pulling them from the hub, I need to look into that)
There is so much room in there with the intake tract removed, I'm thinking of pulling the transaxle out the top. We'll see how that goes. Depends on how heavy and awkward it turns out to be.
Now I need to make a template for the clutch mounting holes and drill those in the driver car, and everything else SHOULD bolt right up. Except maybe the flywheel. Gotta find out about that, too.
No major progress this weekend. We've been redoing the kids' bedroom and I had to fix some bad plumbing on the house.
08-02-2008, 01:47 PM
#27
Senior Member

Join Date: Aug 2009
Location: Washington D.C.
Posts: 11,992
Likes: 0
Received 0 Likes
on
0 Posts
Vehicle: Hyundai Tiburon FX
fantastic work, how did you learn all this? you clearly have a lot of knowledge.
i loved the 1996 generation. the elantra especially looked nice, a little on the cheap side but still a great used value. i know you wouldn't go about a project like this if it weren't cheap.
i loved the 1996 generation. the elantra especially looked nice, a little on the cheap side but still a great used value. i know you wouldn't go about a project like this if it weren't cheap.
08-02-2008, 09:14 PM
#28
Super Moderator
Thread Starter
Thanks, but to me it's all just a logical progression of steps. Sure there are a lot of steps, but you just do them one at a time, and if the parts are all good it should work when you've finished. It's sort of like a paint-by-numbers picture... except, filthy, sweaty, hot, and with occasional busted knuckles! God gave me a good head for mechanical stuff, too, and I'm not afraid to try something just because I haven't done it before.
Being patient with yourself helps. If you get in too big a hurry you're going to end up breaking things and getting hurt.
Being patient with yourself helps. If you get in too big a hurry you're going to end up breaking things and getting hurt.
08-04-2008, 10:13 PM
#29
Super Moderator
Thread Starter
Turns out, I was reading good gouge. Pull off the sway bar, tie rod end, some prying on the axle, 2 bolts at the spindle/strut joint and pry a little more on the axle by the transmission (DON'T pull the shaft! ). Bam. Free axle end.
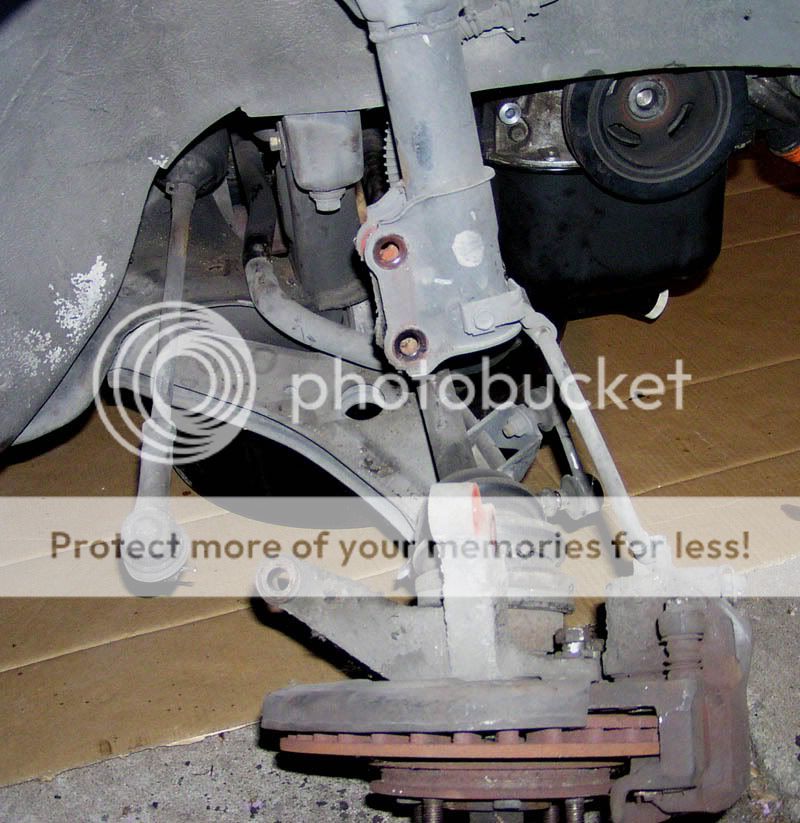

I let this one slide because I'm not reusing this steering gear. On the driver car I'll be sure to use a hard mallet instead of a hammer, because it boogered the threads on the driver's side using a hammer. To separate the tie rod end: leave the castellated nut on there to give something slightly bigger to hit (and reduce chances of messing up the threads, and...
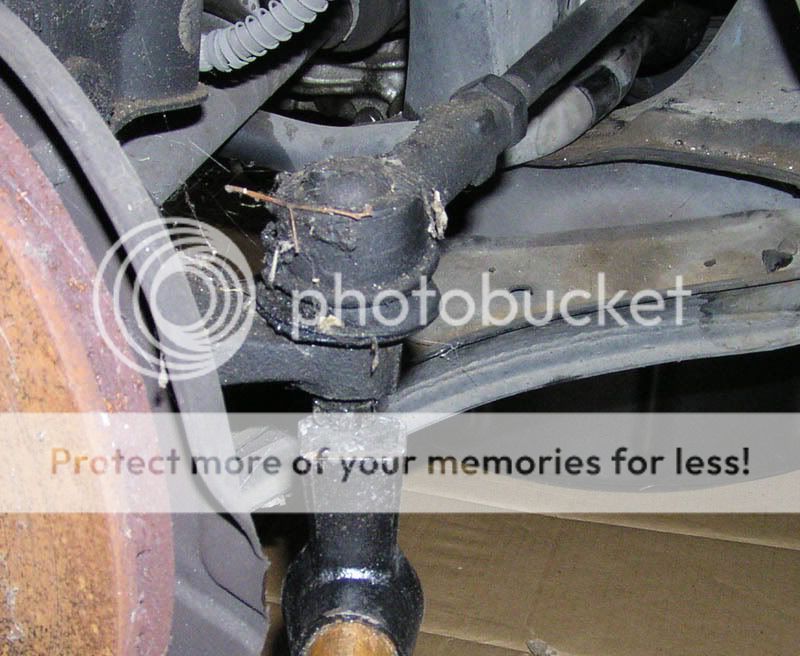
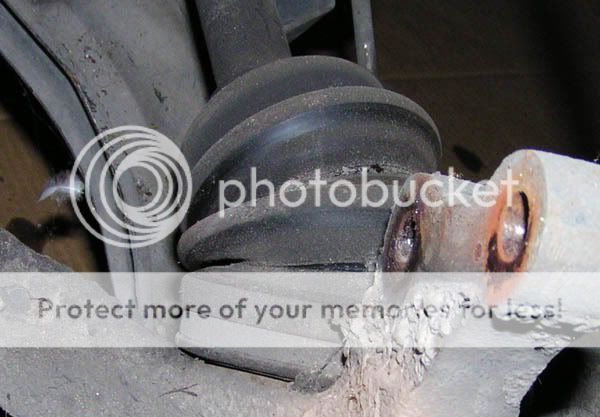
I had hoped to keep these axles for spares... the ones for the automatic better fit, because this boot is in better condition than the other, which was already split and spewing grease everywhere
One more reason this car is not getting rebuilt: needs a brake job.
Now it's down to just the pulling off the transmission. Inspect axle oil seals, clutch parts, and verify the need (or lack of, hopefully) for a new flywheel to fit the 2.0L. Then it's just "installation is the reverse of removal!" lmao.gif lmao.gif lmao.gif mad.gif
I let this one slide because I'm not reusing this steering gear. On the driver car I'll be sure to use a hard mallet instead of a hammer, because it boogered the threads on the driver's side using a hammer. To separate the tie rod end: leave the castellated nut on there to give something slightly bigger to hit (and reduce chances of messing up the threads, and...
I had hoped to keep these axles for spares... the ones for the automatic better fit, because this boot is in better condition than the other, which was already split and spewing grease everywhere
One more reason this car is not getting rebuilt: needs a brake job.
Now it's down to just the pulling off the transmission. Inspect axle oil seals, clutch parts, and verify the need (or lack of, hopefully) for a new flywheel to fit the 2.0L. Then it's just "installation is the reverse of removal!" lmao.gif lmao.gif lmao.gif mad.gif
08-05-2008, 09:36 AM
#30
http://www.hyundaiaftermarket.org/images/vendor1.png


Join Date: Dec 2002
Posts: 3,237
Likes: 0
Received 0 Likes
on
0 Posts
I remember going outside everyday, sometimes for an hour, sometimes for 7 hours, but consistantly making changes to get the job done. Its cool to see others doing the swap as well. There's got to be at least 20 of us here who've done this by now. Maybe more. The only thing that's not straight forward is making sure you wire your ECU up correctly, so that you dont end up overcharging batteries. I killed about 300 dollars worth of batteries (2 optimas) because one of my auto to manual tibs didn't have the Pins wired for the swap. My other car with the swap that I drive daily has the whole wiring system from the donor car, and I didn't realize it was so important to wire up the ECU till it was too late, and the top of my nice battery was bulging up like it was gonna blow. It overcharges the crap out of em. If you have any questions about anything else let me know, but it looks like you're taking the same approach I did, so you should be fine smile.gif