
Total Stereo System Install


Thread Starter
Senior Member
Joined: Nov 2006
Posts: 117
Likes: 0
From: Somewhere in NC
First let us start with removing the front speakers
Tools needed:
- Screw driver
- Flat Head Screw
- 4 Male Spades (Look for red)
- 1/2" Heat Shrink Tubing
- Wire Clamps
- Wrench
Recommendations: Have 2 people on this project so that you can take off both doors or help with one door.
Separate the screw into different piles because of there length.
STEP 1:
Open the hood of the car and remove the negative battery cable
STEP 2:
Start by removing the 2 screws where the vents are using a screw driver in either the driver or passenger door
STEP 3:
Then take out the over 2 screws on the outside of the door
STEP 4:
Take out 3 screw on the under side of the door
STEP 5:
Unscrew the door handle and take that out and place it aside
STEP 6:
Now you will be able to remove the door panel, use the flat head if you are having trouble with the panel (there are all clips which you can pop out)
STEP 7:
Make sure to disconnect the window controls with both door panels
Once the door panel is popped off, it should look like this:

STEP 8:
Again use the screw driver to take out the 4 screws surrounding the speaker
STEP 9:
Repeat STEPs 2-8 for the other door panel
STEP 10:
After removing the speaker head inside to wire everything together, and take the stock speaker inside as well.
STEP 11:
Take 2 male connectors and 2 heat shrink tubing with your wire clamps and clamp the connectors with the new speaker wires from the package and heat shrink the tubes after everything is clamped down
STEP 12:
Repeat STEP 11 for the other speaker
STEP 13:
Connect the wires to the new speakers and make a note of which is positive and which is negative
STEP 14:
Head back to your car and plug in the wires where you took out the old wires
(check on the speaker in case the speaker says it is a right speaker or left speaker)
(where you plug in the new wires into is in a shape of a T, from what i remember the top is negative and the bottom is positive. to double check, look at the old speaker wires on the old speaker and it will show either - or +)
STEP 15:
Screw in the new speaker with the old screw
STEP 16:
After plugging everything in, including the other speaker reconnect the negative battery cable and make sure they both work
STEP 17:
Pop back in the door panel and screw in the screws back into the door
That is all you have do in order to put in the new front speakers!
__________________________________________________ _______
Now for the rear speakers
Tools needed:
- Screw driver
- Flat Head Screw
- 4 Male Spades (Look for red)
- 1/2" Heat Shrink Tubing
- Wire Clamps
-Wrench
STEP 1:
Open the hood of the car and remove the negative battery cable
STEP 2:
Use the flat head and pry off the speaker over starting at the top off the cover
STEP 3:
Take off the 4 screws holding the speaker in
STEP 4:
Remove the wires at the back of the speaker from where they are being held in
It should look like this without the speaker inside

STEP 5:
Take in the old speaker inside and get the new speaker wires
STEP 6:
Repeat STEPs 2-5 for the other speaker
STEP 6:
Take 2 male connectors and 2 heat shrink tubing with your wire clamps and clamp the connectors with the new speaker wires from the package and heat shrink the tubes after everything is clamped down
STEP 7:
Repeat STEP 6 for the other speaker
STEP 8:
Connect the wires to the new speakers and make a note of which is positive and which is negative
STEP 9:
Head back to your car and plug in the wires where you took out the old wires
(check on the speaker in case the speaker says it is a right speaker or left speaker)
(where you plug in the new wires into is in a shape of a T, from what i remember the top is negative and the bottom is positive. to double check, look at the old speaker wires on the old speaker and it will show either - or +)
STEP 10:
Screw in the new speaker with the old screws and repeat for the other speaker
STEP 11:
Reconnect the negative battery cable and check to make sure both the speakers work
STEP 12:
Pop in the old cover on both the speakers and you are done!
__________________________________________________ _______
Now finally, to install the new stereo
Tools needed:
- Screw driver
- Flat Head Screw
- 1/2" Heat Shrink Tubing
- Wire Clamps
- Wrench
- Wire butt(look for red)
- Hyundai wire harness
- Metra housing if using a smaller stereo (here is a LINK to where you can get it. Thanks hardate)
Recommendations: Have 2 people working on this project its very tedious and your need the 2nd person when you prying off everything from the car
STEP 1:
Open the Hyundai wire harness for the new stereo and get the wire connections from the new stereo
STEP 2:
Open the wire holder so that you can see the wires from the new wire connections (do this to all of the wires)
STEP 3:
Match up the wires by color and use the wire butt to connect the 2 wires together and clamp down the wire butt and use heat shrink tubing to make sure it has a good hold
STEP 4:
Repeat STEP 3 until all the wires are matched up and done (this takes a very long time)
STEP 5:
Head out to the car and open the hood and disconnect the negative battery cable
STEP 6:
Start by removing the 4 screws on either side of the center console (use this LINK to help with this and the next couple of steps. Thanks REDZMAN!)
STEP 7:
After removing the screws, pop out the lower half of the center console (use can use the flat head if you need help)
STEP 8:
Take out the cover over the shifter by popping it out upwards (What i did is i turned on the car before taking off the battery cable and put the shifter into 2nd or low and then took off the battery cable. make sure to have the emergency break on!)
STEP 9:
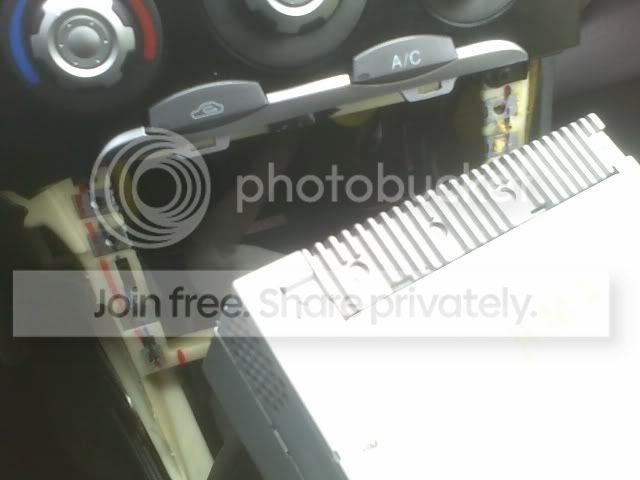
Pop out the console where the old stereo is
It will look like this after everything is taken out
STEP 10:
Remove the old stereo by taking out the 4 screws
STEP 11:
Gently remove the old stereo and unclip the wire connections from the back
This is what the back of the stereo looks like
STEP 12:
Take the new stereo and hook it up with the metra housing unit unless your new stereo is the same size as the old one
STEP 13:
Hook up the Hyundai wire harness with the wire connections from the new stereo into where you took out the wires from the old stereo and plug the harness into there and plug the wire connections into the correct spot of the new stereo (you can hook the ground wire up to a bolt in the back where the old stereo was)
STEP 14:
Push all the wires back into where the old stereo was and screw in the new stereo with the old screws
STEP 15:
This is very important because i didn't do it and i had to do everything all over again! Reconnect the negative battery cable and make sure all the speakers have sound coming out and all the other features working
STEP 16:
Put everything back together starting with the console where the stereo is, then the cover for the shifter, and finally the center console
STEP 17:
Screw the 4 screw back into the center console
Start you car, and you now have just totally redone your sound system
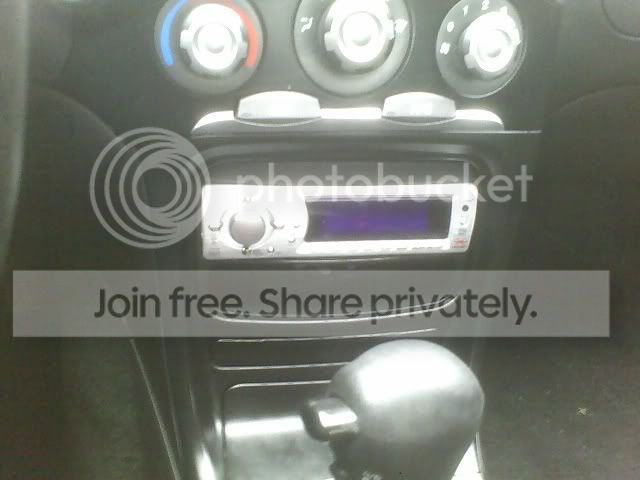
This is a picture of my stereo after everything was put back together (taken at night)

This is the same stereo just taken during the day
Tools needed:
- Screw driver
- Flat Head Screw
- 4 Male Spades (Look for red)
- 1/2" Heat Shrink Tubing
- Wire Clamps
- Wrench
Recommendations: Have 2 people on this project so that you can take off both doors or help with one door.
Separate the screw into different piles because of there length.
STEP 1:
Open the hood of the car and remove the negative battery cable
STEP 2:
Start by removing the 2 screws where the vents are using a screw driver in either the driver or passenger door
STEP 3:
Then take out the over 2 screws on the outside of the door
STEP 4:
Take out 3 screw on the under side of the door
STEP 5:
Unscrew the door handle and take that out and place it aside
STEP 6:
Now you will be able to remove the door panel, use the flat head if you are having trouble with the panel (there are all clips which you can pop out)
STEP 7:
Make sure to disconnect the window controls with both door panels
Once the door panel is popped off, it should look like this:
STEP 8:
Again use the screw driver to take out the 4 screws surrounding the speaker
STEP 9:
Repeat STEPs 2-8 for the other door panel
STEP 10:
After removing the speaker head inside to wire everything together, and take the stock speaker inside as well.
STEP 11:
Take 2 male connectors and 2 heat shrink tubing with your wire clamps and clamp the connectors with the new speaker wires from the package and heat shrink the tubes after everything is clamped down
STEP 12:
Repeat STEP 11 for the other speaker
STEP 13:
Connect the wires to the new speakers and make a note of which is positive and which is negative
STEP 14:
Head back to your car and plug in the wires where you took out the old wires
(check on the speaker in case the speaker says it is a right speaker or left speaker)
(where you plug in the new wires into is in a shape of a T, from what i remember the top is negative and the bottom is positive. to double check, look at the old speaker wires on the old speaker and it will show either - or +)
STEP 15:
Screw in the new speaker with the old screw
STEP 16:
After plugging everything in, including the other speaker reconnect the negative battery cable and make sure they both work
STEP 17:
Pop back in the door panel and screw in the screws back into the door
That is all you have do in order to put in the new front speakers!
__________________________________________________ _______
Now for the rear speakers
Tools needed:
- Screw driver
- Flat Head Screw
- 4 Male Spades (Look for red)
- 1/2" Heat Shrink Tubing
- Wire Clamps
-Wrench
STEP 1:
Open the hood of the car and remove the negative battery cable
STEP 2:
Use the flat head and pry off the speaker over starting at the top off the cover
STEP 3:
Take off the 4 screws holding the speaker in
STEP 4:
Remove the wires at the back of the speaker from where they are being held in
It should look like this without the speaker inside
STEP 5:
Take in the old speaker inside and get the new speaker wires
STEP 6:
Repeat STEPs 2-5 for the other speaker
STEP 6:
Take 2 male connectors and 2 heat shrink tubing with your wire clamps and clamp the connectors with the new speaker wires from the package and heat shrink the tubes after everything is clamped down
STEP 7:
Repeat STEP 6 for the other speaker
STEP 8:
Connect the wires to the new speakers and make a note of which is positive and which is negative
STEP 9:
Head back to your car and plug in the wires where you took out the old wires
(check on the speaker in case the speaker says it is a right speaker or left speaker)
(where you plug in the new wires into is in a shape of a T, from what i remember the top is negative and the bottom is positive. to double check, look at the old speaker wires on the old speaker and it will show either - or +)
STEP 10:
Screw in the new speaker with the old screws and repeat for the other speaker
STEP 11:
Reconnect the negative battery cable and check to make sure both the speakers work
STEP 12:
Pop in the old cover on both the speakers and you are done!
__________________________________________________ _______
Now finally, to install the new stereo
Tools needed:
- Screw driver
- Flat Head Screw
- 1/2" Heat Shrink Tubing
- Wire Clamps
- Wrench
- Wire butt(look for red)
- Hyundai wire harness
- Metra housing if using a smaller stereo (here is a LINK to where you can get it. Thanks hardate)
Recommendations: Have 2 people working on this project its very tedious and your need the 2nd person when you prying off everything from the car
STEP 1:
Open the Hyundai wire harness for the new stereo and get the wire connections from the new stereo
STEP 2:
Open the wire holder so that you can see the wires from the new wire connections (do this to all of the wires)
STEP 3:
Match up the wires by color and use the wire butt to connect the 2 wires together and clamp down the wire butt and use heat shrink tubing to make sure it has a good hold
STEP 4:
Repeat STEP 3 until all the wires are matched up and done (this takes a very long time)
STEP 5:
Head out to the car and open the hood and disconnect the negative battery cable
STEP 6:
Start by removing the 4 screws on either side of the center console (use this LINK to help with this and the next couple of steps. Thanks REDZMAN!)
STEP 7:
After removing the screws, pop out the lower half of the center console (use can use the flat head if you need help)
STEP 8:
Take out the cover over the shifter by popping it out upwards (What i did is i turned on the car before taking off the battery cable and put the shifter into 2nd or low and then took off the battery cable. make sure to have the emergency break on!)
STEP 9:
Pop out the console where the old stereo is
It will look like this after everything is taken out
STEP 10:
Remove the old stereo by taking out the 4 screws
STEP 11:
Gently remove the old stereo and unclip the wire connections from the back
This is what the back of the stereo looks like
STEP 12:
Take the new stereo and hook it up with the metra housing unit unless your new stereo is the same size as the old one
STEP 13:
Hook up the Hyundai wire harness with the wire connections from the new stereo into where you took out the wires from the old stereo and plug the harness into there and plug the wire connections into the correct spot of the new stereo (you can hook the ground wire up to a bolt in the back where the old stereo was)
STEP 14:
Push all the wires back into where the old stereo was and screw in the new stereo with the old screws
STEP 15:
This is very important because i didn't do it and i had to do everything all over again! Reconnect the negative battery cable and make sure all the speakers have sound coming out and all the other features working
STEP 16:
Put everything back together starting with the console where the stereo is, then the cover for the shifter, and finally the center console
STEP 17:
Screw the 4 screw back into the center console
Start you car, and you now have just totally redone your sound system
This is a picture of my stereo after everything was put back together (taken at night)
This is the same stereo just taken during the day


Senior Member

Joined: Nov 2008
Posts: 2,881
Likes: 0
From: Huntsville, AL
Vehicle: 2001/Hyundai/Tiburon
Great DIY!
However, your first step 4 is not needed, the 3 screws underneath the door. Those 3 only hold in your door panel pocket, and since the pocket comes with the door, they DON'T need to be removed.
Just a little time saver wink1.gif
However, your first step 4 is not needed, the 3 screws underneath the door. Those 3 only hold in your door panel pocket, and since the pocket comes with the door, they DON'T need to be removed.
Just a little time saver wink1.gif

