


Pull To Push Clutch Conversion.


Thread Starter
Senior Member
Joined: May 2005
Posts: 191
Likes: 0

Ok this isnt a simple install as i wish it was. it took ME almost a week to do this modification. Without a Lathe, Mill and other fabrication devices I dont recomend this mod. I have put about 500 miles on the act 2600lb clutch and its held together quite nicely, I did have one issue with my clutch release arm twisting the splined top off due to not being strong enough for the new clutch. Here are some pics with discriptions.
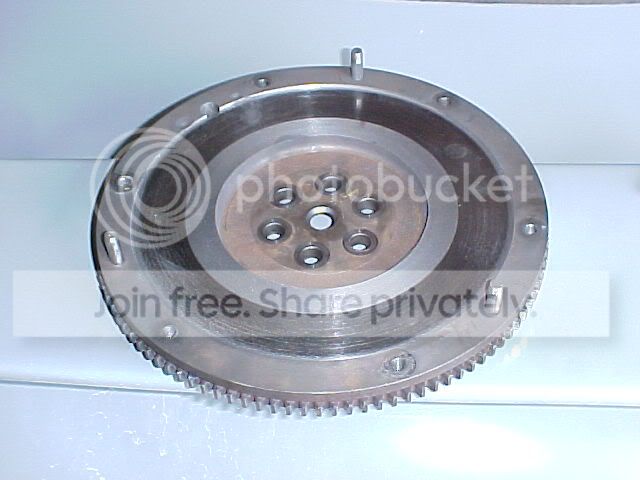
Your flywheel will have to be modified to accept the new pressure plate and disc. I have surfaced mine 50 thou. then in the center you see the undercut that is a .07 deep undercut for the disc. Once i have Finished with the flywheel there are some spacers that will go on the bolt holes they are .450 high and .625 dia these space the pressure plate out from the flywheel so ti has the exact specs for a act 2600lb pressure plate.
I dont have the spacers in but you can imagine them there.

they just space the pressure plate from the flywheel.
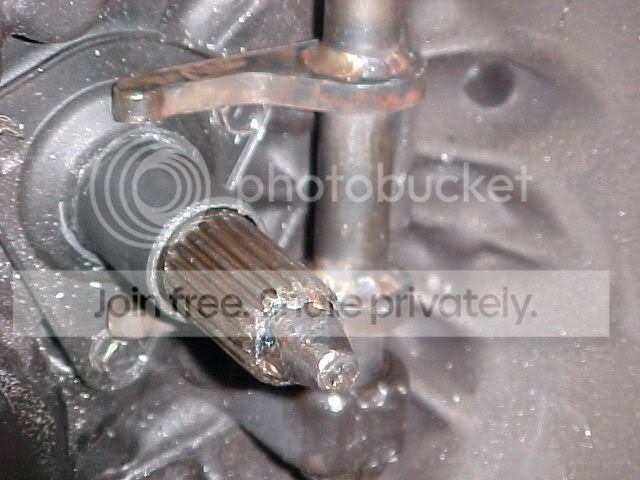
This is a pic of the remade clutch release arm its the same dia all the way to the top i dont have any pics of that though. I just keyed the top and made a new release arm to go to the slave cyl.
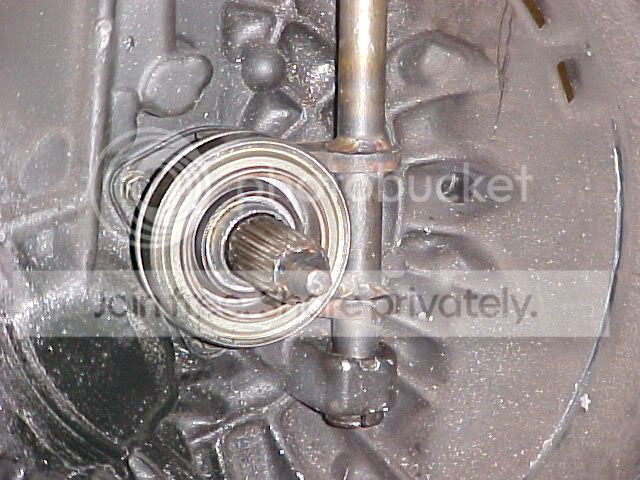
release bearing i had to make up an iner sleave to fit the hyundai input coller i just made it from aluminum you probley cant see it in the pic but if it wasnt on the release bearing would be extremely slopy on the shaft. Oh by the way this is a mitsu 2nd gen turbo release bearing better than the 1st gens. You will also have to grind a slight radious on the back side of the bearing to clear the trany housing. you will see when installing. Also take a look at the input shaft for the tranny at the very tip i have put a taperd lead in on this to help with installing the tranny. I did install it once without it took about 30 min with this i have installed it in less than 5 every time. (just on the motor on fully installed)

Pic of pressure plate installed on motor. When installing the tranny it might have to be shimed out away from the motor to give clearance to the belhousing and the pressure plate. I shimed mine about .030 of an inch very minimal. I however do not have the sheetmetal cover that goes on the block so that might make a diffrence. anyway if you ahve any questions you can email me i will build a kit up for anyone interested this would include a new release arm, spacer bushings, longer dowl pins, longer bolts, and shims. Everything else can be either purchased or done by a machine shop. Again this isnt a 1 day job it will take anyone with good fab skills 2-4 days.
Your flywheel will have to be modified to accept the new pressure plate and disc. I have surfaced mine 50 thou. then in the center you see the undercut that is a .07 deep undercut for the disc. Once i have Finished with the flywheel there are some spacers that will go on the bolt holes they are .450 high and .625 dia these space the pressure plate out from the flywheel so ti has the exact specs for a act 2600lb pressure plate.
I dont have the spacers in but you can imagine them there.
they just space the pressure plate from the flywheel.
This is a pic of the remade clutch release arm its the same dia all the way to the top i dont have any pics of that though. I just keyed the top and made a new release arm to go to the slave cyl.
release bearing i had to make up an iner sleave to fit the hyundai input coller i just made it from aluminum you probley cant see it in the pic but if it wasnt on the release bearing would be extremely slopy on the shaft. Oh by the way this is a mitsu 2nd gen turbo release bearing better than the 1st gens. You will also have to grind a slight radious on the back side of the bearing to clear the trany housing. you will see when installing. Also take a look at the input shaft for the tranny at the very tip i have put a taperd lead in on this to help with installing the tranny. I did install it once without it took about 30 min with this i have installed it in less than 5 every time. (just on the motor on fully installed)
Pic of pressure plate installed on motor. When installing the tranny it might have to be shimed out away from the motor to give clearance to the belhousing and the pressure plate. I shimed mine about .030 of an inch very minimal. I however do not have the sheetmetal cover that goes on the block so that might make a diffrence. anyway if you ahve any questions you can email me i will build a kit up for anyone interested this would include a new release arm, spacer bushings, longer dowl pins, longer bolts, and shims. Everything else can be either purchased or done by a machine shop. Again this isnt a 1 day job it will take anyone with good fab skills 2-4 days.


Senior Member
Joined: Mar 2006
Posts: 9,172
Likes: 0
Vehicle: 2001/Hyundai/Tiburon