
Evaporation Cannister Relocation


Thread Starter
Senior Member
Joined: Jul 2004
Posts: 547
Likes: 0
From: New London, Tx AKA The Middle of Nowhere
If your installing a CAI and notice there's a black box where your new intake needs to go,
then you have a RevA Tiburon and that little box is your Evaperation Canister. Don't worry
it can be moved into the engine bay by your fuse box.
Difficulty:
Moderate
What you'll need:
Tools:
-Screw Drivers(philips and flat)
-Ratchet
-Sockets(10mm and 12mm)
-Small cresent wrench
-Pliers
-Tubing Cutters
-soldering iron
-Torch(this just helps in cutting the metal for mounting)
-Tubing Benders or Cresent Wrench
Supplies:
-2-3 feet of 18 gauge wire
-Heat shrink wrap/liquid electrical tape/electrical tape(anyone will do)
-Solder
-Some metal for mounting(I used some thin plate metal)
-Something to lable the fuel lines(I used tape and a marker)
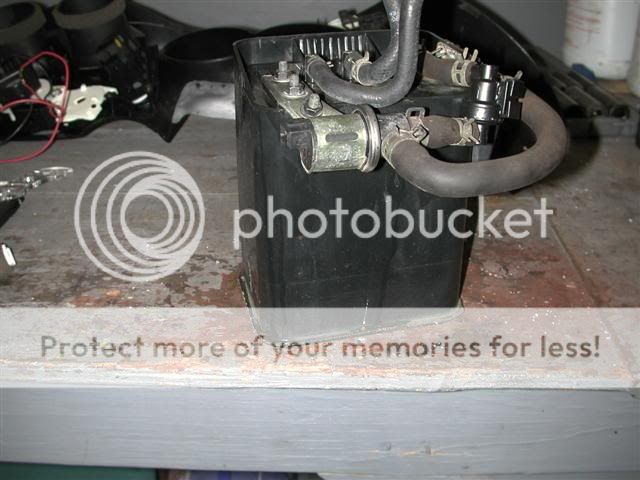
What your Evap. Can. looks like:
1.
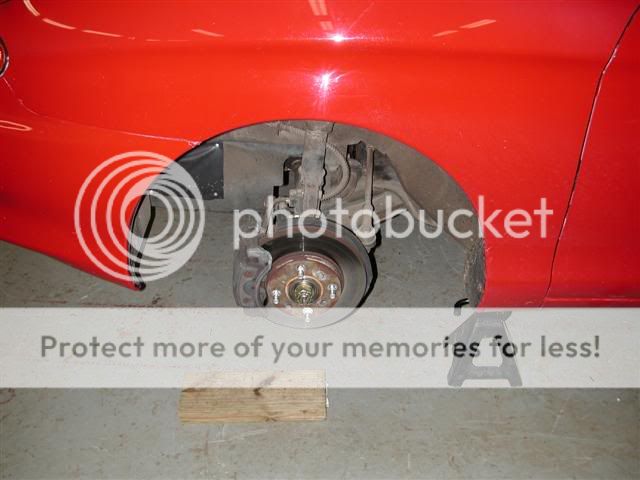
Put your car up on jack stands and take the drivers side wheel off.
2.
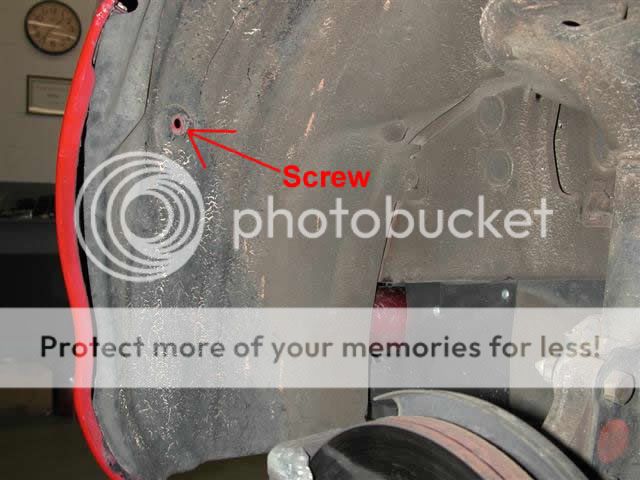
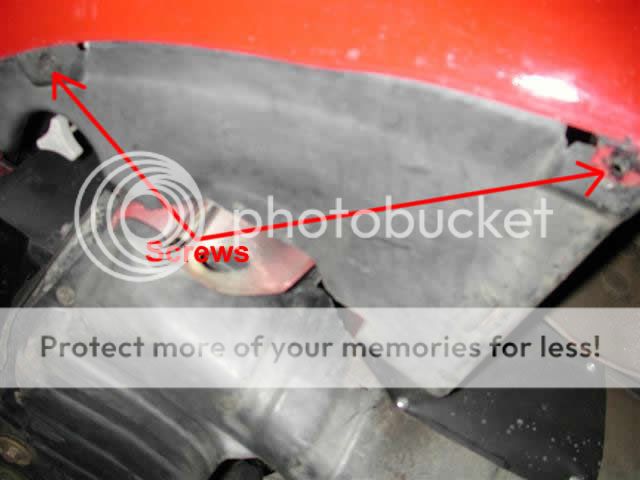
Then remove the front screws on the splash guard, just enough to be able to pull it back.
3.
You need to take out the battery and tray, to do this you need the cresent to loosen the terminals, next use the 12mm socket to take out the plate that's holding the battery, and then remove the battery. Next take out the battery tray, there are 3 12mm screws holding it down.
4.
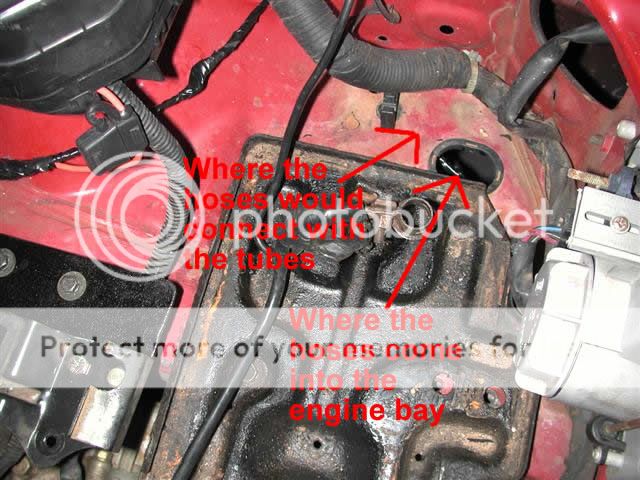
Now you need to get the Evap can out, to do this remove the fuel line going into the frame and pull it out (sorry no pic). Next, remove the 2 fuel lines in the engine bay that go down to the Evap can. Make sure you label the hoses and which pipe they went to.
5.
Next, take the bracket loose that is holding it up(2-3 10mm screws) and take the mounting bracket off.

6.
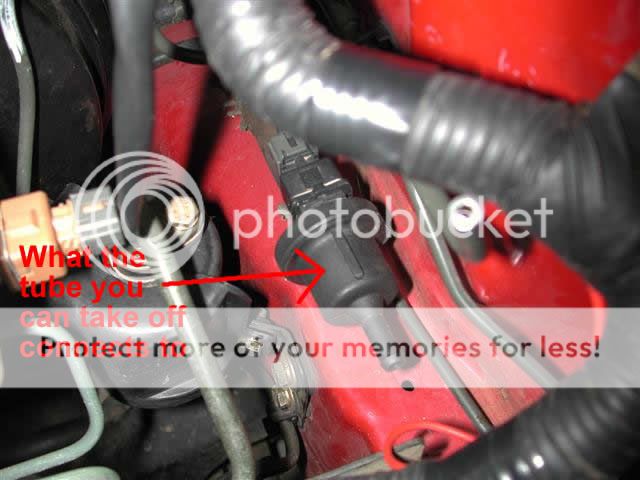
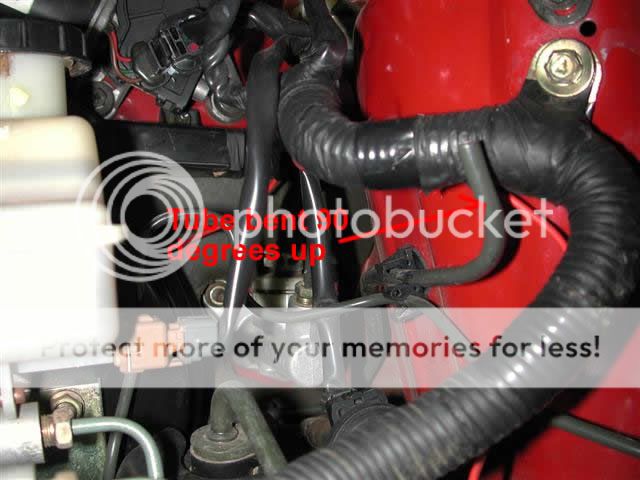
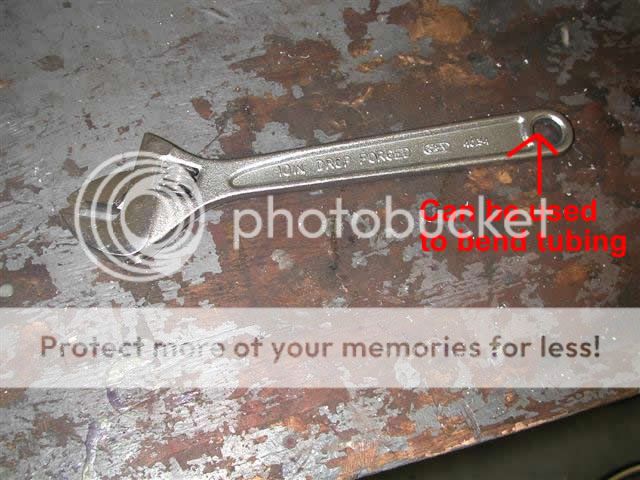
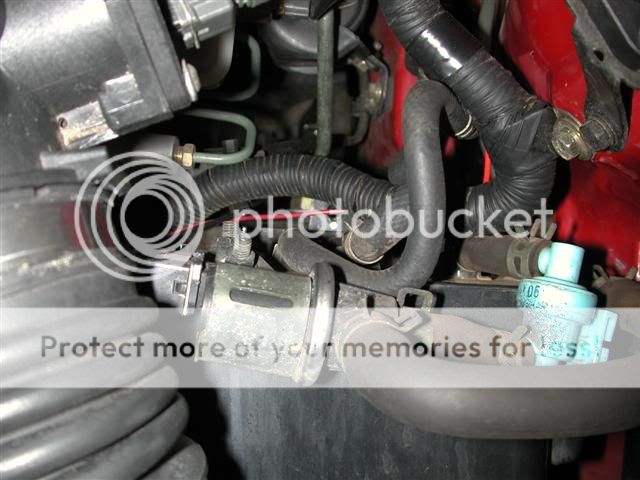
You can take off one of the 2 fuel pipes, it goes to what looks like a sensor(see pic). The other you will have to cut and bend 90 degrees up using tubing benders, or the end of a cresent wrench(also in pic). To bend it with a cresent simply bend it in very small increments in the direction you want, be careful not to kink the tubing.
7.
It's a good idea to go ahead and halfway(don't tighten everything down) install your intake at this point, that way you can get a better idea on how to mount the canister.
8.
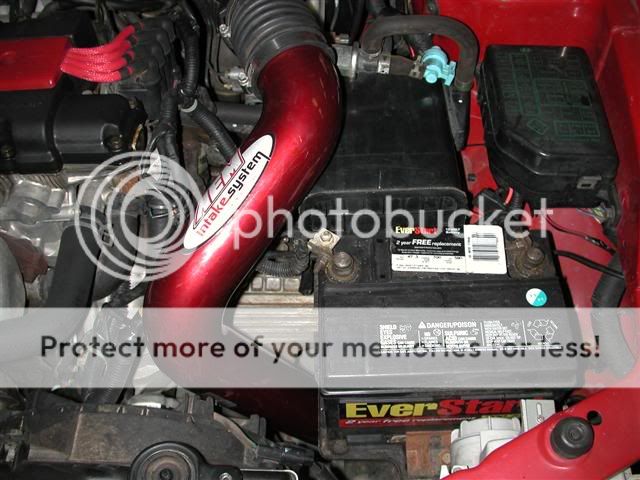
To mount the canister I used the stock bracket and an additional piece of plate metal. To do this we cut a piece of plate medal and drilled 2 holes in it to mount where your stock air box would be(see pic). Then mount the canister bracket on it by drilling 2 more holes, It should look something like this:
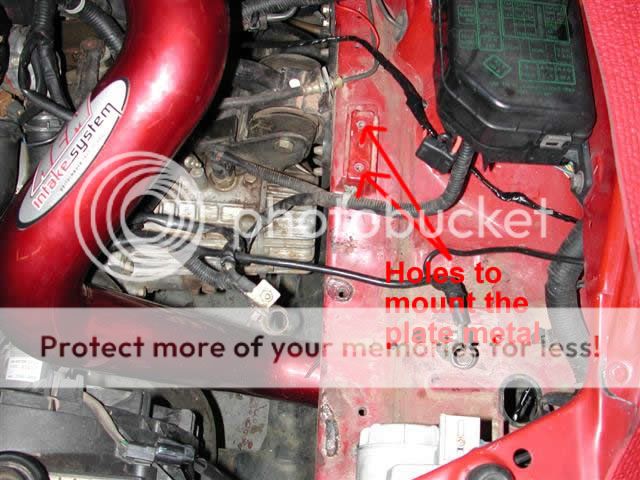
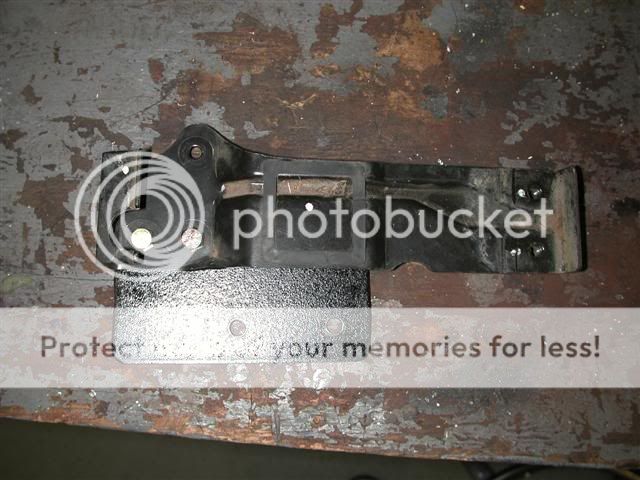
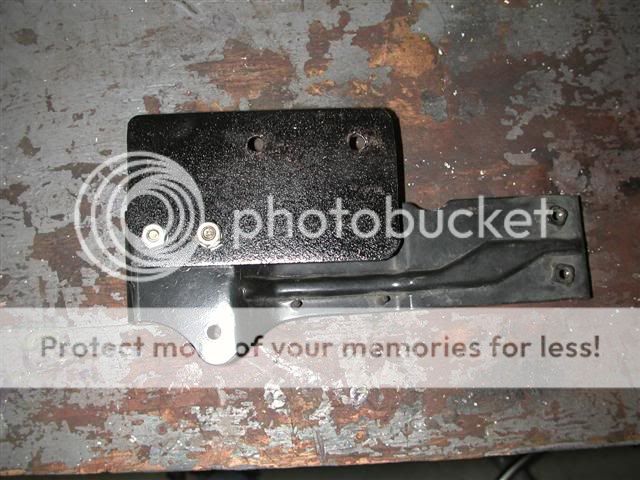

Be careful on the size of the plate and where the holes go, you don't want it mounted to close to your intake or fuse box.
9.
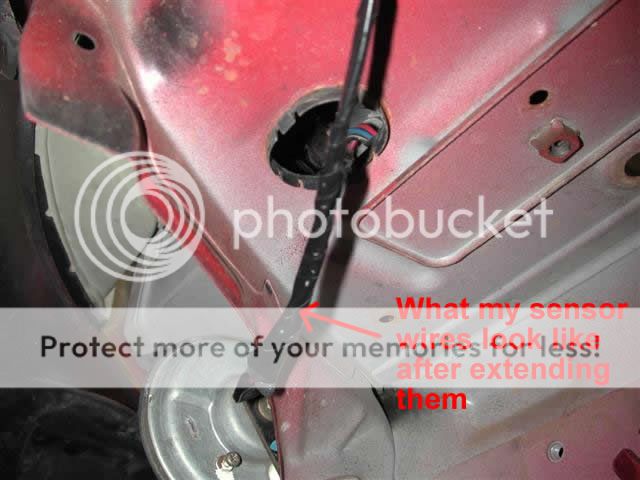
To extend the sensor for the canister, cut the wire 2 or so inches back from the sensor. Next, run some wire from the stock wire into the engine bay to where the canister is, I ran it up under the fuse box. Then solder some wire to each of the 2 wires, I used black for ground and red for hot, and put some electrical tape/heat shrink wrap/liquid electrical tape on the connections. Then, solder the sensor back on and put electrical tape/heat shrink wrap/liquid electrical tape to protect the connections.
10.
Place the canister in the bracket and bolt it down and connect the hoses to there proper places and plugin the sensor.
11.
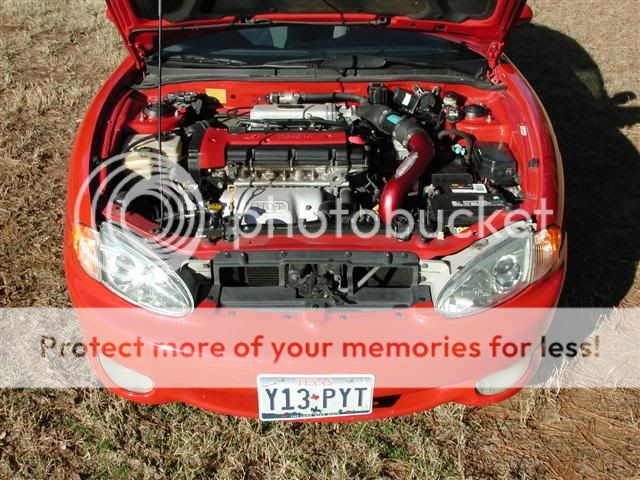
Finish installing your intake and then put everything back together.
When everything is said and done it should look like this:
I hope I didn't forget anything....
I know this has been done before, but I thought I'd post another way to do it.
then you have a RevA Tiburon and that little box is your Evaperation Canister. Don't worry
it can be moved into the engine bay by your fuse box.
Difficulty:
Moderate
What you'll need:
Tools:
-Screw Drivers(philips and flat)
-Ratchet
-Sockets(10mm and 12mm)
-Small cresent wrench
-Pliers
-Tubing Cutters
-soldering iron
-Torch(this just helps in cutting the metal for mounting)
-Tubing Benders or Cresent Wrench
Supplies:
-2-3 feet of 18 gauge wire
-Heat shrink wrap/liquid electrical tape/electrical tape(anyone will do)
-Solder
-Some metal for mounting(I used some thin plate metal)
-Something to lable the fuel lines(I used tape and a marker)
What your Evap. Can. looks like:
1.
Put your car up on jack stands and take the drivers side wheel off.
2.
Then remove the front screws on the splash guard, just enough to be able to pull it back.
3.
You need to take out the battery and tray, to do this you need the cresent to loosen the terminals, next use the 12mm socket to take out the plate that's holding the battery, and then remove the battery. Next take out the battery tray, there are 3 12mm screws holding it down.
4.
Now you need to get the Evap can out, to do this remove the fuel line going into the frame and pull it out (sorry no pic). Next, remove the 2 fuel lines in the engine bay that go down to the Evap can. Make sure you label the hoses and which pipe they went to.
5.
Next, take the bracket loose that is holding it up(2-3 10mm screws) and take the mounting bracket off.
6.
You can take off one of the 2 fuel pipes, it goes to what looks like a sensor(see pic). The other you will have to cut and bend 90 degrees up using tubing benders, or the end of a cresent wrench(also in pic). To bend it with a cresent simply bend it in very small increments in the direction you want, be careful not to kink the tubing.
7.
It's a good idea to go ahead and halfway(don't tighten everything down) install your intake at this point, that way you can get a better idea on how to mount the canister.
8.
To mount the canister I used the stock bracket and an additional piece of plate metal. To do this we cut a piece of plate medal and drilled 2 holes in it to mount where your stock air box would be(see pic). Then mount the canister bracket on it by drilling 2 more holes, It should look something like this:
Be careful on the size of the plate and where the holes go, you don't want it mounted to close to your intake or fuse box.
9.
To extend the sensor for the canister, cut the wire 2 or so inches back from the sensor. Next, run some wire from the stock wire into the engine bay to where the canister is, I ran it up under the fuse box. Then solder some wire to each of the 2 wires, I used black for ground and red for hot, and put some electrical tape/heat shrink wrap/liquid electrical tape on the connections. Then, solder the sensor back on and put electrical tape/heat shrink wrap/liquid electrical tape to protect the connections.
10.
Place the canister in the bracket and bolt it down and connect the hoses to there proper places and plugin the sensor.
11.
Finish installing your intake and then put everything back together.
When everything is said and done it should look like this:
I hope I didn't forget anything....
I know this has been done before, but I thought I'd post another way to do it.

Senior Member

Joined: Aug 2009
Posts: 11,992
Likes: 0
From: Washington D.C.
Vehicle: Hyundai Tiburon FX
Splinter, very very very nice writeup man. thanks for keeping your word up on this one. you've also posted pics of the cannister all hooked up from the factory! now i can finally see how it looked like before i hampered it.
ok, first off, your car is an exact replica of my car without the regard of the transmission and the work i've put into it...
second, did you get any CEL? did you have to extend any tubing? how did you get that fuel tank tube (hidden in the fender) up to the engine bay?
the only possible thought i can think of that the other DIY doesn't work for me is that the valve is configured to pressurize only a certain limit of air hence the small fuel lines it came setup with, and when anybody extends the tubes the valve has to work more? i really don't know. it looks as if the fuel line connections i have wen i extended the fuel lines seem to be correspondant to the way it is connected on that stock setup. what could possibly be wrong? i'm going to observe your pics carefully, see if this is the next thing i should do, thanks for your support!
Here's a question for you, why is that black filter connected to the evap cannister? i'm going to check this ou but i don't think there is a connection between it and the cannister alone. still don't understand why the valve would work for 4 inches of pipe compared to 4 feet of pipe yet overpressurize on 4 feet rather than 4 inches.
Senior Member
Joined: Aug 2009
Posts: 11,992
Likes: 0
From: Washington D.C.
Vehicle: Hyundai Tiburon FX
Splinter, very very very nice writeup man. thanks for keeping your word up on this one. you've also posted pics of the cannister all hooked up from the factory! now i can finally see how it looked like before i hampered it.
ok, first off, your car is an exact replica of my car without the regard of the transmission and the work i've put into it...
second, did you get any CEL? did you have to extend any tubing? how did you get that fuel tank tube (hidden in the fender) up to the engine bay?
the only possible thought i can think of that the other DIY doesn't work for me is that the valve is configured to pressurize only a certain limit of air hence the small fuel lines it came setup with, and when anybody extends the tubes the valve has to work more? i really don't know. it looks as if the fuel line connections i have wen i extended the fuel lines seem to be correspondant to the way it is connected on that stock setup. what could possibly be wrong? i'm going to observe your pics carefully, see if this is the next thing i should do, thanks for your support!
Here's a question for you, why is that black filter connected to the evap cannister? i'm going to check this ou but i don't think there is a connection between it and the cannister alone. still don't understand why the valve would work for 4 inches of pipe compared to 4 feet of pipe yet overpressurize on 4 feet rather than 4 inches.
ok, first off, your car is an exact replica of my car without the regard of the transmission and the work i've put into it...
second, did you get any CEL? did you have to extend any tubing? how did you get that fuel tank tube (hidden in the fender) up to the engine bay?
the only possible thought i can think of that the other DIY doesn't work for me is that the valve is configured to pressurize only a certain limit of air hence the small fuel lines it came setup with, and when anybody extends the tubes the valve has to work more? i really don't know. it looks as if the fuel line connections i have wen i extended the fuel lines seem to be correspondant to the way it is connected on that stock setup. what could possibly be wrong? i'm going to observe your pics carefully, see if this is the next thing i should do, thanks for your support!
Here's a question for you, why is that black filter connected to the evap cannister? i'm going to check this ou but i don't think there is a connection between it and the cannister alone. still don't understand why the valve would work for 4 inches of pipe compared to 4 feet of pipe yet overpressurize on 4 feet rather than 4 inches.

Thread Starter
Senior Member
Joined: Jul 2004
Posts: 547
Likes: 0
From: New London, Tx AKA The Middle of Nowhere
No CEL, she runs like a champ fing02.gif. I didn't extend anything but the sensor wires.
I think that hose is the drain that goes into what looks like the frame. The way mine is sitting in there(relocated) that drain is facing down, so you don't need it when you move it up there(or so I was told).
I have been trying to figure out why hoses would make any difference in yours, my only guesses are: Can that sensor go bad(on the cannister)? Could the wire be broken?
I was told without that sensor hooked up I was guranteed a CEL.
**EDIT**
HKC, I just talked to my dad about your problem and he suggested double checking how the fuel lines cannister are hooked up, and making sure they don't leak, because eithere one of these things would throw a CEL.

Senior Member
Joined: Aug 2009
Posts: 11,992
Likes: 0
From: Washington D.C.
Vehicle: Hyundai Tiburon FX
Thanks dude!! I will get a glue gun and seal the area around the black box. post pictures tomorrow afternoon for you to see how it's all connected.
thanks again buddy.
thanks again buddy.