
Diy Replace Oem Rubber Shift Linkage Bushings W/ Bearings

Thread Starter
Super Moderator


Joined: Sep 2001
Posts: 10,795
Likes: 5
From: Pflugerville, TX
Vehicle: 2000 Elantra
^
When you are changing a clutch, is the perfect time to do this. Everything you need to do to get to the cables, you have to do to get to the clutch anyway.
When you are changing a clutch, is the perfect time to do this. Everything you need to do to get to the cables, you have to do to get to the clutch anyway.
Senior Member
Joined: Aug 2004
Posts: 2,764
Likes: 0
From: South Korea where u car from fool
Vehicle: 2008/Hyundai/Tiburon gt
i must say after reading this. i got on ebay and got me some Bones ball bearing the same ones i used in my skateboard along time ago. I also saw this write up on a DSM web site i was not sure of it. but now i will give it a try.
dam good write up. the only thing you need to do next time is take pic of the work you do durning the mod itself.
i know exactly what your talking about. but some of the Jr. member could get. whats the word... lost.
good work
dam good write up. the only thing you need to do next time is take pic of the work you do durning the mod itself.
i know exactly what your talking about. but some of the Jr. member could get. whats the word... lost.
good work

Senior Member
Joined: Jun 2009
Posts: 1,006
Likes: 0
Vehicle: 2000 hyundai tiburon
i did this over a year ago but i did it differently-...
rather than dremeling out the hole on the fitting, i dremeled the outer edge of the bearing by less than 1/32nd (about 1/2 the thickness of a penny) and just pushed it in the fitting-...
seemed much easier/cleaner than dremeling in the engine bay!
rather than dremeling out the hole on the fitting, i dremeled the outer edge of the bearing by less than 1/32nd (about 1/2 the thickness of a penny) and just pushed it in the fitting-...
seemed much easier/cleaner than dremeling in the engine bay!
Thread Starter
Super Moderator
Joined: Sep 2001
Posts: 10,795
Likes: 5
From: Pflugerville, TX
Vehicle: 2000 Elantra
That's another way to do it, and you still have the option of using stock or off-the-shelf polymer bearings to boot. The strength of the bearing shell is reduced, but it is in a pretty sturdy collar so I don't think it would matter, plus they will never see the shock loads they were designed for, in this application.
My cables were not mounted in a car when they were dremel'd to size... the hole they would pass through was in process of being cut into my car, when it was done. It was VERY easy to get a good angle on them, with them out of the car! laugh.gif
My cables were not mounted in a car when they were dremel'd to size... the hole they would pass through was in process of being cut into my car, when it was done. It was VERY easy to get a good angle on them, with them out of the car! laugh.gif

Moderator

Joined: Feb 2009
Posts: 11,732
Likes: 5
From: Leesville, Louisiana
Vehicle: 2001 Hyundai Tiburon
<div class='quotetop'>QUOTE (Mad_john @ Nov 22 2008, 02:33 PM) <{POST_SNAPBACK}></div><div class='quotemain'>dam good write up. the only thing you need to do next time is take pic of the work you do durning the mod itself.
i know exactly what your talking about. but some of the Jr. member could get. whats the word... lost.</div>
It's really simple, but you could mess up your shifter so Jr. members should not attempt it.
here's the shifter bushing location.
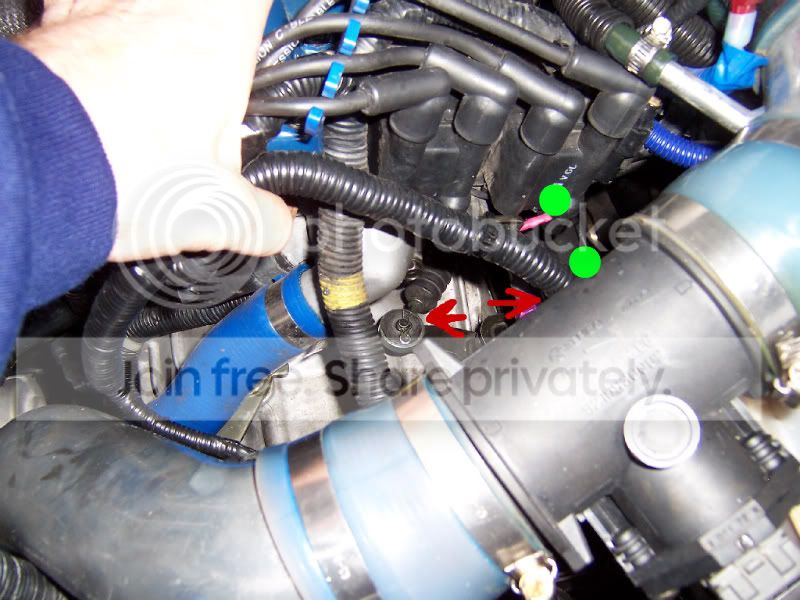
You can remove the 2 12mm bolts securing the linkage from the back side(aproximate locations in green) You won't see them, but you can feel them.
remove the bushings (aproximate locations in red arrows) then dremmel out the rings slightly larger then they are currently. Then you press the new bearing in place and take up space with the washers
Here's a picture of the new bearing in place of a bushing
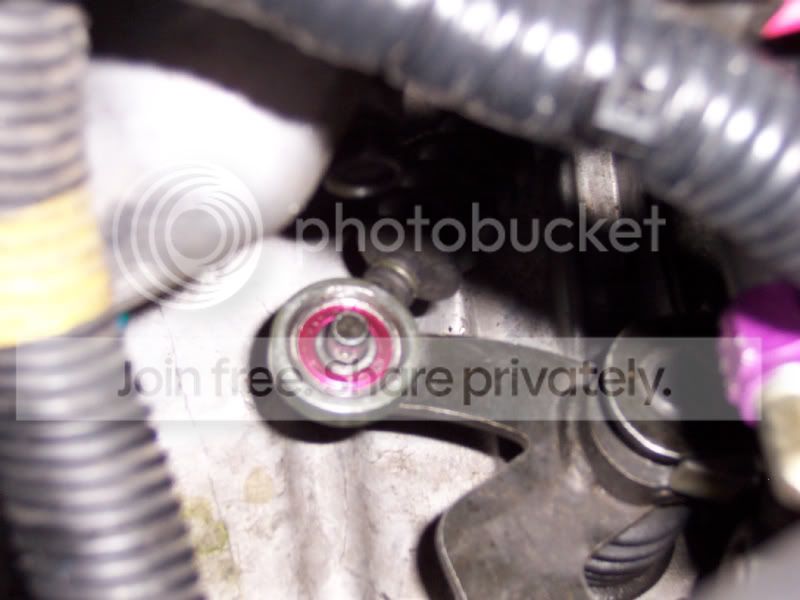
That should be everything that you need to know for this DIY.
i know exactly what your talking about. but some of the Jr. member could get. whats the word... lost.</div>
It's really simple, but you could mess up your shifter so Jr. members should not attempt it.
here's the shifter bushing location.
You can remove the 2 12mm bolts securing the linkage from the back side(aproximate locations in green) You won't see them, but you can feel them.
remove the bushings (aproximate locations in red arrows) then dremmel out the rings slightly larger then they are currently. Then you press the new bearing in place and take up space with the washers
Here's a picture of the new bearing in place of a bushing
That should be everything that you need to know for this DIY.

Senior Member
Joined: Mar 2006
Posts: 5,754
Likes: 0
Vehicle: 1997 Tiburon
I've also done this mod but I've done it a little different than you guys.
Instead of grinding away at the cable end or grinding away at the bearing because you'll never have a true grind with a hand grinder, I got a smaller bearing. I made a bushing out of aluminum that was the correct OD of the cable end, and also the correct ID so I can press the bearing inside the bushing.
So I pressed the bearing inside the aluminum bushing, than pressed that into the non grinded cable end. I used aluminum so It can take a bit of the initial force and is much much stiffer than the stock rubber.