
Diy Replace Oem Rubber Shift Linkage Bushings W/ Bearings

Thread Starter
Super Moderator


Joined: Sep 2001
Posts: 10,795
Likes: 5
From: Pflugerville, TX
Vehicle: 2000 Elantra
This DIY is intended to familiarize you with the reasons for and method of replacing your stock shifter linkage bushings with bearings.
The stock bushings on an RD's shifter are by this time about a decade old. They have been exposed to freezing cold and boiling hot in the engine bay, had brake fluid and oil and gas spilled and sprayed on them, and it shows. They are some kind of rubber with a metal insert in the middle, and the rubber is cracked, broken, or altogether GONE in some cases. Or they might be like mine and just shrunken. Either way, they left the factory tuned for (like? ) the masses: soft and sloppy. While you are trying to make the shift forks inside your transaxle move, the bushings are busy smooshing out of the way until brute force squeezes hard enough to move the shifter linkage.
For someone who knows how to drive a standard transmission, the stock bushing is sub-optimal to say the least. If you did the slave cylinder restrictor removal mod and loved it, you should do this. If you have a short shifter and love it, you should do this mod. If you installed shims on your shifter base pivots to tighten up the lever and loved it, you should do this. Also consider doing the gear link mod
Parts required: Two standard wheel bearings for skateboard or rollerblade wheels
Cost: $0 to $15
Tools Required: Dremel tool, 10mm wrench, Flathead screwdriver, Mechanical Inclination
Time Requirement: <1 hour
Difficulty: Moderate. If you have someone else change your oil this may be a bit much. If you have changed your own spark plugs this is not too bad. If you have changed your own clutch, this is cake.
If you have a part that needs to be rotated on another moving part and slack and friction don't matter, you put a rubber bushing with a metal insert. If slack matters you step that up to a polymer, or brass or bronze solid bushing. If what you want is to move the parts together with a minimum of slack and friction, you use a bearing.
When you have done this modification, you will be able to feel a MUCH more direct connection to the transmission. Before, you might grind gears every once in a while. After, you will feel the gears refusing to synchronize long before they start grinding so hard you can hear it. You will feel the motion the exact moment when the gears engage and disengage, and you will sometimes feel a little roughness before engagement when the gears are getting synchronized. Before, there was a certain amount of mystery slack in the shifting action that will now be gone. It feels tighter, because it is tighter. The benefit and downside of this modification are the same: slightly increased mechanical feedback from the shift linkage, and a requirement for you to be a little easier on the car when you shift, because there is that much less give in the system.
If you are a skater, go rummage through the junk drawer in your kitchen. For those who are not skaters, go ask a skater friend for a pair of bearings. If you insist on new bearings, you might pay single-digits of dollars for top quality new bearings at any skate shop, or you might be lucky and they will have a box of old bearings you can go through and take a pair free. Try to get some that are not gritty and that don't have too much slop.
Okay, now down to brass tacks.
********
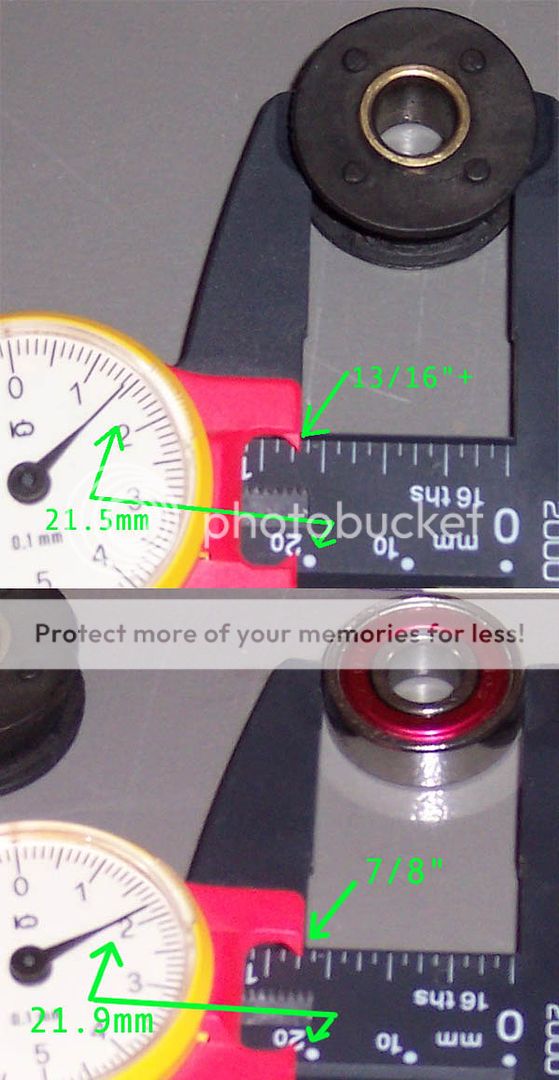
The stock bushing on our shifter linkage is around 21.5mm outside diameter. The outside diameter of the wheel bearings that fit a standard skateboard or rollerblade wheel is about 22mm. The stock bushing is thicker, but the thickness difference is insignificant, as you will soon see. The inside diameter of the stock bushing and skate wheel bearings is close enough to the same to be inconsequential.
Outside diameters: (Photo courtesy of DTN)
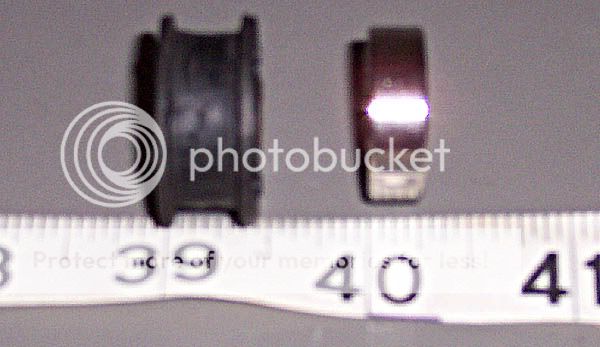
Thickness: (Photo from DTN again)
The reason this takes any time at all is that the bearings have to fit into a metal ring on the end of the shift cable that is too small for them. You have to remove metal from the ring on the shifter cable.
First if you don't know, they are buried under here:
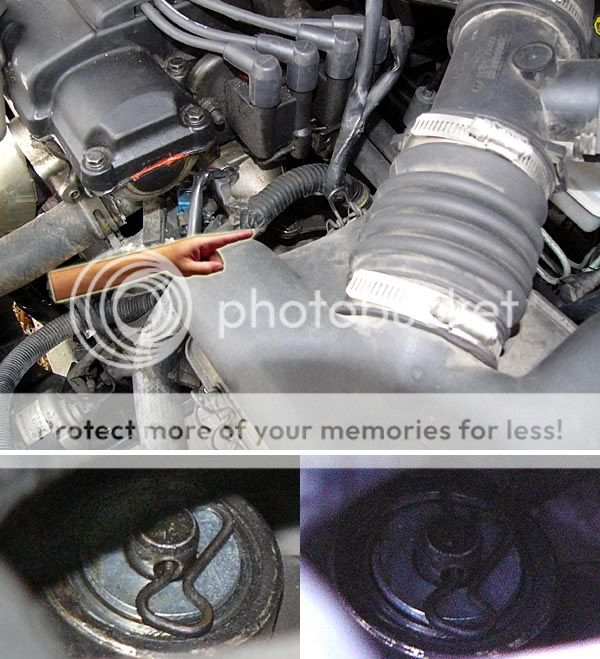
You can barely see them with everything in the engine bay. You will need to remove the air filter box at least, including the bottom of the box. If you have not done the resonator delete aka "Snorkus Mod" this is the time to do so. You may not have to remove the MAFS but it will make life easier for you if you do.
The shift cables are held on the transaxle with one bracket each, using a friction-fit U-shaped clip to hold them in place. Pry the clips off with a big screwdriver. I don't have a photo of it but you can't miss this part if you follow the cables back toward the firewall. I was sure they would be hard to get off, but they just pried right off when I put the screwdriver to them.
Pull the retaining pins off the outside of the stock bushings, being careful not to send them flying. Yank the end of the shifter cables off the shift linkage. You may want to do them one at a time, or you may wish to label the ends to be sure not to get them mixed up when you go to reinstall them.
The stock bushings are difficult to remove, because they are a little stiff. Push on one side and they will pop out. If you can't get it keep pushing or cut the ears off one side to let it slide out. You can destroy the rubber part, because you will not be using any of it.
Take the Dremel to the end of the cable. You want to remove about 1/4mm all the way around the inside, where the bushing was, until the bearings start to fit with a firm push from your hand. Then you can use a BIG C-clamp or a small one with a little piece of wood or something to spread the load, and press the bearings the rest of the way in to the cable end. You do NOT want to have to press too hard. If you press too hard because the cable end hole is still too small, you run a good chance of crushing the innards of the bearing, and then you have a solid steel bushing. That's better than rubber, but you will be depending on grease instead of ball bearings to reduce friction.
Once you have the bearings fitted into the ends of the cable, you can remount the cables on the shift linkage. This is possibly the hardest part of the whole affair. The inside diameter of the bearing is a VERY SNUG fit on the pin on the shift linkage. If you try to put the bearing on the pin at even a shallow angle, it will not fit. On the bottom/rear cable I had to tap the end of the cable with a hammer to line it up straight. Once lined up, it will slip right on. It was at this point that I greased everything that was about to go together, and you may want to do the same. Depending on how small and limber you are, you may find it necessary to work from under the car to get the cables back on. As always, when working under your car, either use a lift or chock your back wheels and use jackSTANDS not just jacks to hold the car up.
Here's where the thickness of the bearings comes into play. Look at Slipkknotfan's KartBoy bushings (the green stuff, Delrin bushings will be white where you see green in this shot)

like the stock bushing, they have ears that protrude on both sides of the cable end, and take up the slack around the actual working part of the bushing, so the end of the cable isn't flopping around between the shift linkage arm and the retaining clip. The skate bearing is MUCH thinner than the bushings. My solution was to use washers made for 1/4" bolts. I put 2 washers on the linkage and one outside the bearing under the retaining clip. With this setup, the bushing has nowhere to slide on its pin. All the motion is rotation of the bearing, or rotation of the cable in its sheath; there is virtually no rotational slop.
You may find it is easier to install the cable ends when you have not yet clipped the cables back onto the transaxle case, I know I did. Once the retaining clips are in place, wrestle the cables back into their brackets and clip them down. Reinstall the airbox and you are done.
And you'd better like the way it feels now because you will not be able to go back to stock without an excessive amount of slop on the bushings! You could still use polymer bushings if you press the bearings out again, but they would have to be shimmed or cut oversize to fit the larger-than-stock shift cable end ring.
Enjoy!
The stock bushings on an RD's shifter are by this time about a decade old. They have been exposed to freezing cold and boiling hot in the engine bay, had brake fluid and oil and gas spilled and sprayed on them, and it shows. They are some kind of rubber with a metal insert in the middle, and the rubber is cracked, broken, or altogether GONE in some cases. Or they might be like mine and just shrunken. Either way, they left the factory tuned for (like? ) the masses: soft and sloppy. While you are trying to make the shift forks inside your transaxle move, the bushings are busy smooshing out of the way until brute force squeezes hard enough to move the shifter linkage.
For someone who knows how to drive a standard transmission, the stock bushing is sub-optimal to say the least. If you did the slave cylinder restrictor removal mod and loved it, you should do this. If you have a short shifter and love it, you should do this mod. If you installed shims on your shifter base pivots to tighten up the lever and loved it, you should do this. Also consider doing the gear link mod
Parts required: Two standard wheel bearings for skateboard or rollerblade wheels
Cost: $0 to $15
Tools Required: Dremel tool, 10mm wrench, Flathead screwdriver, Mechanical Inclination
Time Requirement: <1 hour
Difficulty: Moderate. If you have someone else change your oil this may be a bit much. If you have changed your own spark plugs this is not too bad. If you have changed your own clutch, this is cake.
If you have a part that needs to be rotated on another moving part and slack and friction don't matter, you put a rubber bushing with a metal insert. If slack matters you step that up to a polymer, or brass or bronze solid bushing. If what you want is to move the parts together with a minimum of slack and friction, you use a bearing.
When you have done this modification, you will be able to feel a MUCH more direct connection to the transmission. Before, you might grind gears every once in a while. After, you will feel the gears refusing to synchronize long before they start grinding so hard you can hear it. You will feel the motion the exact moment when the gears engage and disengage, and you will sometimes feel a little roughness before engagement when the gears are getting synchronized. Before, there was a certain amount of mystery slack in the shifting action that will now be gone. It feels tighter, because it is tighter. The benefit and downside of this modification are the same: slightly increased mechanical feedback from the shift linkage, and a requirement for you to be a little easier on the car when you shift, because there is that much less give in the system.
If you are a skater, go rummage through the junk drawer in your kitchen. For those who are not skaters, go ask a skater friend for a pair of bearings. If you insist on new bearings, you might pay single-digits of dollars for top quality new bearings at any skate shop, or you might be lucky and they will have a box of old bearings you can go through and take a pair free. Try to get some that are not gritty and that don't have too much slop.
Okay, now down to brass tacks.
********
The stock bushing on our shifter linkage is around 21.5mm outside diameter. The outside diameter of the wheel bearings that fit a standard skateboard or rollerblade wheel is about 22mm. The stock bushing is thicker, but the thickness difference is insignificant, as you will soon see. The inside diameter of the stock bushing and skate wheel bearings is close enough to the same to be inconsequential.
Outside diameters: (Photo courtesy of DTN)
Thickness: (Photo from DTN again)
The reason this takes any time at all is that the bearings have to fit into a metal ring on the end of the shift cable that is too small for them. You have to remove metal from the ring on the shifter cable.
First if you don't know, they are buried under here:
You can barely see them with everything in the engine bay. You will need to remove the air filter box at least, including the bottom of the box. If you have not done the resonator delete aka "Snorkus Mod" this is the time to do so. You may not have to remove the MAFS but it will make life easier for you if you do.
The shift cables are held on the transaxle with one bracket each, using a friction-fit U-shaped clip to hold them in place. Pry the clips off with a big screwdriver. I don't have a photo of it but you can't miss this part if you follow the cables back toward the firewall. I was sure they would be hard to get off, but they just pried right off when I put the screwdriver to them.
Pull the retaining pins off the outside of the stock bushings, being careful not to send them flying. Yank the end of the shifter cables off the shift linkage. You may want to do them one at a time, or you may wish to label the ends to be sure not to get them mixed up when you go to reinstall them.
The stock bushings are difficult to remove, because they are a little stiff. Push on one side and they will pop out. If you can't get it keep pushing or cut the ears off one side to let it slide out. You can destroy the rubber part, because you will not be using any of it.
Take the Dremel to the end of the cable. You want to remove about 1/4mm all the way around the inside, where the bushing was, until the bearings start to fit with a firm push from your hand. Then you can use a BIG C-clamp or a small one with a little piece of wood or something to spread the load, and press the bearings the rest of the way in to the cable end. You do NOT want to have to press too hard. If you press too hard because the cable end hole is still too small, you run a good chance of crushing the innards of the bearing, and then you have a solid steel bushing. That's better than rubber, but you will be depending on grease instead of ball bearings to reduce friction.
Once you have the bearings fitted into the ends of the cable, you can remount the cables on the shift linkage. This is possibly the hardest part of the whole affair. The inside diameter of the bearing is a VERY SNUG fit on the pin on the shift linkage. If you try to put the bearing on the pin at even a shallow angle, it will not fit. On the bottom/rear cable I had to tap the end of the cable with a hammer to line it up straight. Once lined up, it will slip right on. It was at this point that I greased everything that was about to go together, and you may want to do the same. Depending on how small and limber you are, you may find it necessary to work from under the car to get the cables back on. As always, when working under your car, either use a lift or chock your back wheels and use jackSTANDS not just jacks to hold the car up.
Here's where the thickness of the bearings comes into play. Look at Slipkknotfan's KartBoy bushings (the green stuff, Delrin bushings will be white where you see green in this shot)
like the stock bushing, they have ears that protrude on both sides of the cable end, and take up the slack around the actual working part of the bushing, so the end of the cable isn't flopping around between the shift linkage arm and the retaining clip. The skate bearing is MUCH thinner than the bushings. My solution was to use washers made for 1/4" bolts. I put 2 washers on the linkage and one outside the bearing under the retaining clip. With this setup, the bushing has nowhere to slide on its pin. All the motion is rotation of the bearing, or rotation of the cable in its sheath; there is virtually no rotational slop.
You may find it is easier to install the cable ends when you have not yet clipped the cables back onto the transaxle case, I know I did. Once the retaining clips are in place, wrestle the cables back into their brackets and clip them down. Reinstall the airbox and you are done.
And you'd better like the way it feels now because you will not be able to go back to stock without an excessive amount of slop on the bushings! You could still use polymer bushings if you press the bearings out again, but they would have to be shimmed or cut oversize to fit the larger-than-stock shift cable end ring.
Enjoy!

Moderator

Joined: Feb 2009
Posts: 11,732
Likes: 5
From: Leesville, Louisiana
Vehicle: 2001 Hyundai Tiburon
Good writeup. I'm glad someone did this. I kept hearing about it, but I never quite got it until you posted those pictures a few weeks ago before my clutch job. This mod feels great on the stick.

Senior Member
Joined: Aug 2009
Posts: 11,992
Likes: 0
From: Washington D.C.
Vehicle: Hyundai Tiburon FX
that's awesome!!! i used to be a skater. i wore my first broken bearing as my ring.
i would like to add one VERY important reminder. on the inside of the gearbox the shifter links need to be exactly tightened and in position. the left needs to be purely horizontal and the right one vertical. you can adjust them via the screws on each side. before i did this it was angled and the gears were grinding and slipping if you didn't keep it steady. i fixed this and voila my 2nd gear grinding went completely away and all gears shift like they damn should!
i would like to add one VERY important reminder. on the inside of the gearbox the shifter links need to be exactly tightened and in position. the left needs to be purely horizontal and the right one vertical. you can adjust them via the screws on each side. before i did this it was angled and the gears were grinding and slipping if you didn't keep it steady. i fixed this and voila my 2nd gear grinding went completely away and all gears shift like they damn should!
Senior Member
Joined: Aug 2004
Posts: 2,764
Likes: 0
From: South Korea where u car from fool
Vehicle: 2008/Hyundai/Tiburon gt
<div class='quotetop'>QUOTE (DTN @ Nov 22 2008, 03:56 PM) <{POST_SNAPBACK}></div><div class='quotemain'>Good writeup. I'm glad someone did this. I kept hearing about it, but I never quite got it until you posted those pictures a few weeks ago before my clutch job. This mod feels great on the stick.</div>
muhh i will have to try it on my stick as well.
very good write up. i know what i will be doing this weekend..
muhh i will have to try it on my stick as well.
very good write up. i know what i will be doing this weekend..
Senior Member
Joined: Mar 2002
Posts: 34,642
Likes: 0
From: Los Lunas, New Mexico, USA.
Vehicle: 2001 Hyundai Tiburon, 2004 Kia Sorento, 2010 Kia Soul
A C clamp will also help with this, VERY much so. When I mocked this up a couple of months ago, the bearings fit perfectly over the pin on the shifter arm.
The dremel, yeah, almost necessary for sure, you could try emery cloth or some fine sandpaper might handle it fo ryou.
Oh, and a bit of lube to avoid corrosion.
The dremel, yeah, almost necessary for sure, you could try emery cloth or some fine sandpaper might handle it fo ryou.
Oh, and a bit of lube to avoid corrosion.
Moderator
Joined: Feb 2009
Posts: 11,732
Likes: 5
From: Leesville, Louisiana
Vehicle: 2001 Hyundai Tiburon
Just a couple of notes while I'm thinking about this because I forgot some of the details.. When I did this, if you start to press the bearing in and it won't go all the way, use a 1" socket on one side of the sleeve and a 5/8" on the other to push the bearing out of the sleeve and into the 1" socket and give you another chance to shave the edges of the sleeve and get the clearance for the bearing
the C- Clamp will tend to go side to side, so if it ends up fully compressed onto the slot and wont move, but it ends up with one edge slightly higher then the top of the sleeve, you can use a vice grip on the sleeve to push the edge down.
Also, I recommend a grease bearing, not a roller bearing. Grease bearings have less slack and tend not to move unless you put some weight on them, like when you're shifting. The only difference is that grease bearings are packed with grease instead of oil and it reduces slop and unwanted motion by microns.
Moderator
Joined: Feb 2009
Posts: 11,732
Likes: 5
From: Leesville, Louisiana
Vehicle: 2001 Hyundai Tiburon
It is a simple upgrade. I did mine with the car above my head with the when i had the transmission out. It gave me plenty of room to work which is the main obstacle you will face while doing this upgrade.