
Diy: Change Your Engine Oil (with Crankcase Flush)

Thread Starter
Super Moderator


Joined: Sep 2001
Posts: 10,795
Likes: 5
From: Pflugerville, TX
Vehicle: 2000 Elantra
<span style="color:#FF0000">Never take your car to Jiffy Lube. Ever.</span>
This DIY is to show a car-care novice how to change their engine oil, with lots of explanations and pictures along the way. My little girl helped me, that's how hard this job is. When you do it yourself, you can save on labor and get a higher-quality oil for the same price. Plus, nobody will forget to fill the engine oil after draining it and destroy your engine.
If your engine oil is not changed frequently-enough, it can cost you more than your car is worth to replace the engine. It WILL cost you more on gasoline and cause more air pollution. Most people using quality oils and filters will be fine if they change their oil every 4,000 to 5,000 miles. 3,000 is probably more frequent than required. Any more often than 3,000 miles and you are probably just wasting time, oil, and money. The very highest-quality oils in engines operating in the very best conditions might be fine with a 10,000 mile oil change interval. However far you drive, change the oil and filter at least once per year.
Pull the dipstick and check out the oil on the end of it. If it is opaque and the color of coffee, stop and call a mechanic because you have a blown head gasket. Don't bother changing the oil. If it is foamy, you are working on a Toyota (joke) laugh.gif
Hyundai has issued a Technical Service Bulletin about a ticking/clattering noise from the top of the engine. It sounds like your car is about to need a new engine. It is most often caused by using an oil filter NOT of the kind they sell at the dealership. Seriously. Buy the OEM filter, or be sure the kind you get is VERY high quality. NEVER use the cheap FRAM filter.
You should be able to get everything on this list at your nearest auto parts house. Do not shop at AutoZone if you can avoid it. AutoZone Sucks.
Time Required: 15 to 50 minutes, depending on how fast your daughter can turn a wrench
Tools:
*17mm wrench, I prefer a socket wrench
*Oil catch pan, the bigger the better, preferably at least 15" diameter
*Jack/ramps/lift
*Jack Stand
*Paper towels or rags
*Gloves (optional)
*Splash-proof goggles (optional)
*Funnel (optional)
*7 year-old girl to do the work for you (optional)
Other required items:
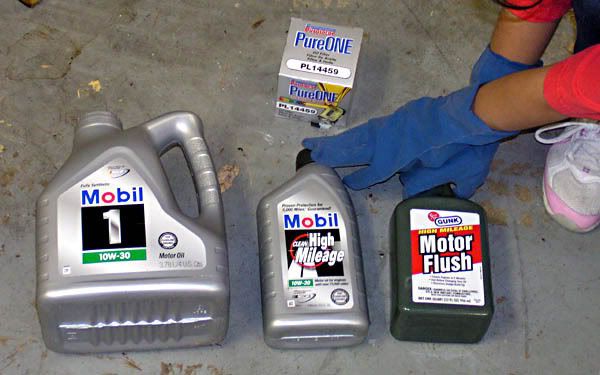
*Oil, 5 quarts. You need only use 4.5 quarts, according to the manual. I always just put in the full 5, and by the time the next oil change comes around it will be low due to normal consumption. This is technically improper, but there it is. If you severely overfill the engine oil, it is a Very Bad Thing. My personal, nonscientific opinion is that you'll be fine with an extra cup or two. I prefer Mobil 1 full-synthetic 10W30 year-round, but it never gets much below freezing where I live. If it freezes hard where you live, consult your owner's manual or ask your local Hyundai dealership if you don't know what oil is appropriate for your car. They will be happy to sell you some oil that will work just fine
*Oil filter, OEM from the dealer or HIGH QUALITY aftermarket. If I am not using an OEM filter, I am using a Purolator PL14459 like the one shown here (half-price sale w00t! ). If you use a cheap filter, especially the cheap FRAM filter, you may damage your engine. The Hyundai-brand filter the dealerships sell is actually a very high quality unit.
*Oil drain plug gasket (optional): when you remove the oil drain plug, there is a little metal washer around the bolt. This used to be round, not flat. It is a crushable metal gasket, not a washer. The dealership will sell you a new one for around a dollar. They can be re-used a few times, but should ideally be replaced ever time the drain plug comes out. I use a . . .
*purpose-made reusable gasket made of soft plastic. These are available from any decent parts store
*Engine/Crankcase/Oil System Flush (optional): This will be a petroleum-based light solvent or detergent oil of some sort. Anything from kerosene to paint thinner will work, but I prefer using off-the-shelf products. This Gunk bottle has mostly naptha and soap in it. I have also used B-12 chemtool with good results.
********
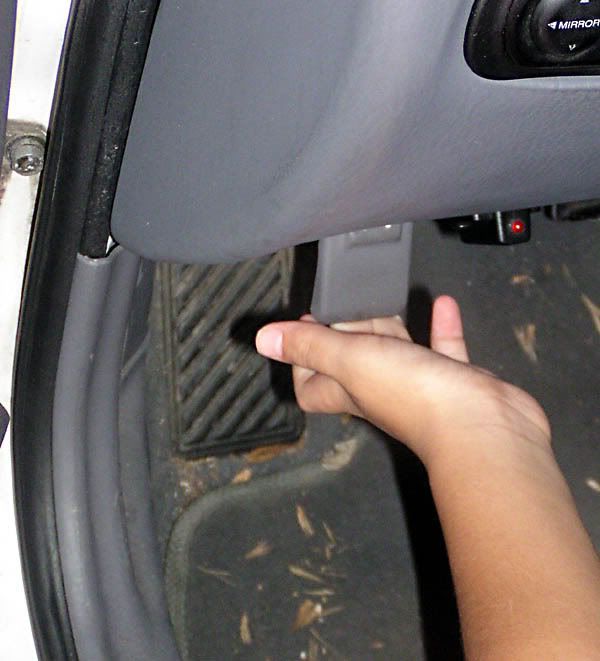
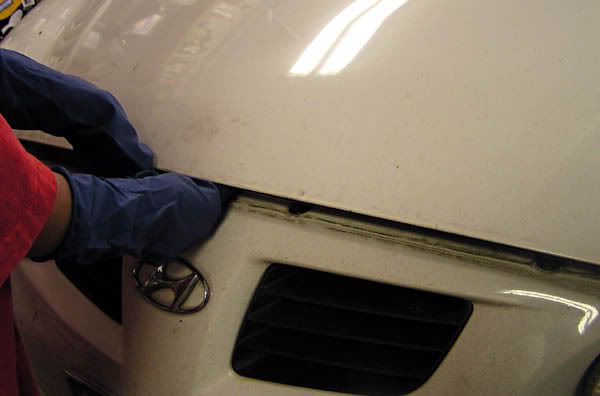
Pull the hood release lever
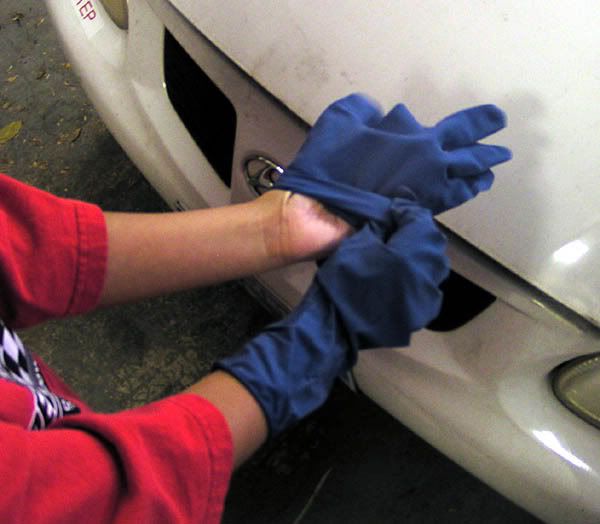
That's the last clean thing you will touch. Gloves go on now. If you are clumsy or new at this, goggles might be a good idea.
The hood latch is in the middle. Lift the hood while sliding your hand sideways under the hood, pushing the catch to the left.
Lift the hood all the way and prop it up. We used the stock support rod built into the car for this purpose.
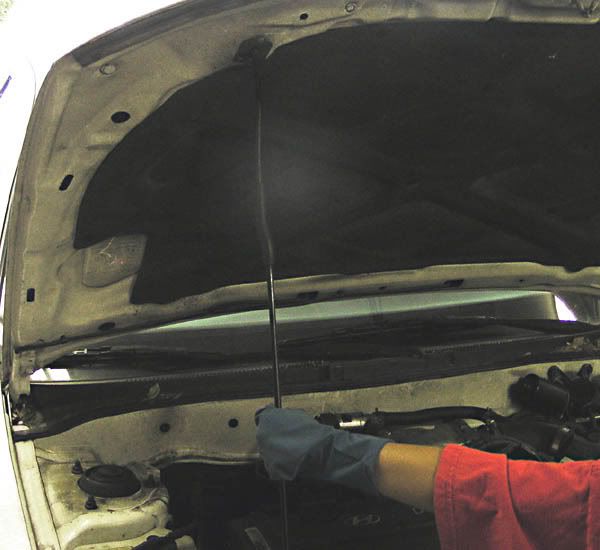
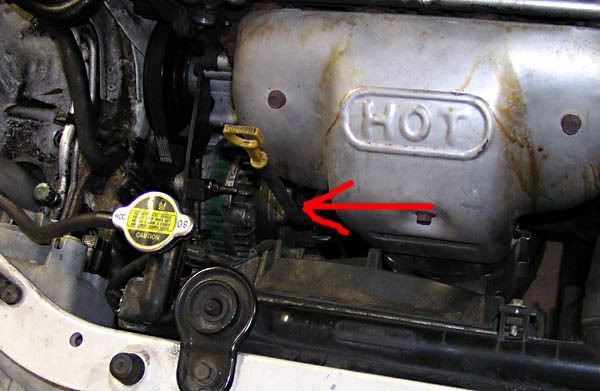
Now is the time to open the oil filler cap. This is the third-hardest thing in the whole job.
***Oil flush section***
This is controversial and entirely optional.
Every once in a while, perhaps every year or two, I like to run a flush through my engine's oil system. It prevents sludge buildup. If your car has never had this done before, I recommend it. If you have gone too long between oil changes several times, I recommend it. If you just bought the car, I recommend it. Hyundai specifically recommends AGAINST it. It is optional and not strictly necessary. Using a high quality synthetic oil with modern additives will eventually clean the gunk out of your engine anyway, but this takes a LOT of stuff out, all at once, right before you dispose of the oil and filter. It's up to you and probably your engine will outlast your ownership of the car either way. IF you run the engine too long, or if you put the engine under load with a flush chemical in it, you stand a good chance of needing a new engine within a week, if not within an hour. Follow the directions on the bottle carefully!
Be careful when you pour in the solvent flushing chemical. The filler hole is small, and you might spill a little. That's ok, but wipe up what you can immediately with a rag or paper towel. This bottle has a foil seal on the opening. I made a couple of slits in the film to let some oil out but prevent it pouring out too fast. The nice thing about a bottle like that is that, When the oil is starting to pour, you can jam the end of the bottle into the fill hole. and it will possibly hold itself up as it drains into your engine.

Reinstall the oil fill cap.
Do this next part outside so you don't kill yourself sucking down exhaust fumes.
Most oil flush directions say to add it to a cold engine which has a 'full' oil level already. If your engine burns or leaks a lot of oil, add some cheap store-brand dino juice in the same oil filler hole until it is 'full'. Then run the engine at idle, and do not drive it! for a few minutes. This Gunk brand bottle I got says run it for five minutes. This can be a nervous five minutes if you start thinking how thin your oil is. Remember that your engine is running at minimum speed and shut it off when the prescribed interval has passed.
Remove the oil fill cap.
***End oil flush section***
Set your parking brake.
Under the car, on both sides, there is a thin rib of metal that runs the length of the car. Behind the front wheels, and in front of the back wheels, there is a spot a few inches long where the jack should be placed. There are little cuts in the rib to show you where to put your jack. Put your jack under the passenger side of the car behind the front wheel, and jack up the car until the wheel is several inches off the ground. This is the hardest part of the job. If you have one, place your jack stand immediately beside the jack. If you lower the car on the jack stand, or if your jack is a slowly-leaking hydraulic type, it will dent the standing rib a little bit, but don't sweat it. It will be fine. This is a strong point on the car. If you drop the car suddenly on the jack stand, it will dent the rib a lot. Go slow, lowering the 2,800lbs of steel. If you don't have a jack stand go back to where you got your oil and get at least one. Anyone who works on cars knows someone whose life has been saved (or lost) due to jack stands (or not having them). DTN made a spiffy <span style="color:#0000FF">DIY for using jacks and jack stands</span>, as well as a few tips for using hydraulic lifts.

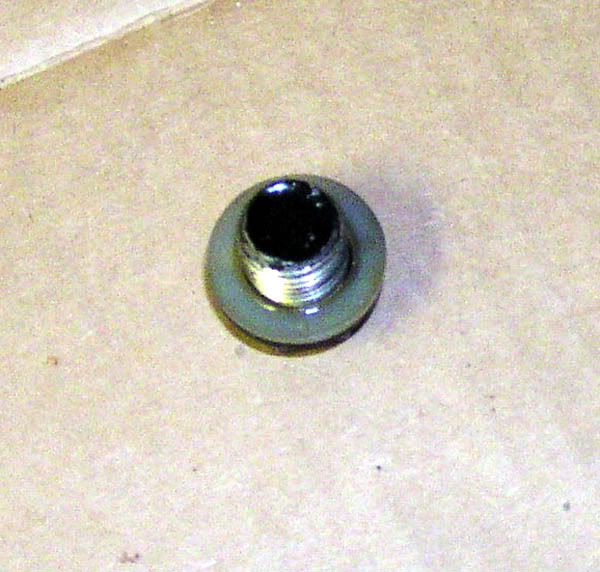
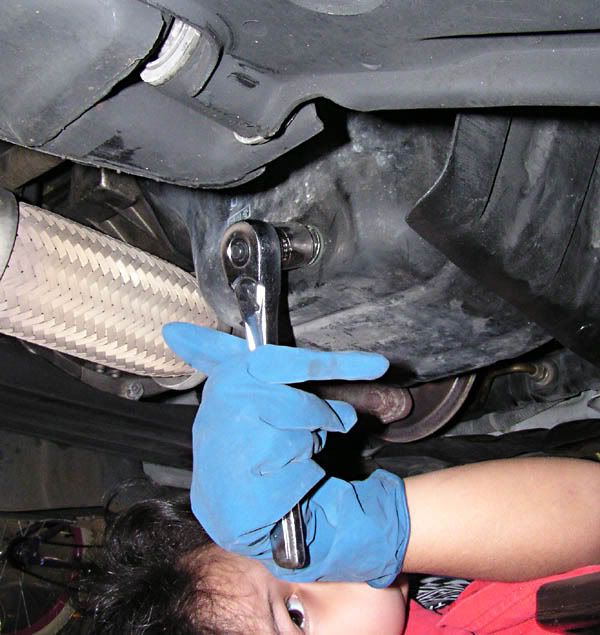
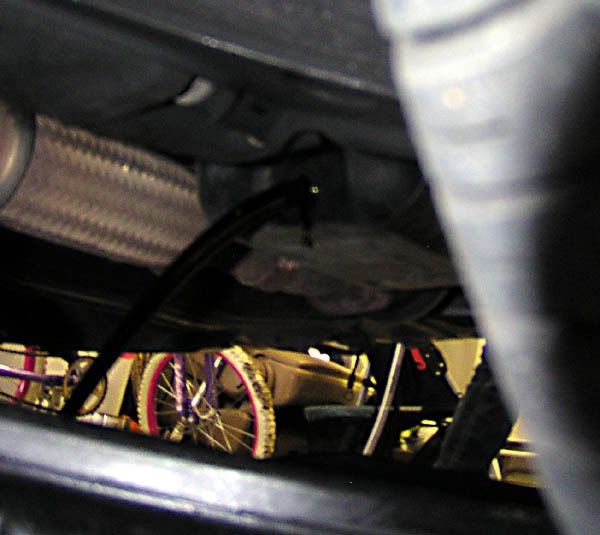
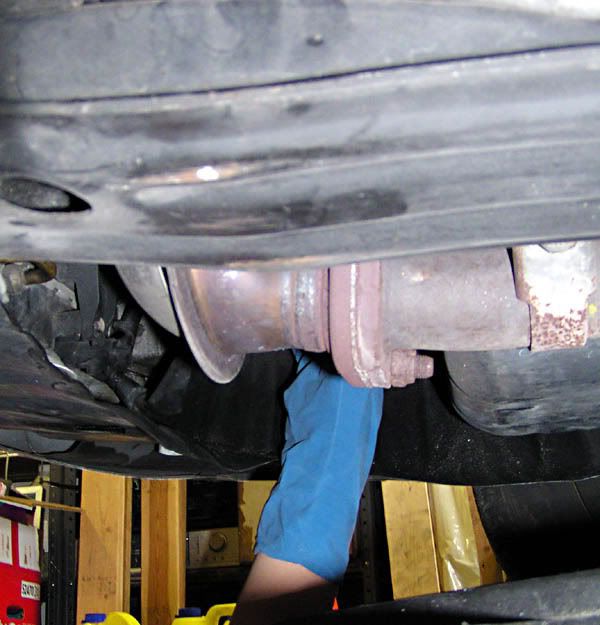
On the bottom of the engine, on the passenger side, the oil pan drops down (this is the "sump"). Mine is black stamped sheet steel. Yours may be silvery cast aluminum. There is a single bolt on the back/bottom corner of the pan. This is the sump drain plug. Loosen (only loosen, do not remove! )the bolt with your 17mm wrench. This is the second-hardest part of the job. The bolt loosens anti-clockwise.
Have your catch pan ready. You want the catch pan positioned about where the oil will fall. The fun part is, the oil comes out in a powerful stream about a FOOT aft from the drain hole. At the same time, the oil dribbles a little stream a few inches IN FRONT of the drain hole, running down the curve of the oil pan. Position your catch pan to get both streams, or stand by with the paper towels!
If your car has not been running for a while, the oil will take for.e.ver to drain. If your engine has been running for a few minutes, the oil will be WARM. If you did not run an oil flush, you should run your car's engine until it is at normal operating temperature. This thins the oil enough to drain well. Your gloves offer minimal protection. Remove the drain plug and get your hand the heck out of the way! Drop the plug into the pan if you have to, but don't be burned by the jet of hot oil. Let it drain for several minutes. Now is a good time to have a look around with a flashlight to be sure nothing looks broken or out of place under your car. Remember: if you ran a flush, you just put a nasty solvent in your crankcase. Let it drain all the way until it is just drip . . . drip . . . dripping. A few drops in left over in the pan won't hurt. A few cups might, and the little thin stream of oil will keep going for longer than you might think.
When the oil is no longer spewing out but only a small stream is coming down, slide the catch pan toward the front of the car. You want it several inches past the front of the oil filter. Note: If it is windy, you will get oil blown all over the place when the oil draining out slows to a trickle; do this when it's not windy.
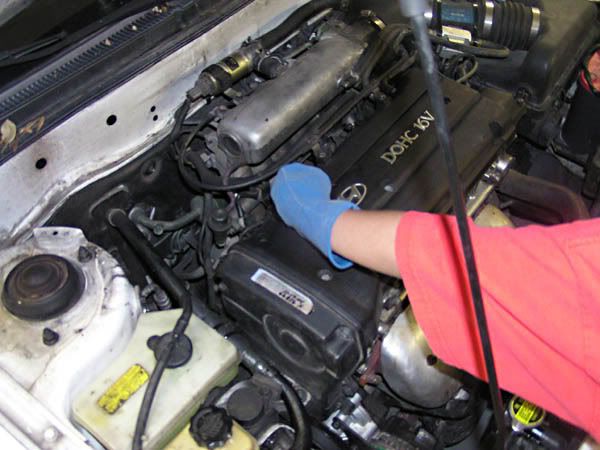
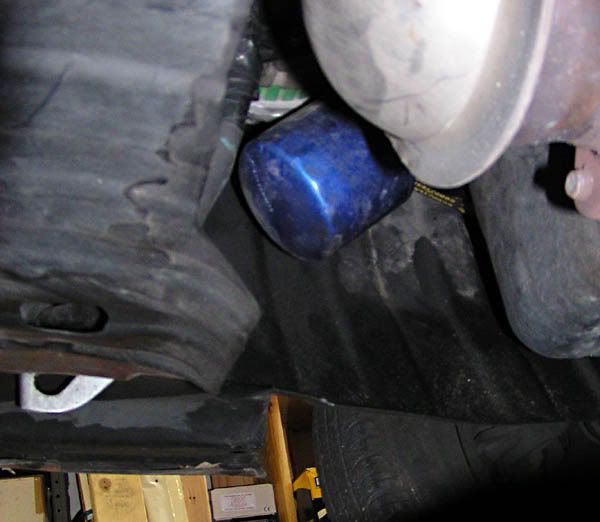
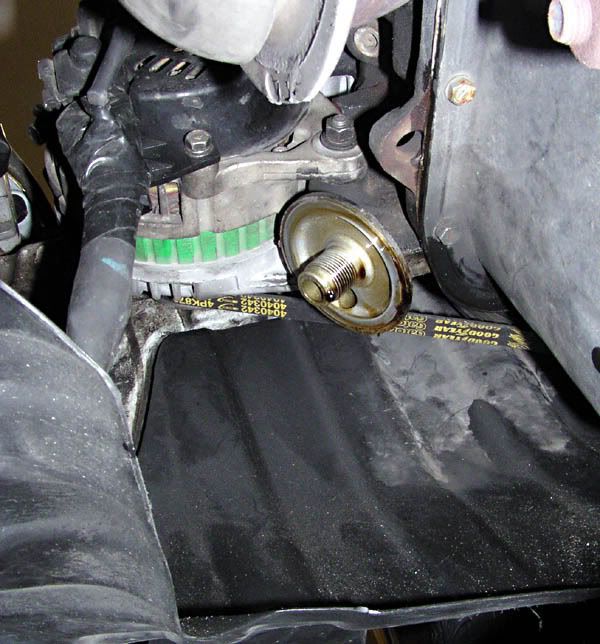
The oil filter is hidden under the alternator.
Mine is blue:
It is every bit as warm as the oil inside the engine. Reach your gloved hand straight up and grasp the filter firmly.
Rotate it anti-clockwise (lefty-loosey) quickly, JUST enough to loosen the tight seal formed by the oil filter gasket on the engine block. Let go to avoid burning your hand. Lightly grasp the end of the oil filter and loosen it a turn or two, so there is a small gap between the engine and the filter. Hot oil will come streaming out; be sure your hand is not in its way. Now is the usual time for a (very quick) repositioning of the catch can. When the oil filter stops draining, quickly unscrew unscrew the oil filter the rest of the way, and set it in your catch pan. The pan will catch any residual oil in and on the filter, keeping your floor clean.
Bust out your new filter. Open one of your bottles of fresh oil. Clean one of your gloved fingers. Dip the finger into the bottle of oil and spread one (1) drop of oil around the entire face of the soft gasket on the new filter. Pour a little oil into the filter, until it is about half full. The oil on the gasket is critical. The oil in the filter is not. You can skip this step, even; do not sweat the amount of oil you put in the filter.
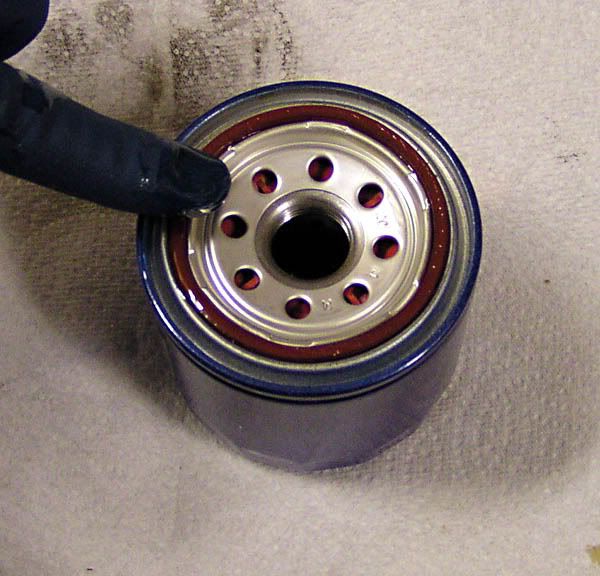
Look at the place where the old filter came off the engine. It should have no trace of the old filter's gasket material. If it does, remove the old gasket material gently with a plastic scraper or very carefully with a metal one. You do not need to clean this area (called the oil filter mounting boss) of any residual oil. It is swimming in oil during normal operation.
Gently thread the new filter on to the mounting boss. If you force it on there crooked, your car will be going NOWHERE until somebody repairs this part. Sometimes it is tricky because of the angles involved, but just keep twirling gently and you'll get it. The oil filter gasket will touch the engine block eventually. Stop. Get a good firm grip on the filter and turn it 1/2 to 3/4 of ONE turn. It is now properly tightened. It will FEEL tight also.
By this time, the oil will probably be done draining from the oil pan drain hole. Install a new drain plug gasket if you are going to, now. Thread the bolt in to the hole gently, until the bolt's head hits the oil pan (finger-tight). This is where the new or soft/reusable drain plug gasket comes into play. An old crush washer will require excessive force to make an effective seal. Eventually, to get the bolt to seal to the pan, you will apply so much force on the old seal-turned-into-a-washer that you will strip the threads right out of the oil pan. These pans cost $50-$120 plus shipping and you'll have to buy a whole new gallon of oil. Finger tight plus about 1/4 turn is where you start thinking the drain bolt is tight enough. "Snug, good and" or "purty well tight" is the arm-specification. Do not hang your weight on the wrench. Most people will be quite strong enough in their one arm to tighten this bolt to the 25 to 33lbs/ft specification.
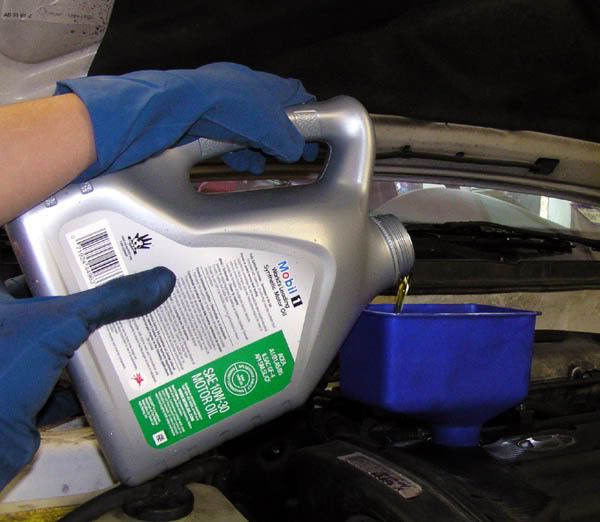
If you don't already have a funnel in the oil fill hole, and want to use one, now is the time to insert it. This fabulous blue number has little teeth on the tip of the funnel that hold it firmly in position in the oil filler hole. Pour whatever is left of your 4.5 (or five) quarts of oil into the oil filler hole. If you pour too fast, it will spill out onto the side of the engine. You have to let the oil settle out into the space around the hole; pour moderately slowly.
Reinstall the oil filler cap. Remove the drain pan and all tools from under the car. Remove the jack stand. Lower the jack. Run the car for a couple of minutes and make sure it is not leaking. If you spilled something on the top of the engine, it may be dripping off the bottom. Confirm that this is the source of your drips with a flashlight. This is easier to write than to do, and it's another reason besides neatness to be careful when you are pouring the fluids in the top of the engine.
If nothing is leaking, shut her down and you're basically done. Clean up. Any major auto chain or service station should be willing to take your old oil. The Advance Auto Parts where I live will take it without charging me anything. They have a recycler turn the old oil into new fuel. Under no circumstances should you pour the old oil on the ground or in a storm drain. In the USA it is a crime almost everywhere, and anywhere it is very harmful to the environment. Throw away your dirty paper towels and the old oil filter. The place that took your oil may have a recycling bin for the oil bottles, or they may just have you pitch them; at least take them with you and ask. I put the old oil from my catch pan into the now-empty bottles and kill both those birds with one stone.
Lower the hood. You're finished. If you used synthetic oil, you just saved $40. Congratulations.
NOW is the time for frosty beverages, if you really needed to read this whole thing. If you just read this for kicks, you were drinking a couple while you were doing this work. So long as you remember to reinstall the drain plug, and put on a new filter, and put *some* oil in, you can be half-lit and do this but I don't recommend it.
This DIY is to show a car-care novice how to change their engine oil, with lots of explanations and pictures along the way. My little girl helped me, that's how hard this job is. When you do it yourself, you can save on labor and get a higher-quality oil for the same price. Plus, nobody will forget to fill the engine oil after draining it and destroy your engine.
If your engine oil is not changed frequently-enough, it can cost you more than your car is worth to replace the engine. It WILL cost you more on gasoline and cause more air pollution. Most people using quality oils and filters will be fine if they change their oil every 4,000 to 5,000 miles. 3,000 is probably more frequent than required. Any more often than 3,000 miles and you are probably just wasting time, oil, and money. The very highest-quality oils in engines operating in the very best conditions might be fine with a 10,000 mile oil change interval. However far you drive, change the oil and filter at least once per year.
Pull the dipstick and check out the oil on the end of it. If it is opaque and the color of coffee, stop and call a mechanic because you have a blown head gasket. Don't bother changing the oil. If it is foamy, you are working on a Toyota (joke) laugh.gif
Hyundai has issued a Technical Service Bulletin about a ticking/clattering noise from the top of the engine. It sounds like your car is about to need a new engine. It is most often caused by using an oil filter NOT of the kind they sell at the dealership. Seriously. Buy the OEM filter, or be sure the kind you get is VERY high quality. NEVER use the cheap FRAM filter.
You should be able to get everything on this list at your nearest auto parts house. Do not shop at AutoZone if you can avoid it. AutoZone Sucks.
Time Required: 15 to 50 minutes, depending on how fast your daughter can turn a wrench
Tools:
*17mm wrench, I prefer a socket wrench
*Oil catch pan, the bigger the better, preferably at least 15" diameter
*Jack/ramps/lift
*Jack Stand
*Paper towels or rags
*Gloves (optional)
*Splash-proof goggles (optional)
*Funnel (optional)
*7 year-old girl to do the work for you (optional)
Other required items:
*Oil, 5 quarts. You need only use 4.5 quarts, according to the manual. I always just put in the full 5, and by the time the next oil change comes around it will be low due to normal consumption. This is technically improper, but there it is. If you severely overfill the engine oil, it is a Very Bad Thing. My personal, nonscientific opinion is that you'll be fine with an extra cup or two. I prefer Mobil 1 full-synthetic 10W30 year-round, but it never gets much below freezing where I live. If it freezes hard where you live, consult your owner's manual or ask your local Hyundai dealership if you don't know what oil is appropriate for your car. They will be happy to sell you some oil that will work just fine
*Oil filter, OEM from the dealer or HIGH QUALITY aftermarket. If I am not using an OEM filter, I am using a Purolator PL14459 like the one shown here (half-price sale w00t! ). If you use a cheap filter, especially the cheap FRAM filter, you may damage your engine. The Hyundai-brand filter the dealerships sell is actually a very high quality unit.
*Oil drain plug gasket (optional): when you remove the oil drain plug, there is a little metal washer around the bolt. This used to be round, not flat. It is a crushable metal gasket, not a washer. The dealership will sell you a new one for around a dollar. They can be re-used a few times, but should ideally be replaced ever time the drain plug comes out. I use a . . .
*purpose-made reusable gasket made of soft plastic. These are available from any decent parts store
*Engine/Crankcase/Oil System Flush (optional): This will be a petroleum-based light solvent or detergent oil of some sort. Anything from kerosene to paint thinner will work, but I prefer using off-the-shelf products. This Gunk bottle has mostly naptha and soap in it. I have also used B-12 chemtool with good results.
********
Pull the hood release lever
That's the last clean thing you will touch. Gloves go on now. If you are clumsy or new at this, goggles might be a good idea.
The hood latch is in the middle. Lift the hood while sliding your hand sideways under the hood, pushing the catch to the left.
Lift the hood all the way and prop it up. We used the stock support rod built into the car for this purpose.
Now is the time to open the oil filler cap. This is the third-hardest thing in the whole job.
***Oil flush section***
This is controversial and entirely optional.
Every once in a while, perhaps every year or two, I like to run a flush through my engine's oil system. It prevents sludge buildup. If your car has never had this done before, I recommend it. If you have gone too long between oil changes several times, I recommend it. If you just bought the car, I recommend it. Hyundai specifically recommends AGAINST it. It is optional and not strictly necessary. Using a high quality synthetic oil with modern additives will eventually clean the gunk out of your engine anyway, but this takes a LOT of stuff out, all at once, right before you dispose of the oil and filter. It's up to you and probably your engine will outlast your ownership of the car either way. IF you run the engine too long, or if you put the engine under load with a flush chemical in it, you stand a good chance of needing a new engine within a week, if not within an hour. Follow the directions on the bottle carefully!
Be careful when you pour in the solvent flushing chemical. The filler hole is small, and you might spill a little. That's ok, but wipe up what you can immediately with a rag or paper towel. This bottle has a foil seal on the opening. I made a couple of slits in the film to let some oil out but prevent it pouring out too fast. The nice thing about a bottle like that is that, When the oil is starting to pour, you can jam the end of the bottle into the fill hole. and it will possibly hold itself up as it drains into your engine.
Reinstall the oil fill cap.
Do this next part outside so you don't kill yourself sucking down exhaust fumes.
Most oil flush directions say to add it to a cold engine which has a 'full' oil level already. If your engine burns or leaks a lot of oil, add some cheap store-brand dino juice in the same oil filler hole until it is 'full'. Then run the engine at idle, and do not drive it! for a few minutes. This Gunk brand bottle I got says run it for five minutes. This can be a nervous five minutes if you start thinking how thin your oil is. Remember that your engine is running at minimum speed and shut it off when the prescribed interval has passed.
Remove the oil fill cap.
***End oil flush section***
Set your parking brake.
Under the car, on both sides, there is a thin rib of metal that runs the length of the car. Behind the front wheels, and in front of the back wheels, there is a spot a few inches long where the jack should be placed. There are little cuts in the rib to show you where to put your jack. Put your jack under the passenger side of the car behind the front wheel, and jack up the car until the wheel is several inches off the ground. This is the hardest part of the job. If you have one, place your jack stand immediately beside the jack. If you lower the car on the jack stand, or if your jack is a slowly-leaking hydraulic type, it will dent the standing rib a little bit, but don't sweat it. It will be fine. This is a strong point on the car. If you drop the car suddenly on the jack stand, it will dent the rib a lot. Go slow, lowering the 2,800lbs of steel. If you don't have a jack stand go back to where you got your oil and get at least one. Anyone who works on cars knows someone whose life has been saved (or lost) due to jack stands (or not having them). DTN made a spiffy <span style="color:#0000FF">DIY for using jacks and jack stands</span>, as well as a few tips for using hydraulic lifts.
On the bottom of the engine, on the passenger side, the oil pan drops down (this is the "sump"). Mine is black stamped sheet steel. Yours may be silvery cast aluminum. There is a single bolt on the back/bottom corner of the pan. This is the sump drain plug. Loosen (only loosen, do not remove! )the bolt with your 17mm wrench. This is the second-hardest part of the job. The bolt loosens anti-clockwise.
Have your catch pan ready. You want the catch pan positioned about where the oil will fall. The fun part is, the oil comes out in a powerful stream about a FOOT aft from the drain hole. At the same time, the oil dribbles a little stream a few inches IN FRONT of the drain hole, running down the curve of the oil pan. Position your catch pan to get both streams, or stand by with the paper towels!
If your car has not been running for a while, the oil will take for.e.ver to drain. If your engine has been running for a few minutes, the oil will be WARM. If you did not run an oil flush, you should run your car's engine until it is at normal operating temperature. This thins the oil enough to drain well. Your gloves offer minimal protection. Remove the drain plug and get your hand the heck out of the way! Drop the plug into the pan if you have to, but don't be burned by the jet of hot oil. Let it drain for several minutes. Now is a good time to have a look around with a flashlight to be sure nothing looks broken or out of place under your car. Remember: if you ran a flush, you just put a nasty solvent in your crankcase. Let it drain all the way until it is just drip . . . drip . . . dripping. A few drops in left over in the pan won't hurt. A few cups might, and the little thin stream of oil will keep going for longer than you might think.
When the oil is no longer spewing out but only a small stream is coming down, slide the catch pan toward the front of the car. You want it several inches past the front of the oil filter. Note: If it is windy, you will get oil blown all over the place when the oil draining out slows to a trickle; do this when it's not windy.
The oil filter is hidden under the alternator.
Mine is blue:
It is every bit as warm as the oil inside the engine. Reach your gloved hand straight up and grasp the filter firmly.
Rotate it anti-clockwise (lefty-loosey) quickly, JUST enough to loosen the tight seal formed by the oil filter gasket on the engine block. Let go to avoid burning your hand. Lightly grasp the end of the oil filter and loosen it a turn or two, so there is a small gap between the engine and the filter. Hot oil will come streaming out; be sure your hand is not in its way. Now is the usual time for a (very quick) repositioning of the catch can. When the oil filter stops draining, quickly unscrew unscrew the oil filter the rest of the way, and set it in your catch pan. The pan will catch any residual oil in and on the filter, keeping your floor clean.
Bust out your new filter. Open one of your bottles of fresh oil. Clean one of your gloved fingers. Dip the finger into the bottle of oil and spread one (1) drop of oil around the entire face of the soft gasket on the new filter. Pour a little oil into the filter, until it is about half full. The oil on the gasket is critical. The oil in the filter is not. You can skip this step, even; do not sweat the amount of oil you put in the filter.
Look at the place where the old filter came off the engine. It should have no trace of the old filter's gasket material. If it does, remove the old gasket material gently with a plastic scraper or very carefully with a metal one. You do not need to clean this area (called the oil filter mounting boss) of any residual oil. It is swimming in oil during normal operation.
Gently thread the new filter on to the mounting boss. If you force it on there crooked, your car will be going NOWHERE until somebody repairs this part. Sometimes it is tricky because of the angles involved, but just keep twirling gently and you'll get it. The oil filter gasket will touch the engine block eventually. Stop. Get a good firm grip on the filter and turn it 1/2 to 3/4 of ONE turn. It is now properly tightened. It will FEEL tight also.
By this time, the oil will probably be done draining from the oil pan drain hole. Install a new drain plug gasket if you are going to, now. Thread the bolt in to the hole gently, until the bolt's head hits the oil pan (finger-tight). This is where the new or soft/reusable drain plug gasket comes into play. An old crush washer will require excessive force to make an effective seal. Eventually, to get the bolt to seal to the pan, you will apply so much force on the old seal-turned-into-a-washer that you will strip the threads right out of the oil pan. These pans cost $50-$120 plus shipping and you'll have to buy a whole new gallon of oil. Finger tight plus about 1/4 turn is where you start thinking the drain bolt is tight enough. "Snug, good and" or "purty well tight" is the arm-specification. Do not hang your weight on the wrench. Most people will be quite strong enough in their one arm to tighten this bolt to the 25 to 33lbs/ft specification.
If you don't already have a funnel in the oil fill hole, and want to use one, now is the time to insert it. This fabulous blue number has little teeth on the tip of the funnel that hold it firmly in position in the oil filler hole. Pour whatever is left of your 4.5 (or five) quarts of oil into the oil filler hole. If you pour too fast, it will spill out onto the side of the engine. You have to let the oil settle out into the space around the hole; pour moderately slowly.
Reinstall the oil filler cap. Remove the drain pan and all tools from under the car. Remove the jack stand. Lower the jack. Run the car for a couple of minutes and make sure it is not leaking. If you spilled something on the top of the engine, it may be dripping off the bottom. Confirm that this is the source of your drips with a flashlight. This is easier to write than to do, and it's another reason besides neatness to be careful when you are pouring the fluids in the top of the engine.
If nothing is leaking, shut her down and you're basically done. Clean up. Any major auto chain or service station should be willing to take your old oil. The Advance Auto Parts where I live will take it without charging me anything. They have a recycler turn the old oil into new fuel. Under no circumstances should you pour the old oil on the ground or in a storm drain. In the USA it is a crime almost everywhere, and anywhere it is very harmful to the environment. Throw away your dirty paper towels and the old oil filter. The place that took your oil may have a recycling bin for the oil bottles, or they may just have you pitch them; at least take them with you and ask. I put the old oil from my catch pan into the now-empty bottles and kill both those birds with one stone.
Lower the hood. You're finished. If you used synthetic oil, you just saved $40. Congratulations.
NOW is the time for frosty beverages, if you really needed to read this whole thing. If you just read this for kicks, you were drinking a couple while you were doing this work. So long as you remember to reinstall the drain plug, and put on a new filter, and put *some* oil in, you can be half-lit and do this but I don't recommend it.
Senior Member
Joined: Mar 2002
Posts: 34,642
Likes: 0
From: Los Lunas, New Mexico, USA.
Vehicle: 2001 Hyundai Tiburon, 2004 Kia Sorento, 2010 Kia Soul
Couple of suggestions/additions.
1. If you do not have jack stands, DO NOT JACK YOUR CAR up.
2. If you do not have wheel chocks, DO NOT JACK YOUR CAR UP.
If you've never seen a car fall off of a jack on someone, you are lucky.
Majiktib, remember Viper at Nopi Nationals?
Either buy some damned jack stands, or get a set of vehicle ramps to drive up on to do your oil.
NEVER GET UNDER ANY VEHICLE HELD UP ONLY BY A JACK!!!!!

Senior Member
Joined: Mar 2002
Posts: 34,642
Likes: 0
From: Los Lunas, New Mexico, USA.
Vehicle: 2001 Hyundai Tiburon, 2004 Kia Sorento, 2010 Kia Soul
A quick story.
When i was in the army, we had an incident that happened. A Hummvee of mine was being worked on, and the front end was up on jack stands, along with 2 wheel chocks being used. The vehicle bay had another hummer in it in front of this one. Someone got in the one on stands and started it..
The vehicle had a bad neutral safety switch, and was in gear, so when he started it, the rear wheels pushed the vehicle forward and smashed it down off the stands. One guy got pinned underneath, not crushed though, but another guy in front of the vehicle got squished between the two vehicles.
Shit happens, do as much as you can to make sure it doesn't happen to you.

Moderator

Joined: Feb 2009
Posts: 11,732
Likes: 5
From: Leesville, Louisiana
Vehicle: 2001 Hyundai Tiburon
I'm going to agree. Always use jackstands.
http://www.rdtiburon.com/index.php?act=ST&...mp;#entry198254
http://www.rdtiburon.com/index.php?act=ST&...mp;#entry198254

Senior Member
Joined: Mar 2009
Posts: 1,014
Likes: 0
From: Pa
Vehicle: 2000 Hyundai Tiburon
RED ZMAN and DTN are agreeing on something? whats this world coming to????? lol, but seriously, I watched a truck almost kill my buddy cause he was jacking it up with a bottlejack and the jack kicked out
Senior Member
Joined: Mar 2002
Posts: 34,642
Likes: 0
From: Los Lunas, New Mexico, USA.
Vehicle: 2001 Hyundai Tiburon, 2004 Kia Sorento, 2010 Kia Soul
<div class='quotetop'>QUOTE </div><div class='quotemain'>If you have one, place your jack stand immediately beside the jack.</div>
This is the whole reason I posted. No ifs ands or buts.
This is the whole reason I posted. No ifs ands or buts.
Moderator
Joined: Feb 2009
Posts: 11,732
Likes: 5
From: Leesville, Louisiana
Vehicle: 2001 Hyundai Tiburon
You need a jackstand to do the job. It's required. Also, you should spend the $30 at autozone to get a floor jack, use the front jacking point, and put the jackstand where your emergency jack is located.
Don't use your emergency jack with jackstands. You can only bend the frame so much before it's done. Use emergency jack for emergencies. Use a "shop jack" for maintenance.
Don't use your emergency jack with jackstands. You can only bend the frame so much before it's done. Use emergency jack for emergencies. Use a "shop jack" for maintenance.