
Diy: Auto Dimming Mirror Install


Thread Starter
Senior Member
Joined: Mar 2006
Posts: 9,172
Likes: 0
Vehicle: 2001/Hyundai/Tiburon
This mirror was made by Exon Science, and can be had on Ebay for around 100 dollars. This DIY should help a bunch for other types of mirrors too.
http://stores.ebay.com/Advance-Mcs-Electro...1QQftidZ2QQtZkm
Materials:
-Mirror Kit
-Wire Strippers/Crimpers
-JB KWIK Weld
-Needle-Nosed Pliers
-Razor Blade
-Alcohol wipe
-Drill
-Dremel Tool
-Basic tools for removing body panels (Socket Set, Screwdrivers)
This DIY will not go over how to take the body panels off. That would require far too many pictures and I didn't take them. wink1.gif
One thing to remember, don't connect wires/insert pins into harnesses until you are done and know you can.
1. Take off driver side fender, front bumper, lower crash pad peice(plastic panel that contains dimmer switch), headliner, and driver side pillar. Basically, you need to clear a way for a wire harness to run from the engine bay to the mirror. I know this is probably the most complicating part for most, but webtech is there to help if you get stuck. Use the universal login in the DIY stickied section if you don't have your own.
2. You want to start by removing the stock mount. Push the stock mirror down at the mount to remove it from the mount. Turn on the heat gun and heat up the area where the mount is from the other side of the windshield while pulling on the mount with a pair of pliers. I got some slight bubbling from the black area of the windshield that stayed there, it's really not noticeable though. Heating the mount directly may cut down on it.
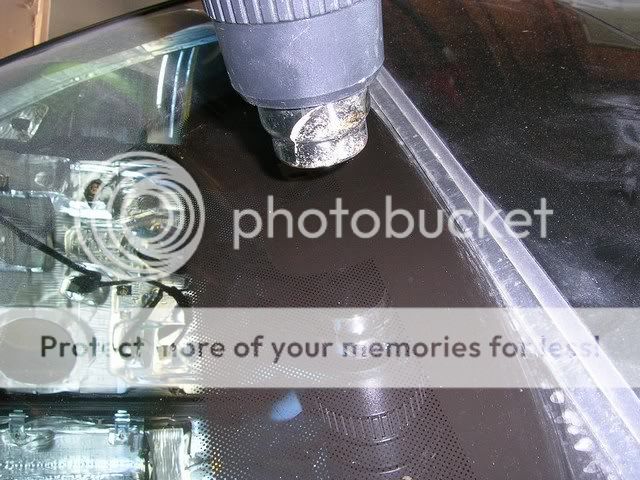
3. Once the mount is off you want to remove any glue that is still left on the glass. Grab the razorblade and clear it away. Grab the wedge mount tab that is in the kit and put some tape on it. Stick it where you want it on the glass, and then test to make sure you can get the mirror on with enough clearance from the roof.
4. When you have a good spot, mark it off with some tape. Clean the area where the tab is going thoroughly with the alcohol wipe. Make sure it dries good, and then it's time for the mounting.
5. This part was easily the biggest pain in the ass. I used atleast 5 different "Extreme Hold Permanent" windshield tab mounting glues. None of them were close to holding. Some super cheap crappy superglue worked better than any of them, but still wasn't good enough. I finally decided to try some JB Weld KWIK i had lying around, and its holding great so far. It comes in two tubes that you mix and then apply. Follow the directions, and then apply a little bit to the tab. Press and hold for a while(couple minutes) to make sure its on there good. Let it dry for a good day before touching it.
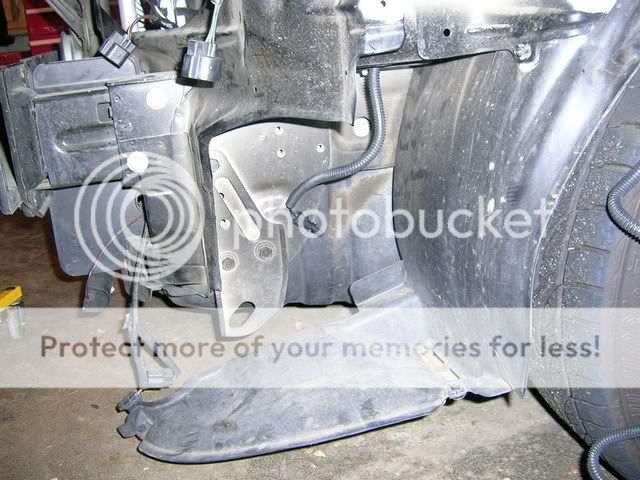
6. On to running the wires. I had relatively easy access to every part of the car, because I was only working with about 3/4 of it...lol. Begin by taking the driver side fender off. You will see a huge loom of wires and a rubber grommet. You will want to make a slit in that grommet to run the wires through.

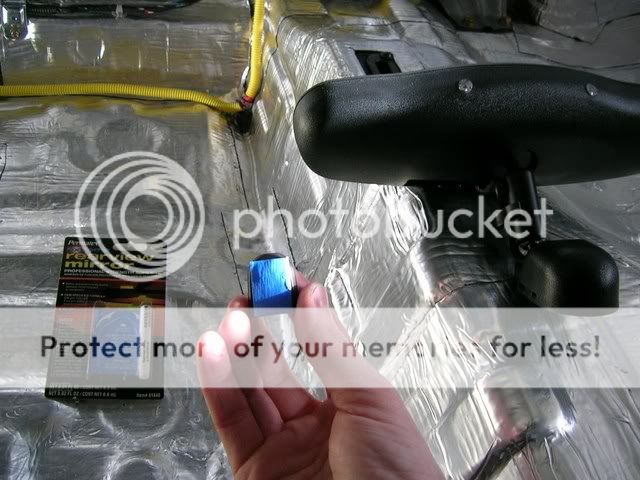
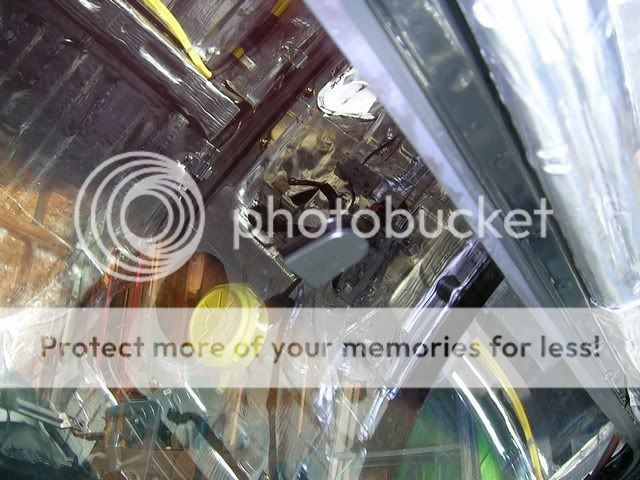
7. Now you want to mount the temperature sensor. I found one spot, and then figured out that it's probably not available to AEM intake users. So I took pictures of both. I ended up using the first spot. Run the wires to the cabin

 \
\
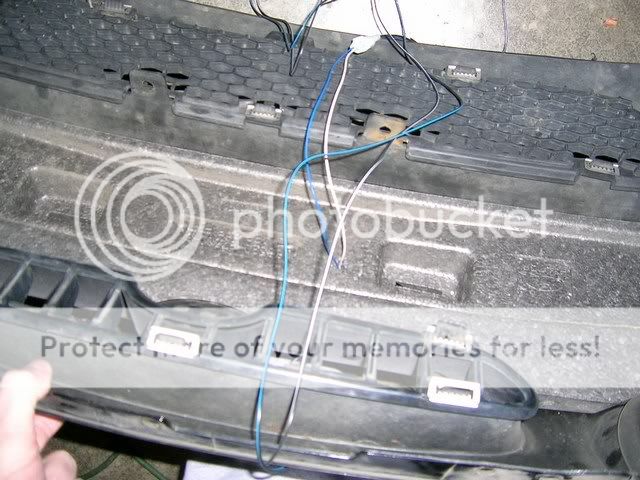
8. These next couple steps apply to the UV sensor wiring, which is just a cool extra feature, and really doesnt take that much extra time if you have everything off already. You will be replacing the liscense plate bolts with the nice shiny one with the sensor in it and its matching regular bolt. Take off the bumper and drill a hole through the foam that is behind one of the holes.
9. You then want to grind down the tabs behind the plate because the bolts you have come with nuts and washers. Wip out the dremel and chop em' off.
10. Run the wires through the foam, up the fender, through the grommet and into the cabin.
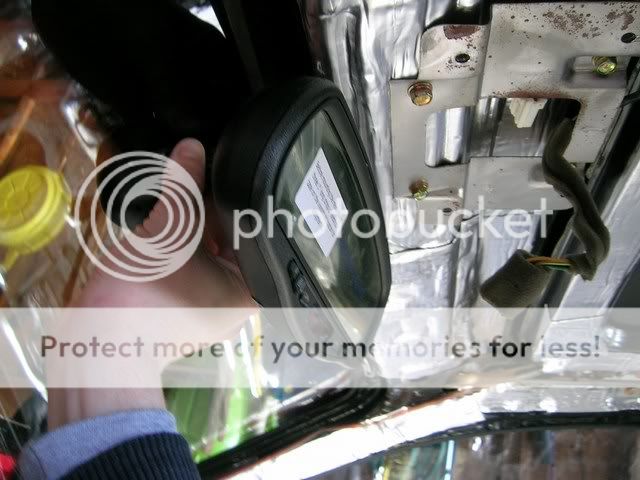
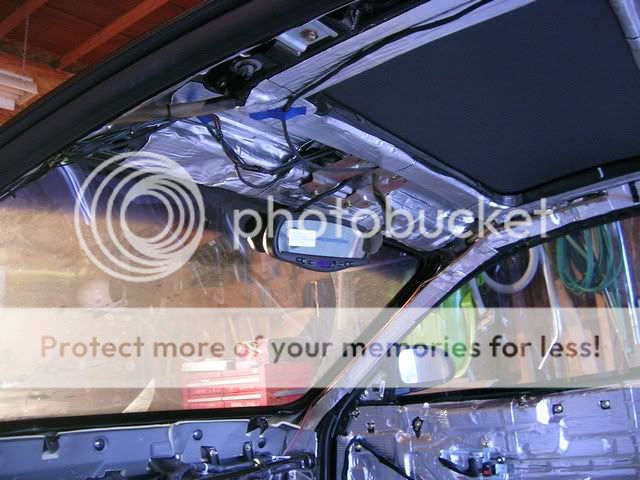
11. Run the harness up the pillar and to the spot where the mirror will be. Make all connnections to the mirror and insert the pins into the harnesses. Instructions for this are in the mirror manual.
12. OK, now be careful or you will be soon frustrated. slide the mirror on the tab and CAREFULLY tighten the allen screw while pushing the mirror against the glass to secure it in place. If you go crazy tightening it, it will pop the tab off.
13. Run the power and ground wires back down the pillar, and connect them per the instructions in the install manual. You want ignition switched wires for the two mirror power wires(according to the ebay sellers, I still think differently; there is no reason to have two wires run to the same place. I think the b/r wire is for constant power, and the b/y wire is for ignition power, but I suppose we will follow the seller's advise). You should use a relay, and connect them directly to the battery. If not you risk burning up the stock wiring. Go to www.the12volt.com and read up on relays. Here's a quick rundown of how to hook it up using a relay(NOT observing polarity across the coil):
86 to ignition activated power wire
85 to ground
30 to battery
87a to mirror power wires
14. Test it to make sure it is getting power and works correctly. Go through the manual and set things up.
Some pictures from inside and outside:
That's it. It's really late and I'm tired, so there are probably some mistakes. I know it's a bunch of work just for a mirror, but it's a luxury feature that will prove to be worth it in the end. Enjoy.
http://stores.ebay.com/Advance-Mcs-Electro...1QQftidZ2QQtZkm
Materials:
-Mirror Kit
-Wire Strippers/Crimpers
-JB KWIK Weld
-Needle-Nosed Pliers
-Razor Blade
-Alcohol wipe
-Drill
-Dremel Tool
-Basic tools for removing body panels (Socket Set, Screwdrivers)
This DIY will not go over how to take the body panels off. That would require far too many pictures and I didn't take them. wink1.gif
One thing to remember, don't connect wires/insert pins into harnesses until you are done and know you can.
1. Take off driver side fender, front bumper, lower crash pad peice(plastic panel that contains dimmer switch), headliner, and driver side pillar. Basically, you need to clear a way for a wire harness to run from the engine bay to the mirror. I know this is probably the most complicating part for most, but webtech is there to help if you get stuck. Use the universal login in the DIY stickied section if you don't have your own.
2. You want to start by removing the stock mount. Push the stock mirror down at the mount to remove it from the mount. Turn on the heat gun and heat up the area where the mount is from the other side of the windshield while pulling on the mount with a pair of pliers. I got some slight bubbling from the black area of the windshield that stayed there, it's really not noticeable though. Heating the mount directly may cut down on it.
3. Once the mount is off you want to remove any glue that is still left on the glass. Grab the razorblade and clear it away. Grab the wedge mount tab that is in the kit and put some tape on it. Stick it where you want it on the glass, and then test to make sure you can get the mirror on with enough clearance from the roof.
4. When you have a good spot, mark it off with some tape. Clean the area where the tab is going thoroughly with the alcohol wipe. Make sure it dries good, and then it's time for the mounting.
5. This part was easily the biggest pain in the ass. I used atleast 5 different "Extreme Hold Permanent" windshield tab mounting glues. None of them were close to holding. Some super cheap crappy superglue worked better than any of them, but still wasn't good enough. I finally decided to try some JB Weld KWIK i had lying around, and its holding great so far. It comes in two tubes that you mix and then apply. Follow the directions, and then apply a little bit to the tab. Press and hold for a while(couple minutes) to make sure its on there good. Let it dry for a good day before touching it.
6. On to running the wires. I had relatively easy access to every part of the car, because I was only working with about 3/4 of it...lol. Begin by taking the driver side fender off. You will see a huge loom of wires and a rubber grommet. You will want to make a slit in that grommet to run the wires through.
7. Now you want to mount the temperature sensor. I found one spot, and then figured out that it's probably not available to AEM intake users. So I took pictures of both. I ended up using the first spot. Run the wires to the cabin
\8. These next couple steps apply to the UV sensor wiring, which is just a cool extra feature, and really doesnt take that much extra time if you have everything off already. You will be replacing the liscense plate bolts with the nice shiny one with the sensor in it and its matching regular bolt. Take off the bumper and drill a hole through the foam that is behind one of the holes.
9. You then want to grind down the tabs behind the plate because the bolts you have come with nuts and washers. Wip out the dremel and chop em' off.
10. Run the wires through the foam, up the fender, through the grommet and into the cabin.
11. Run the harness up the pillar and to the spot where the mirror will be. Make all connnections to the mirror and insert the pins into the harnesses. Instructions for this are in the mirror manual.
12. OK, now be careful or you will be soon frustrated. slide the mirror on the tab and CAREFULLY tighten the allen screw while pushing the mirror against the glass to secure it in place. If you go crazy tightening it, it will pop the tab off.
13. Run the power and ground wires back down the pillar, and connect them per the instructions in the install manual. You want ignition switched wires for the two mirror power wires(according to the ebay sellers, I still think differently; there is no reason to have two wires run to the same place. I think the b/r wire is for constant power, and the b/y wire is for ignition power, but I suppose we will follow the seller's advise). You should use a relay, and connect them directly to the battery. If not you risk burning up the stock wiring. Go to www.the12volt.com and read up on relays. Here's a quick rundown of how to hook it up using a relay(NOT observing polarity across the coil):
86 to ignition activated power wire
85 to ground
30 to battery
87a to mirror power wires
14. Test it to make sure it is getting power and works correctly. Go through the manual and set things up.
Some pictures from inside and outside:
That's it. It's really late and I'm tired, so there are probably some mistakes. I know it's a bunch of work just for a mirror, but it's a luxury feature that will prove to be worth it in the end. Enjoy.
Thread Starter
Senior Member
Joined: Mar 2006
Posts: 9,172
Likes: 0
Vehicle: 2001/Hyundai/Tiburon
This mirror was made by Exon Science, and can be had on Ebay for around 100 dollars. This DIY should help a bunch for other types of mirrors too.
http://stores.ebay.com/Advance-Mcs-Electro...1QQftidZ2QQtZkm
Materials:
-Mirror Kit
-Wire Strippers/Crimpers
-JB KWIK Weld
-Needle-Nosed Pliers
-Razor Blade
-Alcohol wipe
-Drill
-Dremel Tool
-Basic tools for removing body panels (Socket Set, Screwdrivers)
This DIY will not go over how to take the body panels off. That would require far too many pictures and I didn't take them. wink1.gif
One thing to remember, don't connect wires/insert pins into harnesses until you are done and know you can.
1. Take off driver side fender, front bumper, lower crash pad peice(plastic panel that contains dimmer switch), headliner, and driver side pillar. Basically, you need to clear a way for a wire harness to run from the engine bay to the mirror. I know this is probably the most complicating part for most, but webtech is there to help if you get stuck. Use the universal login in the DIY stickied section if you don't have your own.
2. You want to start by removing the stock mount. Push the stock mirror down at the mount to remove it from the mount. Turn on the heat gun and heat up the area where the mount is from the other side of the windshield while pulling on the mount with a pair of pliers. I got some slight bubbling from the black area of the windshield that stayed there, it's really not noticeable though. Heating the mount directly may cut down on it.
3. Once the mount is off you want to remove any glue that is still left on the glass. Grab the razorblade and clear it away. Grab the wedge mount tab that is in the kit and put some tape on it. Stick it where you want it on the glass, and then test to make sure you can get the mirror on with enough clearance from the roof.
4. When you have a good spot, mark it off with some tape. Clean the area where the tab is going thoroughly with the alcohol wipe. Make sure it dries good, and then it's time for the mounting.
5. This part was easily the biggest pain in the ass. I used atleast 5 different "Extreme Hold Permanent" windshield tab mounting glues. None of them were close to holding. Some super cheap crappy superglue worked better than any of them, but still wasn't good enough. I finally decided to try some JB Weld KWIK i had lying around, and its holding great so far. It comes in two tubes that you mix and then apply. Follow the directions, and then apply a little bit to the tab. Press and hold for a while(couple minutes) to make sure its on there good. Let it dry for a good day before touching it.
6. On to running the wires. I had relatively easy access to every part of the car, because I was only working with about 3/4 of it...lol. Begin by taking the driver side fender off. You will see a huge loom of wires and a rubber grommet. You will want to make a slit in that grommet to run the wires through.
7. Now you want to mount the temperature sensor. I found one spot, and then figured out that it's probably not available to AEM intake users. So I took pictures of both. I ended up using the first spot. Run the wires to the cabin
\
8. These next couple steps apply to the UV sensor wiring, which is just a cool extra feature, and really doesnt take that much extra time if you have everything off already. You will be replacing the liscense plate bolts with the nice shiny one with the sensor in it and its matching regular bolt. Take off the bumper and drill a hole through the foam that is behind one of the holes.
9. You then want to grind down the tabs behind the plate because the bolts you have come with nuts and washers. Wip out the dremel and chop em' off.
10. Run the wires through the foam, up the fender, through the grommet and into the cabin.
11. Run the harness up the pillar and to the spot where the mirror will be. Make all connnections to the mirror and insert the pins into the harnesses. Instructions for this are in the mirror manual.
12. OK, now be careful or you will be soon frustrated. slide the mirror on the tab and CAREFULLY tighten the allen screw while pushing the mirror against the glass to secure it in place. If you go crazy tightening it, it will pop the tab off.
13. Run the power and ground wires back down the pillar, and connect them per the instructions in the install manual. You want ignition switched wires for the two mirror power wires(according to the ebay sellers, I still think differently; there is no reason to have two wires run to the same place. I think the b/r wire is for constant power, and the b/y wire is for ignition power, but I suppose we will follow the seller's advise). You should use a relay, and connect them directly to the battery. If not you risk burning up the stock wiring. Go to www.the12volt.com and read up on relays. Here's a quick rundown of how to hook it up using a relay(NOT observing polarity across the coil):
86 to ignition activated power wire
85 to ground
30 to battery
87a to mirror power wires
14. Test it to make sure it is getting power and works correctly. Go through the manual and set things up.
Some pictures from inside and outside:
That's it. It's really late and I'm tired, so there are probably some mistakes. I know it's a bunch of work just for a mirror, but it's a luxury feature that will prove to be worth it in the end. Enjoy.
http://stores.ebay.com/Advance-Mcs-Electro...1QQftidZ2QQtZkm
Materials:
-Mirror Kit
-Wire Strippers/Crimpers
-JB KWIK Weld
-Needle-Nosed Pliers
-Razor Blade
-Alcohol wipe
-Drill
-Dremel Tool
-Basic tools for removing body panels (Socket Set, Screwdrivers)
This DIY will not go over how to take the body panels off. That would require far too many pictures and I didn't take them. wink1.gif
One thing to remember, don't connect wires/insert pins into harnesses until you are done and know you can.
1. Take off driver side fender, front bumper, lower crash pad peice(plastic panel that contains dimmer switch), headliner, and driver side pillar. Basically, you need to clear a way for a wire harness to run from the engine bay to the mirror. I know this is probably the most complicating part for most, but webtech is there to help if you get stuck. Use the universal login in the DIY stickied section if you don't have your own.
2. You want to start by removing the stock mount. Push the stock mirror down at the mount to remove it from the mount. Turn on the heat gun and heat up the area where the mount is from the other side of the windshield while pulling on the mount with a pair of pliers. I got some slight bubbling from the black area of the windshield that stayed there, it's really not noticeable though. Heating the mount directly may cut down on it.
3. Once the mount is off you want to remove any glue that is still left on the glass. Grab the razorblade and clear it away. Grab the wedge mount tab that is in the kit and put some tape on it. Stick it where you want it on the glass, and then test to make sure you can get the mirror on with enough clearance from the roof.
4. When you have a good spot, mark it off with some tape. Clean the area where the tab is going thoroughly with the alcohol wipe. Make sure it dries good, and then it's time for the mounting.
5. This part was easily the biggest pain in the ass. I used atleast 5 different "Extreme Hold Permanent" windshield tab mounting glues. None of them were close to holding. Some super cheap crappy superglue worked better than any of them, but still wasn't good enough. I finally decided to try some JB Weld KWIK i had lying around, and its holding great so far. It comes in two tubes that you mix and then apply. Follow the directions, and then apply a little bit to the tab. Press and hold for a while(couple minutes) to make sure its on there good. Let it dry for a good day before touching it.
6. On to running the wires. I had relatively easy access to every part of the car, because I was only working with about 3/4 of it...lol. Begin by taking the driver side fender off. You will see a huge loom of wires and a rubber grommet. You will want to make a slit in that grommet to run the wires through.
7. Now you want to mount the temperature sensor. I found one spot, and then figured out that it's probably not available to AEM intake users. So I took pictures of both. I ended up using the first spot. Run the wires to the cabin
\8. These next couple steps apply to the UV sensor wiring, which is just a cool extra feature, and really doesnt take that much extra time if you have everything off already. You will be replacing the liscense plate bolts with the nice shiny one with the sensor in it and its matching regular bolt. Take off the bumper and drill a hole through the foam that is behind one of the holes.
9. You then want to grind down the tabs behind the plate because the bolts you have come with nuts and washers. Wip out the dremel and chop em' off.
10. Run the wires through the foam, up the fender, through the grommet and into the cabin.
11. Run the harness up the pillar and to the spot where the mirror will be. Make all connnections to the mirror and insert the pins into the harnesses. Instructions for this are in the mirror manual.
12. OK, now be careful or you will be soon frustrated. slide the mirror on the tab and CAREFULLY tighten the allen screw while pushing the mirror against the glass to secure it in place. If you go crazy tightening it, it will pop the tab off.
13. Run the power and ground wires back down the pillar, and connect them per the instructions in the install manual. You want ignition switched wires for the two mirror power wires(according to the ebay sellers, I still think differently; there is no reason to have two wires run to the same place. I think the b/r wire is for constant power, and the b/y wire is for ignition power, but I suppose we will follow the seller's advise). You should use a relay, and connect them directly to the battery. If not you risk burning up the stock wiring. Go to www.the12volt.com and read up on relays. Here's a quick rundown of how to hook it up using a relay(NOT observing polarity across the coil):
86 to ignition activated power wire
85 to ground
30 to battery
87a to mirror power wires
14. Test it to make sure it is getting power and works correctly. Go through the manual and set things up.
Some pictures from inside and outside:
That's it. It's really late and I'm tired, so there are probably some mistakes. I know it's a bunch of work just for a mirror, but it's a luxury feature that will prove to be worth it in the end. Enjoy.

Senior Member
Joined: Dec 2005
Posts: 240
Likes: 0
From: Des Moines, IA
Nice job on the DIY, it should come in very handy. Thanks.
I've got my mirror and your excellent instructions, now all I need is the time...always seems that is the toughest part of every mod.
Thanks again, your time and effort is greatly appreciated.
I've got my mirror and your excellent instructions, now all I need is the time...always seems that is the toughest part of every mod.
Thanks again, your time and effort is greatly appreciated.

Moderator


Joined: Feb 2009
Posts: 11,732
Likes: 5
From: Leesville, Louisiana
Vehicle: 2001 Hyundai Tiburon
you forgot to mention to get a reverse EMF protection on the relay to prevent the colapsing field messing with any other electronics in the circuit. I blew my radio fuse because of reverse EMF
Reverse EMF- When an inductor (such as the coil in a relay) looses power, the voltage built up in the magnetic field will reverse directions and try to find a path back to itself. depending on the size of the coil, 12V can build up to to an extreme -120V on a large relay. If a wire comes loose from your relay while driving down the road and it turns on and off quickly, without reverse EMF protection, you may as well plug your vehical into a wall outlet 120VAC.
Fix- Place a diode between wires 85 and 86. The line on the diode will be on the hot wire side of the coil. unless it is reverse EMF protected, pins 85 and 86 are not polarized and you can hook them up either way. if you hook power to 85 and ground to 86, then place the line side of the diode to 85 and solder in place.
Awesome DIY Tibby01. I wish i had a garage and an extra car. You're doing what few of us can possibly do. I never realized how boxy the vehical was without the body on it. Keep up the good work. How long do you think until you're done and ready for car shows and mad sponsorships?
Thread Starter
Senior Member
Joined: Mar 2006
Posts: 9,172
Likes: 0
Vehicle: 2001/Hyundai/Tiburon
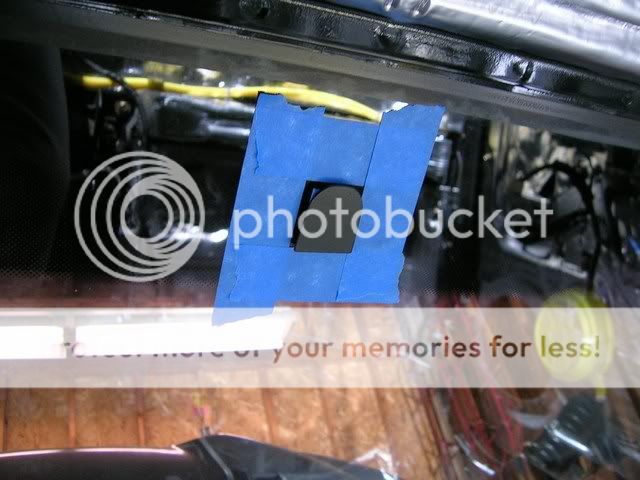
thought i would update. tibs with the sunroof have the much larger console that bulges downwards. this gets in the way a pretty good amount. i had to mount the wedge just under the black diffusion on the windsheild, so you can see it. ill figure out a way to invert the mounting cause i know that will eventually bug the hell out of me, but for now it works great.