
Alternator Removal & Replacement

Thread Starter
Super Moderator


Joined: Sep 2001
Posts: 10,795
Likes: 5
From: Pflugerville, TX
Vehicle: 2000 Elantra
This DIY will show you how to remove and replace the alternator in an RD platform Hyundai. The pictures are of a 2000 Elantra, but 97-2000 Elantras and Tiburons should be the same where this is concerned.
Where to get the parts: DEALER ONLY. Do NOT get the autozone lifetime warranty special, unless you like doing this repeatedly.
Tools Required: 10, 12, and 14mm sockets, ratchet and (helpful but not required) an extension. Voltmeter or multimeter for testing if you want to test the new alternator (good idea).
Time: <1hr to 3hrs depending on how mechanicky you are. An assistant would be nice for about 3 minutes of this job.
Beer: If you like. Not so much you start dropping expensive replacement alternators.
Difficulty: 5/10. More frustrating than difficult due to tight spaces (especially if you have big arms)
Apologies in advance for some of the photos . . . what do you want from a free camera? laugh.gif
********
Stop the engine and allow it to cool enough to work in close proximity.
Set the parking brake.
Disconnect the battery (+) cables. If you don't do this, you stand a good chance of welding with your wrench when you disconnect or reconnect the cable, or welding with the cable when it is flopping around loose.
(optional) Lift the right-front corner of the car and set it on a jackstand. You can R/R the alternator with the car on the ground, but it's more hassle
(optional) There are two bolts holding the power steering pump to its mounting bracket. Remove them and the power steering pump drive belt, and set the pump to the side. This will give much better visibility and slightly better clearance for your arms and tools. In the photos you will note that my PS belt is already disconnected; I took the belt off to disable power steering a while back and find it's not all that important to a car as light as these are. Try leaving the belt off when you are done with this work, you may find you like it that way.
Poke the retaining clip into the charging warning light connector and pull the connector off the alternator.

Remove the bolt holding the tensioner to the top mounting bracket to loosen the top of the alternator. If you want, you can pull the tensioning bolt (the longer one) instead, but if you leave it as-is, you will have a rough idea of where the tensioner needs to be when the new alternator is installed and you go to tighten the belt back up.
Slide under the front of the car and remove the 5 bolts holding the passenger-side splash guard in position. You will want to replace this before you drive away. One of the members of FXTreme had an engine bay fire because it was missing. A piece of road debris cut a fuel line going down the highway. . . put it back when you're done! Three of the bolts are easy to see, two up by the wheel are not.

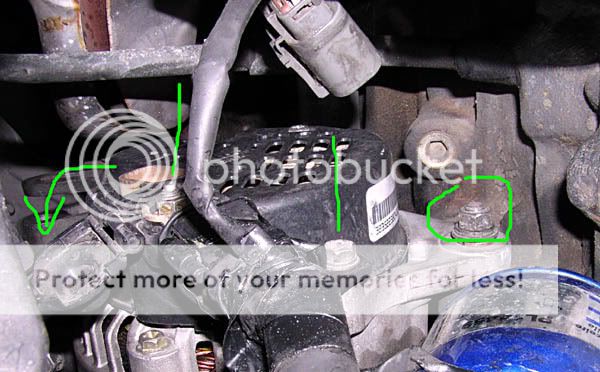
Flip open the cover on the battery charging cable and unbolt the cable. Be careful not to drop the nut or washer. Unbolt the charging cable's bracket as well. Pull the cable ends away from the alternator. Remove the nut circled in the picture below.
Now is the time to remove the alternator drive belt. Push up on the alternator until it hits the side of the engine block, and push the now-slack belt off the bottom of the crank pulley. Then, pull the long lower alternator mounting bolt out toward the passenger wheel. The splash guard prevents this bolt coming out, as does the alternator drive belt, if they are still in position.
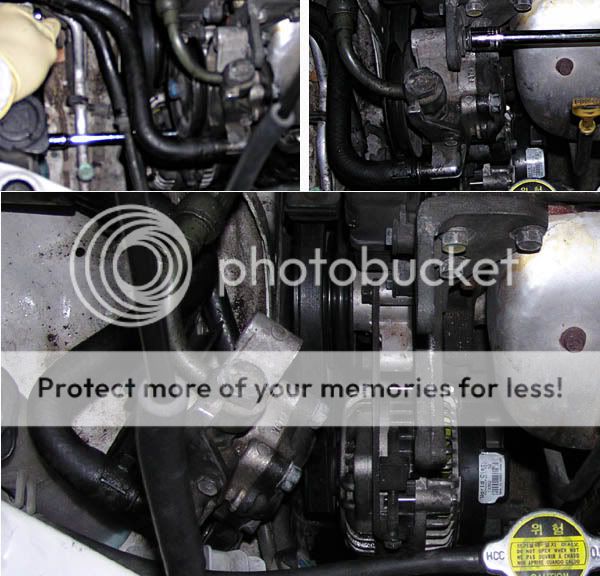
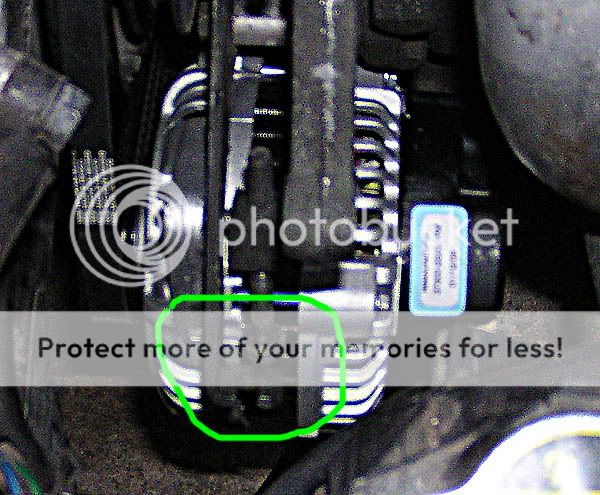
Now comes the hardest part. Nothing but friction now holds your alternator to the engine. take a look:

The long bolt goes through the two tabs, and the tabs straddle a boss that pokes out from the engine block. The green circle and its buddy on the other side, pointed out by the arrow, are usually holding pretty tight onto that mounting boss. If required, hit them with some penetrating oil or WD-40 and pull. If the alt. still won't come off, use a big flat-head screwdriver to pry it off the engine. Go ahead, there is nothing holding it but friction so don't be shy with the leverage and application of force.
Don't let the alternator just fall and smash into the oil filter or fan. Have a hand ready to catch it when it finally comes loose.
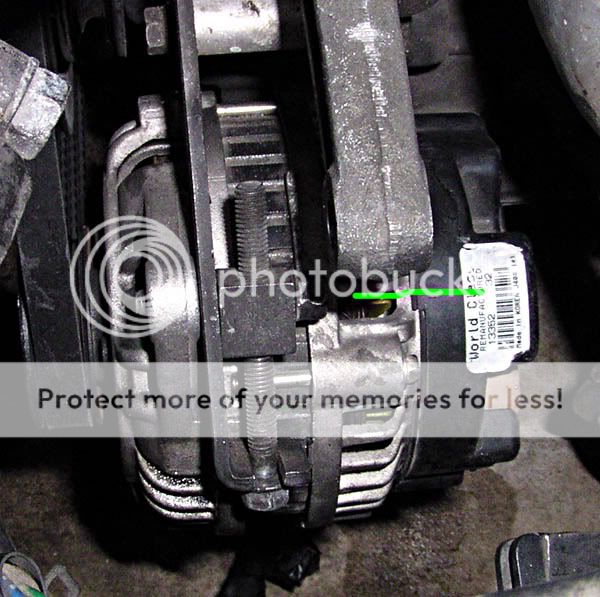
BE CAREFUL NOW. You don't want to kill your fan, oil filter, or condenser while rotating the alternator in the engine bay. You MUST rotate the alternator so it is oriented the right way to slip out of the engine bay. It fits out the bottom exactly ONE way. This way:

If you remove the power steering bracket the alternator might fit out the top, but it looked like it might be too tight going up, so I went down instead. If you can co-ordinate replacing your alternator with an oil change, remove the oil filter and leave it off but <u>mind the oil filter threads</u>. If you leave the oil filter on, the green lines show where the alt. does not have sufficient clearance to come out of the engine bay. Wrestle with the alternator for 10 minutes and dent up your oil filter in the process like I did, or trust me on this: you need to remove the passenger-side fan. Remove the four bolts holding the fan to the right side of the radiator and do some pulling. It is easier to remove both fans, but I didn't feel like it, because this is as far as the fan shroud needs to move:
Just far enough to catch on top of the radiator filler neck. Note: the fan connector is fragile and you stand a good chance of having it broken (like mine) if you are too rough with it. Go easy. The fan shroud does NOT want to move, but you need to move it. Some force is required to get it over the filler neck. If you start to feel like you are going to bust the fan shroud, go ahead and pull both fans out instead.
There is now enough clearance, barely, to remove the alternator. Remove it. The new one has to go in oriented exactly the same way.
Installation is the reverse of removal.
Since you're already down there, shoot the long lower alternator mounting bolt to hold the part in position. You can install the washer & nut on the mounting bolt, but don't tighten them all the way tight just yet. Put the alternator drive belt on the water pump and alternator pullies and then push it over the crank pulley (opposite of how it came off). The belt will hold the alternator up for now. Bolt and snap the alternator cables into position. Close the charging cable cover.
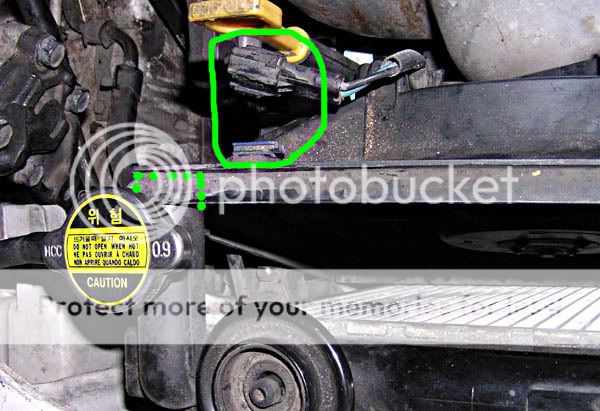
Remember that tensioner? If you're he-man you will be able to slip it in place as-is. Likely, you will have to loosen it a little bit but at least you will remember about where it should be. When you bolt it up, leave the tensioning bolt off the tensioner bracket like this:
Then loosen the tensioning bolt enough to slip it into the bracket, and tighten the tensioner up again.
A word about belt tension: Moderation! Too tight, and you will be replacing your fresh alternator very shortly due to fried bearings. Too loose, and it will slip when you most need the alternator to be charging up the battery. When it is tight, the belt should give maybe 1/4 to 1/2" with moderate pressure from your thumb, on the span between the crank and alternator pullies. Moderate as in, 15-20-ish pounds. Without Hyundai's fancy tension gauge, you have to guess a little, but as long as it stays on the pullies and spins under heavy electrical load, loose is better than tight when it comes to alternator bearing life.
Put the power steering pump and splash shield back on. Reconnect the charging wire to the battery. Tighten the mounting bolts for good. Double check to make sure there are no tools in harm's way, and start the car.
Testing: you should have 12.6V on a fully-charged good battery on a warm day. Less than 11.5 and you really should charge it before starting the car, because that's a pretty heavy load on the alternator. The alternator is for maintaining battery charge, not recharging dead batteries! Less than 10V means you likely need a new battery soon, if not today. So. You have 12V. Start the car and it should go up by a couple of volts within a few seconds. Rev the engine and the battery voltage should go up as much as another volt. If you don't see an increase in voltage when you start the car, your alternator (or something) is bad. If the voltage does not increase when you rev the engine to 3000+RPM, your alternator (or something) is bad. If it goes over 15V, that's a problem too. 16+V means your new alternator is definitely faulty.
NOW, if you are so inclined, is the time to have a frosty beverage.
Where to get the parts: DEALER ONLY. Do NOT get the autozone lifetime warranty special, unless you like doing this repeatedly.
Tools Required: 10, 12, and 14mm sockets, ratchet and (helpful but not required) an extension. Voltmeter or multimeter for testing if you want to test the new alternator (good idea).
Time: <1hr to 3hrs depending on how mechanicky you are. An assistant would be nice for about 3 minutes of this job.
Beer: If you like. Not so much you start dropping expensive replacement alternators.
Difficulty: 5/10. More frustrating than difficult due to tight spaces (especially if you have big arms)
Apologies in advance for some of the photos . . . what do you want from a free camera? laugh.gif
********
Stop the engine and allow it to cool enough to work in close proximity.
Set the parking brake.
Disconnect the battery (+) cables. If you don't do this, you stand a good chance of welding with your wrench when you disconnect or reconnect the cable, or welding with the cable when it is flopping around loose.
(optional) Lift the right-front corner of the car and set it on a jackstand. You can R/R the alternator with the car on the ground, but it's more hassle
(optional) There are two bolts holding the power steering pump to its mounting bracket. Remove them and the power steering pump drive belt, and set the pump to the side. This will give much better visibility and slightly better clearance for your arms and tools. In the photos you will note that my PS belt is already disconnected; I took the belt off to disable power steering a while back and find it's not all that important to a car as light as these are. Try leaving the belt off when you are done with this work, you may find you like it that way.
Poke the retaining clip into the charging warning light connector and pull the connector off the alternator.
Remove the bolt holding the tensioner to the top mounting bracket to loosen the top of the alternator. If you want, you can pull the tensioning bolt (the longer one) instead, but if you leave it as-is, you will have a rough idea of where the tensioner needs to be when the new alternator is installed and you go to tighten the belt back up.
Slide under the front of the car and remove the 5 bolts holding the passenger-side splash guard in position. You will want to replace this before you drive away. One of the members of FXTreme had an engine bay fire because it was missing. A piece of road debris cut a fuel line going down the highway. . . put it back when you're done! Three of the bolts are easy to see, two up by the wheel are not.
Flip open the cover on the battery charging cable and unbolt the cable. Be careful not to drop the nut or washer. Unbolt the charging cable's bracket as well. Pull the cable ends away from the alternator. Remove the nut circled in the picture below.
Now is the time to remove the alternator drive belt. Push up on the alternator until it hits the side of the engine block, and push the now-slack belt off the bottom of the crank pulley. Then, pull the long lower alternator mounting bolt out toward the passenger wheel. The splash guard prevents this bolt coming out, as does the alternator drive belt, if they are still in position.
Now comes the hardest part. Nothing but friction now holds your alternator to the engine. take a look:
The long bolt goes through the two tabs, and the tabs straddle a boss that pokes out from the engine block. The green circle and its buddy on the other side, pointed out by the arrow, are usually holding pretty tight onto that mounting boss. If required, hit them with some penetrating oil or WD-40 and pull. If the alt. still won't come off, use a big flat-head screwdriver to pry it off the engine. Go ahead, there is nothing holding it but friction so don't be shy with the leverage and application of force.
Don't let the alternator just fall and smash into the oil filter or fan. Have a hand ready to catch it when it finally comes loose.
BE CAREFUL NOW. You don't want to kill your fan, oil filter, or condenser while rotating the alternator in the engine bay. You MUST rotate the alternator so it is oriented the right way to slip out of the engine bay. It fits out the bottom exactly ONE way. This way:
If you remove the power steering bracket the alternator might fit out the top, but it looked like it might be too tight going up, so I went down instead. If you can co-ordinate replacing your alternator with an oil change, remove the oil filter and leave it off but <u>mind the oil filter threads</u>. If you leave the oil filter on, the green lines show where the alt. does not have sufficient clearance to come out of the engine bay. Wrestle with the alternator for 10 minutes and dent up your oil filter in the process like I did, or trust me on this: you need to remove the passenger-side fan. Remove the four bolts holding the fan to the right side of the radiator and do some pulling. It is easier to remove both fans, but I didn't feel like it, because this is as far as the fan shroud needs to move:
Just far enough to catch on top of the radiator filler neck. Note: the fan connector is fragile and you stand a good chance of having it broken (like mine) if you are too rough with it. Go easy. The fan shroud does NOT want to move, but you need to move it. Some force is required to get it over the filler neck. If you start to feel like you are going to bust the fan shroud, go ahead and pull both fans out instead.
There is now enough clearance, barely, to remove the alternator. Remove it. The new one has to go in oriented exactly the same way.
Installation is the reverse of removal.
Since you're already down there, shoot the long lower alternator mounting bolt to hold the part in position. You can install the washer & nut on the mounting bolt, but don't tighten them all the way tight just yet. Put the alternator drive belt on the water pump and alternator pullies and then push it over the crank pulley (opposite of how it came off). The belt will hold the alternator up for now. Bolt and snap the alternator cables into position. Close the charging cable cover.
Remember that tensioner? If you're he-man you will be able to slip it in place as-is. Likely, you will have to loosen it a little bit but at least you will remember about where it should be. When you bolt it up, leave the tensioning bolt off the tensioner bracket like this:
Then loosen the tensioning bolt enough to slip it into the bracket, and tighten the tensioner up again.
A word about belt tension: Moderation! Too tight, and you will be replacing your fresh alternator very shortly due to fried bearings. Too loose, and it will slip when you most need the alternator to be charging up the battery. When it is tight, the belt should give maybe 1/4 to 1/2" with moderate pressure from your thumb, on the span between the crank and alternator pullies. Moderate as in, 15-20-ish pounds. Without Hyundai's fancy tension gauge, you have to guess a little, but as long as it stays on the pullies and spins under heavy electrical load, loose is better than tight when it comes to alternator bearing life.
Put the power steering pump and splash shield back on. Reconnect the charging wire to the battery. Tighten the mounting bolts for good. Double check to make sure there are no tools in harm's way, and start the car.
Testing: you should have 12.6V on a fully-charged good battery on a warm day. Less than 11.5 and you really should charge it before starting the car, because that's a pretty heavy load on the alternator. The alternator is for maintaining battery charge, not recharging dead batteries! Less than 10V means you likely need a new battery soon, if not today. So. You have 12V. Start the car and it should go up by a couple of volts within a few seconds. Rev the engine and the battery voltage should go up as much as another volt. If you don't see an increase in voltage when you start the car, your alternator (or something) is bad. If the voltage does not increase when you rev the engine to 3000+RPM, your alternator (or something) is bad. If it goes over 15V, that's a problem too. 16+V means your new alternator is definitely faulty.
NOW, if you are so inclined, is the time to have a frosty beverage.

Senior Member
Joined: Feb 2007
Posts: 898
Likes: 0
From: London, Ontario
Vehicle: 2011 Kawasaki ZX6R
I couldnt quite find the right way to fit it around the oil filter so I took the power steering off from the bracket held on by 3 bolts and took the big fan off and it fit right out the top. I have to say out of the 2 times I have done this, the easiest way is to do an oil change at the same time. It takes a while to get the alt out when it is your first time doing it but once you get it out it will take you about 10 minutes to get the new on ein and bolted up with the belt on.
Great write up!
Great write up!

Moderator

Joined: Feb 2009
Posts: 11,732
Likes: 5
From: Leesville, Louisiana
Vehicle: 2001 Hyundai Tiburon
LOL. I just changed out my alternator today too.
Mine was much easier because I have a JDMMotors header. I just have to unbolt the alternator, remove the 13mm nut, remove the plug, lift the alternator up, rotate it and drop it down clearing the dipstick, the oil filter and the header. It would probly be easier if I removed more parts like you did, but hey, I'm not turning a wrench more then I need to lol.
Took me 2 hours because I thought I crossthreaded a bolt but I didn't and I took about 20 minutes smoking a cigarette because I was frustrated.
Thread Starter
Super Moderator
Joined: Sep 2001
Posts: 10,795
Likes: 5
From: Pflugerville, TX
Vehicle: 2000 Elantra
I have removed my power steering pump and its bracket since posting this DIY. The alternator bracket, exhaust manifold, and radiator fans still get in the way and prevent removal of the alternator out the top of the engine bay. Unbolt both fans and the alternator comes out the bottom MUCH easier. I VERY highly recommend taking the extra effort to unbolt the driver's side fan.

Member
Joined: Nov 2008
Posts: 78
Likes: 0
From: South Texas
Nice write up and thanks for the help Stocker. I replaced my Alternator this past Friday. Had to do it twice actually - turns out the Alternator checked out fine when removed, but once on the car it failed.
I just dropped the oil and removed the oil filter. The alternator comes out easily from under the car, did not have to touch the power steering pump. Total time including removing the air-dam, oil change, and alternator about 40 minutes.
I just dropped the oil and removed the oil filter. The alternator comes out easily from under the car, did not have to touch the power steering pump. Total time including removing the air-dam, oil change, and alternator about 40 minutes.
Moderator
Joined: Feb 2009
Posts: 11,732
Likes: 5
From: Leesville, Louisiana
Vehicle: 2001 Hyundai Tiburon
Topic link: replacing the voltage regulator on the alternator. http://www.rdtiburon.com/index.php?showtop...view=getnewpost
Senior Member
Joined: May 2008
Posts: 545
Likes: 0
From: California
Vehicle: 2001/Hyundai/Tiburon
Nice Post.
After replacing the Alternator this info might be useful too since you might have to charge your battery since your alternator was bad.
First Check the Electrolyte level in your battery if it's not a sealed battery then,
Using a volt meter with the engine off and all accessories off (Doors closed, all lights/radio off), the battery should read 12.6 Volts across the terminals on a freshly charged battery.
If your battery reads:
12.65 V = 100% Charge
12.45 V = 75% Charge
12.24 V = 50% Charge
12.06 V = 25% Charge
11.89 V = 0% Charge
Those values are approximates on a battery since every battery is different but you can't go wrong with a fully charged battery and a functioning charging system.
Thread Starter
Super Moderator
Joined: Sep 2001
Posts: 10,795
Likes: 5
From: Pflugerville, TX
Vehicle: 2000 Elantra
To add to Krazy's post above, a little background information:
Your alternator is designed to <u>top-off</u> the car's battery. Charging a dead battery is extremely hard work for an alternator. It is, in fact, a good way to kill your new alternator. This is why you are supposed to let the other guy's engine run for a couple of minutes when you get a jump-start. If it is at all possible, try to get a battery charger on your battery before starting for the first time with the new alternator.
If you don't know how to check the battery's electrolyte level, ask someone who does, because it can literally get you killed or disfigured for life.
Your car will run for anywhere up to an hour on a battery in good condition, with no charging from the alternator. When a battery is used to run a car without the alternator, it can be discharged to a very low voltage while still having enough power to run your car's engine. An unsealed (conventional, acid bath) battery that is discharged to 10V is effectively dead. It may take a little juice, but it has at least one foot in the grave. Below 11V is a very, very unhealthy place for a lead-acid battery to be.
Footnote:
I haven't had an unsealed battery in my cars for a decade or so. When the stock Solite died, I replaced it with an Optima "red top" and never looked back. The Optima (especially their deep-cycle "yellow top" type) is a real champion for coming back from a low-charge state. When one of my alternators went, the battery was down to 10.2-ish volts by the time I got to work. I put it on a smart charger to recharge it while I was working, replaced the alternator, and the battery has had zero problems since then.