


Tom's single slammer - the piglet

Senior Member

Joined: Jul 2011
Posts: 1,021
Likes: 1
From: Illinois
Vehicle: 2010 Genesis Coupe 2L track

That's great. I haven't seen mileage like that since I got rid of my Festivas. The best I've ever got with my Accent is around 42 mpg. It's dropped down to around 40 at best now, 37 average..

Thread Starter
Senior Member
Joined: Dec 2008
Posts: 3,837
Likes: 0
From: Floating around the AUDM
Vehicle: X3 Sprint, S-Coupe Turbo
Dude even a 37 mpg average is excellent. To be fair I had to use some pretty specialised driving techniques to get that figure.
Oh, I forgot to mention. I'm going down the 1/4 mile strip on wednesday night, so we'll see how it goes. Here's hoping for a sub-18 second time, but I'm not holding my breath
Oh, I forgot to mention. I'm going down the 1/4 mile strip on wednesday night, so we'll see how it goes. Here's hoping for a sub-18 second time, but I'm not holding my breath
Senior Member
Joined: Jul 2011
Posts: 1,021
Likes: 1
From: Illinois
Vehicle: 2010 Genesis Coupe 2L track
Dude even a 37 mpg average is excellent. To be fair I had to use some pretty specialised driving techniques to get that figure.
Oh, I forgot to mention. I'm going down the 1/4 mile strip on wednesday night, so we'll see how it goes. Here's hoping for a sub-18 second time, but I'm not holding my breath
Oh, I forgot to mention. I'm going down the 1/4 mile strip on wednesday night, so we'll see how it goes. Here's hoping for a sub-18 second time, but I'm not holding my breath
Sub 18s woot.

I recently had the Accent out on the interstate driving 70-75 mph and with a 30 mph cross wind. It was a fight all the way down and back but still managed to get 34 mpg.
Thread Starter
Senior Member
Joined: Dec 2008
Posts: 3,837
Likes: 0
From: Floating around the AUDM
Vehicle: X3 Sprint, S-Coupe Turbo
More hypermiling BS 

It is only nig rigged in place for now, I don't have any tools/workspace at my new house.
A vacuum gauge is a really cheap way to improve your fuel economy. It basically acts as a super sensitive TPS, so you can pick a 'load limit', and drive according to that. Basically, you decelerate going uphill, and accelerate going downhill - the engine sees a constant load and it allows the 02 sensor to keep doing its thang.
When I get a little more instrumentation, I'm going to begin some fuel economy testing. The aim is to correspond real-world load values and acceleration times to theoretical MPG values, so I can just pick a desired MPG rating and drive to that. There are actually existing computers that can do that for you, but the only product available for OBD-1 cars requires some pretty crazy electronics skills to assemble and test. Google MPGuino if you are bored.
So yeah, that's it for now! I'm heading down the 1320 tomorrow night, f*ck yeah! I've got a pretty worrying clunk from the front left on take off, I figure it is either the torn CV or the noisy wheel bearing, but fingers crossed nothing will explode while I'm there.
It is only nig rigged in place for now, I don't have any tools/workspace at my new house.
A vacuum gauge is a really cheap way to improve your fuel economy. It basically acts as a super sensitive TPS, so you can pick a 'load limit', and drive according to that. Basically, you decelerate going uphill, and accelerate going downhill - the engine sees a constant load and it allows the 02 sensor to keep doing its thang.
When I get a little more instrumentation, I'm going to begin some fuel economy testing. The aim is to correspond real-world load values and acceleration times to theoretical MPG values, so I can just pick a desired MPG rating and drive to that. There are actually existing computers that can do that for you, but the only product available for OBD-1 cars requires some pretty crazy electronics skills to assemble and test. Google MPGuino if you are bored.
So yeah, that's it for now! I'm heading down the 1320 tomorrow night, f*ck yeah! I've got a pretty worrying clunk from the front left on take off, I figure it is either the torn CV or the noisy wheel bearing, but fingers crossed nothing will explode while I'm there.
Thread Starter
Senior Member
Joined: Dec 2008
Posts: 3,837
Likes: 0
From: Floating around the AUDM
Vehicle: X3 Sprint, S-Coupe Turbo
Well, I made it to the drags and back without dying, nor frying anything.
The best time I got was on my first run of the night, an 18.2 @ 74.62 mph

And here's some quick footage of the night, I had some more skids recorded but the recording quality hurt my eyes:
http://video.ak.fbcdn.net/cfs-ak-ash...d1c0327bffebd9
I holeshot the sh*t outta that RX-7... small victories...
Cheers to aaron the trusty cameraman. However, the clutch has probably aged 30,000 km in one night. Thankfully I've got a spare oem LC1 clutch, flywheel and crank angle sensor sitting in my cupboard at home, so when the time comes it will be no biggie to swap everything over.
I managed to get 36.8 mpg outta that tank of fuel, drag runs and much skid testing included
*EDIT(s)* I had to keep messing around with the picture, sorry.
The best time I got was on my first run of the night, an 18.2 @ 74.62 mph
And here's some quick footage of the night, I had some more skids recorded but the recording quality hurt my eyes:
http://video.ak.fbcdn.net/cfs-ak-ash...d1c0327bffebd9
I holeshot the sh*t outta that RX-7... small victories...
Cheers to aaron the trusty cameraman. However, the clutch has probably aged 30,000 km in one night. Thankfully I've got a spare oem LC1 clutch, flywheel and crank angle sensor sitting in my cupboard at home, so when the time comes it will be no biggie to swap everything over.
I managed to get 36.8 mpg outta that tank of fuel, drag runs and much skid testing included
*EDIT(s)* I had to keep messing around with the picture, sorry.


Thread Starter
Senior Member
Joined: Dec 2008
Posts: 3,837
Likes: 0
From: Floating around the AUDM
Vehicle: X3 Sprint, S-Coupe Turbo
Repping the punctual build thread updates... Well, a lot has happened since I last posted in here, so I guess I'll post it up chronologically.
Well, Piglet was motoring along well. He was just being a great and nondescript daily, saving fuel and not giving a f*ck about petrol prices or passenger comfort. In the meantime, I picked up another Twin Cam excel from my housemate. It had been lightly rear rear ended and I intended to register it. However, the inspection fees and general fuggery of getting a written off vehicle back on the road made the project simply not viable. So... what to do with an unregisterable Twin Cam excel?
A drawn out engine swap that runs overtime, of course.
EASY MODE - PULLING IT ALL APART
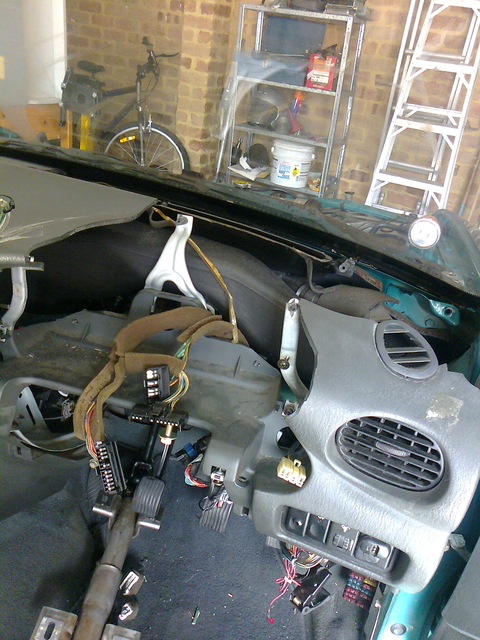
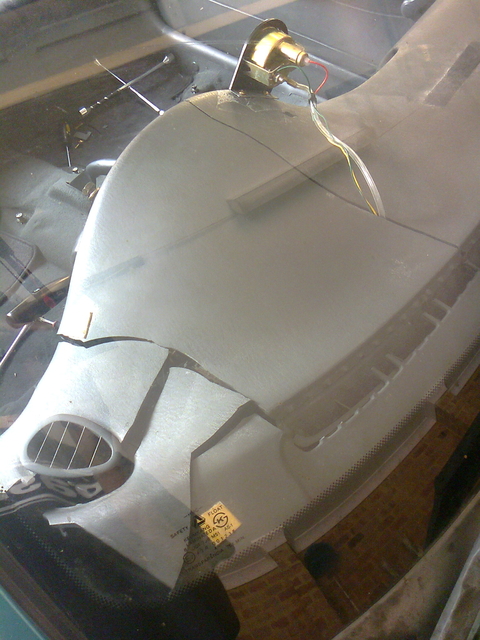
I started out by removing the dash of the Twinkie, which promptly exploded into a zillion shards when even mildly flexed. Incidentally, excels are SUPER easy to hotwire. Iirc they are the third-most stolen cars in the country, behind the VN commodore and EA falcon. The factory immobiliser in this 99 is simply an on/off switch, mounted inline with the earth and ON wires coming from the ignition barrel. You just cut and strip the three wires upstream of the immobiliser, and bam, you have a running excel. None of this SMARTRA bs that you find on the LC accent.


Anyhoo, I pulled the Twin Cam engine and transmission out of Twinkie, as well as some other bits which I shall get to later. Twinkie only had 140k on it, but I bet that the timing belt was never changed. Ian at Hyspares hooked me up with a new belt for the price of a slab of beer. In changing the belt, I was an idiot and stripped out the idler thread, which was not very promptly re-drilled and helicoiled. The moral of the story is to tension the belt with the TENSIONER, don't try and tighten the idler on an angle... I was tired so don't judge me.
I also installed a brand new OEM LC accent clutch disc and pressure plate onto the excel flywheel, and replaced the throw out bearing... more on this later.
At around this point, Hyper member 342four sold me his old suspension goodies.


Whiteline rear sway bar, probably whiteline front castor bushes, adjustable sway bar links and gmac lowering springs. I took the struts, control arms, front brakes, and power steering rack from Twinkie for a badly needed suspension overhaul. I was going to swap the rear brakes out, but to be honest, I couldn't remove the handbrake lines, nor could I get the drum brakes apart. Piglet's rears were strong enough for touge handbrakies, so that wasn't really an issue.
ANYway, now that the twinkie hulk had basically been sodomised, it was time to run the single slam for the last time to warm up the oil. It was a solid, but ultimately tired and probably shagged engine. It even came with high RPM oil injection via the valve stem seals which was pretty cool. While removing the SOHC, it was interesting how much harder it was to access parts at the back of the engine than it was on the DOHC, despite looking simpler. The A/C compressor has different lines, and there are bulk coolant hard lines under the SOHC intake manifold. I guess they had more R&D time to optimise the DOHC engine.
With Piglet's engine bay free of the engine, steering rack, struts, front sway bar and cooling system, I took the opportunity to flush the heater core and thoroughly clean out the engine bay.


The heater still doesn't work, turns out rusty sludge isn't a good conductor of heat. Oh well. I removed piglet's dashboard, and it suffered much the same fate as twinkie's dash. Australian UV light isn't kind to these camp korean plastics. Oh well.
THE FUN PART - MODIFYING STUFF FOR THE SWAP
Big cheers to Shake from Hyper. He's done this swap before and wrote a great DIY detailing some of the pitfalls of the swap. There are a few main differences to look out for, especially if you are dealing with a pre '96 single cam.
-The A/C compressor is mounted in a different place, has different lines, bolts to the block differently, and the pulleys are of differing depths.


I swapped the DOHC pulley onto the SOHC compressor. This allows 3 out of 4 ribs of the DOHC A/C belt to bite. I just cut the extra rib off with a stanley knife. Two of the four compressor mounting bolts line up, so the compressor wouldn't be secure under belt tension. That's okay though, because my belt ended up being too short anyway. To solve this, I'm looking to make a small adaptor for one of the top mounting bolts, and get a longer 3 ribbed belt. For now the compressor is bolted in with two bolts and the belt is just zip tied out of the way.

I forgot to mention, you will need to hammer/cut the DOHC intake manifold brace to fit around the SOHC A/C lines. Only two out of four bolts ended up lining up, but oh well. It is now rather difficult to access the starter motor.
-The power steering pump moves from the rear of the engine in a SOHC, to the front of the engine in a DOHC.
I didn't have/want/need power steering, but if you swap over the DOHC pump, lines and rack, you can keep it without a hassle.
-The roll stoppers are mounted to the engine block in the SOHC, but the DOHC excels mounted them to the gearbox instead.
You just swap the SOHC engine mounts onto the DOHC block. I don't have a photo of the area, but the DOHC block has been drilled and tapped from the factory to accept the same mounts. The only pitfall is that the front roll stop only lines up with one bolt, but as it is not under much load, it does the job.
-The DOHC wiring loom does not simply plug into the SOHC body loom.
Admittedly, I had some trouble with the wiring. Initially, I followed shake's DIY steps with the looms on the garage floor. It involved swapping over six wires from the black SOHC interior plug, to the blue DOHC interior plug. To clarify, this wiring combination worked for shake. It resulted in a crank/no start situation for me. After much fuggery, it turns out that I only needed to run three wires to get everything working, apart from the OBD port.

As per the photo, the two-into-one control relay wire needs to be run to the green/white wire on the SOHC plug. The other two wires are for the reverse lights. Apologies for being vague, but I did this a while ago and don't have the specific pin info in front of me. I'll go into more detail it if anyone needs help.
-DOHC front control arms don't fit into SOHC control arm brackets
The brackets stay with the control arms. The DOHC items are much beefier.
-Clutch slave cylinders need to stay with whichever transmission you are using
-Throttle cables need to be swapped over
-You need to swap the pre-cat exhaust pipe from the DOHC into the SOHC.
-DOHC hatch trim is different to allow easier access to the reverse lights. Also the DOHC hatch itself has more internal bracing. (not swap necessary, but it's a valid point)
I installed the lowering springs onto the DOHC struts, and installed all of the suspension back into the car, followed by the fresh new powertrain... nek minnut...
TROUBLESHOOTING - YUCK
Well, after me touching a mechanical object, sh*t's always going to get messsy. Although I got the car running on jack stands fairly early in the piece, it was still a long way away from moving. I got the car back on the ground:

Awww yeah. So I went to go for a cutta hype test spin with no dashboard/bonnet. Upon trying to reverse out of the driveway... KRRRRRCH. Couldn't engage reverse. I adjusted the pedal all the way out. Bled the hydraulics three times. Rebuilt the master and slave cylinders (and de-restricted the slave cylinder while I was there) but it still wouldn't move. I furiously googled the problem and some people seemed to have solved it by jolting the clutch, or slipping it badly, to counter rust or high spots on the flywheel. As the clutch was partially disengaging, I thought this to be plausible. After a few clutch burnouts and a lot of nasty flat shifting around the suburb, there was nothing left for me to do. I had to pull the transmission and swap the Excel clutch back into place.
The LC accent clutch disc is wider than the X3 disc by like 15ish mm. It had only been wearing on that 15mm outside when installed on the Excel flywheel. I still don't know why this is the case, my best guess is that it's a leverage issue. I installed the original excel clutch back into place, and she drove off without a worry.
Well, that wasn't the end of my troubles. I noticed that the back right tyre was scrubbing quite badly. Even coming off speed humps, the wheel would scrub for a few seconds. Turns out the back right shock was busted, and had almost siezed on rebound. I replaced it and the problem sort of went away. The replacement shock is not in the best condition but it was the best I could do on short notice.
...Some time passed...
There were still scrubbing issues in the rear after fixing the shock absorber, hard cornering or bulking housemates would set both wheels off pretty badly. Aditionally, the car was baulking under throttle changes and the idle was getting rather rough. The TPS was giving really erratic readings, plus the coil pack resistances were really out of spec. A 99 GLX hatch donated some crisp coils and a TPS, but I totally forgot to nab the cluster. As for the scrubbing, I always preached that people should use the phonebook method for rolling guards. Well...

I gave it a good blast from mum's hairdryer and lowered the car onto the papers. The problem is that the rear of the Excel is simply too light to squish the metal of the guards! So I ended up beating the lip with a hammer, it worked a treat and the paint didn't even crack. Total cost = free.
I also had to get an alignment, as my front right tyre had worn down to the tread wear markers in about 1000k of driving. I'll let y'all have a read of the alignment sheet...
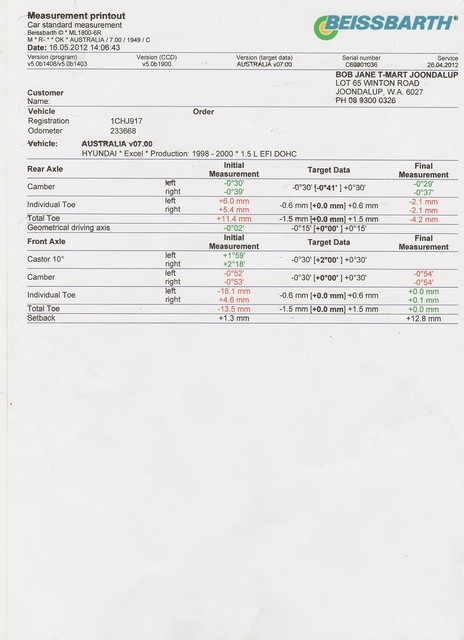
Needless to say, the car handles much better now. It's an absolute blast to drive, and it's quite amazing how much grip you can get out of some high profile 185 tyres!
With all the serious issues sorted out now, the car was driving really well. I could now turn my attention to some non-necessities. First step was to fix the nasty muffler. The tip was quite rusty, but the join between the tail pipe and the muffler had rusted clean apart! AND the internals of the muffler had rusted out and were rattling around. Definitely had to get rid of that sh*t. But what to replace it with?
Well, I did miss having open headers...

I had the cat converter sitting on the ground, and I accidentally dropped my screwdriver, and... err... my exhaust was a bit louder when I put it all back together. Just don't tell Al Gore.
Getting onto the desperate rice now, I finally managed to get some USDM rear side marker lights. I was hunting for these for aaaages.


Today I stuffed some cotton wool into the vacuum line, because the mechanical gauge was rattling like mad. I re-sprayed my wiper arms to get rid of the rust, and got rid of the twinkie hulk.
Aaaaand that about brings us up to date! Sorry for the damned essay. I actually filmed the Twin Cam swap, but it's like 20 hours of footage and I don't have time to edit it all due to exams. That's why I don't have as many swap pics as I usually take. I'll have to get some overall photos soon, I guess. Cheers for reading along!
Well, Piglet was motoring along well. He was just being a great and nondescript daily, saving fuel and not giving a f*ck about petrol prices or passenger comfort. In the meantime, I picked up another Twin Cam excel from my housemate. It had been lightly rear rear ended and I intended to register it. However, the inspection fees and general fuggery of getting a written off vehicle back on the road made the project simply not viable. So... what to do with an unregisterable Twin Cam excel?
A drawn out engine swap that runs overtime, of course.
EASY MODE - PULLING IT ALL APART
I started out by removing the dash of the Twinkie, which promptly exploded into a zillion shards when even mildly flexed. Incidentally, excels are SUPER easy to hotwire. Iirc they are the third-most stolen cars in the country, behind the VN commodore and EA falcon. The factory immobiliser in this 99 is simply an on/off switch, mounted inline with the earth and ON wires coming from the ignition barrel. You just cut and strip the three wires upstream of the immobiliser, and bam, you have a running excel. None of this SMARTRA bs that you find on the LC accent.
Anyhoo, I pulled the Twin Cam engine and transmission out of Twinkie, as well as some other bits which I shall get to later. Twinkie only had 140k on it, but I bet that the timing belt was never changed. Ian at Hyspares hooked me up with a new belt for the price of a slab of beer. In changing the belt, I was an idiot and stripped out the idler thread, which was not very promptly re-drilled and helicoiled. The moral of the story is to tension the belt with the TENSIONER, don't try and tighten the idler on an angle... I was tired so don't judge me.
I also installed a brand new OEM LC accent clutch disc and pressure plate onto the excel flywheel, and replaced the throw out bearing... more on this later.
At around this point, Hyper member 342four sold me his old suspension goodies.
Whiteline rear sway bar, probably whiteline front castor bushes, adjustable sway bar links and gmac lowering springs. I took the struts, control arms, front brakes, and power steering rack from Twinkie for a badly needed suspension overhaul. I was going to swap the rear brakes out, but to be honest, I couldn't remove the handbrake lines, nor could I get the drum brakes apart. Piglet's rears were strong enough for touge handbrakies, so that wasn't really an issue.
ANYway, now that the twinkie hulk had basically been sodomised, it was time to run the single slam for the last time to warm up the oil. It was a solid, but ultimately tired and probably shagged engine. It even came with high RPM oil injection via the valve stem seals which was pretty cool. While removing the SOHC, it was interesting how much harder it was to access parts at the back of the engine than it was on the DOHC, despite looking simpler. The A/C compressor has different lines, and there are bulk coolant hard lines under the SOHC intake manifold. I guess they had more R&D time to optimise the DOHC engine.
With Piglet's engine bay free of the engine, steering rack, struts, front sway bar and cooling system, I took the opportunity to flush the heater core and thoroughly clean out the engine bay.
The heater still doesn't work, turns out rusty sludge isn't a good conductor of heat. Oh well. I removed piglet's dashboard, and it suffered much the same fate as twinkie's dash. Australian UV light isn't kind to these camp korean plastics. Oh well.
THE FUN PART - MODIFYING STUFF FOR THE SWAP
Big cheers to Shake from Hyper. He's done this swap before and wrote a great DIY detailing some of the pitfalls of the swap. There are a few main differences to look out for, especially if you are dealing with a pre '96 single cam.
-The A/C compressor is mounted in a different place, has different lines, bolts to the block differently, and the pulleys are of differing depths.
I swapped the DOHC pulley onto the SOHC compressor. This allows 3 out of 4 ribs of the DOHC A/C belt to bite. I just cut the extra rib off with a stanley knife. Two of the four compressor mounting bolts line up, so the compressor wouldn't be secure under belt tension. That's okay though, because my belt ended up being too short anyway. To solve this, I'm looking to make a small adaptor for one of the top mounting bolts, and get a longer 3 ribbed belt. For now the compressor is bolted in with two bolts and the belt is just zip tied out of the way.
I forgot to mention, you will need to hammer/cut the DOHC intake manifold brace to fit around the SOHC A/C lines. Only two out of four bolts ended up lining up, but oh well. It is now rather difficult to access the starter motor.
-The power steering pump moves from the rear of the engine in a SOHC, to the front of the engine in a DOHC.
I didn't have/want/need power steering, but if you swap over the DOHC pump, lines and rack, you can keep it without a hassle.
-The roll stoppers are mounted to the engine block in the SOHC, but the DOHC excels mounted them to the gearbox instead.
You just swap the SOHC engine mounts onto the DOHC block. I don't have a photo of the area, but the DOHC block has been drilled and tapped from the factory to accept the same mounts. The only pitfall is that the front roll stop only lines up with one bolt, but as it is not under much load, it does the job.
-The DOHC wiring loom does not simply plug into the SOHC body loom.
Admittedly, I had some trouble with the wiring. Initially, I followed shake's DIY steps with the looms on the garage floor. It involved swapping over six wires from the black SOHC interior plug, to the blue DOHC interior plug. To clarify, this wiring combination worked for shake. It resulted in a crank/no start situation for me. After much fuggery, it turns out that I only needed to run three wires to get everything working, apart from the OBD port.
As per the photo, the two-into-one control relay wire needs to be run to the green/white wire on the SOHC plug. The other two wires are for the reverse lights. Apologies for being vague, but I did this a while ago and don't have the specific pin info in front of me. I'll go into more detail it if anyone needs help.
-DOHC front control arms don't fit into SOHC control arm brackets
The brackets stay with the control arms. The DOHC items are much beefier.
-Clutch slave cylinders need to stay with whichever transmission you are using
-Throttle cables need to be swapped over
-You need to swap the pre-cat exhaust pipe from the DOHC into the SOHC.
-DOHC hatch trim is different to allow easier access to the reverse lights. Also the DOHC hatch itself has more internal bracing. (not swap necessary, but it's a valid point)
I installed the lowering springs onto the DOHC struts, and installed all of the suspension back into the car, followed by the fresh new powertrain... nek minnut...
TROUBLESHOOTING - YUCK
Well, after me touching a mechanical object, sh*t's always going to get messsy. Although I got the car running on jack stands fairly early in the piece, it was still a long way away from moving. I got the car back on the ground:
Awww yeah. So I went to go for a cutta hype test spin with no dashboard/bonnet. Upon trying to reverse out of the driveway... KRRRRRCH. Couldn't engage reverse. I adjusted the pedal all the way out. Bled the hydraulics three times. Rebuilt the master and slave cylinders (and de-restricted the slave cylinder while I was there) but it still wouldn't move. I furiously googled the problem and some people seemed to have solved it by jolting the clutch, or slipping it badly, to counter rust or high spots on the flywheel. As the clutch was partially disengaging, I thought this to be plausible. After a few clutch burnouts and a lot of nasty flat shifting around the suburb, there was nothing left for me to do. I had to pull the transmission and swap the Excel clutch back into place.
The LC accent clutch disc is wider than the X3 disc by like 15ish mm. It had only been wearing on that 15mm outside when installed on the Excel flywheel. I still don't know why this is the case, my best guess is that it's a leverage issue. I installed the original excel clutch back into place, and she drove off without a worry.
Well, that wasn't the end of my troubles. I noticed that the back right tyre was scrubbing quite badly. Even coming off speed humps, the wheel would scrub for a few seconds. Turns out the back right shock was busted, and had almost siezed on rebound. I replaced it and the problem sort of went away. The replacement shock is not in the best condition but it was the best I could do on short notice.
...Some time passed...
There were still scrubbing issues in the rear after fixing the shock absorber, hard cornering or bulking housemates would set both wheels off pretty badly. Aditionally, the car was baulking under throttle changes and the idle was getting rather rough. The TPS was giving really erratic readings, plus the coil pack resistances were really out of spec. A 99 GLX hatch donated some crisp coils and a TPS, but I totally forgot to nab the cluster. As for the scrubbing, I always preached that people should use the phonebook method for rolling guards. Well...
I gave it a good blast from mum's hairdryer and lowered the car onto the papers. The problem is that the rear of the Excel is simply too light to squish the metal of the guards! So I ended up beating the lip with a hammer, it worked a treat and the paint didn't even crack. Total cost = free.
I also had to get an alignment, as my front right tyre had worn down to the tread wear markers in about 1000k of driving. I'll let y'all have a read of the alignment sheet...
Needless to say, the car handles much better now. It's an absolute blast to drive, and it's quite amazing how much grip you can get out of some high profile 185 tyres!
With all the serious issues sorted out now, the car was driving really well. I could now turn my attention to some non-necessities. First step was to fix the nasty muffler. The tip was quite rusty, but the join between the tail pipe and the muffler had rusted clean apart! AND the internals of the muffler had rusted out and were rattling around. Definitely had to get rid of that sh*t. But what to replace it with?
Well, I did miss having open headers...
I had the cat converter sitting on the ground, and I accidentally dropped my screwdriver, and... err... my exhaust was a bit louder when I put it all back together. Just don't tell Al Gore.
Getting onto the desperate rice now, I finally managed to get some USDM rear side marker lights. I was hunting for these for aaaages.
Today I stuffed some cotton wool into the vacuum line, because the mechanical gauge was rattling like mad. I re-sprayed my wiper arms to get rid of the rust, and got rid of the twinkie hulk.
Aaaaand that about brings us up to date! Sorry for the damned essay. I actually filmed the Twin Cam swap, but it's like 20 hours of footage and I don't have time to edit it all due to exams. That's why I don't have as many swap pics as I usually take. I'll have to get some overall photos soon, I guess. Cheers for reading along!

Senior Member
Joined: Aug 2009
Posts: 11,992
Likes: 0
From: Washington D.C.
Vehicle: Hyundai Tiburon FX
That is a load of work! I like how you're restoring everything piece by piece. Do you have a junkyard that you go to?
How is the weather by the way, isn't it winter down there right now?
How is the weather by the way, isn't it winter down there right now?
Thread Starter
Senior Member
Joined: Dec 2008
Posts: 3,837
Likes: 0
From: Floating around the AUDM
Vehicle: X3 Sprint, S-Coupe Turbo
This thread is a jury riggers best collection.
Thanks man, the whole car has cost less than two grand to date. My boss mainly pays me in love and interpretive dance.
I like how you're restoring everything piece by piece.
Cheers dude! It's not even intentional, I'm just fixing all the broken stuff for the most part. Junkyards are expensive as hell around here, so not any more. I managed to get this swap done using parts from a crashed 99 X3, and some vague leftovers that I had in my garage from previous bad Hyundaideas.
And it's certainly getting towards winter nowadays. Australian winter is like your fall, I guess. It ranges from about 30-50 degrees and rains occasionally.

