
DIY: H11b to H11 Conversion

Thread Starter
Senior Member

Joined: Dec 2011
Posts: 257
Likes: 0
From: Santa Rosa, CA
Vehicle: 2011 Genesis Coupe 3.8 R-Spec
Hey all,
I decided to write my very first ever DIY guide. As a fellow n00b, I wanted to write this as n00b friendly as I possibly could. If you guys/gals feel anything is missing/incorrect, please let me know and I'll update it.
Reason:
The main reason I did this DIY is because all I could find online for H11b to H11 conversions required you to drill in the dust caps or were for other cars that had slightly easier modifications to be made. I also wrote this DIY because the choice of bulbs for H11b are extremely limited. I've tried MTEC "Blinglights" and while the color temperature was much whiter than OEM, the visibility while driving was worse, much worse. I've also tried Eiko H11b, which were just as bright as OEM's, but gave off a slightly duller yellow hue. Better than OEM, just not that much better. I also avoided going the HID route because of personal preference. I didn't feel like drilling in the dust caps and having wiring all around my engine bay, nor did I feel comfortable stuffing the ballast in the projector housing like some have done.
On to the guide!
First things first, here's what you'll need:
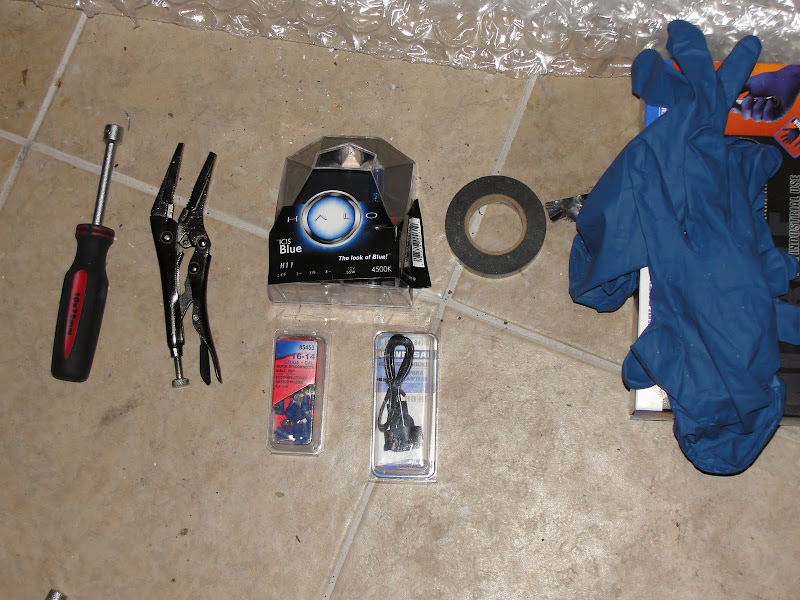
1. 10mm nut driver (or wrench/socket wrench - I really recommend picking up a set of nut drivers, they're definitely quick and handy)
2. Vise-grip (optional)
3. H11b bulb set (I picked up a set of Halo Automotive Icis Blue for $14 shipped on Amazon)
4. 16-14 gauge quick disconnects (can be found at your local auto store)
5. H11 wiring harness (also can be picked up at your local auto store)
6. Electrical tape (optional)
7. Gloves (optional)
Oh yea! And these things...

8. Wire stripper/crimper
9. Phillips head screwdriver
10. Pliers (not pictured)
Take off your headlights
Pop the hood (it's the black latch under the steering wheel, on your left) and open it. The first thing you should do is disconnect the battery (just in case)
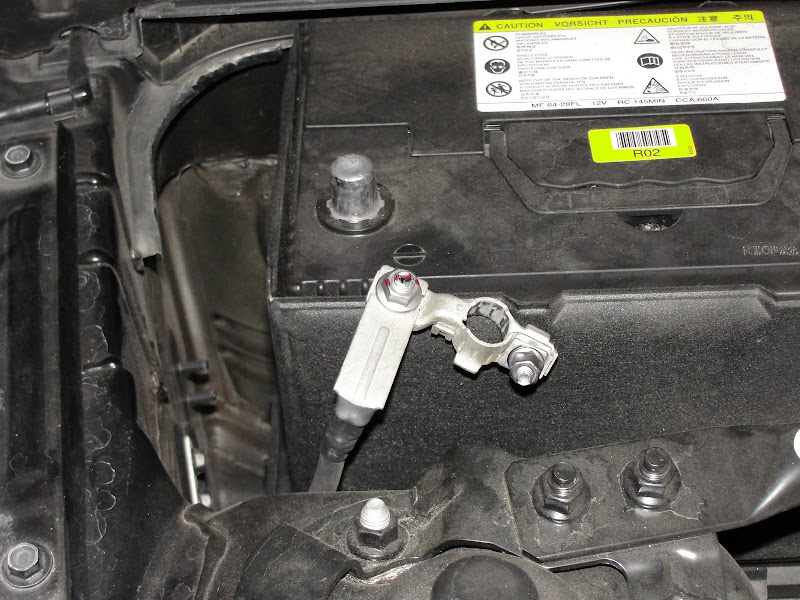
You can use your 10mm nut driver for this.

Now, using your nutdriver, unbolt the 2 10mm bolts holding the headlight, and unscrew the plastic screw located in the bottom right hand corner. Removing the headlight requires some brute force. Generally the way I do it is pull one side of the light until it pulls out a little bit, then pull the on the other side. I also yank constantly instead of pulling all at once.
Here's a video showing someone removing the headlight:
http://www.youtube.com/watch?v=h3xbCZVMbE8

You'll need to disconnect the wiring by pushing down on the plastic tab and then disconnect the wiring harness at the bottom of the housing with pliers by squeezing then pulling out.

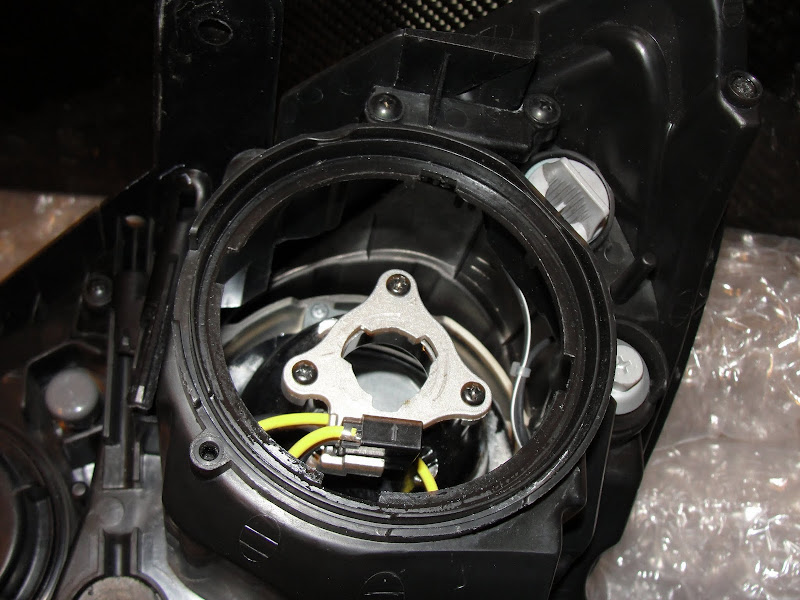
Once you've completely disconnected the headlights, you'll need to set down the headlights on a towel or some sort of padding to keep it from getting scratched. Then you will need to remove the dust caps by pushing down and turning clockwise.

Once the dust cap is removed, you will need to remove the old H11b bulb.
When the bulb is removed, go ahead and unscrew the 3 screws holding the metal base.


Now grab your vise-grip and attach it to the black plastic piece.
There will be a metal tab that you can push down.
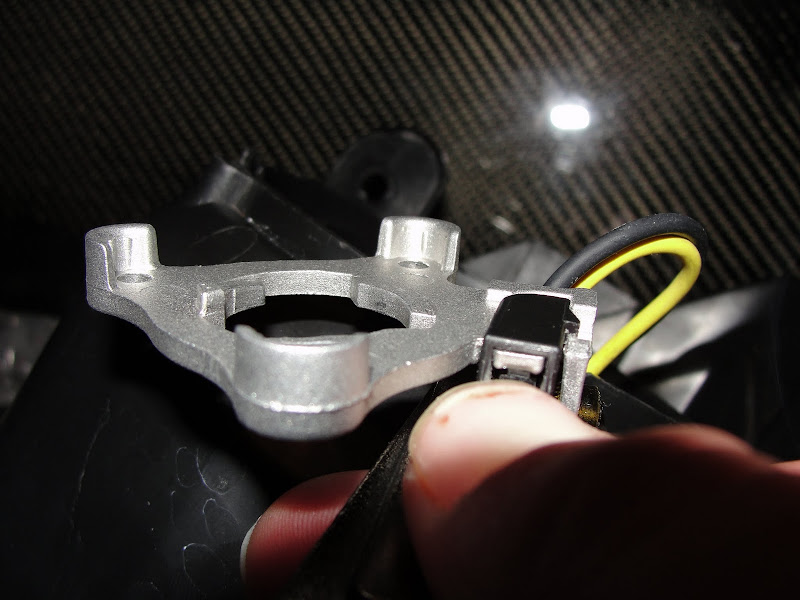

You will also need to push up on the metal base to allow clearance for...

...this plastic piece. So while pushing down on the metal tab with your thumb, grab the vise-grip and lift the metal base while pushing out on the metal base. This will require a little strength to take off.

You should end up with this.
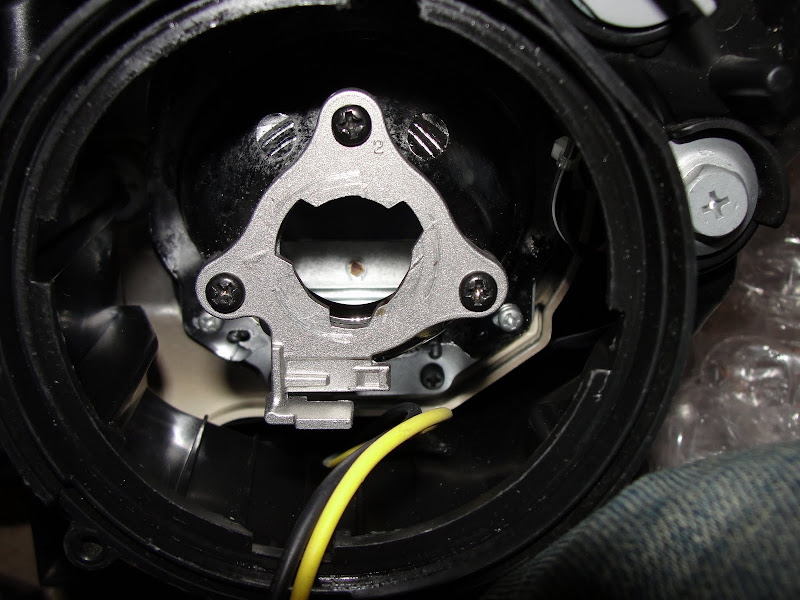
Go ahead and screw the metal base back onto the projector.

Now we'll want to grab the H11 wiring harness and slide the wire into the quick disconnect.

Crimp down the connector.

After doing both you should end up with this.

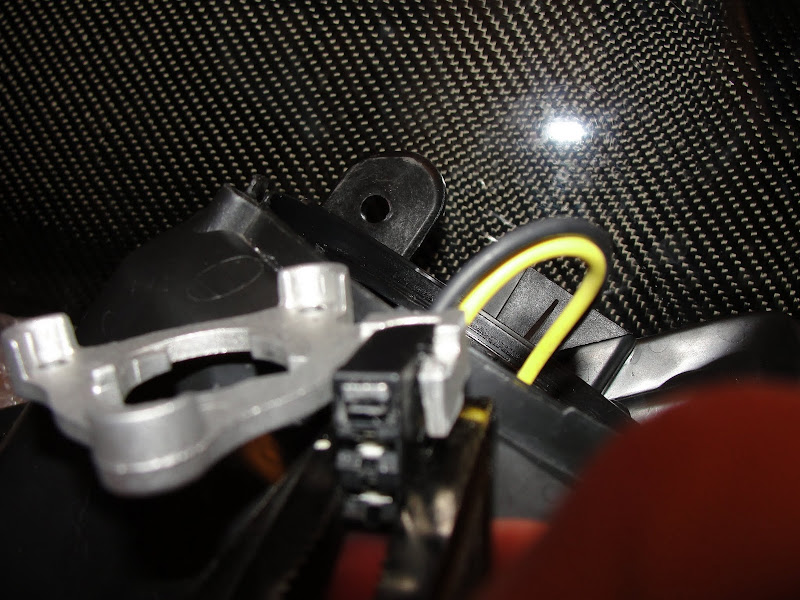
Now slide the quick disconnects into the black connector. One thing I noticed is that the harness is not color coded so I didn't know which one was the ground. I went ahead and winged it here.

After connecting the quick disconnects, I taped around them with electrical tape. I did this as a precaution, to make sure the metal quick disconnects wouldn't touch anything and cause a short.

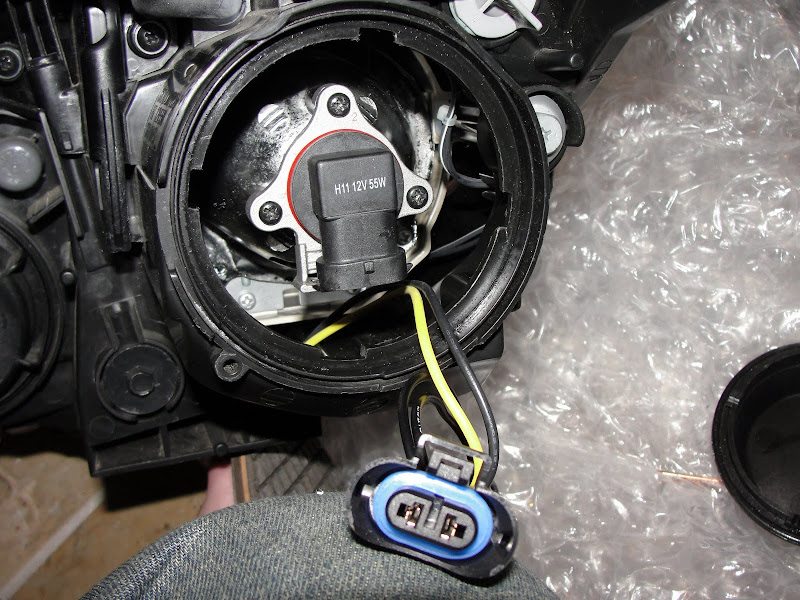
Now grab your gloves and take out one of the H11 bulbs and connect it to the harness.

Screw it into the holder.
With the passenger side, things were a little more difficult. I had to screw the bulb in first.

Then I slid the connector inside the housing.
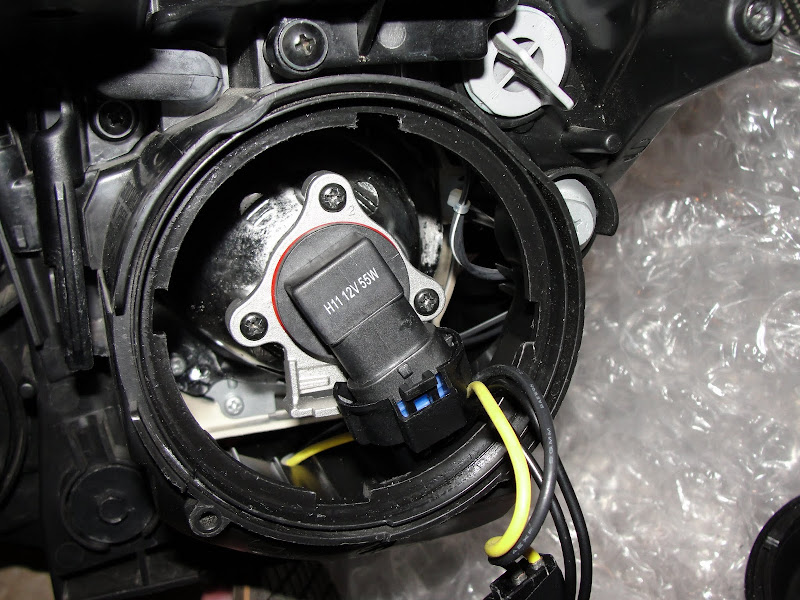
Of course another problem arose as there wasn't enough space in the housing to get the connector to connect to the bulb. I had to turn the bulb a bit to an area with more space.

Once it was connected, I went ahead and turned the bulb back.
Okay!
Now you'll want to do the reverse. Screw back on the dust cap. One thing that I would recommend doing is connect the main power harness to the headlights and place the headlights somewhere secure. Reconnect the battery and make sure the light works. This will save you some time from having to bolt everything in just to find out that the light isn't working. Repeat the steps for your headlights on the other side and you should end up with the following results:


TA-DA! I found that the "Icis Blue" are actually quite white. I'm really satisfied with the end result. Visibility is as good as the OEM bulbs are, and the color temperature is a perfect white hue with the ever so slightest blue hue.
Thanks for reading! I hope you found this helpful/useful
I decided to write my very first ever DIY guide. As a fellow n00b, I wanted to write this as n00b friendly as I possibly could. If you guys/gals feel anything is missing/incorrect, please let me know and I'll update it.
Reason:
The main reason I did this DIY is because all I could find online for H11b to H11 conversions required you to drill in the dust caps or were for other cars that had slightly easier modifications to be made. I also wrote this DIY because the choice of bulbs for H11b are extremely limited. I've tried MTEC "Blinglights" and while the color temperature was much whiter than OEM, the visibility while driving was worse, much worse. I've also tried Eiko H11b, which were just as bright as OEM's, but gave off a slightly duller yellow hue. Better than OEM, just not that much better. I also avoided going the HID route because of personal preference. I didn't feel like drilling in the dust caps and having wiring all around my engine bay, nor did I feel comfortable stuffing the ballast in the projector housing like some have done.
On to the guide!
First things first, here's what you'll need:
1. 10mm nut driver (or wrench/socket wrench - I really recommend picking up a set of nut drivers, they're definitely quick and handy)
2. Vise-grip (optional)
3. H11b bulb set (I picked up a set of Halo Automotive Icis Blue for $14 shipped on Amazon)
4. 16-14 gauge quick disconnects (can be found at your local auto store)
5. H11 wiring harness (also can be picked up at your local auto store)
6. Electrical tape (optional)
7. Gloves (optional)
Oh yea! And these things...
8. Wire stripper/crimper
9. Phillips head screwdriver
10. Pliers (not pictured)
Take off your headlights
Pop the hood (it's the black latch under the steering wheel, on your left) and open it. The first thing you should do is disconnect the battery (just in case)
You can use your 10mm nut driver for this.
Now, using your nutdriver, unbolt the 2 10mm bolts holding the headlight, and unscrew the plastic screw located in the bottom right hand corner. Removing the headlight requires some brute force. Generally the way I do it is pull one side of the light until it pulls out a little bit, then pull the on the other side. I also yank constantly instead of pulling all at once.
Here's a video showing someone removing the headlight:
http://www.youtube.com/watch?v=h3xbCZVMbE8
You'll need to disconnect the wiring by pushing down on the plastic tab and then disconnect the wiring harness at the bottom of the housing with pliers by squeezing then pulling out.
Once you've completely disconnected the headlights, you'll need to set down the headlights on a towel or some sort of padding to keep it from getting scratched. Then you will need to remove the dust caps by pushing down and turning clockwise.
Once the dust cap is removed, you will need to remove the old H11b bulb.
When the bulb is removed, go ahead and unscrew the 3 screws holding the metal base.
Now grab your vise-grip and attach it to the black plastic piece.
There will be a metal tab that you can push down.
You will also need to push up on the metal base to allow clearance for...
...this plastic piece. So while pushing down on the metal tab with your thumb, grab the vise-grip and lift the metal base while pushing out on the metal base. This will require a little strength to take off.
You should end up with this.
Go ahead and screw the metal base back onto the projector.
Now we'll want to grab the H11 wiring harness and slide the wire into the quick disconnect.
Crimp down the connector.
After doing both you should end up with this.
Now slide the quick disconnects into the black connector. One thing I noticed is that the harness is not color coded so I didn't know which one was the ground. I went ahead and winged it here.
After connecting the quick disconnects, I taped around them with electrical tape. I did this as a precaution, to make sure the metal quick disconnects wouldn't touch anything and cause a short.
Now grab your gloves and take out one of the H11 bulbs and connect it to the harness.
Screw it into the holder.
With the passenger side, things were a little more difficult. I had to screw the bulb in first.
Then I slid the connector inside the housing.
Of course another problem arose as there wasn't enough space in the housing to get the connector to connect to the bulb. I had to turn the bulb a bit to an area with more space.
Once it was connected, I went ahead and turned the bulb back.
Okay!
Now you'll want to do the reverse. Screw back on the dust cap. One thing that I would recommend doing is connect the main power harness to the headlights and place the headlights somewhere secure. Reconnect the battery and make sure the light works. This will save you some time from having to bolt everything in just to find out that the light isn't working. Repeat the steps for your headlights on the other side and you should end up with the following results:
TA-DA! I found that the "Icis Blue" are actually quite white. I'm really satisfied with the end result. Visibility is as good as the OEM bulbs are, and the color temperature is a perfect white hue with the ever so slightest blue hue.
Thanks for reading! I hope you found this helpful/useful
Thread Starter
Senior Member
Joined: Dec 2011
Posts: 257
Likes: 0
From: Santa Rosa, CA
Vehicle: 2011 Genesis Coupe 3.8 R-Spec
Thanks man! I think the total time for both headlights was 2 1/2 hours. Taking pictures added to it, but I don't think that much. I definitely wasn't rushing it, since I had all night
