
MD HID Install Help!


Thread Starter
Moderator


Joined: Mar 2009
Posts: 1,442
Likes: 0
From: Colchester, VT
Vehicle: 2013 Subaru Legacy 2.5l Limited
Hello Everyone!!!
As you know I traded in my 08 Elantra for a 2012 Elantra Limited.
I'm running into huge HID issues with the 2012 model. I have been looking around but I still can't figure it out. I took the HID kit out of my 08 (which did not need a relay) and installed it. Found out that the car was killing the power to the low beams once the car was started. So I ordered a H11b relay off of Ebay, only to discover that the ground wires for the drivers side were too big. So I turned around and brought a H11 relay off of Ebay. I have hooked up the relay and still no HIDs. I have no idea at this point what I am doing wrong. The first day I installed them, the battery light came on in my MD with the relay hooked up and only the right side HID worked. So I unhooked everything and came online to do more research. The next day, I hooked everything up again and this time, the battery light did not light up and neither HID worked. I messed with the harness and tried it again and this time a weird ticking noise came from the battery so immediately I turned off the car and unhooked again.
I am hoping to get more insight on the problem I am having.
Administrator

Joined: Oct 2002
Posts: 13,943
Likes: 0
From: ɯooɹpǝq ɹnoʎ
Vehicle: ǝdnoɔ sısǝuǝƃ
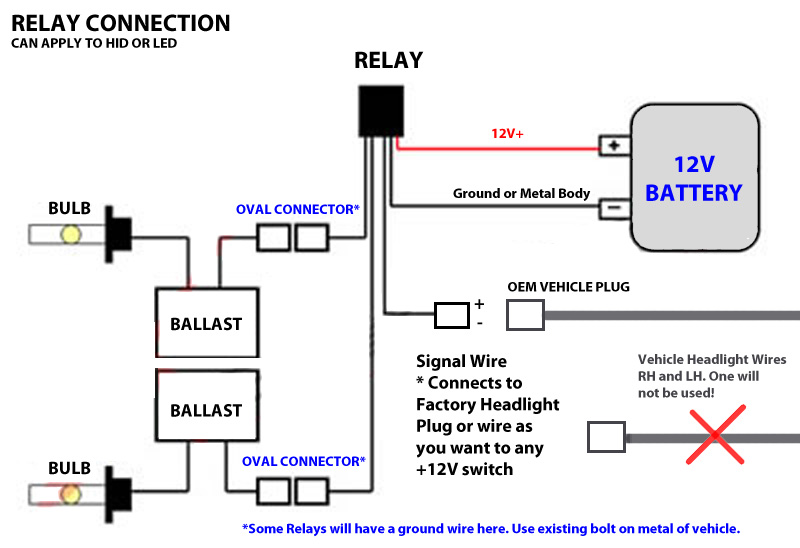
I know you've been looking at diagrams and tried half a dozen setups, but does this help?

#5 is the plug in your harness that fits into the stock headlight wire plug. For H7 size, it is a red connector, for all other sizes, it is a black female connector.
1. Connect to Left Ballast input
2. Connect to Right Ballast input
3. Connect to the Positive + side of your battery.
4. Connect to the Negative - side of your battery.
Note: the negative power leg may also be connected to a solid chassis ground anywhere on the body of the vehicle.
5. Connect to your car's stock headlight power cable.
Note: This connection can be to either the right or left headlight power connector. The other headlight connector is no longer used.
How it works: The Headlight power connector (5) powers the relay (6) which provides power directly from the battery (3 & 4) through a fuse (7) to the HID ballasts (1 & 2).
http://www.diodedynamics.com/install/hidrelay.html

Senior Member
Joined: Aug 2009
Posts: 11,992
Likes: 0
From: Washington D.C.
Vehicle: Hyundai Tiburon FX
Thread Starter
Moderator
Joined: Mar 2009
Posts: 1,442
Likes: 0
From: Colchester, VT
Vehicle: 2013 Subaru Legacy 2.5l Limited
HyundaiKitCoupe: That video has been my guide. 
Majik: I see in the bottom in photo that it says all the negative grounds must be on bare metal aka no paint. The whole chassis is painted red. Will this make a difference? And you stated above to have one of the negative ground connect to the negative on the battery. I haven't done and that wasn't done in the video. Should I try that next?
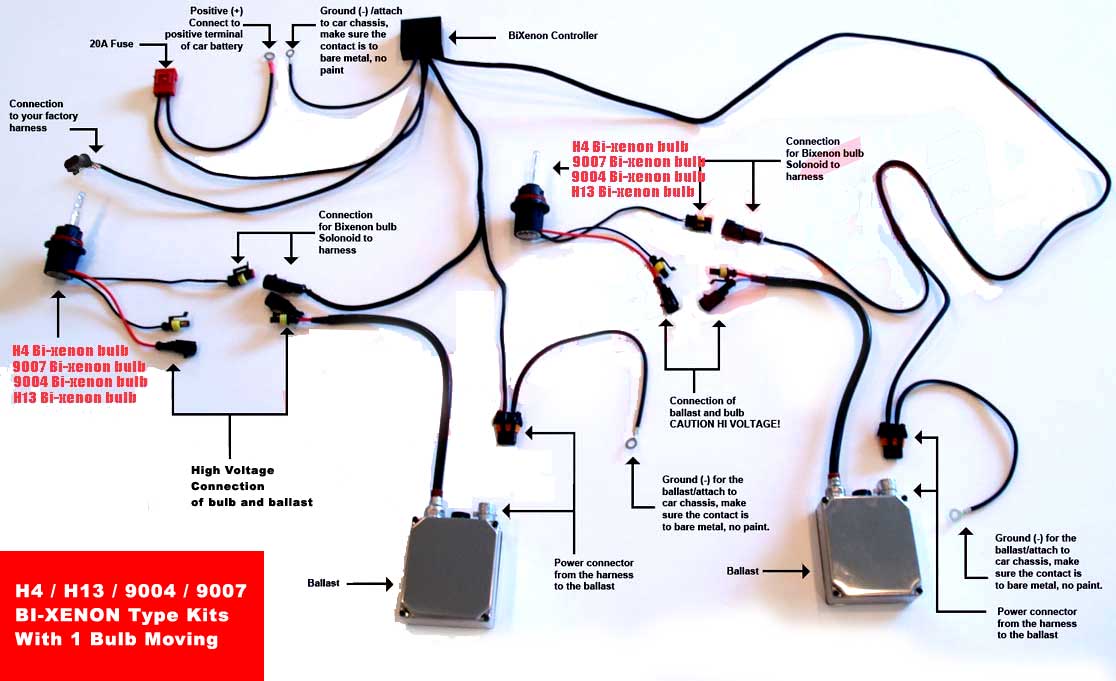
 This is the exact relay I have except I dont have a connecter for 3. So my step 4 goes directly to the relay skipping step 3.
Majik: I see in the bottom in photo that it says all the negative grounds must be on bare metal aka no paint. The whole chassis is painted red.
Will this make a difference? And you stated above to have one of the negative ground connect to the negative on the battery. I haven't done and that wasn't done in the video. Should I try that next? This is the exact relay I have except I dont have a connecter for 3. So my step 4 goes directly to the relay skipping step 3.
Administrator
Joined: Oct 2002
Posts: 13,943
Likes: 0
From: ɯooɹpǝq ɹnoʎ
Vehicle: ǝdnoɔ sısǝuǝƃ
post pictures of your HID ballasts, wires, and relay.. laying out separate from each other. I'll try to photoshop them in the order they should be in.
You can ground to either the battery, or the chassis. Unpainted is preferred, it gets a better connection, but it will probably still work if you do it on paint. Some people sand a little piece of paint around a bolt and ground it there. Since you have a brand new 2012 car, in VERMONT, I would advise against exposing any bare metal at this point.
Are wires 7 and 8 long enough to connect to the battery?
Number 4... you said at one time you connected both sides. Am I interpreting what you said wrong? Do you have one #4 or two? If you have 2, the relay may not require one of them to be used. Use electrical tape to secure them from touching metal if you can't remove them.
Thread Starter
Moderator
Joined: Mar 2009
Posts: 1,442
Likes: 0
From: Colchester, VT
Vehicle: 2013 Subaru Legacy 2.5l Limited
post pictures of your HID ballasts, wires, and relay.. laying out separate from each other. I'll try to photoshop them in the order they should be in.
You can ground to either the battery, or the chassis. Unpainted is preferred, it gets a better connection, but it will probably still work if you do it on paint. Some people sand a little piece of paint around a bolt and ground it there. Since you have a brand new 2012 car, in VERMONT, I would advise against exposing any bare metal at this point.
Are wires 7 and 8 long enough to connect to the battery?
Number 4... you said at one time you connected both sides. Am I interpreting what you said wrong? Do you have one #4 or two? If you have 2, the relay may not require one of them to be used. Use electrical tape to secure them from touching metal if you can't remove them.
You can ground to either the battery, or the chassis. Unpainted is preferred, it gets a better connection, but it will probably still work if you do it on paint. Some people sand a little piece of paint around a bolt and ground it there. Since you have a brand new 2012 car, in VERMONT, I would advise against exposing any bare metal at this point.
Are wires 7 and 8 long enough to connect to the battery?
Number 4... you said at one time you connected both sides. Am I interpreting what you said wrong? Do you have one #4 or two? If you have 2, the relay may not require one of them to be used. Use electrical tape to secure them from touching metal if you can't remove them.
Number 4 is only plugged in on the driver's side only. Let me add pictures. I didn't explain it well.
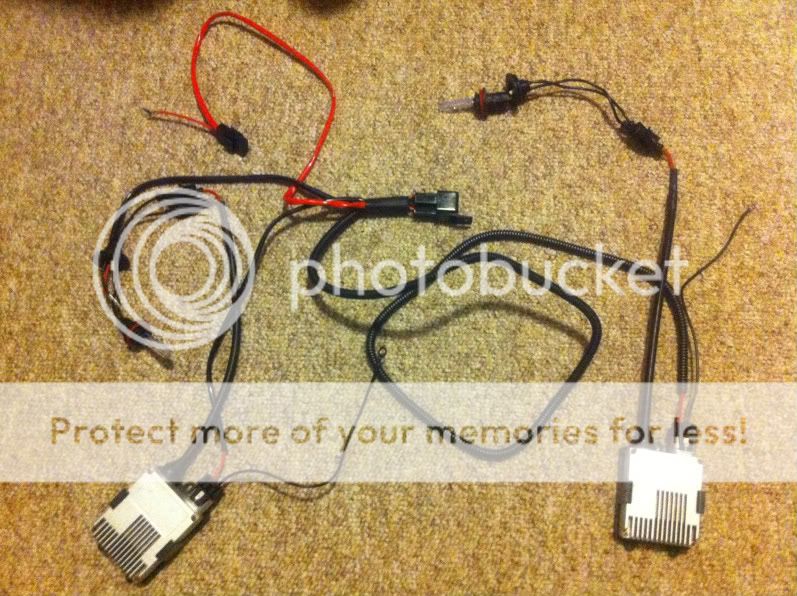
That is my HID and relay setup. 4 is all the way next to the bulb on the left. I know where everything goes. It just isn't working.

This is the plug I am talking about. In the video, the guy only mentions plugging the passenger side in.

This is the plug on the drivers side. In the video, the guy never says anything about plugging this back in. (I have tried it plugged in and unplugged.
Senior Member
Joined: Aug 2009
Posts: 11,992
Likes: 0
From: Washington D.C.
Vehicle: Hyundai Tiburon FX
I know you're careful, and smart  but I would put plastic bags over those bulbs secured with rubber bands from debris and fingerprints. Careful not to scratch the cathodes as well. Another tip, do not test one HID with another OEM.
Did you ground the small black wires coming from the ballasts to a screw on the chassis? Did you reverse both yellow power/ground wires (inside the headlight) like in the video (4:30)? I can't find those on your kit...
I have the same relay. With the relay harness, only the driver's side headlamp needs to be plugged in. For the passenger side, the relay harness draws power directly from the battery so you wouldn't plug it into the headlamp assembly but it still needs to be grounded. (#3 on the diagram).
I think the reason why the guy says to plug that main plug only on the passenger side is because you don't use it, you're only using the driver's side plug to plug into the HID ballast wiring.
but I would put plastic bags over those bulbs secured with rubber bands from debris and fingerprints. Careful not to scratch the cathodes as well. Another tip, do not test one HID with another OEM. Did you ground the small black wires coming from the ballasts to a screw on the chassis? Did you reverse both yellow power/ground wires (inside the headlight) like in the video (4:30)? I can't find those on your kit...
I have the same relay. With the relay harness, only the driver's side headlamp needs to be plugged in. For the passenger side, the relay harness draws power directly from the battery so you wouldn't plug it into the headlamp assembly but it still needs to be grounded. (#3 on the diagram).
I think the reason why the guy says to plug that main plug only on the passenger side is because you don't use it, you're only using the driver's side plug to plug into the HID ballast wiring.
Thread Starter
Moderator
Joined: Mar 2009
Posts: 1,442
Likes: 0
From: Colchester, VT
Vehicle: 2013 Subaru Legacy 2.5l Limited
Did you ground the small black wires coming from the ballasts to a screw on the chassis? Did you reverse both yellow power/ground wires (inside the headlight) like in the video (4:30)? I can't find those on your kit...
I have the same relay. With the relay harness, only the driver's side headlamp needs to be plugged in. For the passenger side, the relay harness draws power directly from the battery so you wouldn't plug it into the headlamp assembly but it still needs to be grounded. (#3 on the diagram).
I think the reason why the guy says to plug that main plug only on the passenger side is because you don't use it, you're only using the driver's side plug to plug into the HID ballast wiring.
I think the reason why the guy says to plug that main plug only on the passenger side is because you don't use it, you're only using the driver's side plug to plug into the HID ballast wiring.
My kit doesn't have a number 3(on the picture I posted). I'm so confused now.
Senior Member
Joined: Aug 2009
Posts: 11,992
Likes: 0
From: Washington D.C.
Vehicle: Hyundai Tiburon FX
Ok I checked my set and the main headlight plugs should always be plugged in to both headlights.
The guy in the video is using an HID without a factory 9006 plug for power, which is that 4:30 mumbo jumbo. #4 should be the only one you plug into any factory harness on the drivers side. The rest is the relay - battery. If grounded correctly, it should work, unless you've blown a headlight fuse.
BTW, the ticking noise means you drained your battery out. Does the car start at all? Check the fuses in the engine bay as well as inside of the cabin. One of the fuses should be busted.
You can't turn on the HID's with your car turned off without a relay (in your case the proper relay) or the fuses will blow.