
Sports Driving: Cornering & Heel-and-toe downshift

Thread Starter
Senior Member

Joined: Mar 2006
Posts: 2,163
Likes: 0
From: Australia
Vehicle: Lancer Evo IX
Hi guys. I posted these up on HP a while ago in the Strategy & Technique forums of HP. I'll be pasting several topics here of the same nature, as an online backup if that's alright with Josh(seeing as how HP is no longer under Rob's control and may one day come under fire) Anyhoo:
Well, haven't done one of these write-ups for quite a while so I decided to put this up for referance.
CORNERING 101
~Basic cornering technique:
Well, haven't done one of these write-ups for quite a while so I decided to put this up for referance.
CORNERING 101
~Basic cornering technique:
Obviously this has little to nothing to do with drag racing, which would be the regular passtime. It has even less to do with street-racing, as it's not possible to predict the condition of the surface that you happen to be "racing" on [ie. a spot of gravel on the road shoulder could take away what little tractio you have left while corntering at the limit.] This is compounded by the problem that our cars are FWD, and the front wheels are handling both the braking/drive as well as the lateral loading[sideways centrifugal force] Also, not everyone on the public road is aware of proper race-craft. Thus, it's best to keep it to the track, or sanctioned events.~Here's a few things that should be kept in mind when reading this:
What's gonna be discussed here are the basic elements of getting a FWD car to turn both quickly AND safely. There are several other things you can do to agitate the chassis and rotate the car towards the corner apex, but since this requires a certain degree of traction loss and agressive weight-shifting, it will not be discussed here.
~A few things about FWD that you need to know about:[*]This article assumes that, for purposes of minimizing time, you are accelerating towards the corner at WOT on either the front or rear straight.[*]The article will assume that you are wearing the essential safety gear, ie. helmet, suit, gloves, boots and associated fireproof underwear. It will also assume that you have a fire extinguisher in the car and that trackside assistance is availible.[*]The article will assume that your brakes are working at 100% efficiency, and that your chassis has been set up properly for motorsports events.[/list]
- [*]The weight of the car is primarily at the front of the chassis; it is safe to assume a weight distribution of 65/35 front-to-rear for a sedan and even up to 70/30 front-rear in a normal production hatch.[*]The front tyres handle pretty much everything. They handle both braking and accelration forces, and as mentioned before they also handle the majority of lateral loads. This means that the front wheels handle drive, cornering AND braking chores while the rears follow along for the ride.[*]The above means that there is far less traction left over for the turn, compared to RWD.[*]When accelerating, the weight of the vehicle is shifted towards the rear. And thus, pressure on the front tyres is reduced. That means, traction[grip] is also reduced upon acceleration at the corner exit. Accelerating too hard ut of a cirner will result in the car going wide, or understeering.[*]When braking, the weight of the car is shifted onto the front wheels, so the inverse to the above occurs. However, this uses up a great deal of the traction availible from a given set of tyres, so you will not be able to turn in as harshly on the brakes as you would be able to in a RWD car. Attempting to do so will result in "plow," or understeer.[*]While doing either of the above, you will also be trying to do one of two things: either you will be trying to enter the corner, or to leave it as quickly as possible.[/list]~Now, let's get down to it: There's not much of a point to descrive every concievable type of corner that you're going to encounter. Thus, I'll be telling you only what you should be looking out for, and what you'll need to feel the car and the tyres doing. Every corner is different, every one has its own little naunces that you'll have to become familiar with. Every track has a different rhythm, and it's something that you'll need to familiarize yourself with over time and practice. Let's first break it down into steps followed by actions, and then the feedback of those actions. The final part will be drills that you can do in order to get better.
- DO look where you want to go.
- DO plant your foot on the dead pedal and use it for support
- DO use the steering wheel to control the direction of the car and NOT for support against the g-forces.
Corner approach:
At this point, you'll be at wide-open-throttle and using up 100% of your tyre's grip to move the car forewards. Assuming that you're noy 500m away from the braking point[there will be markers at the side of the track denoting 300, 200, 150 and 100m marks if that is how its done in your country] you shold have to brake somewhere in order to avoid a collision with the wall or a trip into the run-off area due to your tyres becoming overloaded, hence you will travel straight or outwards in an arc away from the geometric centre of the turn.Braking
This part is easy, you simply pin your foot to the floor and use 100% of your engine power to get you down the straight as quickly as possible.
Here things start to get interesting. Where do you start braking? If you've been to the track before, you'll know where the braking points are. If you haven't though, it is safest to begin braking at the 300m mark and gradually reduce the braking distance. No two cars are similar, and no two drivers have the same technique. You have to do what is right for you, and so you will have to rely on your own individual practice to tell you when you should be doing what.Turning in
Method:
Brake as hard as you can, while at the same time, no so hard that the tyres lock up. The objective here is to spend as little time as possible braking[or reducing speed] This will allow you to spend more time moving forwards under full throttle. This can also be used for out-braking manouvers, where you should ideally be occpying the inside line. If you have ABS, this is pretty easy as the system will do most of the work for you. Just focus on taking off as much speed in the shortest amount of time possible. If you do not have ABS, then you will have to feel what the tyres are doing, and practice some drills before heading to the track in order to learn how much brake you ca use without your tyres locking up[as above, focus on one corner and gradually reduce your braking distance. Do not attempt to exit quickly, just practice on dropping as much speed as you can in the shortest amount of time possible. It will feel much like panic-braking at first and the G-forces will be considerable. However, if you are harnessed in, the harness and the seat will absorb most of it leaving the sensation of your eyeballs leaving your head.
Drills, on track:
As above, ignore the corner itself and focus on scrubbing off as much speed as possible by braking at the 300m mark. Brake for longer at first, even if it means your comfort zone is well away from 300m. Even if it is as 450m, brake there and coast in[don't care if the other drivers fly past you, you are the one learning] As you get more comfortable with the g-forces and the pressure on the pedal, brgin braking later and later, and as you brake later you will also be applying more pressure on the pedal.
Drills, normal driving:
If you are at the front of the queue and the first car before the stoplight, go say 10-20km/h under the speed limit and try to stop before the stop-line. Ideally, your bumper should be 2-3" away whe your vehicle comes to a complete stop. Also, focus on releasing the brake smoothly so that the vehicle does "rebound" as the front suspension extends again from dissipating all that energy.
Application:
Now, the whole point of the above is to learn how much brakes you can use witout locking the tyres up. This is essential to SAFETY. The entire point of it all though, when looking at the big picture is how little speed you can scrub off so that you can carry it through the corner as momentum.
Here is where you will need to pick your line. There are a couple of do's:The basic line is, to hit the apex of the corner. This basically means, taking the shortest part between two points around a common axis. That means, outside of the corner to the inside of the corner, then back to the outside on the throttle.
During the turn-in phase, you will be transferring from braking to cornering force, meaning that you will have to be coming off the brake while increasing the degree that you turn the steering wheel. All while scrubbing off speed. Imagine the total availible traction your tyres can give as 100%. Everythig you do with the wheel and the pedals will take up a measure of this. When you exceed 100%, your tyres break loose and the vehicle goes out of control. Thus, with a FWD platform, you will have to be extremely sensitive to what the tyres are doing. In the beginning you will need to do one thing at a time, braking, releasing the brake, then turning in.
Here, you will be transferring from 100% braking into 100% cornering force. Which means, you will need to come off the brake smoothly before turning the car into the corner. [hence why the drill above also emphasizes smoothness of brake release]
As speed drops, you can begin to turn the car in[more traction is now availible for you to change the car's direction with. The more grip you have left, the tighter you can clip the turn] Ideally, you will have taken off enough speed to make the apex. This of course, takes practice. So don't worry if you don't make it the first few times, it will happen with enough practice.
Also, it should be noted that the steering wheel should be turned only as little as need be. The less you turn the wheel, the less time the car will need to recover from the turn. And the less time it takes to do so, the more quickly you will be able to go from 100% lateral load to 100% acceleration. At the begining, it will feel like there isn't enough steering for you to make the turn[after all, you are limiting the amount of steer in order to preserve traction and the balance of the chassis] Again, it will take practice. And in order to get this right, you will need to be on the correct line. You will also have had to take off just enough speed so that the car doesn't understeer. Again, this takes practice. AND on top of it all, you will have had to transfer smoothly from full braking to full cornering loads.
The recommended hand position is 10 & 2, but generally you need to find what works for you. Resting your thumbs gently on the opposing spokes of the steering wheels closest to these points usually works the best since not all wheels are created equal.
WHat you will feel at this point, is the sensation of being thrown either against the side of your seat, or out of the seat by the centrifugal force[hence why it is ideal to have a seat with good support] Planting your foot into the dead pedal will help some, but it is no substitute for having a fixed bucket and a harness.
Drills, on-track:
As mentioned above.
Drills, normal driving:
Drive below the speed limit, and keep to your lane. At no time should any part of your vehicle leave it. You are focusing on removing enough speed to make the turn you're aiming for with the least amount of steering input possible. Do not change yur hand position, stop short of crossing your arms up. Your shoulders as well, should not leave the backrest of our seat. Practice with BOTH HANDS ON THE WHEEL, and change down before hand. Focus on putting the tyres where you want them to go, and look where you want to go.
The whole idea of driving below the speed limit, is so that you will not go wide and slam into oncoming traffic because of excessive centrifugal forces acting on your tyres. This is a dangerous exercise, and you should first attempt it on roads where there is no traffic.
Leaving the corner:
Well, you've gotten into it. You've gotten past the middle of it. And now it's time to leave the turn.Overall application:
Remember the process of turning in after the braking entry? Leaving the corner is pretty much the opposite with the same principles applied. To-whit, you will be using the accelerator, unwinding the steering and shifting cornering load[lateral] to acceleration load[weight **** to the rear of the car again] Unfortunately, it won't be as simple as mashing the throttle at the later part of the turn; this will result in one thing: understeer. And if you pitch the car into the turn and the back comes loose, you're into an uncontrolled slide towards the wall.
Here you will be doing the opposite of turning in; you will be unwinding the steering from its minimal lock position while getting back on the throttle, and both of these things will have to be done together. Of course, in the beginning you will need to do one thing at a time[point the car straight, then get back on the accelerator] Again, this has to do with the amount of traction you have; with more grip[semi-slicks, better suspension, etc.] you will be able to get back on the throttle sooner. However, you are going to have to feel what the tyres are telling you. At this point you will be heading towards the outside of the turn while you exit, and setting up your line for the next turn.
You will be feeling at this point centrifugal force dying off, to be replaced by the familiar feeling of having yourself pressed backwards into the seat. It is at this point that you will have to think of the line again, and the process is repeated when you reach the next turn.
Drills, on-track:
Ignore the forst part of the turn, and clip the apex. Accelerate out of the turn while pointing the wheel in the direction that you want to go. The more you accelerate, the more the wheel is returned to its straight-ahead position. When the wheel in straight, that is when you should again be at 100% WOT.
Drills, normal driving:
Do NOT practice this on normal roads.
When you are confident that you are able to feel the limits of the tyres and clip the apex of the turn consistantly after braking into the turn hard, it's time to put everything together. I cannot stress enough the importance of being smooth in the process of turning the car; how smooth you are will determine how quickly you can get things done. Be rough, and you will have to wait for the car to settle itself[ie. the suspension will want to smooth out all the little jerks that come with inonsistant loading/unloading, and this will take time]Other stuff:
Mentally, break the corner down into its 3 stages, and perform them one after the other until it becomes just another process while increasing your speed each time. As you go, you will find out exactly how little speed you can scrub off using your brakes. You will find out how little you can turn the wheel in order to still make the apex, and you will find out how much throttle you an apply at the exit while still mantaining enough traction to guide the vehicle out safely. As time goes by, you'll beging to do everything as a single process. As per usual, it takes practice and seat time.
Throwaway turns:
There are times when taking the ""ideal" apex through every turn in a sequence of corners actually slows you down. Have a look at the track, and decide which is the shortest route through the series of bends. In this, you will have to incorrectly clip some turns in order to set up for others. Place particular emphasis on the turns that lead out into the straights; the final turn is the one you're looking at setting up for in order to maximise the amount of time you can stay at WOT.
Changing down:
Not once above has changing down been mentioned. That is because the article focuses on the stages of the corner. The best way to do this is, basically, heel-and-toe downshifting where you are doing two things at once: braking, and cycling down through the gears.
Others:
If you are starting out, keep off the racing line. For safety reasons, allow the faster cars with more skilled drivers to go past before you begin your practice. Slowing them down will only put you in a dangerous position; they will be braking far later than you, and when you brake they will still be at WOT. Hence, a rear-end collision will occur.
If you are caught in the middle of a turn by a faster driver, do NOT let them past in the middle of the turn; the other driver will have set up to pass you at the exit and your changing ines to let him by will mess up this plan, resulting in a dangerous situation. They have more experience, get off the line and let them figure out how to execute the pass. When they pass, watch their line and their brake lights. Attempt to follow that line, but use your own braking points[ie. find out how soon or how late you can brake gradually] This will allow you to improve more quickly.
Also, changing your line mid-corner will cause the car to become unsettled; once you begin the turn-in, you're committed to the turn. Le the faster and more experienced drivers in the faster cars fnd their way around you. They will do it in short order, and you will be able to resume your practice after they do.
Take note of who and what is around you. It is difficult to see open-wheelers when you are putting around in a saloon.
That's about if for this write-up. Go out to the trackdays, have fun, take it slow at first and build yourself up through practice. And most of all, be safe.
Thread Starter
Senior Member
Joined: Mar 2006
Posts: 2,163
Likes: 0
From: Australia
Vehicle: Lancer Evo IX
Heel & Toe downshift:
-Introduction:
Right. We've covered thus far how to make your front-driver go round the bends. However, that article didn't cover how to get through the gears while you're on the brakes and setting up for the turn. So, where that one didn't, this one will.
This article applies from the point where you get on the brake, to the point where you release it before or at the apex, whichever suits you better. As usual, the disclaimers:
-Basics of equipment:
-The process of using three pedals at the same time:
First, a little diagram. Sorry about the shoes people, these have been with me for a few years now and blipping a lot does rip the sides of them:
-Introduction:
Right. We've covered thus far how to make your front-driver go round the bends. However, that article didn't cover how to get through the gears while you're on the brakes and setting up for the turn. So, where that one didn't, this one will.
This article applies from the point where you get on the brake, to the point where you release it before or at the apex, whichever suits you better. As usual, the disclaimers:
[*]This article assumes that, for purposes of minimizing time, you are accelerating towards the corner at WOT on either the front or rear straight.[*]The article will assume that you are wearing the essential safety gear, ie. helmet, suit, gloves, boots and associated fireproof underwear. It will also assume that you have a fire extinguisher in the car and that trackside assistance is availible.[*]The article will assume that your brakes are working at 100% efficiency, and that your chassis has been set up properly for motorsports events.[/list]
-Basics of equipment:
Generally, the stock pedal locations and throw of the pedals are absolutely horrible for blipping while holding onto the brakes. ie, the brake and accelerator are very far apart and the brake pedal does not go far enough down towards the floorboard for you to push the accelerator down much with the same foot leading to you performing feats of contortionism.-What you're looking for in pedals:
Of course, there are exceptions; cars built for sports or sporting purposes usually have this factor considered in their design process. Unfortunately, we don't fall into that bracket; we drive FWD econoboxes. Thus, we will have to make our own way.
Enter the aftermarket, and bolt-on sports pedal kits:
Now, these are cheaper ones that do the job just fine. What you are looking for isn't carbon fiber or bling; these happen to have the worst grip of all. And that's what you basically need: grip at the pedals. You do not want your feet slipping off at any time while driving. In general aftermarket pedals come in normal aluminium finishes with rubber or PU inserts. What you see above is a method for both increasing all-weather grip. You need to apply self-adhesive skateboard grip to them. Just apply the grip to the pedals and trim off the excess.
The whole point of this is to maximize the feedback you get from each pedal; the more grip you have, the better it is, the more precise your inputs will be.
As a rule, do NOT use the type of pedals that have plastic brackets behind them. Do NOT use any pedal that isn't made of a metal. The ones above are sheet aluminium, and the brackets have been removed so that they can be screwed into the stock pedals.
More tips here:[*]If you can't press the accelerator far enough towards the floorboard while applying enough pressure on the brake, you will want to shim the accelerator upwards.[*]If you have to distort your ankle unnatrually while trying to reach the accelerator while on the brake with the same foot, the aftermarket pedals will allow you to move the plates closer together.[/list]
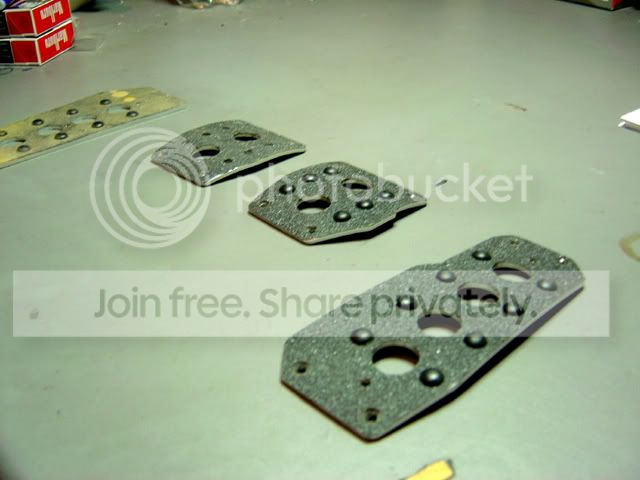
Have a look at the accelerator pedal above. See the little obtrusion at the lower-left corner that goes 3/4 of the way up towards the top? That's what you're looking for; a part in the pedal that helps you reach it with the right edge of your right foot.-Now, it is not necessary to have aftermarket pedals. However, if your feet are small like most ladies' or if you have small feet for a guy[OR if the vehile you have spaces the pedals out really, really far] the aftermarket bits will help.
The brake pedal is the same in this set; the lower right portion is extended towards the accelerator, helping you to reach it without having to excessively turn the lower half of your right leg. The clutch pedal, as you see, is perfectly normal along with the dead-pedal. The only difference is, that I have covered them with grip in order to get as much feedback and traction as possible.
-The process of using three pedals at the same time:
First, a little diagram. Sorry about the shoes people, these have been with me for a few years now and blipping a lot does rip the sides of them:
-Right, here's the explanation:
As you're approaching the turn and braking in, you will have to change down through the gears in order to be in the right gear for the exit. You're using three pedals at the same time, because, it lets you do these things at once:
As you're approaching the turn and braking in, you will have to change down through the gears in order to be in the right gear for the exit. You're using three pedals at the same time, because, it lets you do these things at once:
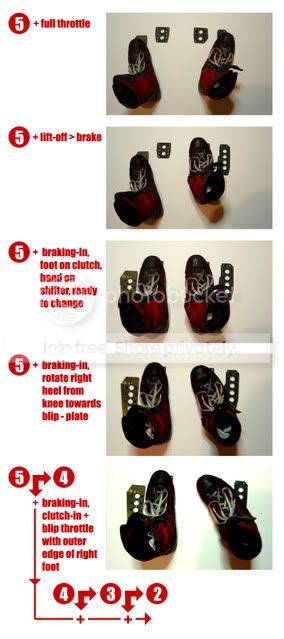
- [*]Braking[*]Changing gears[*]Matching revs[smooth changes without jerking][/list]Since the diagram is quite an explanation in itself, I'll just fill in the gaps here.
- Put left foot on clutch
- Turn left foot heel-outwards towards the accelerator while braking in
- Place hand on shifter
- Keep braking in
- Push in clutch, press down on the accelerator with the right edge of your right foot while getting into the next lower gear.
- Release the clutch while the revs are up from the blip.
You're on the brake first, scrubbing off speed. ONLY when you have taken off enough speed for that gear do you:
As before, this will take some practice. You will be looking out for these things:
- [*]How much to jab the acelerator[that's right, you basically give the accelerator a short KICK! in order to get the revs up] in order to get the revs high enough to even out with the engine speed.[*]Keep CONSTANT pressure in the brake pedal[after a while, you will be able to modulate brake pressure while blipping][*]Watch that the porcedure is done quickly.[/list]And most importantly:
- [*]Do NOT twist your foot; pivot your leg at the knee, and press down from the knee. Bring your knee inwards, so that it places your calf and foot at an angle that makes it look like you're knock-knee'd. Blip by moving your thigh downwards, while retaining a stabbing motion with your heel[this will being the outer edge of your right foot down much more quickly than trying to blip with just your foot.] [*]You do NOT have to have the ball of your foot on the brake and the heel of your foot on the accelerator[no matter how much Initial D you've watched, we're real people with real muscles and skeletons. AND, the previous method is faster to pull off with less discomfort.][*]If you wish, you can also roll your foot sideways if it suits you better[this is however done more often with cars that have very small leg-room and with very close-in pedal boxes, ie. Formula Fords and other open-wheelers][*]Have the correct footwear; slim shoes such as boxing boots, thin-soled X-trainers or anything else with a slim sole that lets you feel the pedal. DO NOT try this with thongs and slippers. After a while, you'll be able to do it natrually. After that time, you should be able to do it even when wearing a pair of CLOGS.
 JK
JK [/list]And now for perhaps the most important bit: speed and smoothness is the key when you'r doing this. The smoother you are the the quicker you are, the later you will be able to brake and the more traction you'll be able to get out of the tyres. You'll also be able to work in an amount of engine braking when you get the hand of it; this is done by blipping higher and letting the revs fall.
Drills, normal roads:
Make a concious note to brake-clutch-blip+change-release wherever you go, and whatever gear you have to go down into. The only exception should be when parking the bloody car. The more you do this, the better you'll get at it. Every stop sign, every traffic light, every turn where you have to go a gear or two lower, practice this.Drills, closed course:
Do NOT practice this on the track; you will be going a lot faster than on the street and a badly-timed shift with a blip that's too low will take away whatever grip you have left. You will get int trouble, and you will get hurt. On the contrary, a blip too high with a change too early will see you bouncing off of the limiter; you will damage your engine.Well, that's about it for this one as well. Remember, it's best to practice this at VERY low speeds and gradually, go faster and faster. Ideally, you should be well within your comfort zone speed-wise when you start doing this. As a safety tip; extend your safety distance from the car in front when you practice during your daily driving; a blip too high will leave you with increased forward motivation when you release the clutch[no matter how smoothly, this will happen] I'd recommend +1 1/2 ~ 2 car lengths of an increase; its better to be safe than sorry. Also, reduce your speed to under 10-15km/h below the safety limit, and increase your braking point when setting up for a corner. About 2-3 cars of an increase to be absolutely safe and to take stress off the driver; the less stress you feel, the more you'll notice about your technique.
Before you hit the track, be damned sure that you've got this down pat at EVERY point in your rev range.
But most of all, keep it controlled, keep in on the track, and stay safe out there!
Thread Starter
Senior Member
Joined: Mar 2006
Posts: 2,163
Likes: 0
From: Australia
Vehicle: Lancer Evo IX
Where to shift, and area to remain in while cornering and blipping:
In response to the "where should I shift" thread, I decided to put this one up. For the price of a dyno pull, you'll be able to tell where you should be shifting. Every car is different, and even fully stock the peak power or torque might occur a bit sooner or later. The curve might not even be completely identical. The curve may be effected by altitude, fuel as well as engine wear. Or a combination of all three, if you discount modifications. This is the reason I would encourage a dyno run for those who are looking for their very own shift points, relative to their own cars and sets of modifications.
Righto.
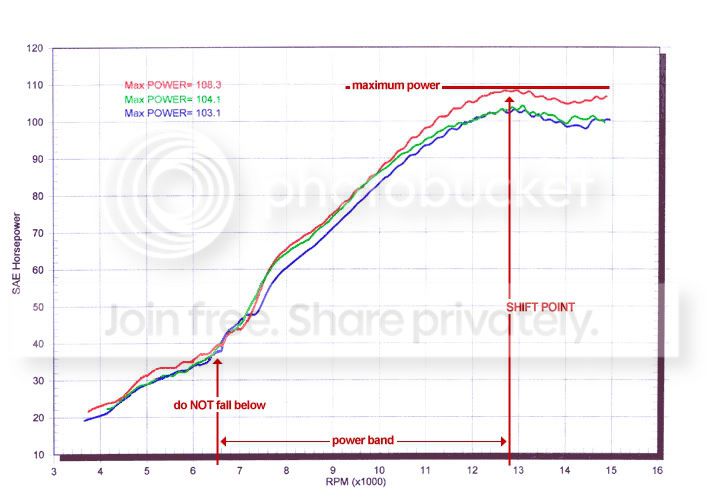
That should explain everything. Now, basically there is a dropoff behind peak power(this is the graph off of an R6 BTW, not off of a car. Its pretty textbook and its all we need for this demo.) There isn't a reason to go past the shift point(here at approx 12,800rpm) because you are not making any more power(you will be stressing your engine needlessly and actually losing your forward motion) Thus, shift at peak power or just after it(to compensate for rev dropoff at the time the throttle is lifted)
In response to the "where should I shift" thread, I decided to put this one up. For the price of a dyno pull, you'll be able to tell where you should be shifting. Every car is different, and even fully stock the peak power or torque might occur a bit sooner or later. The curve might not even be completely identical. The curve may be effected by altitude, fuel as well as engine wear. Or a combination of all three, if you discount modifications. This is the reason I would encourage a dyno run for those who are looking for their very own shift points, relative to their own cars and sets of modifications.
Righto.
That should explain everything. Now, basically there is a dropoff behind peak power(this is the graph off of an R6 BTW, not off of a car. Its pretty textbook and its all we need for this demo.) There isn't a reason to go past the shift point(here at approx 12,800rpm) because you are not making any more power(you will be stressing your engine needlessly and actually losing your forward motion) Thus, shift at peak power or just after it(to compensate for rev dropoff at the time the throttle is lifted)