
How To Make Custom Eyelids....

Thread Starter
Member

Joined: Mar 2008
Posts: 58
Likes: 0
From: Vancouver, WA
Vehicle: 98 Hyundai Accent X3
Some may have seen this on a different forum, but thought to share it here. I recently wrote up a How To on making custom Eyelids.
Hopefully this will help someone guide them if they/you are looking to do something similar....Note you do not need to copy my design I made but rather as an example of what you can do.
How To Make Custom Eyelids
Some of you may know I have a 98 Accent. And there really is no aftermarket support for this
Vehicle. Sure some minor things can be obtained. But nothing like Body Kits, Projector headlights, or
Special Taillights and many more items I could name. Well one of the newer items I stumbled upon is the Custom Eyelids. Again no support for the Accent. If there are, maybe I�m looking in the wrong place.
Thus, brings me to making my own. This is a basic overview of what I did to make mine and does not take
A lot tools to complete. Just maybe patience and determination to make something custom for your ride. I hope, that I can inspire some one to think outside the box�a little if it may be�..So here goes it. (Some pics will have side notes I added to them, hopefully they�ll still be readable).
First. Determine a design that will work for your headlights. Keeping in mind not to over do it and to make sure you will still be legal. In thinking of this. Make sure you will still have at least 80-85% of your
Lenses visible. Remember this is to create a new look, but still to keep your lights very much functional. Sketch something basic or start taping your lights up. I used the Blue painters tape.

Now draw your design. In helping me to make this I used the curves of the tape roll. You can also use
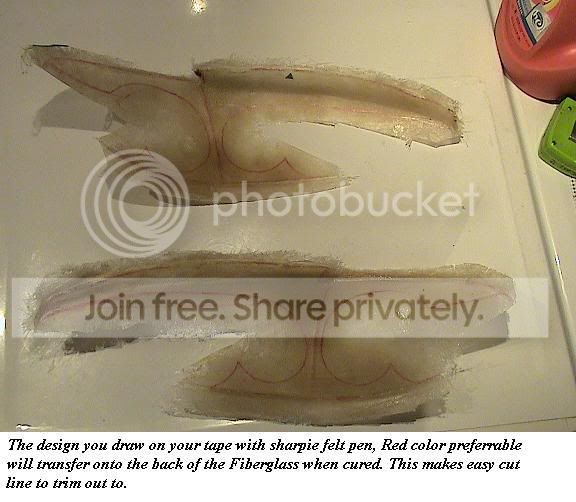
Artists French curves. I suggest using a RED sharpie felt pen. This will be visible to see on the tape, plus the red lines will transfer to the back side of the Fiberglass to reveal your cut lines. Outline the seams of the headlights and on top as well to include a mounting ledge.
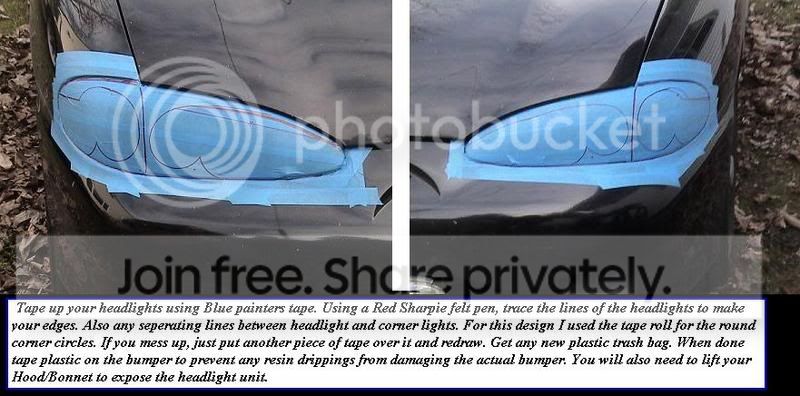
Next step is to make sure you have the headlights and surrounding areas of the car well taped. Use plastic garbage bags taped to the bumper just under the lights to catch any resin drippings�..hehehe drippings.

Continued Next posting......
Hopefully this will help someone guide them if they/you are looking to do something similar....Note you do not need to copy my design I made but rather as an example of what you can do.
How To Make Custom Eyelids
Some of you may know I have a 98 Accent. And there really is no aftermarket support for this
Vehicle. Sure some minor things can be obtained. But nothing like Body Kits, Projector headlights, or
Special Taillights and many more items I could name. Well one of the newer items I stumbled upon is the Custom Eyelids. Again no support for the Accent. If there are, maybe I�m looking in the wrong place.
Thus, brings me to making my own. This is a basic overview of what I did to make mine and does not take
A lot tools to complete. Just maybe patience and determination to make something custom for your ride. I hope, that I can inspire some one to think outside the box�a little if it may be�..So here goes it. (Some pics will have side notes I added to them, hopefully they�ll still be readable).
First. Determine a design that will work for your headlights. Keeping in mind not to over do it and to make sure you will still be legal. In thinking of this. Make sure you will still have at least 80-85% of your
Lenses visible. Remember this is to create a new look, but still to keep your lights very much functional. Sketch something basic or start taping your lights up. I used the Blue painters tape.
Now draw your design. In helping me to make this I used the curves of the tape roll. You can also use
Artists French curves. I suggest using a RED sharpie felt pen. This will be visible to see on the tape, plus the red lines will transfer to the back side of the Fiberglass to reveal your cut lines. Outline the seams of the headlights and on top as well to include a mounting ledge.
Next step is to make sure you have the headlights and surrounding areas of the car well taped. Use plastic garbage bags taped to the bumper just under the lights to catch any resin drippings�..hehehe drippings.
Continued Next posting......
Thread Starter
Member
Joined: Mar 2008
Posts: 58
Likes: 0
From: Vancouver, WA
Vehicle: 98 Hyundai Accent X3
Once you�re ready. Start by making pre cut or torn pieces of mat glass. Mix resin to directions on can. I suggest only mixing up 2oz. At a time. Work quickly but efficiently. You will have to move pieces around to get them to set right to minimize and edges that will stick up. They�ll be sanded later, but less work is best. You will be doing 2-3 layers on each light, but making each layer after each cure time. If you make the resin to HOT it�ll cure more quickly and you will waste resin greatly.
As a release agent, I used petroleum jelly or Vaseline. A very light coat is needed. Too thick and the Fiberglass will be problem to keep in place. Just enough to create a light film on the tape. Be sure to dab well to saturate the fibers with resin or you will get massive bubbles and may have to sand them out later and add more FG to fill it.

You will be letting this cure for about 1� - 2 hours. Once time has pasted, check it and do your second coats, and if needed a third coat.
This pic I�ll us again for this was my second layer of glass.
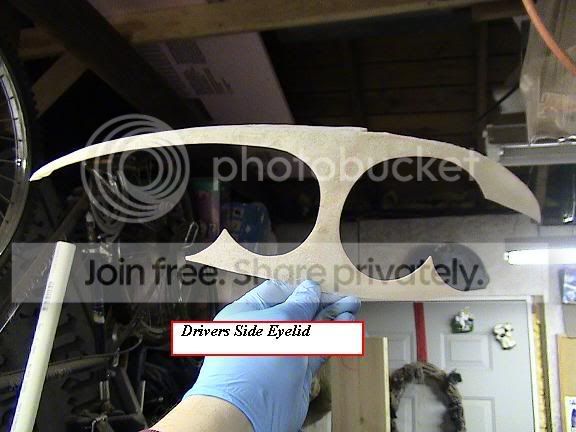
So now after your layers have cured, it is time to pull the shells. Be careful in doing this and make use
Of the tape to help you lift the shell gently off. As you lift, you may see under the FG where it is separating for the tape. If the tape totally comes off, no problems. Just pull it off later as you clean up your shell.
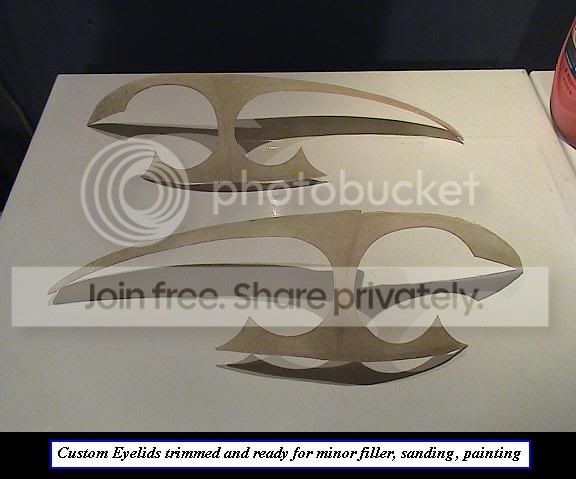
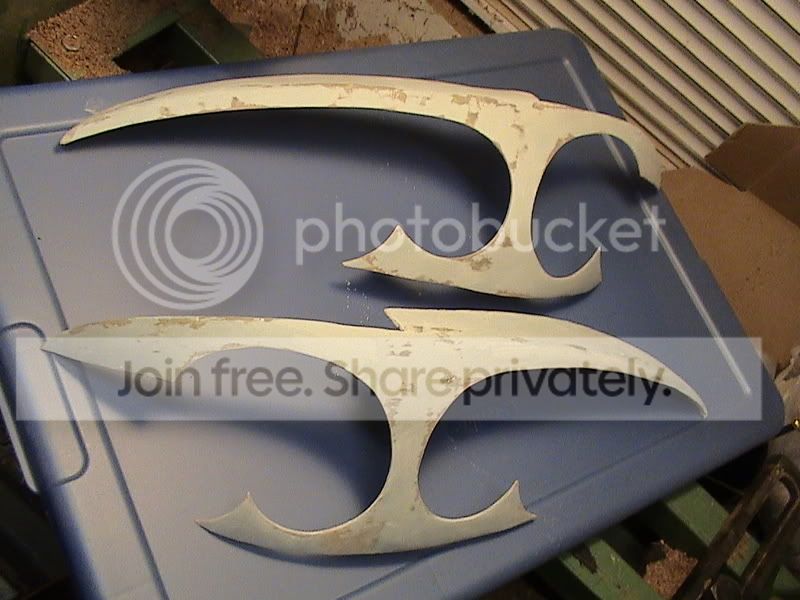
Now the fun part. Get out the Dremel if you have one, or some rotary tool. You can pic up a cheap one at a Harbor Freight if there is one near you. I used the Fiber cutting wheels to cut close to the red lines. You do not want to totally cut on the lines, leave room for sanding and altering for fitment.
I didn�t have a roughed out piece, for got that pic. But you�ll get the idea.
Next, what work best for me in getting close to the lines is a sanding drum. Either on your Dremel or on your Drill Press. I made a custom Drum Sanding barrel a couple of years ago and was perfect for this job.
Included in the pic is a small How To on making the Sanding Drum and how to use it.

So now you start shaping the design more to how you have it drawn / outlined.
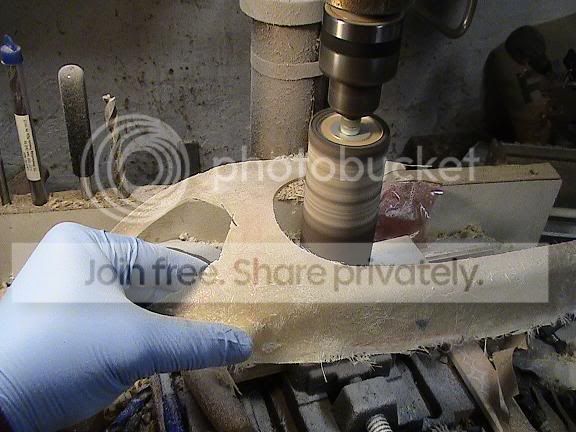
I set the drill Press to a speed setting of 1750. For my Delta this was middle speed. I used a course grit on the sanding drum as described above 80 grit should do fine.
Now you have both of them sanded close to lines and your pair should look fairly close. Its hard to get an
Exact look on both, unless you printed out a design on the computer. But try to get as even as possible. Once you have your shape going, Us a finer grit to help smooth out the surface of any rough edges. I used 220 grit.
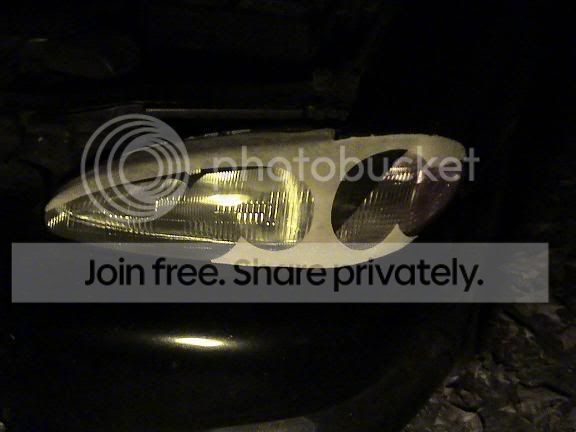
Before you start on using the Filler, Go and check fitment after you final shaping and make sure its lining up the way you want. Excuse the pic here, for it was getting dark and had to use a yellow light to see. But it gave me a look into if I was on the right track.
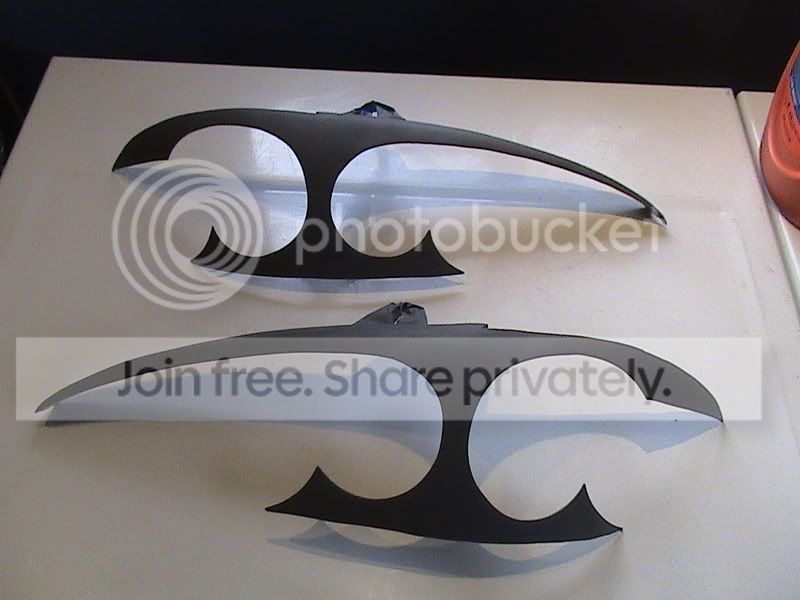
Next is the Filler stage. This I got from my local Napa Auto parts store. This is a 1 Quart can, which cost $12.00 with hardener.
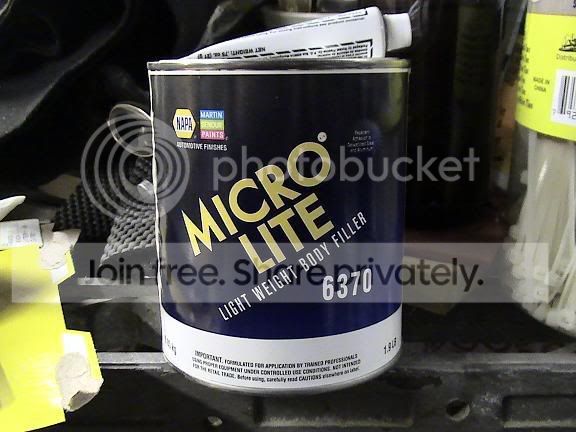
Mix small amounts as described on can and give the Eyelids a layer to help fill gaps and smooth lines. Wouldn�t hurt to do a second layer after a first sanding. Just to make sure you got any low spots.
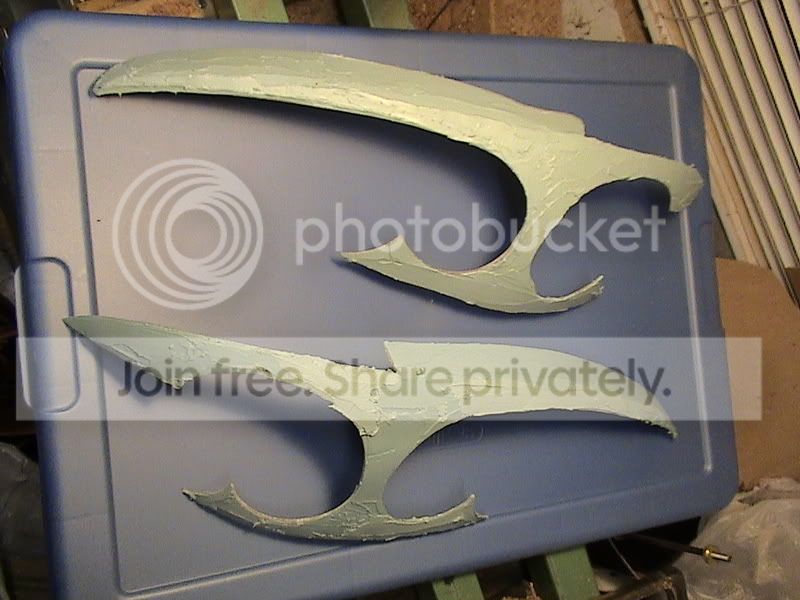
Also use by hand some 240 or 320 wetdry paper to help get a more even smooth surface.
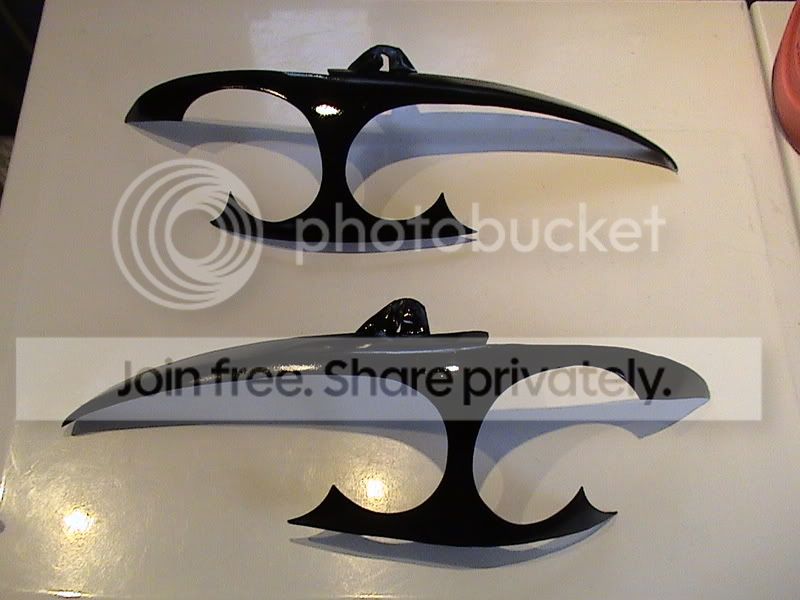
Once satisfied with your results, its time to prime the lids. This is mainly to make sure that you buildup
Some coats to eliminate light showing through since some areas could be thinner. After each coat put Lid to light source to see if any light shows. This will give you a better idea where to concentrate the spray.
I used a gray Krylon Indoor/Outdoor Primer. You can also use the Fusion as well. Spray in light coats. You may have to coat up to 4-6 times for good measure.
Since my car is Black. I got Gloss Black also Krylon product. Spray in light coats also. Making sure even coverage. You may have to spray also up to 4 coats. Wouldn�t hurt since these will be exposed to the road.
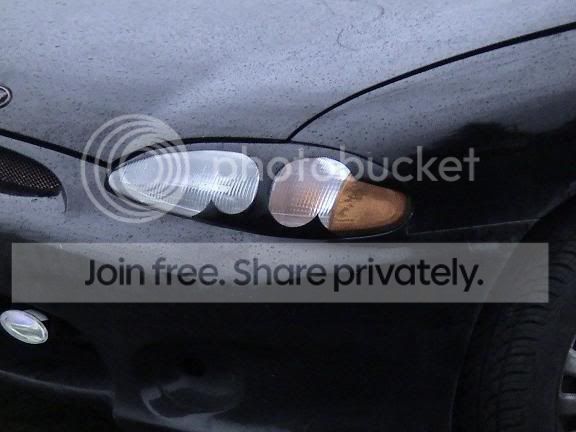
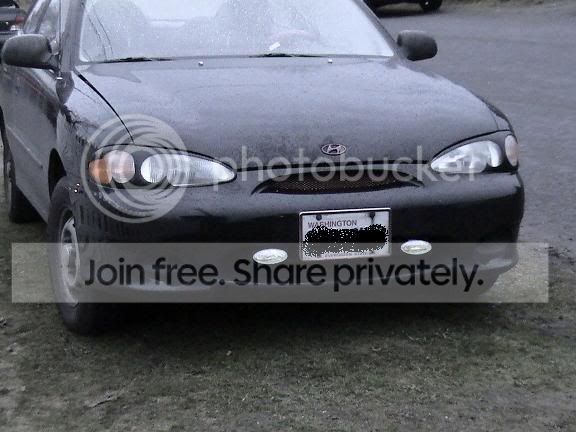
And So here they are finished. I�ll have a pic of them on the car soon. When I get a chance in the daylight to do this.
I hope this was informative. Since I had not seen any How To�s here on how to make them posted on CrookedH. If you like it. Maybe it can be added to the approved How To�s. If you have any questions. I�ll do my best to answer anything about my process.
Thanks,
GDAccent
As a release agent, I used petroleum jelly or Vaseline. A very light coat is needed. Too thick and the Fiberglass will be problem to keep in place. Just enough to create a light film on the tape. Be sure to dab well to saturate the fibers with resin or you will get massive bubbles and may have to sand them out later and add more FG to fill it.
You will be letting this cure for about 1� - 2 hours. Once time has pasted, check it and do your second coats, and if needed a third coat.
This pic I�ll us again for this was my second layer of glass.
So now after your layers have cured, it is time to pull the shells. Be careful in doing this and make use
Of the tape to help you lift the shell gently off. As you lift, you may see under the FG where it is separating for the tape. If the tape totally comes off, no problems. Just pull it off later as you clean up your shell.
Now the fun part. Get out the Dremel if you have one, or some rotary tool. You can pic up a cheap one at a Harbor Freight if there is one near you. I used the Fiber cutting wheels to cut close to the red lines. You do not want to totally cut on the lines, leave room for sanding and altering for fitment.
I didn�t have a roughed out piece, for got that pic. But you�ll get the idea.
Next, what work best for me in getting close to the lines is a sanding drum. Either on your Dremel or on your Drill Press. I made a custom Drum Sanding barrel a couple of years ago and was perfect for this job.
Included in the pic is a small How To on making the Sanding Drum and how to use it.
So now you start shaping the design more to how you have it drawn / outlined.
I set the drill Press to a speed setting of 1750. For my Delta this was middle speed. I used a course grit on the sanding drum as described above 80 grit should do fine.
Now you have both of them sanded close to lines and your pair should look fairly close. Its hard to get an
Exact look on both, unless you printed out a design on the computer. But try to get as even as possible. Once you have your shape going, Us a finer grit to help smooth out the surface of any rough edges. I used 220 grit.
Before you start on using the Filler, Go and check fitment after you final shaping and make sure its lining up the way you want. Excuse the pic here, for it was getting dark and had to use a yellow light to see. But it gave me a look into if I was on the right track.
Next is the Filler stage. This I got from my local Napa Auto parts store. This is a 1 Quart can, which cost $12.00 with hardener.
Mix small amounts as described on can and give the Eyelids a layer to help fill gaps and smooth lines. Wouldn�t hurt to do a second layer after a first sanding. Just to make sure you got any low spots.
Also use by hand some 240 or 320 wetdry paper to help get a more even smooth surface.
Once satisfied with your results, its time to prime the lids. This is mainly to make sure that you buildup
Some coats to eliminate light showing through since some areas could be thinner. After each coat put Lid to light source to see if any light shows. This will give you a better idea where to concentrate the spray.
I used a gray Krylon Indoor/Outdoor Primer. You can also use the Fusion as well. Spray in light coats. You may have to coat up to 4-6 times for good measure.
Since my car is Black. I got Gloss Black also Krylon product. Spray in light coats also. Making sure even coverage. You may have to spray also up to 4 coats. Wouldn�t hurt since these will be exposed to the road.
And So here they are finished. I�ll have a pic of them on the car soon. When I get a chance in the daylight to do this.
I hope this was informative. Since I had not seen any How To�s here on how to make them posted on CrookedH. If you like it. Maybe it can be added to the approved How To�s. If you have any questions. I�ll do my best to answer anything about my process.
Thanks,
GDAccent

Moderator

Joined: Feb 2009
Posts: 11,732
Likes: 5
From: Leesville, Louisiana
Vehicle: 2001 Hyundai Tiburon
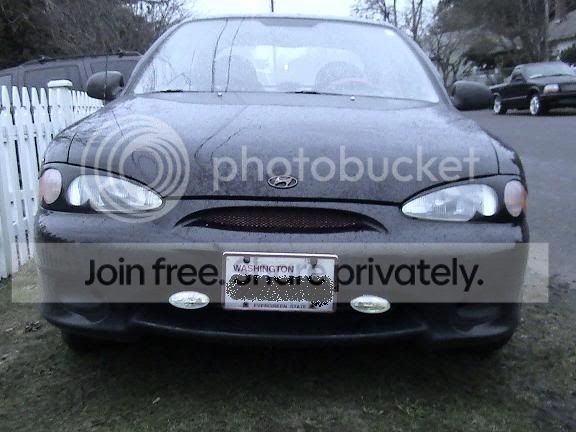
LOL... I read custom E - Yelids. So I get 1/2 way through and realize this has nothing to do with anything electronic and I went back and realized E-Yelids was actually eye-lids. So much for reading about some new custom e-yeilds.
That was a great idea. That looks like great fun. I've done a few similar projects. You might want to consider marketing those to people who are not skilled with tools. I've done quite a bit with fiberglass, but those swoops and curves in your piece really add to the professional look when they're perfectly matched on either side.
Good work mang!
Thread Starter
Member
Joined: Mar 2008
Posts: 58
Likes: 0
From: Vancouver, WA
Vehicle: 98 Hyundai Accent X3
Glad you like them. I had thought about making them available, but would take a lot of setup to do. To effectively make them in a timely manner. But I'm always keeping things in mind.
Administrator

Joined: Mar 2006
Posts: 12,515
Likes: 2
From: Lacey, WA
Vehicle: Two Accents, Mini, Miata, Van, Outback, and a ZX-6
QUOTE(GDAccent @ Mar 9 2009, 12:38 PM)
Why did you think it would be a disaster? I know looked rough at first, but has to be before you get smooth.....lol.
Honestly because I thought the design would look really stupid on your car. Congrats though your visualization is better than mine because I really like the finished product.