
How To Design / Shape Foam...

Thread Starter
Member

Joined: Mar 2008
Posts: 58
Likes: 0
From: Vancouver, WA
Vehicle: 98 Hyundai Accent X3
Designing With Foam ~ Basics
First off. Using sharp tools must be at your own risk. Know you safety procedures. I am not liable for any injuries.
This is just a brief How To on how I shape my foam. I'm sure everyone has there own way, but thought I'd share since it was asked of me to do so.
With this said�Here it is.
Note: I did this all in 30 minutes time from design to shaping this small piece. To get the pics needed to make the write up.
For this How To I�m just going to make a basic generic design, there is no meaning of it and using
The curves as given around me. I use often the curves of the Tape roll. It can come in very handy, both inside and outside curves. I started off on a piece of 2� pink insulation foam using the tape roll. (Note: in the pics to follow I have included more notes, hopefully its readable).
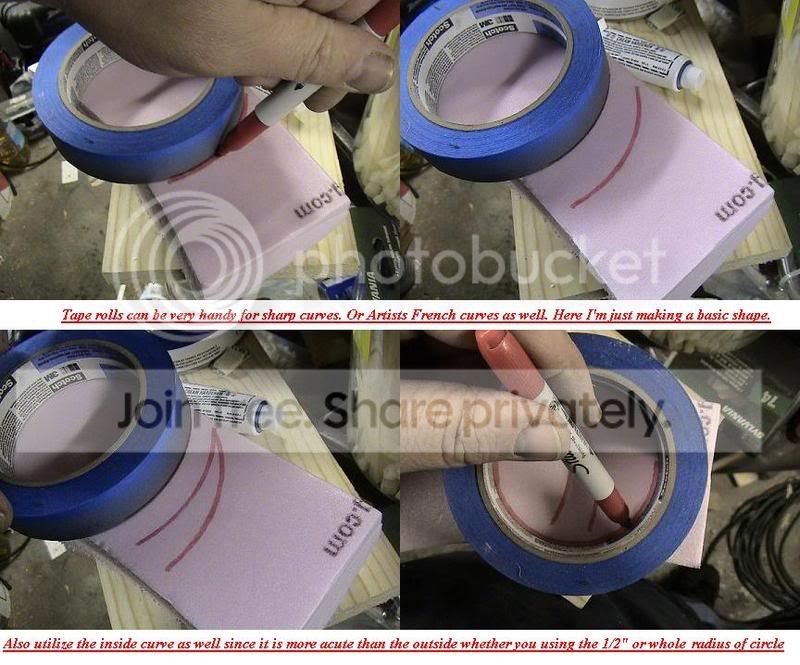
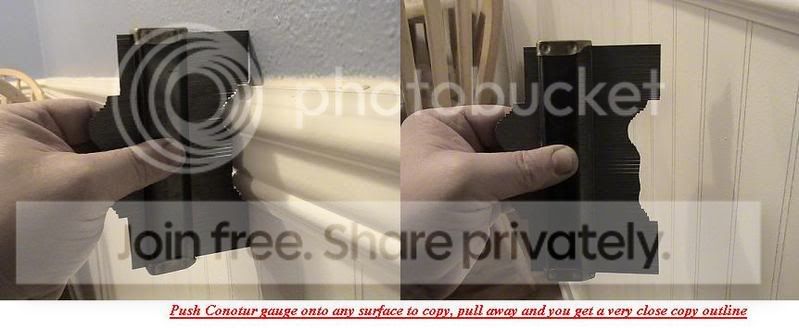
You can also use a Contour Gauge which is great to copy a line and then transfer it to your design. Many times I have been working on something and needed and angle or curve. I took my Contour Gauge and found the right line needed, then copied it.

Use it to copy anything. Only drawback is that most Contour gauges are small in length, generally about 5-6�. These are mainly used in carpentry for working with molding. A contractor can copy the shape and if not know the name of the molding, take it to a store and match it up.
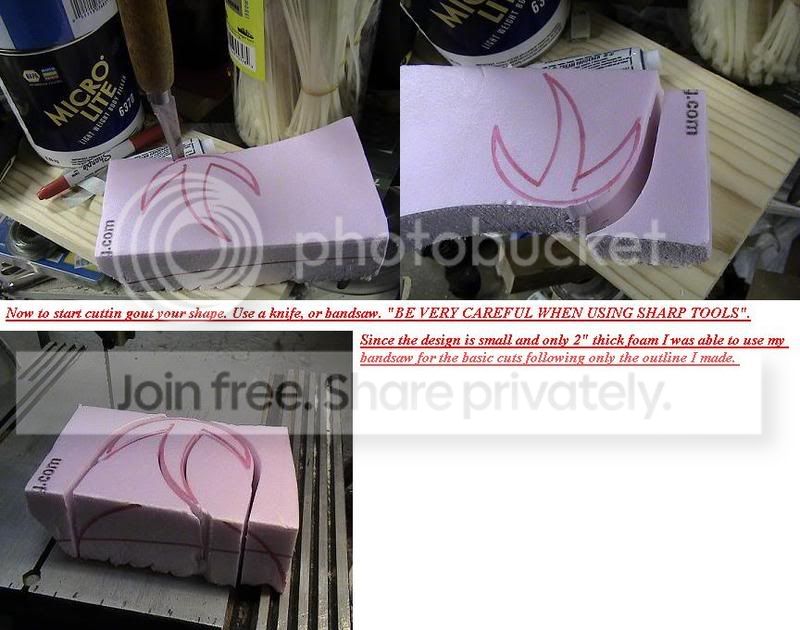
After you have outlined your design. Its now time to cut it out.
I wanted a High center and Low sides. I used the Contour gauge and copied the outside curve of the tape roll.
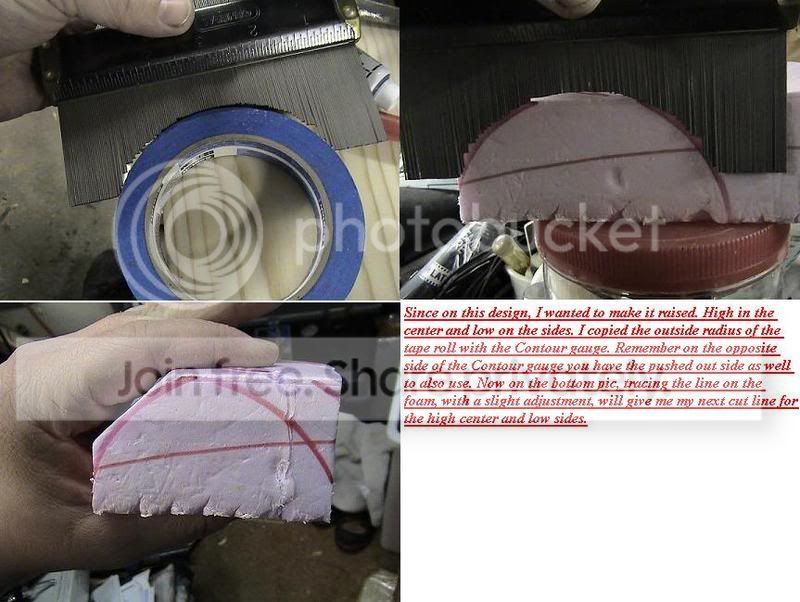
Being careful when cutting the sides as well. I wanted a High center with Low sides. Be careful to not cut yourself.
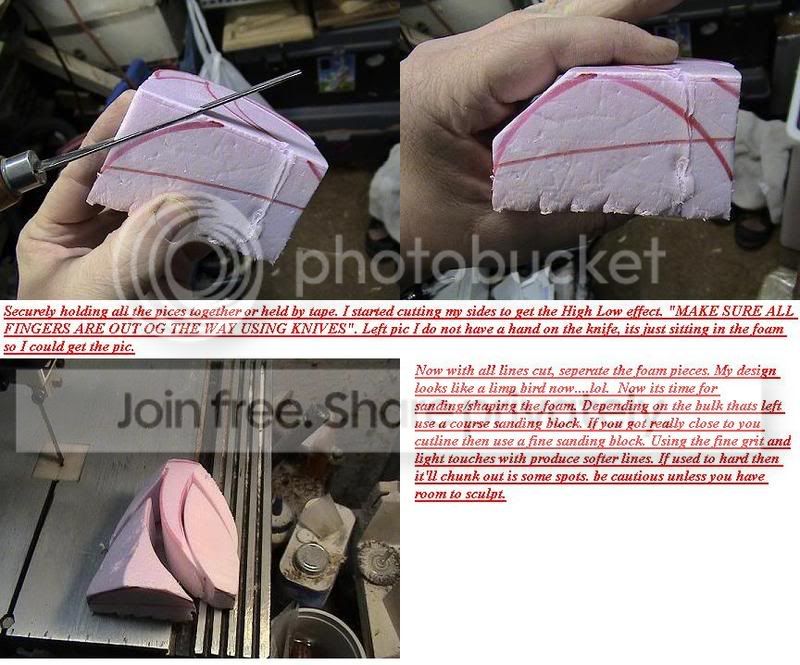
Once its all cut out to desired shape and height, its time to sand / shape it. I used a course grit and fine grit sanding blocks. The course grit will take off the bilk of material quickly while the Fine sanding block with shape the foam smoothly. Using light, medium, hard pressure, you can shape it nicely. If going to hard, its may chunk out the foam and cause more sanding. Just be cautious not to over do it.
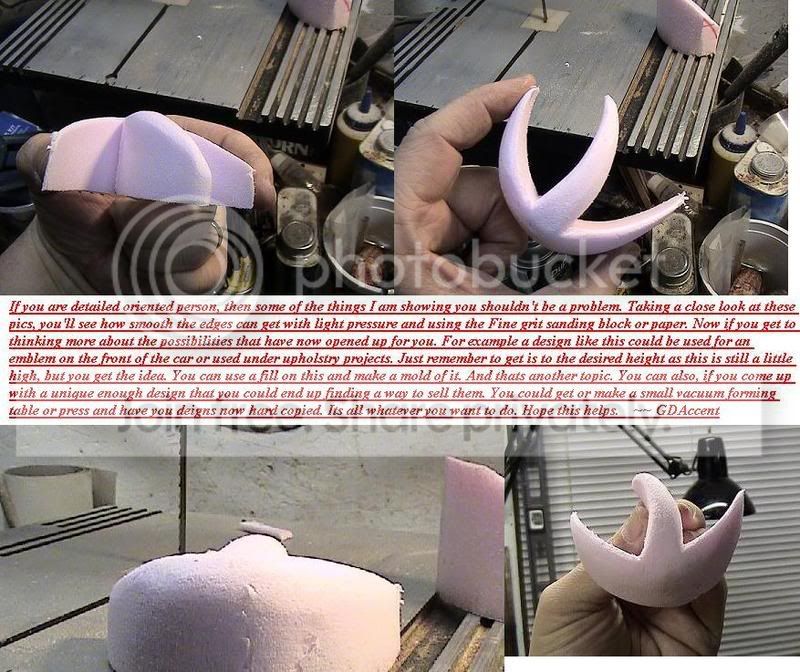
And for a final look you can come out with a nice piece. There are open doors to this depending on how indepth you want to get or how much of a detail oriented person you are. For example this piece could be used as an emblem on the car or in upholstery, of course it would have to be thinner, but you get the idea. You could ever make a small vacuum forming table and make copies. Heres an example of a vacuum forming table, which can be made really cheap and the size of a sheet of paper.
http://www.instructables.com/id/Make-a-goo...t-plastic-vacu/
Watch the video, I�m sure it�ll give you more ideas of uses. And notice all the stuff he used to make it, generally all stuff found around a home. I would suggest using a strong Shop Vac like the 5 gallon, because it has a strong motor. You can also make a small box with the top being peg board. Do a search online and I�m sure you�ll find a lot about doing homemade vacuum formers.
So in final here is my piece all sanded and shaped.
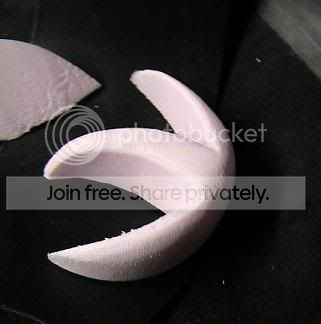


Hope this helps. Thinking about it you can apply this to any foam project, i.e. Spoilers, Hood/Roof scoops, Custom body kits.
~GDAccent
First off. Using sharp tools must be at your own risk. Know you safety procedures. I am not liable for any injuries.
This is just a brief How To on how I shape my foam. I'm sure everyone has there own way, but thought I'd share since it was asked of me to do so.
With this said�Here it is.
Note: I did this all in 30 minutes time from design to shaping this small piece. To get the pics needed to make the write up.
For this How To I�m just going to make a basic generic design, there is no meaning of it and using
The curves as given around me. I use often the curves of the Tape roll. It can come in very handy, both inside and outside curves. I started off on a piece of 2� pink insulation foam using the tape roll. (Note: in the pics to follow I have included more notes, hopefully its readable).
You can also use a Contour Gauge which is great to copy a line and then transfer it to your design. Many times I have been working on something and needed and angle or curve. I took my Contour Gauge and found the right line needed, then copied it.
Use it to copy anything. Only drawback is that most Contour gauges are small in length, generally about 5-6�. These are mainly used in carpentry for working with molding. A contractor can copy the shape and if not know the name of the molding, take it to a store and match it up.
After you have outlined your design. Its now time to cut it out.
I wanted a High center and Low sides. I used the Contour gauge and copied the outside curve of the tape roll.
Being careful when cutting the sides as well. I wanted a High center with Low sides. Be careful to not cut yourself.
Once its all cut out to desired shape and height, its time to sand / shape it. I used a course grit and fine grit sanding blocks. The course grit will take off the bilk of material quickly while the Fine sanding block with shape the foam smoothly. Using light, medium, hard pressure, you can shape it nicely. If going to hard, its may chunk out the foam and cause more sanding. Just be cautious not to over do it.
And for a final look you can come out with a nice piece. There are open doors to this depending on how indepth you want to get or how much of a detail oriented person you are. For example this piece could be used as an emblem on the car or in upholstery, of course it would have to be thinner, but you get the idea. You could ever make a small vacuum forming table and make copies. Heres an example of a vacuum forming table, which can be made really cheap and the size of a sheet of paper.
http://www.instructables.com/id/Make-a-goo...t-plastic-vacu/
Watch the video, I�m sure it�ll give you more ideas of uses. And notice all the stuff he used to make it, generally all stuff found around a home. I would suggest using a strong Shop Vac like the 5 gallon, because it has a strong motor. You can also make a small box with the top being peg board. Do a search online and I�m sure you�ll find a lot about doing homemade vacuum formers.
So in final here is my piece all sanded and shaped.
Hope this helps. Thinking about it you can apply this to any foam project, i.e. Spoilers, Hood/Roof scoops, Custom body kits.
~GDAccent


Thread Starter
Member
Joined: Mar 2008
Posts: 58
Likes: 0
From: Vancouver, WA
Vehicle: 98 Hyundai Accent X3
Yeah, its an Owens/Corning product. Where I get it, its mostly pink in color. But I think Lowes has it and its blue. I comes in
1", 1�", and 2". Its great for doing projects like this or for Halloween props as well. Also don't forget Great Stuff expanding foam, that too can also be utilized. I made a Tach gauge pod recently. Posted the How To over at CrookedH.com, plus they Custom Eyelids as well.
I'll warn you though, it does get a little messy with the sanding. You get fine particals floating around. It cal also be routed with a Dremel with router attachment base. Comes in handy for carving out letters i.e. Tombstones. If you are working on something an need thicker. You can use the 3M Super 77 spray adhesive to stick for example of needing 3", glue together a 2" +1" piece. If you need 4", use 2, 2" pieces. As for External body modding. If you wanted slight fender flares, you could use the 1" and sand to shape. I'm going to be doing this, this summer, Maybe I'll get a write up of that too going.
I'll try to answer questions when I can. You are welcome to email me anytime.