
My Head Has Holes In It. They Need A Port And Polish!


Senior Member
Joined: Jul 2007
Posts: 276
Likes: 0
From: Kingsland, GA
Absolutely take your time with this one. I wanted my car back on the road fast, since driving that Rx7 isn't the most practical thing to do laugh.gif I recently got 21 mpg on the highway!!! In town it's around 17, which is a bit costly when gas was 3.90/gal for regular. That's why I hurried up and finished my port/polish and pistons without taking any pics for a DIY. That and the transmission was on its last leg... again. Over revving the rotary won't hurt it, but it's weakling transmission will suffer.
One solution for your valve springs is to make your own compressor. I had some 3/8"rod, pipe, and metal conduit laying around, so I broke out the drill and plumber's torch to make one really quick. Here's something to get you started if you want.
After porting the head, I washed mine with simple green and a garden hose. You may want to find something a little better than that to clean the metal shavings out, but it works.
Senior Member

Joined: Apr 2008
Posts: 2,087
Likes: 0
From: Western PA
Vehicle: 2001 Tiburon
QUOTE (Ericy321 @ Aug 9 2008, 10:23 PM)
OTC off ebay. Works perfect for our head.
something like this?
http://cgi.ebay.com/ebaymotors/VaLvE-Sprin...emZ120291281887

Thread Starter
Super Moderator

Joined: Sep 2001
Posts: 10,795
Likes: 5
From: Pflugerville, TX
Vehicle: 2000 Elantra
Here is the setup I used to cut the Singh grooves on the intake side quench pad. I marked the cylinder wall and the groove location, then used vinyl tape and covered what I didn't want to cut. Then I hit it with a 0.080" aluminum cutting ball. Feather the end into the chamber, smooth over the edges. This was an hour's work, taking it slow.
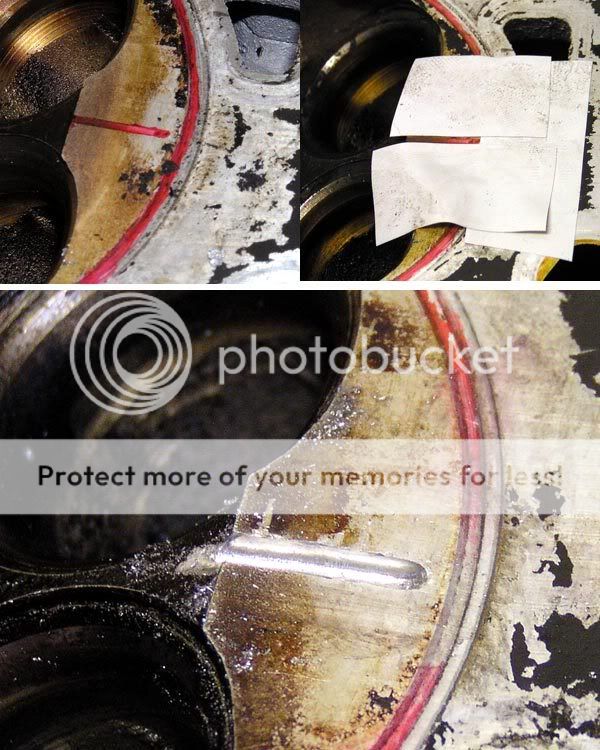
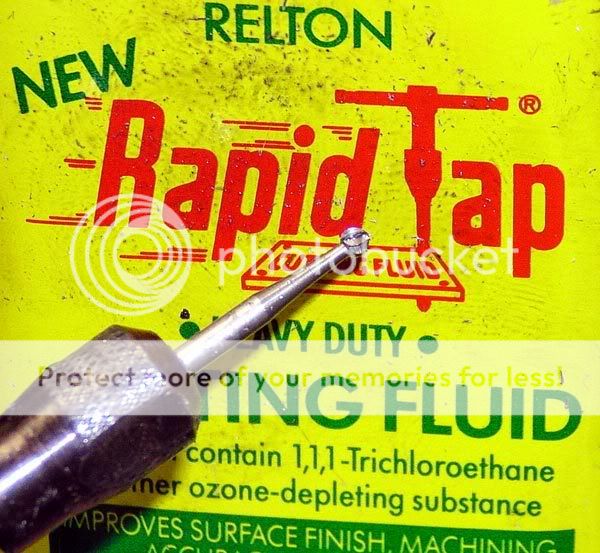
My little friends. Don't forget the cooling/cutting oil!
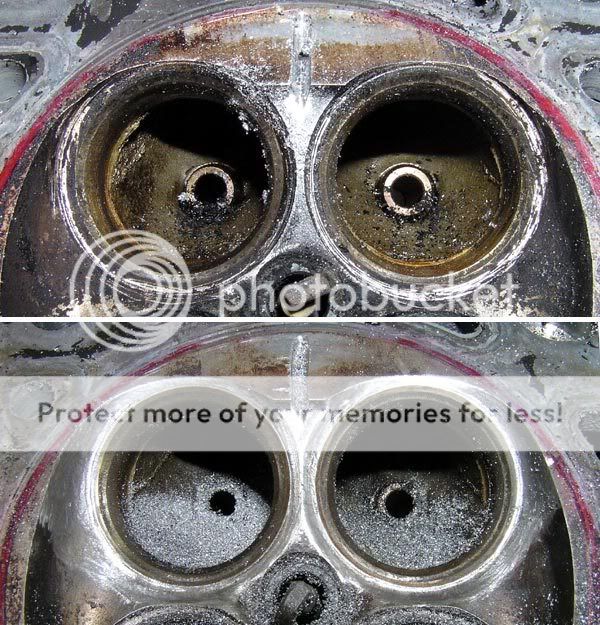
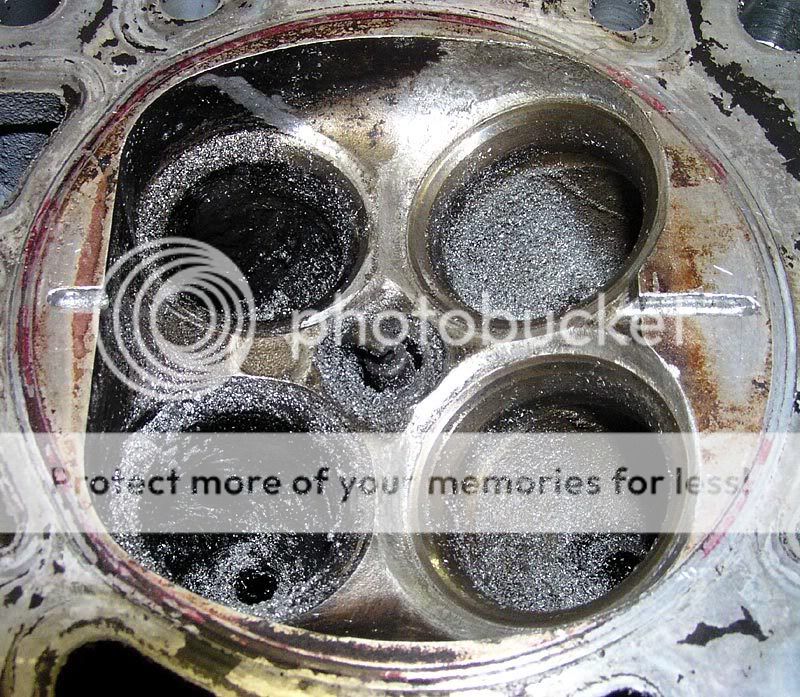
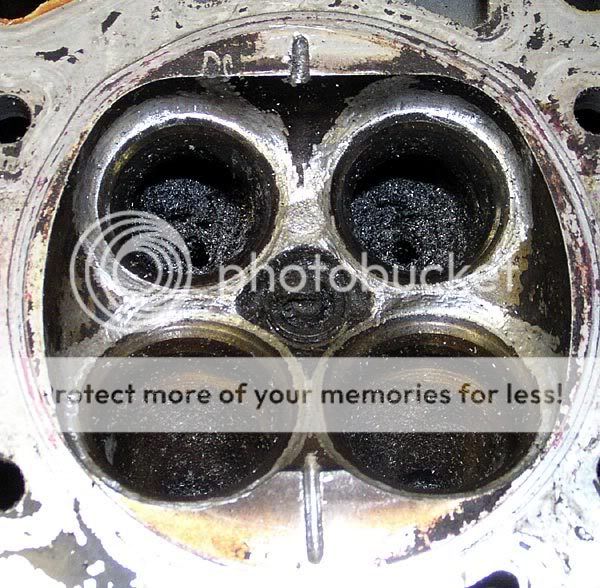
Here are before/after (adjacent cylinders, actually) shots of my head after spending 2 hours working on the intake side of one chamber. The valves are heavily shrouded, with an actual overhang by the cylinder wall. Also, when they cast the head, they didn't cast the pocket for the hardened seat insert the same dimension, so not only is it shrouded, there's a frikken right angle STEP right at the outlet of the intake valve. I used a 1/8" round cutter for this work, and took it slow. Use your finger to tell you when the geometry needs to change. Pretend to be a whiff of air, and see what would be an impediment to your flowing into the chamber. Feel what would trip you up. Then remove it.

Man, no wonder it costs $$$$ to have a good-name engine shop work over a cylinder head. It's a hobby all to itself, for every head you do! Working straight through, it's a solid 3-day job. Working after the kids go to sleep... we'll see how long it takes. I didn't stop on these because I was done, by the way, I stopped because it was 00:40hrs and time to go to bed. There is a very small amount of work that I could still do, but I think this would be a good stopping point for these 2 valve pockets if you feel like leaving it. I may leave it, we'll see.
My little friends. Don't forget the cooling/cutting oil!
Here are before/after (adjacent cylinders, actually) shots of my head after spending 2 hours working on the intake side of one chamber. The valves are heavily shrouded, with an actual overhang by the cylinder wall. Also, when they cast the head, they didn't cast the pocket for the hardened seat insert the same dimension, so not only is it shrouded, there's a frikken right angle STEP right at the outlet of the intake valve. I used a 1/8" round cutter for this work, and took it slow. Use your finger to tell you when the geometry needs to change. Pretend to be a whiff of air, and see what would be an impediment to your flowing into the chamber. Feel what would trip you up. Then remove it.
Man, no wonder it costs $$$$ to have a good-name engine shop work over a cylinder head. It's a hobby all to itself, for every head you do! Working straight through, it's a solid 3-day job. Working after the kids go to sleep... we'll see how long it takes. I didn't stop on these because I was done, by the way, I stopped because it was 00:40hrs and time to go to bed. There is a very small amount of work that I could still do, but I think this would be a good stopping point for these 2 valve pockets if you feel like leaving it. I may leave it, we'll see.
Thread Starter
Super Moderator
Joined: Sep 2001
Posts: 10,795
Likes: 5
From: Pflugerville, TX
Vehicle: 2000 Elantra
Dang I'm slow. I blame my family.
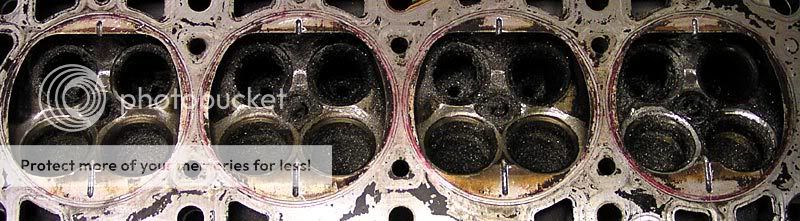
Singh grooves all the way across on the exhaust side, done.
Rough-out work on 2.5 more chambers on the intake side, done. Knocked down the edges on the funky flat depression next to the spark plug. That's 3 more hours' work.
I was using a new bit. Much. Much. Much. Faster. But it's a smaller diameter so I have more contouring to do than with the duller, larger bit. I'm really hoping the 1.8L pistons clean up alright, because there is a LOT of material coming out of the chambers. It's those pistons, or some big-time decking for compression.
postpics.gif
Okay, so you want a peek?
Senior Member
Joined: Aug 2004
Posts: 2,764
Likes: 0
From: South Korea where u car from fool
Vehicle: 2008/Hyundai/Tiburon gt
^ dont take this the wrong way... great work. but
why are you doing this. i have done alot of work on beta's i have never seen this done to them..
here is what i did to mine..


those valves are stock. and yes i hand sanded them with a drill press and reshaped them with sandpaper..
girt goes as follows 50 80 400 600 800 1000 1200 1500 and 3M fininess it.. compond.glaze and fininess it and some eagle one metal poslish
this should give you some fresh ideals
why are you doing this. i have done alot of work on beta's i have never seen this done to them..
here is what i did to mine..
those valves are stock. and yes i hand sanded them with a drill press and reshaped them with sandpaper..
girt goes as follows 50 80 400 600 800 1000 1200 1500 and 3M fininess it.. compond.glaze and fininess it and some eagle one metal poslish
this should give you some fresh ideals
Thread Starter
Super Moderator
Joined: Sep 2001
Posts: 10,795
Likes: 5
From: Pflugerville, TX
Vehicle: 2000 Elantra
It might, if my idea(l)s weren't well thought out beforehand. I read a lot of words written by a lot of people who do heads for a living before deciding what and what not to do. I like what you did with the text on the valves (removed it). Did you CC those chambers to see how much aluminum was removed? I'm curious to know just how much is coming out, because it looks like a lot.
If you've never seen the Singh grooves, that's no surprise. It seems like small groups of people swear by it and everybody else has never heard of it. One member @ EXD put the grooves on the intake side and installed his head already. Smoother running and more power at low-RPM operation were reported, which I expected.
If you've never seen the Singh grooves, that's no surprise. It seems like small groups of people swear by it and everybody else has never heard of it. One member @ EXD put the grooves on the intake side and installed his head already. Smoother running and more power at low-RPM operation were reported, which I expected.
Thread Starter
Super Moderator
Joined: Sep 2001
Posts: 10,795
Likes: 5
From: Pflugerville, TX
Vehicle: 2000 Elantra
Another couple of hours have gone into the combustion chambers. Roughed in the last chamber's intake side and 3 of the chambers' exhaust sides.
The exhaust side has a frikken WALL right next to 1/3 of the valve. I've opened up the area just after the valve seat and increased the radius of the turn that gasses have to take to get out, but I'm wondering if I shouldn't open that part of the chamber all the way out to the bottom of the head.
I'm also thinking of shaving 1mm off the bottom to get the chambers back down in volume.
How much clearance is there, stock, to the pistons from the fully-open valves? That's probably going to be a deciding factor in how far I can deck the head. If *somebody* with the cut-up cylinder head photos could get them to me, I would have a better idea how much I could do in there...
Thread Starter
Super Moderator
Joined: Sep 2001
Posts: 10,795
Likes: 5
From: Pflugerville, TX
Vehicle: 2000 Elantra
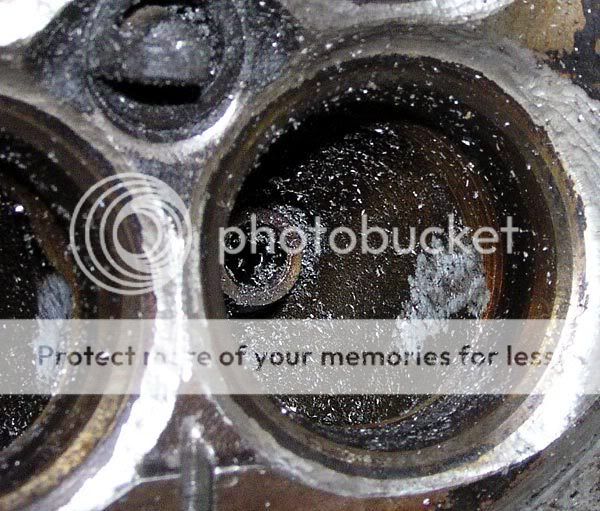
The combustion chambers are roughed-in. I left the wall next to the exhaust valves for now. I want to measure the volume of the chamber as it sits, and see if I want to remove more material, or leave it and have the higher compression w/ slightly worse flow. I'm not sure how much I want to take out around the spark plug hole, but it's probably not going to look like that when I'm done. Yes, it will all get hit with some sandpaper when I get the shape finalized. Yes there are a few scuffs on the deck; those will be gone when 1/2 to 1mm gets shaved off the head. That's going to require recutting the Singh grooves a little, but oh well.
I've started in on the intake runners, cleaning up casting flash and core shift. It's not that bad, really. Here's the worst one:
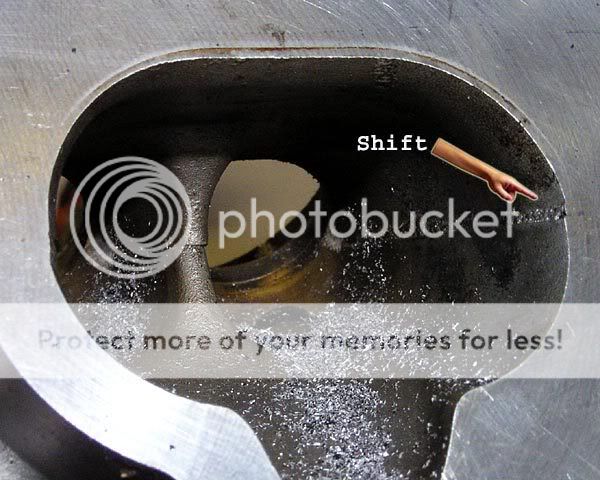
I've also started on it from the chamber side. I need to get a collet so I can use an extension for my grinder, because this is as far as I can reach with my current tooling.
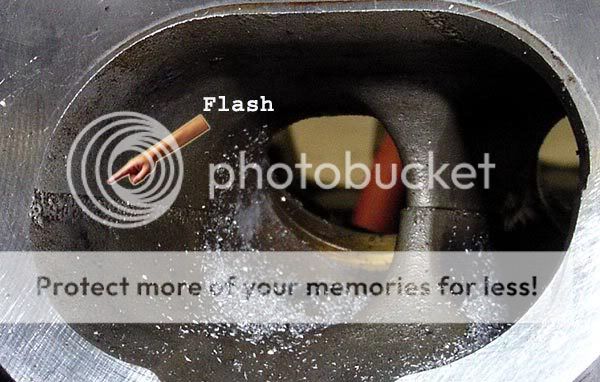
Hopefully we all know that the short-side radius on the intake port, where it bends to go into the chamber, is one of the MOST important places to have a smooth transition for good flow numbers. In light of that, have a look at this:
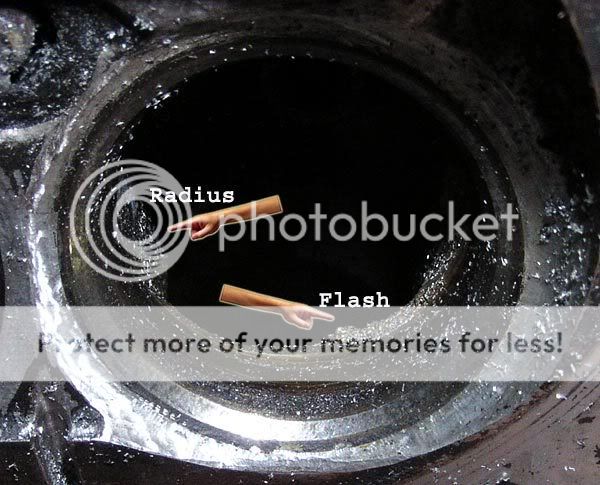
That thing labelled Flash? Yeah, that's 1/16-1/8" of casting flash jutting out into the SSR transition to the valve seat. Nice eh?
IF VISIONZ WOULD GET ME THE CUTAWAY PHOTOS (hint hint, I know, I'm subtle) I would know how far I will be able to push out the sides of the runner floor to increase the width of the short-side radius on the intake runner (labeled Radius). I would also be more comfortable with the thickness of the quench pads for cutting the Singh grooves after the head is machined. I'm pretty sure the pads will be plenty thick, though, seeing MadJohn removed his exhaust-side pads entirely! fing02.gif
That's all for now kids! More photos when I get more work done.
I've started in on the intake runners, cleaning up casting flash and core shift. It's not that bad, really. Here's the worst one:
I've also started on it from the chamber side. I need to get a collet so I can use an extension for my grinder, because this is as far as I can reach with my current tooling.
Hopefully we all know that the short-side radius on the intake port, where it bends to go into the chamber, is one of the MOST important places to have a smooth transition for good flow numbers. In light of that, have a look at this:
That thing labelled Flash? Yeah, that's 1/16-1/8" of casting flash jutting out into the SSR transition to the valve seat. Nice eh?
IF VISIONZ WOULD GET ME THE CUTAWAY PHOTOS (hint hint, I know, I'm subtle) I would know how far I will be able to push out the sides of the runner floor to increase the width of the short-side radius on the intake runner (labeled Radius). I would also be more comfortable with the thickness of the quench pads for cutting the Singh grooves after the head is machined. I'm pretty sure the pads will be plenty thick, though, seeing MadJohn removed his exhaust-side pads entirely! fing02.gif
That's all for now kids! More photos when I get more work done.