
Follow Along W/ My Auto To Manual Swap!

Thread Starter
Super Moderator


Joined: Sep 2001
Posts: 10,795
Likes: 5
From: Pflugerville, TX
Vehicle: 2000 Elantra
My wife called and said the clutch is here. fing02.gif That would be 7 days after I ordered it. Wow.
I'm going to try to use a chassis punch for the master cylinder hole, we'll see if it works
Amsoil MTG and some DOT3 brake fluid, plus the flywheel parts, need to be acquired now. And a helper. Do you want to help?
I'm going to try to use a chassis punch for the master cylinder hole, we'll see if it works
Amsoil MTG and some DOT3 brake fluid, plus the flywheel parts, need to be acquired now. And a helper. Do you want to help?


Thread Starter
Super Moderator
Joined: Sep 2001
Posts: 10,795
Likes: 5
From: Pflugerville, TX
Vehicle: 2000 Elantra
My cubicle buddy at work just kicked out his roommate that also works at our company, and now he's keen to carpool w/ me because he likes to have a beer on the way home sometimes and the cops don't seem keen on that sort of thing if you're driving (also to save gas & not have to drive all the time). He said he'd trade for some labor, so I'm set.
Thanks DTN, I would if I had to and appreciate the offer.
Thanks DTN, I would if I had to and appreciate the offer.
Thread Starter
Super Moderator
Joined: Sep 2001
Posts: 10,795
Likes: 5
From: Pflugerville, TX
Vehicle: 2000 Elantra
Update: a hunnert dullars and a week's wait get me a new clutch! Just a new bearing is 1/2 that so w00t!
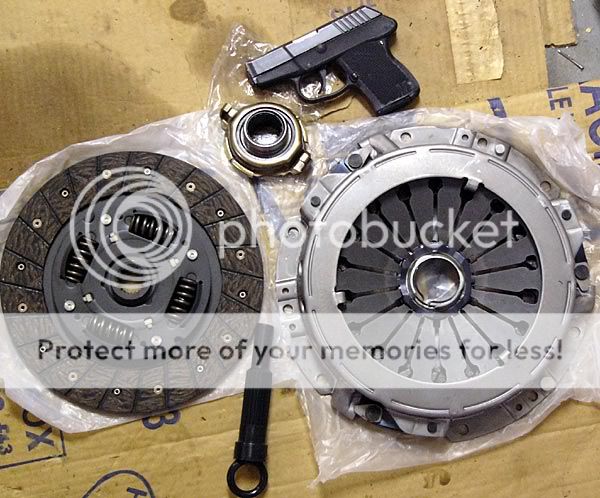
The gun is for fun, I just had it on my when I shot this & felt like spicing up the picture. That's Little Brother, my Kel-Tek P-380.
The gun is for fun, I just had it on my when I shot this & felt like spicing up the picture. That's Little Brother, my Kel-Tek P-380.
Thread Starter
Super Moderator
Joined: Sep 2001
Posts: 10,795
Likes: 5
From: Pflugerville, TX
Vehicle: 2000 Elantra
Performance Machine Shop in Hutto is about the only place within 1/2 hour of where I live. Everybody else that ran an automotive machine shop folded or sold out in the last few years.
Anyhow, I showed up at the end of their day, having taken off from work early, and the machinist was the only one there.
He used a purpose-built slide-hammer with a friction chuck to pull the dowel pins and it took HIM 15 minutes, after they had soaked in penetrating oil for a day and a half. Slapped that puppy on the flywheel grinder and let it spin while we talked machining. He estimated 0.008" had to come off, just to clean it up. It was worn more to the outside than in the center, just like the clutch plate. Now it's flat & purdy. We shot the breeze for like an hour, and he gave me a couple of tips for my cylinder head project (he's also their head porter) and we swapped a couple of fun stories & then I split. You know you're in the right place when the machinist shows you the crank he is knife-edging for his own Eclipse, and gives you a peek at the Mazda Protege turbo engine they're building.
I figured out that, if this transaxle turns out to be crap I will regret having $30 worth of Amsoil MTG in it, so it's getting whatever they have on the shelf @ Advance Auto.
I need to clean my garage, and I'd really like to try to get some solid bushings turned out to replace the ones on the shifter cables. And then, barring further unforseen circumstance,
NEXT WEEKEND, SWAP TIME! intheclub.gif
Thread Starter
Super Moderator
Joined: Sep 2001
Posts: 10,795
Likes: 5
From: Pflugerville, TX
Vehicle: 2000 Elantra
Well NOBODY in p-ville sells GL4 75W90.
Maybe the one small parts shop does, but it's dark & dingy in there, and the one time I went in the guy was smoking behind the counter. No thanks.
So I hit up the Advance Auto first... GL5, about 8 kinds. I bought a jug of DOT3 for the clutch and moved on.
Auto Zone next because it's 3 doors down... GL5 only, except for the Royal Purple for like $16 or $18/pint. No thanks.
So it's down the road (there's a 4-lane road that goes through Pflugerville, and it's small shops & neighborhoods away from that street, for the most part, until you get to the outskirts) to O'Reillys and they had a bunch of GL5s, and the same Royal Purple GL4/GL5 synthetic that Auto Zone had, for $10.50 each, or else some "never hoid of um" GL3/GL4/GL5 oil that I didn't want to be a guinea pig for. So now I've got the Royal Purple. I was hoping to find some cheap GL4 but I'd have to order it or head to Austin, so PASS. Also I'll take a pass on HMA's dealer-only synthetic 75W85 for $15/qt or whatever it is.
Classic Hyundai in Round Rock was supposed to get the Crankshaft Spacer in today, but they didn't call & say they have it 02.gif I hope it gets here b4 friday or it's a no-go for this weekend.
My cubicle buddy is going for a camping trip to celebrate a long-time friend's birthday this weekend, but one of the guys from church sounded like he could help me out for the heavy lifting this weekend if need be, after visitation is over.
Now I'm up late studying, and I'm making a check list to be sure I don't skip anything. After the swap, you'll get the checklist.
The part was there, but "we'll call you" turned into "you'll call us".
My dad said he'll come help.
it's ON!
Thread Starter
Super Moderator
Joined: Sep 2001
Posts: 10,795
Likes: 5
From: Pflugerville, TX
Vehicle: 2000 Elantra
Friday Night
19:07 "Park"ed for the last time, in my garage.
19:09 Cardboard under the front, here we go!
19:15 Battery is out
19:24 Airbox is out
***Label your connectors! I used 2" blue painting prep tape. It's high-visibility in a black engine bay, you can write on it easily, and it comes off without leaving nasty residue***
19:26 MAFS is out
19:35 Driver's seat is in the back seat
19:43 Back footwell is cleaned out (trash/papers), passenger front seat is in rear pass. footwell
***Do remove the seats. You will be SO glad you did. Tape the chair bolts and their covers, TO the chairs, so you don't forget which went where, or lose any of the bolts or covers.***
19:49 Center console is out
20:01 Shifter is out; it took longer because of the wiring for my stereo
20:32 ECM, TCM, and their brackets are out
20:42 Supper break, kids' bedtime business
21:15 Back at it
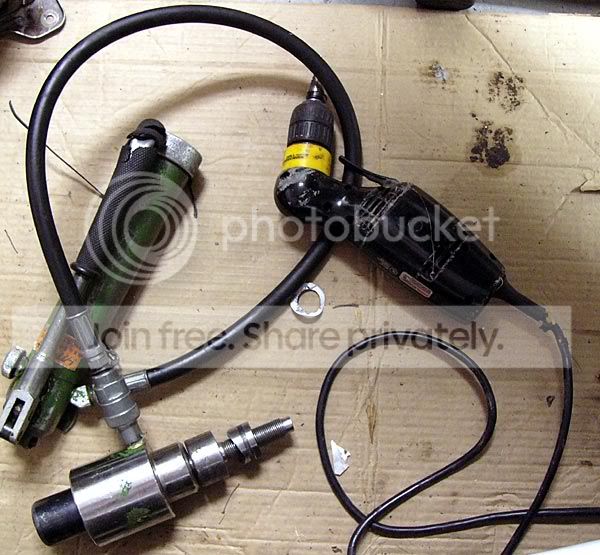
21:20 Used UNIBIT in angle drill to drill 7/8" pilot hole, then Greenlee 1" conduit-sized chassis punch to make the master cylinder mounting hole. Thank God for that punch. You can tell how long it took to make the hole.
21:34 Brushing child's teeth
21:42 Putting children to bed
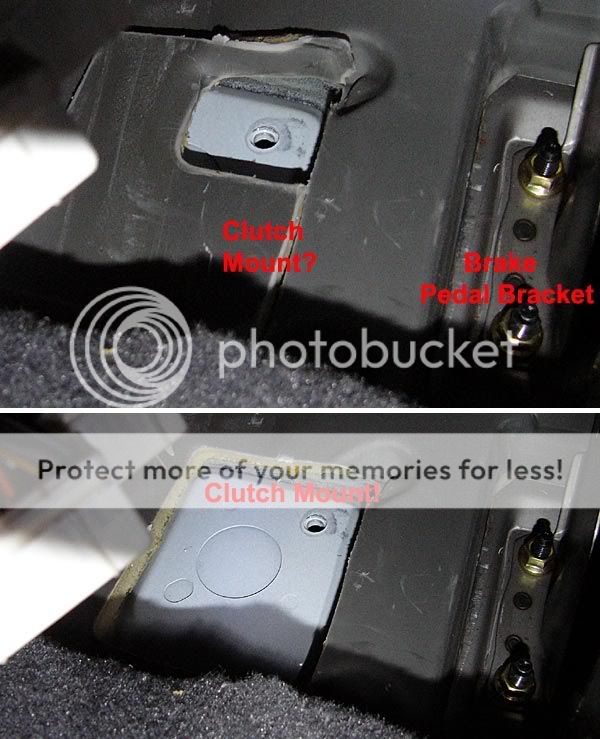
21:48 Used screwdriver from the cabin side to pop welds on the nut by the master cylinder hole. You need to remove one of the mounting nuts for the TCM, in order to let the clutch pedal stud through that hole. I ended up finally getting it off by using a bicycle-hanging hook threaded into the nut, with the hook for a handle. Getting to this from the engine bay side is nearly impossible, and I am thankful that the welds broke fairly easily.
You will want to have these:
A very happy sight:
21:57 used side-chewing drill bit to make the other clutch mounting stud hole
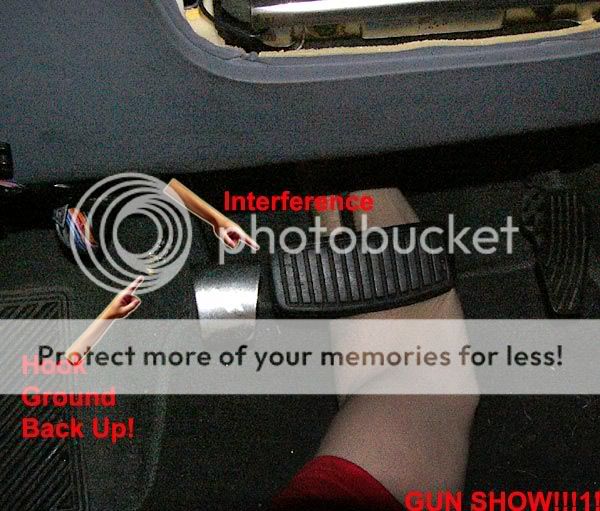
22:45 Stopped for the night. Clutch pedal hits the brake pedal, so you CAN'T use the autotragic's brake pedal. Cut it or do like I did, use the pedal from the donor car. The spring for the brake pedal was fighting me, and I was tired after wrestling with the pedal for half an hour, upside down, with the ridge on the floor bending my back into a funny angle. Tomorrow: up at 07:00, quick breakfast, and hit it hard.
I forgot (twice) to put that ground wire back into the top bolt-hole on the clutch pedal bracket. It's tight in there; be smart and do it the first time you hang the pedal!
Saturday
11:45 Back at it. We got up at 09:15, went out to IHOP (it was packed, just kept driving) then the grocery store. Went home, cooked and ate breakfast. Dad showed up as we were finishing breakfast, followed shortly by D.R., one of the men from my church. We said a brief prayer for safety & skill before we started.
12:20 Brake pedal finally in. Car is jacked up, the wheels are off, and the ATF is draining.
***If you have an automatic car, get a trans cooler. The cooler in the radiator keeps it at 205 degrees. You want 195. My car, I didn't care. If you plan on driving your car forever, get a cooler as soon as practicable***
12:46 Mounting up the clutch pedal (DO NOT tighten down the master cylinder bolts yet. You need to connect the hydraulic lines to it BEFORE you tighten it to the clutch. Remember it is impossible to get down in there next to the brake booster; this is how you work around it)
13:25 Working on the shift cable, and a random neighbor stopped by to give us coffee. She had bought three for the Monopoly game pieces and only wanted to drink one. Ooookay, coffee break!
13:35 Back at it
15:41 Axles out, transaxle out, shift cables out, lunch break. D.R. showed up right before we went to pull the transaxle.
***Having three people was a HUGE help. We used 3 jacks and I don't think it matters if they are screw or floor jacks. PLEASE PLEASE PLEASE REMEMBER to put a jack under the oil pan on the engine. We were wondering why the angles were getting screwy when we were lowering the auto trans. by alternating lowering on the 2 jacks holding it up (one guy on top holding the cross-bolt for the side engine mount as a handle). We were about to drop the engine on my Dad's chest. He could have bench pressed it (it's not THAT heavy) but it would have SUCKED to have it smash his ribs first.***
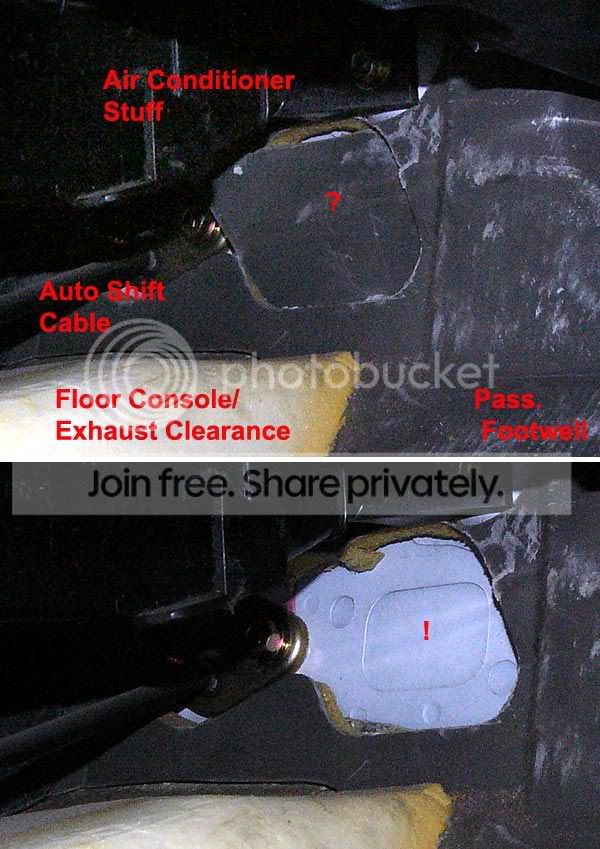
Here is the hole for the shifter cables. The automatic and standard cables do NOT use the same pass-through location from the factory, but there is a hidden template for the standard cables, just like for the clutch pedal mounting bracket.
BUT YOU HAVE TO LOOK OUT! Right behind the lower mounting hole for the standard shifter cables, you will find a power steering hard line. The guy on the drill making the hole didn't notice until it was too late, and now there is a ding/nick in that line. I have a spare on the parts car, but it would be no fun to have a power steering leak/fire (looks like they already had one in the parts car). We had to use nuts/bolts to hold the shift cables in the new hole and there is NO room for fat fingers. If your hand is bigger than my wife's (thank you honey! ) you will NOT be able to get a nut on the bolt for that lower hole.
17:05 Clutch is mounted
***You can use skateboard/rollerblade wheel bearings for the transaxle shifter cables. The holes in the end of the cables are a hair too small, so my dad used a dremel sander to open them up a little. Then he thought it would be good to have them be a "press-fit" and used a big socket to seat them. Well they're not quite as free as they were, so it's more like a bushing than a bearing until I decide to go open those holes a little more and mount some new bearings. Good thing they were used bearings from a friend at work who makes skateboards! (Thanks E.N.)***
20:10 Engine and manual transaxle are bolted together w/ 3 bolts, the axles are in, and my helpers left. The manual is TINY compared to the automatic. And much, much lighter, like by half.
20:30 Clutch hydraulic lines all tight, time for Supper
21:25 Children in bed, Back at it
22:25 Clutch fluid was NASTY. Flushed about a pint through it, bled it (wife helped for a minute, pushing the clutch pedal) and called it working. The engine and transaxle are bolted together all the way, the under-engine brace (not the crossmember) is mounted. The starter is not playing nice and I'm stopping for the night.
***BE SURE to mount the ground wire on the starter bolt. One person who did this swap left that wire loose and it wasted 2 batteries with overcharging before they figured out what was wrong.***
Sunday (church basically all day)
20:35 Back at it
21:41 Used bolts from parts car to replace the damaged strut/spindle mounting bolts from the driver. Also got a cotter pin for the steering from the donor car. Suspension is back together.
22:10 Looking up wiring information
23:25 Back-up lamp wiring figured out.
***NOBODY MENTIONED that you have to have the key ON to get the reverse lamps to light when you short the wires for the back-up lamps switch! I wasted a frikken HOUR troubleshooting those lamps until I figured this out!***
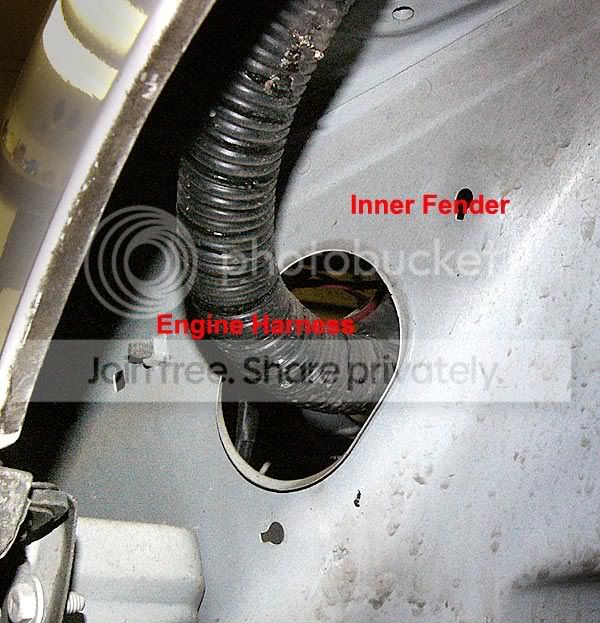
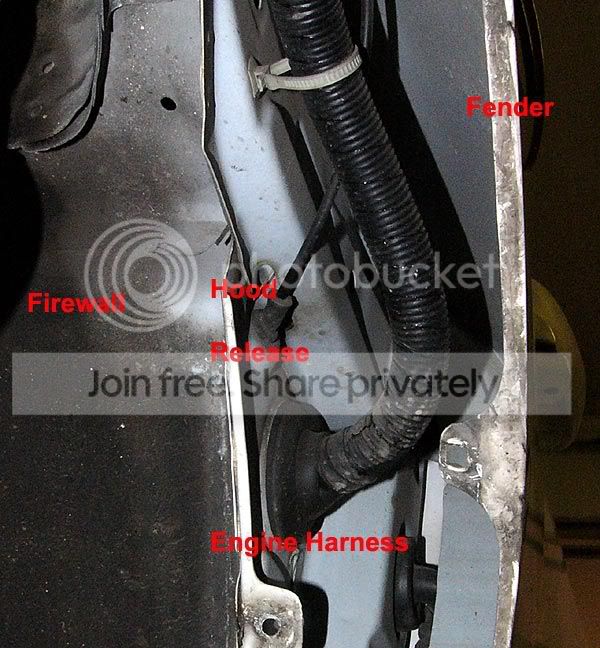
00:11 Reverse lamp wires just need tape. Fender liner removed for access to wiring harness pass-through for the clutch wires. There is a HUGE space to run wires through the fender. If I'd known about it 9 years ago, you would be looking at a 4AWG power wire for my stereo in here, instead of having it snake through the engine bay to a hole in the firewall up in the top/middle of the dash.
The last you'll see of my back-up lamp wiring! I SOLDERed the connections for reliability.
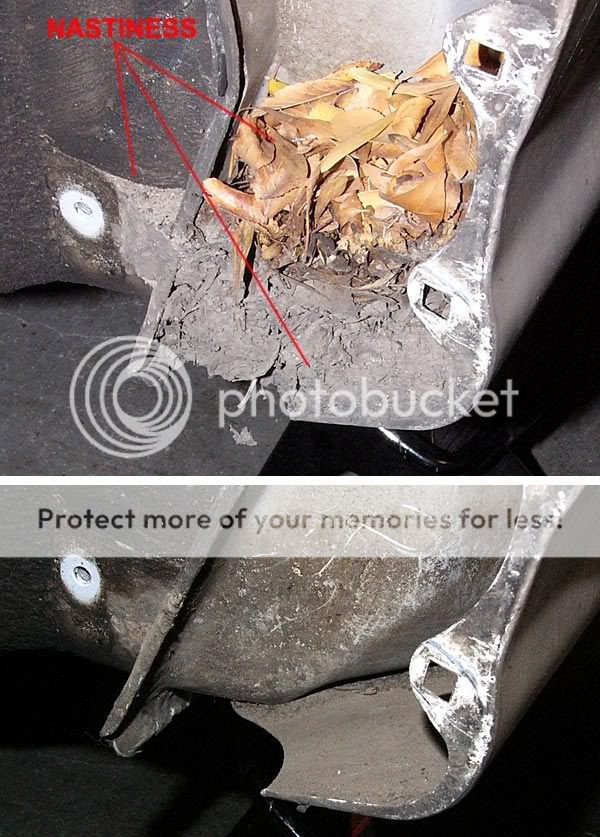
***ClEAN OUT YOUR FENDER! there is a decade worth of junk, leaves, mud, bugs, etc. in there. and it will rust eventually if you don't clean it out every once in a while.
And there it sits. If I had got up when I intended to, and been 100% ready for the wiring changes, I might have driven it to work today. I'm going to have my son help tonight, now that it's not going to be dangerous and/or too hard for him. I felt bad for the little guy, he wanted to help and kept coming out and playing with loose bolts and whatnot, then going back in.
I still need to make 2 bolt holes to hold down the front of the shifter base, and hook up the starter and then the shifter cables (the shifter cables block the starter bolt heads somewhat). I need to run wires for the clutch pedal/neutral safety switch, and run power to pin 86 on the ECM. Pin 72 is already cut. Then re-mount the ECM. I need to get the wheels on, verify clutch operation, put the console back together and that's a wrap. I'm seriously considering redoing the wiring for my stereo. The power wire I'm likely to leave, but in the floor console there is about 20 feet of RCA cable coiled up (I got it free and didn't want to cut it when I installed the stereo). Trim that, slap it together and (pray to God) the car will be 100% DONE.
oh, and my wife called to let me know that the part I ordered had come in at the dealership. I told her it was already in the car, but thanks.
19:07 "Park"ed for the last time, in my garage.
19:09 Cardboard under the front, here we go!
19:15 Battery is out
19:24 Airbox is out
***Label your connectors! I used 2" blue painting prep tape. It's high-visibility in a black engine bay, you can write on it easily, and it comes off without leaving nasty residue***
19:26 MAFS is out
19:35 Driver's seat is in the back seat
19:43 Back footwell is cleaned out (trash/papers), passenger front seat is in rear pass. footwell
***Do remove the seats. You will be SO glad you did. Tape the chair bolts and their covers, TO the chairs, so you don't forget which went where, or lose any of the bolts or covers.***
19:49 Center console is out
20:01 Shifter is out; it took longer because of the wiring for my stereo
20:32 ECM, TCM, and their brackets are out
20:42 Supper break, kids' bedtime business
21:15 Back at it
21:20 Used UNIBIT in angle drill to drill 7/8" pilot hole, then Greenlee 1" conduit-sized chassis punch to make the master cylinder mounting hole. Thank God for that punch. You can tell how long it took to make the hole.
21:34 Brushing child's teeth
21:42 Putting children to bed
21:48 Used screwdriver from the cabin side to pop welds on the nut by the master cylinder hole. You need to remove one of the mounting nuts for the TCM, in order to let the clutch pedal stud through that hole. I ended up finally getting it off by using a bicycle-hanging hook threaded into the nut, with the hook for a handle. Getting to this from the engine bay side is nearly impossible, and I am thankful that the welds broke fairly easily.
You will want to have these:
A very happy sight:
21:57 used side-chewing drill bit to make the other clutch mounting stud hole
22:45 Stopped for the night. Clutch pedal hits the brake pedal, so you CAN'T use the autotragic's brake pedal. Cut it or do like I did, use the pedal from the donor car. The spring for the brake pedal was fighting me, and I was tired after wrestling with the pedal for half an hour, upside down, with the ridge on the floor bending my back into a funny angle. Tomorrow: up at 07:00, quick breakfast, and hit it hard.
I forgot (twice) to put that ground wire back into the top bolt-hole on the clutch pedal bracket. It's tight in there; be smart and do it the first time you hang the pedal!
Saturday
11:45 Back at it. We got up at 09:15, went out to IHOP (it was packed, just kept driving) then the grocery store. Went home, cooked and ate breakfast. Dad showed up as we were finishing breakfast, followed shortly by D.R., one of the men from my church. We said a brief prayer for safety & skill before we started.
12:20 Brake pedal finally in. Car is jacked up, the wheels are off, and the ATF is draining.
***If you have an automatic car, get a trans cooler. The cooler in the radiator keeps it at 205 degrees. You want 195. My car, I didn't care. If you plan on driving your car forever, get a cooler as soon as practicable***
12:46 Mounting up the clutch pedal (DO NOT tighten down the master cylinder bolts yet. You need to connect the hydraulic lines to it BEFORE you tighten it to the clutch. Remember it is impossible to get down in there next to the brake booster; this is how you work around it)
13:25 Working on the shift cable, and a random neighbor stopped by to give us coffee. She had bought three for the Monopoly game pieces and only wanted to drink one. Ooookay, coffee break!
13:35 Back at it
15:41 Axles out, transaxle out, shift cables out, lunch break. D.R. showed up right before we went to pull the transaxle.
***Having three people was a HUGE help. We used 3 jacks and I don't think it matters if they are screw or floor jacks. PLEASE PLEASE PLEASE REMEMBER to put a jack under the oil pan on the engine. We were wondering why the angles were getting screwy when we were lowering the auto trans. by alternating lowering on the 2 jacks holding it up (one guy on top holding the cross-bolt for the side engine mount as a handle). We were about to drop the engine on my Dad's chest. He could have bench pressed it (it's not THAT heavy) but it would have SUCKED to have it smash his ribs first.***
Here is the hole for the shifter cables. The automatic and standard cables do NOT use the same pass-through location from the factory, but there is a hidden template for the standard cables, just like for the clutch pedal mounting bracket.
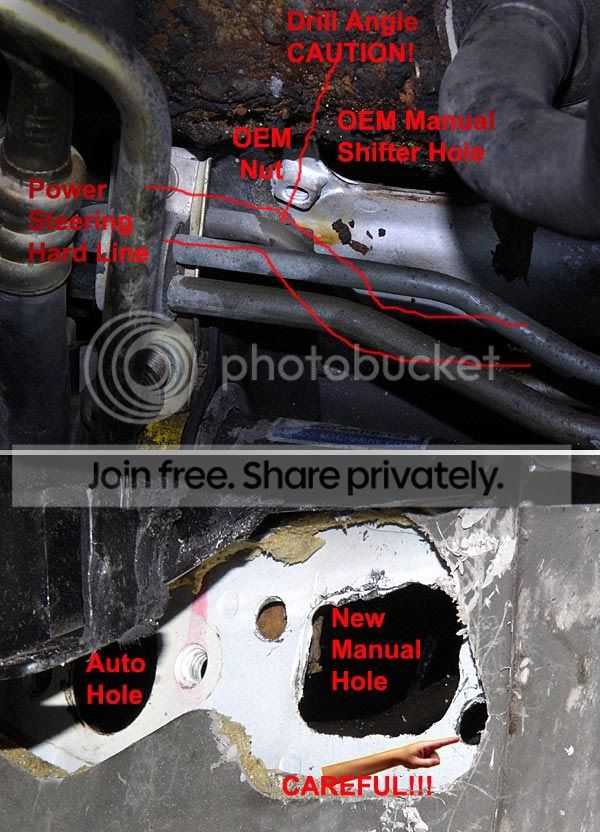
BUT YOU HAVE TO LOOK OUT! Right behind the lower mounting hole for the standard shifter cables, you will find a power steering hard line. The guy on the drill making the hole didn't notice until it was too late, and now there is a ding/nick in that line. I have a spare on the parts car, but it would be no fun to have a power steering leak/fire (looks like they already had one in the parts car). We had to use nuts/bolts to hold the shift cables in the new hole and there is NO room for fat fingers. If your hand is bigger than my wife's (thank you honey! ) you will NOT be able to get a nut on the bolt for that lower hole.
17:05 Clutch is mounted
***You can use skateboard/rollerblade wheel bearings for the transaxle shifter cables. The holes in the end of the cables are a hair too small, so my dad used a dremel sander to open them up a little. Then he thought it would be good to have them be a "press-fit" and used a big socket to seat them. Well they're not quite as free as they were, so it's more like a bushing than a bearing until I decide to go open those holes a little more and mount some new bearings. Good thing they were used bearings from a friend at work who makes skateboards! (Thanks E.N.)***
20:10 Engine and manual transaxle are bolted together w/ 3 bolts, the axles are in, and my helpers left. The manual is TINY compared to the automatic. And much, much lighter, like by half.
20:30 Clutch hydraulic lines all tight, time for Supper
21:25 Children in bed, Back at it
22:25 Clutch fluid was NASTY. Flushed about a pint through it, bled it (wife helped for a minute, pushing the clutch pedal) and called it working. The engine and transaxle are bolted together all the way, the under-engine brace (not the crossmember) is mounted. The starter is not playing nice and I'm stopping for the night.
***BE SURE to mount the ground wire on the starter bolt. One person who did this swap left that wire loose and it wasted 2 batteries with overcharging before they figured out what was wrong.***
Sunday (church basically all day)
20:35 Back at it
21:41 Used bolts from parts car to replace the damaged strut/spindle mounting bolts from the driver. Also got a cotter pin for the steering from the donor car. Suspension is back together.
22:10 Looking up wiring information
23:25 Back-up lamp wiring figured out.
***NOBODY MENTIONED that you have to have the key ON to get the reverse lamps to light when you short the wires for the back-up lamps switch! I wasted a frikken HOUR troubleshooting those lamps until I figured this out!***
00:11 Reverse lamp wires just need tape. Fender liner removed for access to wiring harness pass-through for the clutch wires. There is a HUGE space to run wires through the fender. If I'd known about it 9 years ago, you would be looking at a 4AWG power wire for my stereo in here, instead of having it snake through the engine bay to a hole in the firewall up in the top/middle of the dash.
The last you'll see of my back-up lamp wiring! I SOLDERed the connections for reliability.
***ClEAN OUT YOUR FENDER! there is a decade worth of junk, leaves, mud, bugs, etc. in there. and it will rust eventually if you don't clean it out every once in a while.
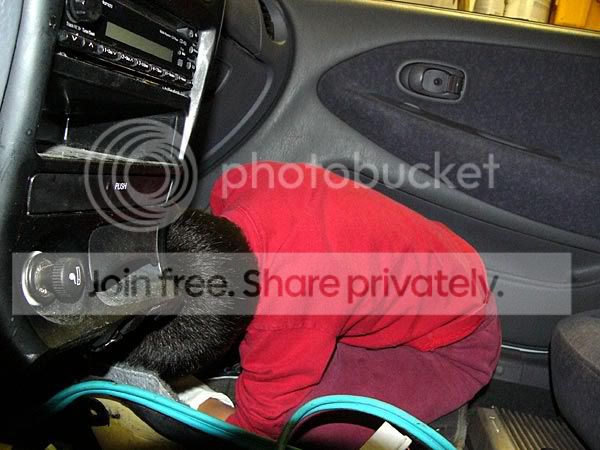
And there it sits. If I had got up when I intended to, and been 100% ready for the wiring changes, I might have driven it to work today. I'm going to have my son help tonight, now that it's not going to be dangerous and/or too hard for him. I felt bad for the little guy, he wanted to help and kept coming out and playing with loose bolts and whatnot, then going back in.
I still need to make 2 bolt holes to hold down the front of the shifter base, and hook up the starter and then the shifter cables (the shifter cables block the starter bolt heads somewhat). I need to run wires for the clutch pedal/neutral safety switch, and run power to pin 86 on the ECM. Pin 72 is already cut. Then re-mount the ECM. I need to get the wheels on, verify clutch operation, put the console back together and that's a wrap. I'm seriously considering redoing the wiring for my stereo. The power wire I'm likely to leave, but in the floor console there is about 20 feet of RCA cable coiled up (I got it free and didn't want to cut it when I installed the stereo). Trim that, slap it together and (pray to God) the car will be 100% DONE.
oh, and my wife called to let me know that the part I ordered had come in at the dealership. I told her it was already in the car, but thanks.
Thread Starter
Super Moderator
Joined: Sep 2001
Posts: 10,795
Likes: 5
From: Pflugerville, TX
Vehicle: 2000 Elantra
Monday
19:11 Back at it
20:21 Clutch/Neutral safety switch wiring done, starter mounted. Pin 86 got 12V at on/start from fuse 9 in the kick panel fuse box. Soldered those connections also. We used the hood release cable grommet to hold the wires for the clutch pedal. My son helped a little with the zip-tie gun, and my wife helped with the things she could (thanks again honey! ). She isn't much of a gearhead, but she wanted it to be done!
20:41 Working on shifter, childrens' bed time
20:55 Shift cables mounted on transaxle with gentle persuasion from a hammer, putting stuff back in engine bay
22:40 Engine bay back together
23:18 Wiring done, shifter base held down in front with metal strapping like they use to hold A/C ducts in place
00:00 Trim and seats are still loose, wheels are torqued on
00:25 Bolting in the seats, cleaning up
00:35 Buttoned up... clutch not engaging! Troubleshot for a while, then realized (duh, newb) that it has to be in gear to do anything.
01:30-ish Oil is in the transaxle, on the floor, and in my mouth. Gear oil stinks. And tastes bad. Don't ask. Took a test drive down the street to verify function. W0rkS!
Tuesday
10:00 doctor visit for child #3 (he's fine)
13:00 Oops, put the splash guards back on, installed console after straightening up the wiring. Tightened up the shifter a little with some zip-ties on the spring and a thin bushing in the pivot. Now it's officially DONE. Just in time for work.

So I headed out to go to work. And couldn't get over 40MPH. It was shifting fine but seemed like it didn't have any power, over 30MPH and generally it was kindof gutless. Drove to a gas station. I asked a mechanic who was outside if that white smoke smelled like clutch or brakes. It was brakes. The angle of the dangle on the new brake pedal was different. ADJUST YOUR BRAKE PEDAL FREE PLAY!!! Fortunately I had almost-new brakes on there so I'm not worried about having lost some of them; and thank God the rotors seem not to have warped. Drove maybe 1/2 mile or so on them, never above 40-ish MPH.
I adjusted the free play (thank GOD I had left a set of wrenches in the car! ) and took it for a drive. While I was loosening the brake light switch, the car started rolling so I was pretty sure that was it. I adjusted the switch and master cylinder piston settings and took it for a spin. WOW.
This
Car
Frikken
RIPS
Now!
Burn it up in 1st, chirp 2nd, and that's just because I'm rusty driving a stick. If I got on it I bet it would burn all the way thru first and part of second!
Thank God, nothing was broken beyond use/repair, it all worked the first time, nobody got more than minor scratches and it's finally DONE! w00t!
19:11 Back at it
20:21 Clutch/Neutral safety switch wiring done, starter mounted. Pin 86 got 12V at on/start from fuse 9 in the kick panel fuse box. Soldered those connections also. We used the hood release cable grommet to hold the wires for the clutch pedal. My son helped a little with the zip-tie gun, and my wife helped with the things she could (thanks again honey! ). She isn't much of a gearhead, but she wanted it to be done!
20:41 Working on shifter, childrens' bed time
20:55 Shift cables mounted on transaxle with gentle persuasion from a hammer, putting stuff back in engine bay
22:40 Engine bay back together
23:18 Wiring done, shifter base held down in front with metal strapping like they use to hold A/C ducts in place
00:00 Trim and seats are still loose, wheels are torqued on
00:25 Bolting in the seats, cleaning up
00:35 Buttoned up... clutch not engaging! Troubleshot for a while, then realized (duh, newb) that it has to be in gear to do anything.
01:30-ish Oil is in the transaxle, on the floor, and in my mouth. Gear oil stinks. And tastes bad. Don't ask. Took a test drive down the street to verify function. W0rkS!
Tuesday
10:00 doctor visit for child #3 (he's fine)
13:00 Oops, put the splash guards back on, installed console after straightening up the wiring. Tightened up the shifter a little with some zip-ties on the spring and a thin bushing in the pivot. Now it's officially DONE. Just in time for work.
So I headed out to go to work. And couldn't get over 40MPH. It was shifting fine but seemed like it didn't have any power, over 30MPH and generally it was kindof gutless. Drove to a gas station. I asked a mechanic who was outside if that white smoke smelled like clutch or brakes. It was brakes. The angle of the dangle on the new brake pedal was different. ADJUST YOUR BRAKE PEDAL FREE PLAY!!! Fortunately I had almost-new brakes on there so I'm not worried about having lost some of them; and thank God the rotors seem not to have warped. Drove maybe 1/2 mile or so on them, never above 40-ish MPH.
I adjusted the free play (thank GOD I had left a set of wrenches in the car! ) and took it for a drive. While I was loosening the brake light switch, the car started rolling so I was pretty sure that was it. I adjusted the switch and master cylinder piston settings and took it for a spin. WOW.
This
Car
Frikken
RIPS
Now!
Burn it up in 1st, chirp 2nd, and that's just because I'm rusty driving a stick. If I got on it I bet it would burn all the way thru first and part of second!
Thank God, nothing was broken beyond use/repair, it all worked the first time, nobody got more than minor scratches and it's finally DONE! w00t!
Thread Starter
Super Moderator
Joined: Sep 2001
Posts: 10,795
Likes: 5
From: Pflugerville, TX
Vehicle: 2000 Elantra
So I went to go to work this morning, and there was dew on the windscreen. I went to hit it with the wipers one time, and nothing happened. Just a click from somewhere in the console, no wipey-wipers.
I said "you've got to be kidding me, I don't have WIPERS now?"
fing02.gif Remember to put that connector back on when you finish with the master cylinder hydraulics. It sits very close to the wiper motor, naturally, so it looked like it was on at a glance. It weren't. Now it is.
I also hooked up my stereo's power wire at the same time. 2 days' commuting and no unhappy noises from the car = time for some tunes.
Also, the fuel economy looks to have shot up, compared to the old/busted auto with slipping clutches, funny noises, and who knows what else. I'll try to remember to post up the difference.
I am SO glad I did all that work. ContROL, COMPLETE CONTROL!!!!!1! Thank God it is working great! There's this one intersection on my drive to/from work with 2 lights, one on either side of a highway. If you take off slow, it gives you a pair of greens in sequence. If you don't want to get cut off by the guy next to you, you can't take off slow. So you back off the gas crossing the highway and wait for the light to change. With the auto, it would upshift to 3rd unless I felt like tearing it up with "sport-shifting". Then the 2nd light goes green, and you hit the gas and it goes "BUuuuuuuuuuuUUUUUUUH" all slow-like. With the standard, just leave it in 2nd and hit it when the light changes: WAAAAAAAAAHHH! and off we go! WOOHOO! Thank God I REALLY REALLY LIKE this car now!
Hints & Tips Update #1:
The axles for the automatic use a different joint, and so they are a different part number. Also there is a length difference of <1/4" but the slip-joint has more than enough slack to handle it. The auto axle shafts DO WORK with the manual transaxle.
If you take the axle shafts out of the transaxle without removing them from the spindles you can use bungee cords to hold them out of the way. We put the ends of the bungee cords on the brackets on top of the strut towers. This is not strictly necessary but for a hundred dollar part x2 it gives a little peace of mind.
The engine turns. I used an electric impact wrench to get the flywheel bolts off the engine in my donor car and my driver. The bolts broke loose and spun free before the engine turned more than a few degrees if at all. Putting the bolts back was a bit more involved. We had D.R. holding a breaker bar or ratchet (I forget which) with a socket on the crankshaft pulley mounting bolt. You could also use a breaker bar on the bolt for the upper timing gear on the exhaust cam but that would involve removing the upper timing cover if it's not already off.
By the way if you ever wanted to tighten the crank pulley bolt but had difficulty the upper timing gear bolt will hold the engine still while you torque that down as well.
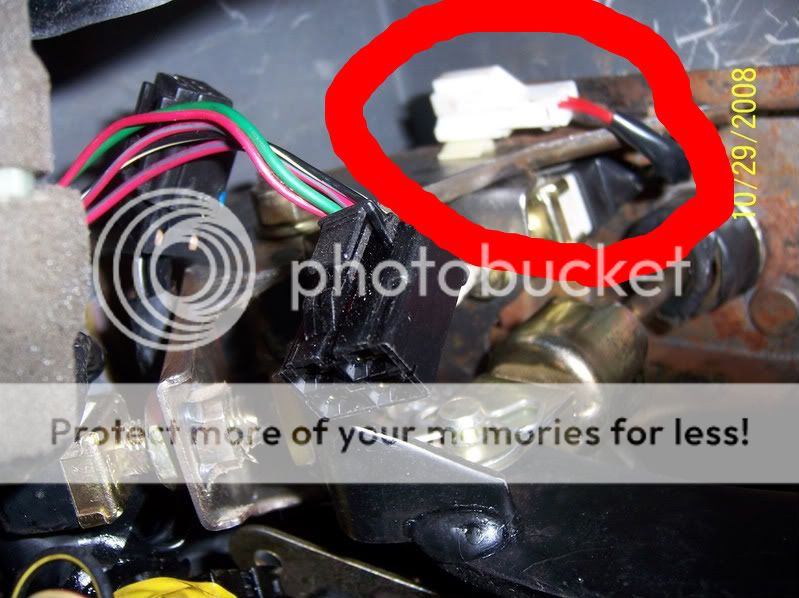
If your donor car had cruise control your clutch pedal will have 2 switches on it. The one that is depressed when you push the pedal all the way in gets connected to the harness that used to be on the auto transaxle. That is your neutral safety switch. The multi-pin connector on the clutch is for cruise control. I didn't see a connector for it in my wiring harness but I wasn't looking since my clutch pedal didn't have that connector. Neither of my cars has cruise control so it wasn't a problem for me. You might have to get clever with brackets and get a switch from a manual trans. car with cruise if you want to keep cruise control functional after the swap. The white connector that is circled here is the neutral safety switch connector on sleepertib's car. The black connectors are for cruise.
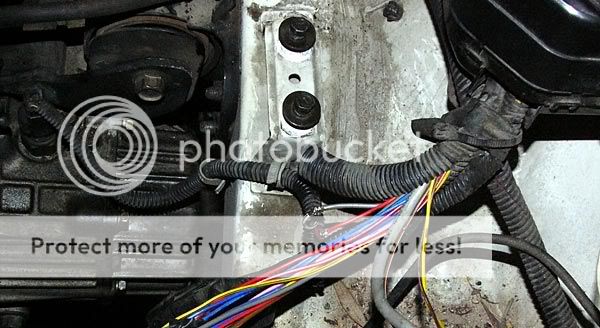
You will need to ADD a couple of feet of wire to the end of the 2 wires on the white connector. The wire harness that used to go to the transaxle is too short. I pulled the harness apart all the way back to the fuse box and that would be enough wire to get halfway through the fender. From the connector on the donor car's clutch pedal I got the wires as far up as I could and that was only about a foot or so.
This right here
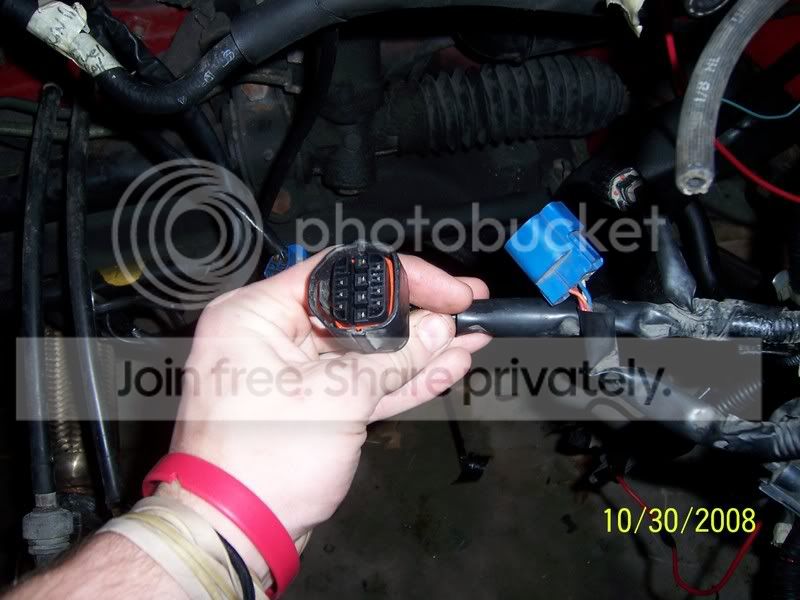
is the connector from the transaxle on sleepertib's car. The middle row of contacts had (on my car anyhow) 3 fat and 1 skinny wires. The skinny/fat pair is for the clutch pedal and the fat pair is for the back-up lamps. Or else it's the other way round. Set the key to on and short a pair of wires. If the lamps don't light, short the other pair. The ones that make the back-up lamps light, is for the back-up lamps nana.gif
********
The power steering line is holding pressure for now and I think I am just going to keep an eye on it and see if it starts deforming at the place where it was nicked. I'll pull the one from my donor car just in case but I don't think I'll need it. The power steering belt is a little loose so it squeaks instead of making max. pressure but I think it might even be ok under max. pressure. I hope so anyway.
The brake rotors warped a little tiny bit during the shenanigans with the brake pedal. Just a little eee-eee-eee-eee when coming to a complete stop with hot brakes, but it sounds like a hoopty 02.gif Oh well it still stops perfectly and the warping is not enough to make the pedal pulsate, or else it would make me insane and I'd have to have them cut. Bear in mind, these are the 130,000 miles original OEM brake rotors and they have NEVER been redressed when I changed pads. I just let the new pads bed in to the surface and I've never had a problem. The 1st set of pads lasted 80,000, the second 40,000 and the third looked like new when I just put them back on this last week. Unless they are severely warped, I see no need for cutting brake rotors, EVER.
I have driven this car now for several days and no CELs have cropped up. I am hopeful this means we got the wiring right by having done it according to the info in this thread.
I will need to get an alignment done on this car now. I unbolted the steering from the spindles so that will affect it. Also one of the strut/spindle mount bolts was an eccentric camber adjusting bolt. I asked my dad if he remembered which way it was pointed and he laughed and said it was spinning when he was loosening it. Doh. This car has been crashed on the left and it's a bear to get the alignment straight but they should be able to get it. Brake Specialists Plus in Cedar Park is Good People. I am considering cutting 1/4 to 1/2 a coil on the springs for a SLIGHT increase in spring rate and SMALL drop. I'll do that before getting an alignment eh wink1.gif
I can still feel a little slack in the drivetrain. The sprung clutch hub is one source, the soft-stuff-filled engine mounts are another, and the fat stock tires are yet another. If it bothers me, I'll have to get some REALLY solid mounts, and possibly long-term I'll consider getting an unsprung clutch. Yes I know I know but I don't like the sloppy feel of this stock replacement sprung clutch disc. Oh well. I'm too cheap to do anything about it until the clutch wears out! Also I'm considering the relative merit of a lighter flywheel. I guess when the clutch goes (years, please! ) I'll evaluate whether or not I want the revs to drop faster when I let off the clutch. It drops faster than with the auto tragic, and yes I pulled the restrictor from the slave cylinder, but still the engine stays spinning for what seems like a hair too long. Oh well. At least I can pick my gears!
I'll have to remember to do it, but the shifter boot needs some black shoe polish. Kiwi, just like for the other kind of boots!
I haven't completely forgotten about the checklist I made, but I didn't follow it precisely (read: at all) since it was all right there in my head after I finally figured everything out.
I hope that this thread can have all the information anyone needs to be able to do this swap. Have I missed anything or left anything out? Anything but the cliff's notes, that is nana.gif
I said "you've got to be kidding me, I don't have WIPERS now?"
fing02.gif Remember to put that connector back on when you finish with the master cylinder hydraulics. It sits very close to the wiper motor, naturally, so it looked like it was on at a glance. It weren't. Now it is.
I also hooked up my stereo's power wire at the same time. 2 days' commuting and no unhappy noises from the car = time for some tunes.
Also, the fuel economy looks to have shot up, compared to the old/busted auto with slipping clutches, funny noises, and who knows what else. I'll try to remember to post up the difference.
I am SO glad I did all that work. ContROL, COMPLETE CONTROL!!!!!1! Thank God it is working great! There's this one intersection on my drive to/from work with 2 lights, one on either side of a highway. If you take off slow, it gives you a pair of greens in sequence. If you don't want to get cut off by the guy next to you, you can't take off slow. So you back off the gas crossing the highway and wait for the light to change. With the auto, it would upshift to 3rd unless I felt like tearing it up with "sport-shifting". Then the 2nd light goes green, and you hit the gas and it goes "BUuuuuuuuuuuUUUUUUUH" all slow-like. With the standard, just leave it in 2nd and hit it when the light changes: WAAAAAAAAAHHH! and off we go! WOOHOO! Thank God I REALLY REALLY LIKE this car now!
Hints & Tips Update #1:
The axles for the automatic use a different joint, and so they are a different part number. Also there is a length difference of <1/4" but the slip-joint has more than enough slack to handle it. The auto axle shafts DO WORK with the manual transaxle.
If you take the axle shafts out of the transaxle without removing them from the spindles you can use bungee cords to hold them out of the way. We put the ends of the bungee cords on the brackets on top of the strut towers. This is not strictly necessary but for a hundred dollar part x2 it gives a little peace of mind.
The engine turns. I used an electric impact wrench to get the flywheel bolts off the engine in my donor car and my driver. The bolts broke loose and spun free before the engine turned more than a few degrees if at all. Putting the bolts back was a bit more involved. We had D.R. holding a breaker bar or ratchet (I forget which) with a socket on the crankshaft pulley mounting bolt. You could also use a breaker bar on the bolt for the upper timing gear on the exhaust cam but that would involve removing the upper timing cover if it's not already off.
By the way if you ever wanted to tighten the crank pulley bolt but had difficulty the upper timing gear bolt will hold the engine still while you torque that down as well.
If your donor car had cruise control your clutch pedal will have 2 switches on it. The one that is depressed when you push the pedal all the way in gets connected to the harness that used to be on the auto transaxle. That is your neutral safety switch. The multi-pin connector on the clutch is for cruise control. I didn't see a connector for it in my wiring harness but I wasn't looking since my clutch pedal didn't have that connector. Neither of my cars has cruise control so it wasn't a problem for me. You might have to get clever with brackets and get a switch from a manual trans. car with cruise if you want to keep cruise control functional after the swap. The white connector that is circled here is the neutral safety switch connector on sleepertib's car. The black connectors are for cruise.
You will need to ADD a couple of feet of wire to the end of the 2 wires on the white connector. The wire harness that used to go to the transaxle is too short. I pulled the harness apart all the way back to the fuse box and that would be enough wire to get halfway through the fender. From the connector on the donor car's clutch pedal I got the wires as far up as I could and that was only about a foot or so.
This right here
is the connector from the transaxle on sleepertib's car. The middle row of contacts had (on my car anyhow) 3 fat and 1 skinny wires. The skinny/fat pair is for the clutch pedal and the fat pair is for the back-up lamps. Or else it's the other way round. Set the key to on and short a pair of wires. If the lamps don't light, short the other pair. The ones that make the back-up lamps light, is for the back-up lamps nana.gif
********
The power steering line is holding pressure for now and I think I am just going to keep an eye on it and see if it starts deforming at the place where it was nicked. I'll pull the one from my donor car just in case but I don't think I'll need it. The power steering belt is a little loose so it squeaks instead of making max. pressure but I think it might even be ok under max. pressure. I hope so anyway.
The brake rotors warped a little tiny bit during the shenanigans with the brake pedal. Just a little eee-eee-eee-eee when coming to a complete stop with hot brakes, but it sounds like a hoopty 02.gif Oh well it still stops perfectly and the warping is not enough to make the pedal pulsate, or else it would make me insane and I'd have to have them cut. Bear in mind, these are the 130,000 miles original OEM brake rotors and they have NEVER been redressed when I changed pads. I just let the new pads bed in to the surface and I've never had a problem. The 1st set of pads lasted 80,000, the second 40,000 and the third looked like new when I just put them back on this last week. Unless they are severely warped, I see no need for cutting brake rotors, EVER.
I have driven this car now for several days and no CELs have cropped up. I am hopeful this means we got the wiring right by having done it according to the info in this thread.
I will need to get an alignment done on this car now. I unbolted the steering from the spindles so that will affect it. Also one of the strut/spindle mount bolts was an eccentric camber adjusting bolt. I asked my dad if he remembered which way it was pointed and he laughed and said it was spinning when he was loosening it. Doh. This car has been crashed on the left and it's a bear to get the alignment straight but they should be able to get it. Brake Specialists Plus in Cedar Park is Good People. I am considering cutting 1/4 to 1/2 a coil on the springs for a SLIGHT increase in spring rate and SMALL drop. I'll do that before getting an alignment eh wink1.gif
I can still feel a little slack in the drivetrain. The sprung clutch hub is one source, the soft-stuff-filled engine mounts are another, and the fat stock tires are yet another. If it bothers me, I'll have to get some REALLY solid mounts, and possibly long-term I'll consider getting an unsprung clutch. Yes I know I know but I don't like the sloppy feel of this stock replacement sprung clutch disc. Oh well. I'm too cheap to do anything about it until the clutch wears out! Also I'm considering the relative merit of a lighter flywheel. I guess when the clutch goes (years, please! ) I'll evaluate whether or not I want the revs to drop faster when I let off the clutch. It drops faster than with the auto tragic, and yes I pulled the restrictor from the slave cylinder, but still the engine stays spinning for what seems like a hair too long. Oh well. At least I can pick my gears!
I'll have to remember to do it, but the shifter boot needs some black shoe polish. Kiwi, just like for the other kind of boots!
I haven't completely forgotten about the checklist I made, but I didn't follow it precisely (read: at all) since it was all right there in my head after I finally figured everything out.
I hope that this thread can have all the information anyone needs to be able to do this swap. Have I missed anything or left anything out? Anything but the cliff's notes, that is nana.gif
Thread Starter
Super Moderator
Joined: Sep 2001
Posts: 10,795
Likes: 5
From: Pflugerville, TX
Vehicle: 2000 Elantra
I've been driving long enough to go through a tank of gas, and it looks like the mileage went from 27 to 31 MPG. Not too shabby eh! It won't save as much $ as it would have a month or 2 ago but thank God anyhow!
Hints & Tips update #2
When you are trying to mate the transaxle to the engine, you have to have the splines lined up. The input shaft on the transaxle has to slide in smoothly to the hub of the clutch plate. If it is not lined up and you force it, you will break your clutch or transaxle. That's what the alignment tool is for. Install the alignment tool as you mount the clutch/pressure plate, and it will keep the clutch in proper position (centered on the crank). If you try to mount the transaxle and it won't go, pull it back a couple of inches from the engine. Stick a hand up in there and VERY slightly rotate the input shaft. Try again to mount the transaxle. This is standard fare for folks who have changed their clutches before, but if you are converting to a standard and this is your first clutch, I guess it's easier to find here than to go searching through clutch related threads, if you even think to run the search!
If your first attempt at mating the engine/trans. fails, you hypothetically may knock the clutch plate off-center. If you think you may have done, reinsert the alignment tool, and it will tell you if you need to recenter the clutch or not. Happily, we got this on the second try, but I have heard of anywhere from 1 to 5+ attempts before successful mounting of a transaxle. Just be patient and remember:
DON'T FORCE IT!
The brake light switch touches the arm of the brake pedal. When the car rolled off the assembly line in Korea, there was a little pad between the switch and the pedal arm. My brakes were so far out of adjustment with the manual trans. brake pedal, that it crushed the little pad against the brake light switch bracket, and it disintegrated. I had to get the pad from the automatic brake pedal arm. It is EXTREMELY HELPFUL to have a spotter standing by when you adjust the brake lights switch. First, adjust the pedal free play at the master cylinder plunger rod-end at the "front" side of the arm, and then have your spotter tell you when the brake lights are on/off as you adjust the switch. The plunger pushing into the switch body makes the lights go off. The plunger going out makes them come on. If there is no little pad in the brake arm, the plunger goes all the way through the arm, into the mounting hole where the pad should go. Put a piece of rubber or something on the hole if your pad is gone and you don't have another. Otherwise your brake lights will stay on. While this may get you a new friend with a badge and a gun, it will also possibly cost you some money (ticket) so do check out the brake lights for proper operation before you drive off!
Here is one more reason my parts car will never run again:
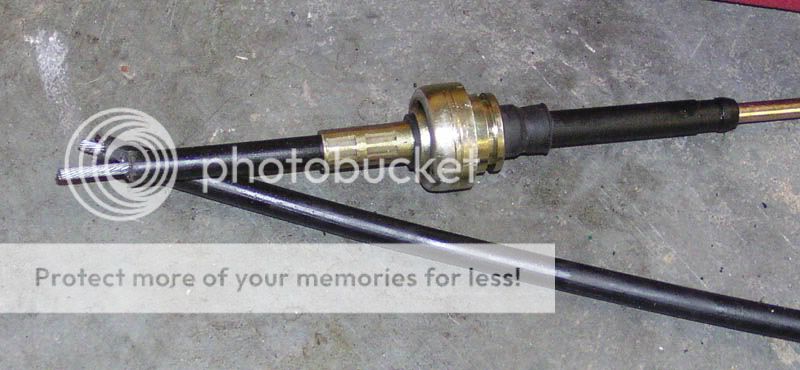
The shift cable for the automatic
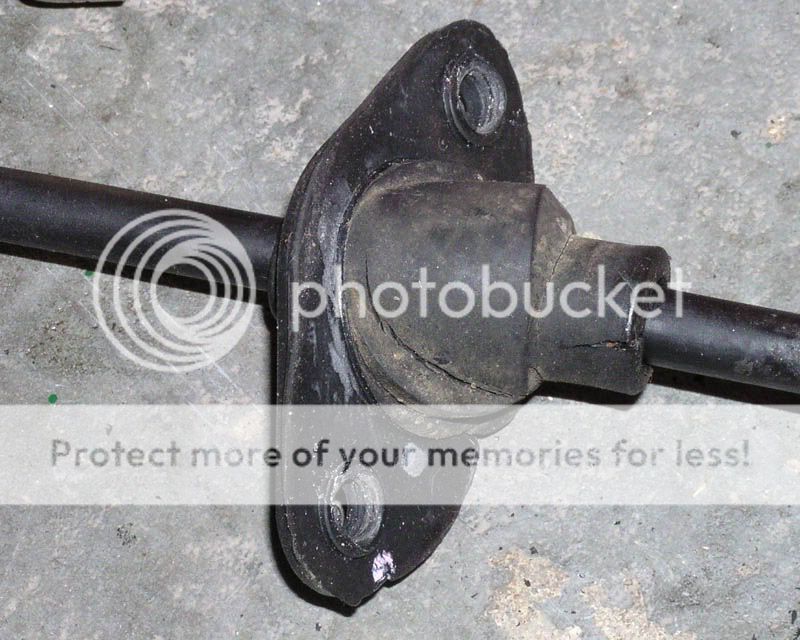
has a FAT hole for it in your firewall. Perfect for rain/nastiness intrusion. I cut the shift cable to get the metal bracket off it. Then I cut up a section of coolant hose to about the shape of the bracket. Make 2 holes with the side-chewing dremel bit, and you get this:

Which leads to this:
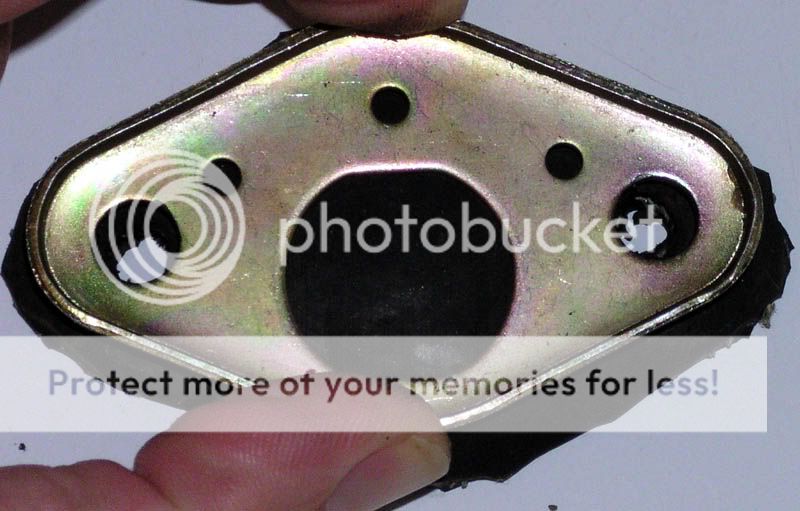
Which should seal out the elements nicely, when bolted on to the place where the automatic's shift cable used to go. DO THIS BEFORE you install the manual shift cables because it's going to suck getting a wrench in there after!
Hints & Tips update #2
When you are trying to mate the transaxle to the engine, you have to have the splines lined up. The input shaft on the transaxle has to slide in smoothly to the hub of the clutch plate. If it is not lined up and you force it, you will break your clutch or transaxle. That's what the alignment tool is for. Install the alignment tool as you mount the clutch/pressure plate, and it will keep the clutch in proper position (centered on the crank). If you try to mount the transaxle and it won't go, pull it back a couple of inches from the engine. Stick a hand up in there and VERY slightly rotate the input shaft. Try again to mount the transaxle. This is standard fare for folks who have changed their clutches before, but if you are converting to a standard and this is your first clutch, I guess it's easier to find here than to go searching through clutch related threads, if you even think to run the search!
If your first attempt at mating the engine/trans. fails, you hypothetically may knock the clutch plate off-center. If you think you may have done, reinsert the alignment tool, and it will tell you if you need to recenter the clutch or not. Happily, we got this on the second try, but I have heard of anywhere from 1 to 5+ attempts before successful mounting of a transaxle. Just be patient and remember:
DON'T FORCE IT!
The brake light switch touches the arm of the brake pedal. When the car rolled off the assembly line in Korea, there was a little pad between the switch and the pedal arm. My brakes were so far out of adjustment with the manual trans. brake pedal, that it crushed the little pad against the brake light switch bracket, and it disintegrated. I had to get the pad from the automatic brake pedal arm. It is EXTREMELY HELPFUL to have a spotter standing by when you adjust the brake lights switch. First, adjust the pedal free play at the master cylinder plunger rod-end at the "front" side of the arm, and then have your spotter tell you when the brake lights are on/off as you adjust the switch. The plunger pushing into the switch body makes the lights go off. The plunger going out makes them come on. If there is no little pad in the brake arm, the plunger goes all the way through the arm, into the mounting hole where the pad should go. Put a piece of rubber or something on the hole if your pad is gone and you don't have another. Otherwise your brake lights will stay on. While this may get you a new friend with a badge and a gun, it will also possibly cost you some money (ticket) so do check out the brake lights for proper operation before you drive off!
Here is one more reason my parts car will never run again:
The shift cable for the automatic
has a FAT hole for it in your firewall. Perfect for rain/nastiness intrusion. I cut the shift cable to get the metal bracket off it. Then I cut up a section of coolant hose to about the shape of the bracket. Make 2 holes with the side-chewing dremel bit, and you get this:
Which leads to this:
Which should seal out the elements nicely, when bolted on to the place where the automatic's shift cable used to go. DO THIS BEFORE you install the manual shift cables because it's going to suck getting a wrench in there after!