
How to uninstall/install and clean/gap spark plugs (Genesis Coupe 2010-2012)

Thread Starter
Senior Member

Joined: Jan 2012
Posts: 382
Likes: 0
From: US
Vehicle: 2010/Hyundia/Genesis Coupe 2.0T Track
If you need to take your plugs out to check them or clean them or gap them, here is how.
Tools needed:
10mm socket or wrench
5/8 spark plug socket (it has a rubber lining in it to �grab� your plug and hold it so you can pull it out)
- In a pinch, you may be able to use a 16mm deep socket.
At least a 6� ratchet extension
Needle nose pliers (if you intend to change the gap)
Spark plug gap checking tool
1. Pull the negative terminal to your battery. This is always a good idea when working on anything under the hood. Make sure your alarm is off and doors unlocked or when you reconnect your alarm will go off right in your ear. I just leave mine hanging like this, making sure it doesn�t touch the positive (which has a cover on it so it isn�t very likely). It is ground and connected to metal, so it can touch metal.


2. Take off the 4 bolts (10mm) holding down your spark plug/engine cover. (Tightening specs not listed, but make it snug when re-installing.

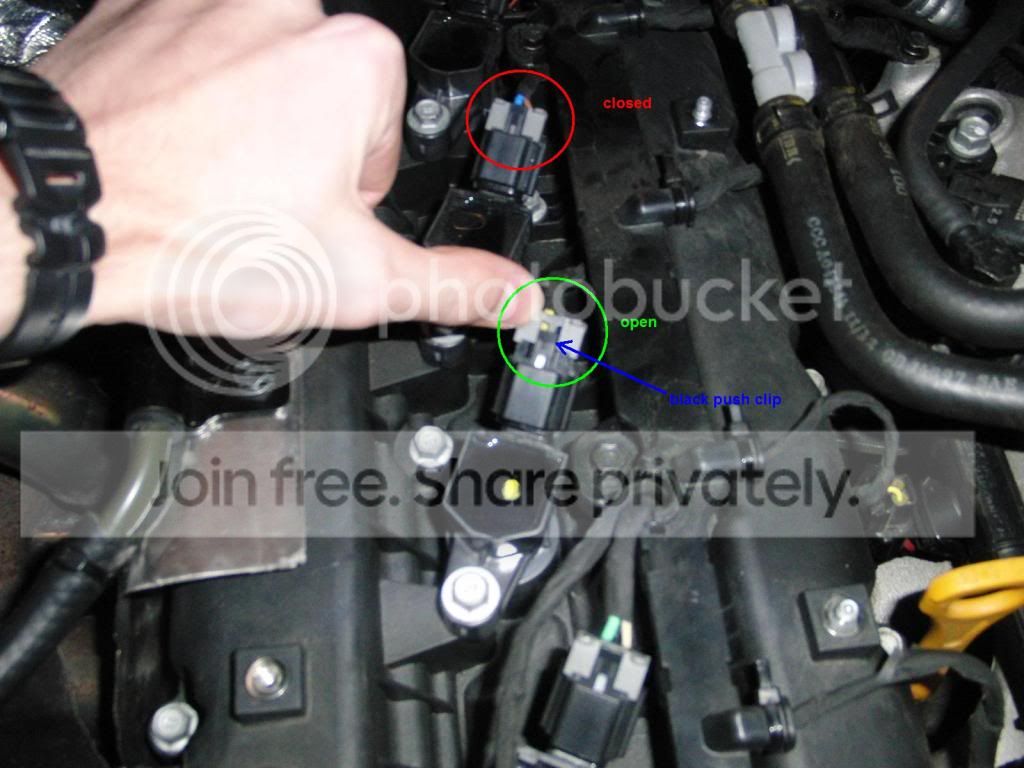
3. Push the gray �lock� on the electric connector up. Then the black center of that (was covered by the gray) needs to be pushed down. Then pull the connector off, you don�t have to pull hard, just firmly on the connector, not the wire.
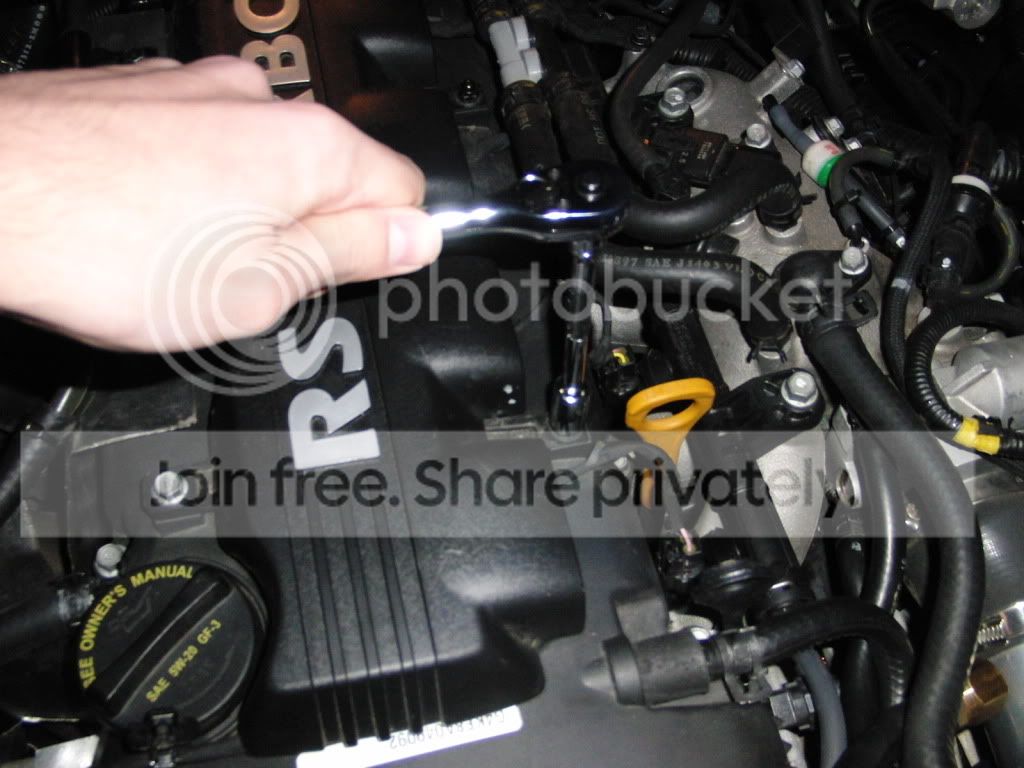
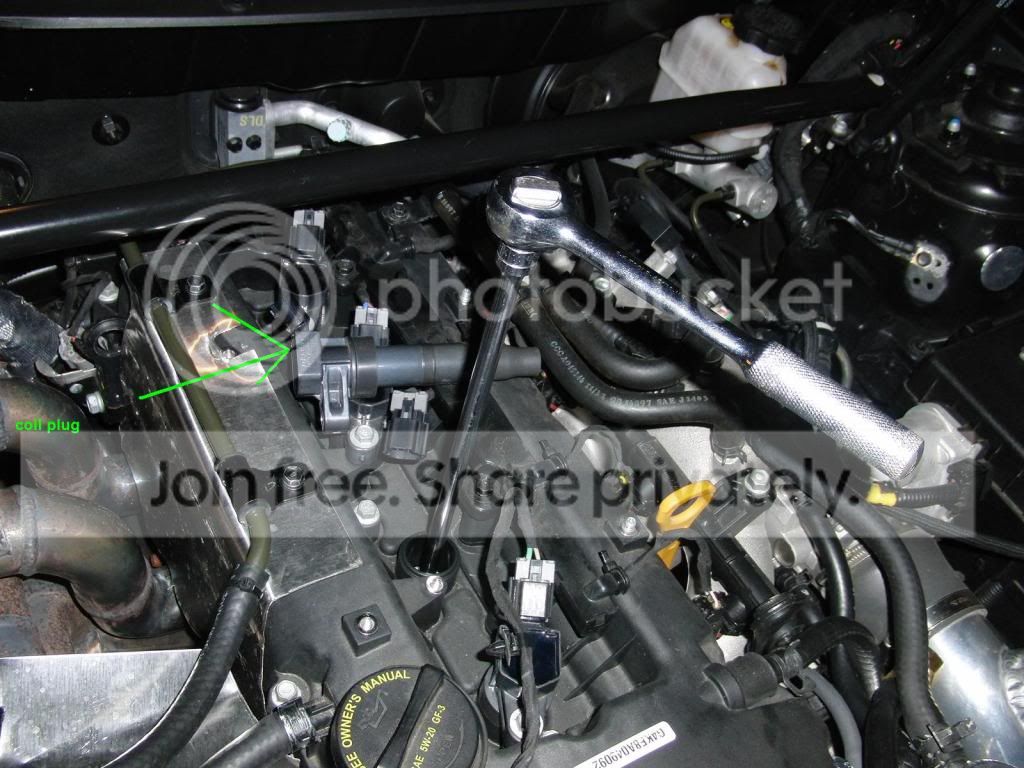
4. Unbolt the 10mm bolt holding down the spark plug coil plug. (Again no specs, make it snug).
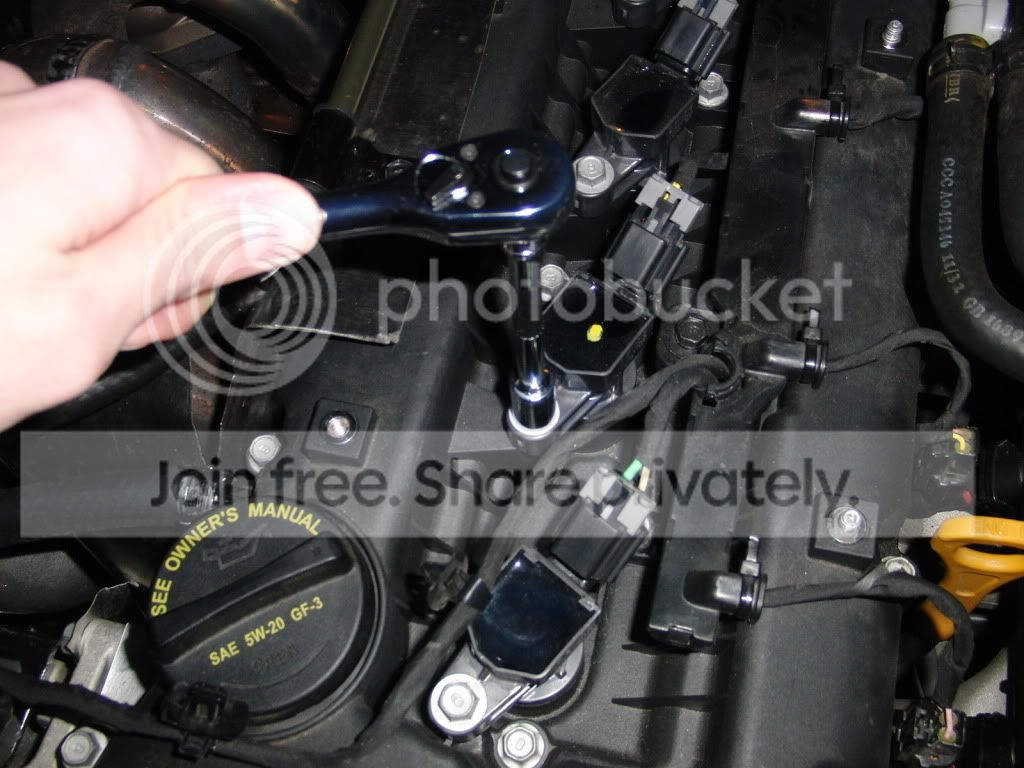
5. Pull the coil plug off and set it aside. I like to do 1 at a time so I don�t confuse which one goes where.
6. Stick your 5/8� socket on at least 6� extender into the hole and over the spark plug. Take the spark plug out like and screw, turning counter clockwise. (It takes about 16-19 turns) Once you feel it loose, pull your ratchet out with the spark plug still in it. Sometimes your socket might come off the ratchet, in which case stick it back on and the spark plug probably wasn�t out the whole way. Put a clean rag or something over the hole so dirt/contaminants don�t get into your engine and take car that nothing drops in there.
7. Inspect your plug, clean the threads from any dirt in them while it is out. If the electrode has black looking soot on it, you probably need to clean or replace it. The electrode is the small tip coming from the center, and the ground strap is the metal rounded �L� coming off of the side. If the porcelain is chipped or cracked I would advise getting a new plug.
You can see me checking my gap here with a common spark plug tool. You can see the .040� fits in no problem, but the .044 won�t fit. So my gap is probably a .042�. Do not use a feeler gauge to check gap or a progressive sloped gapping tool. Also if it is very close to .04" using a gapping tool, don't force it through, you could rub some of the irrudium tip off.
Those have about 16,000 miles on them and you see the porcelain and electrode are clean. This means my plugs do have a proper heat range to burn off all the carbon, possibly too hot, since I have had light detonation before on my stock car, but that probably has more to do with the fuel tune than the heat range. I don�t have any pictures of �bad plugs� but you can Google �spark plug diagnosis� and find plenty of pictures and examples.
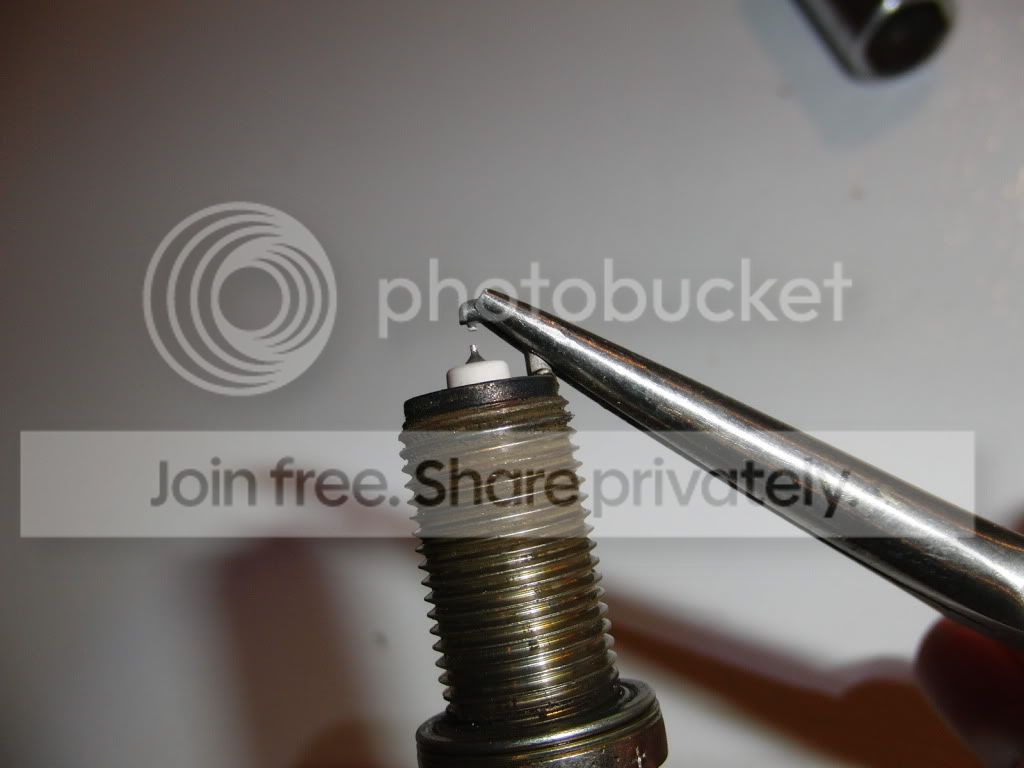
8. If you want to adjust your gap, you MUST TAKE CARE NOT TO TOUCH THE TIP or THE GROUND or THE ELECTRODE or THE PORCELAIN. This is an example of how to �properly� adjust the gap by pinching the ground strap and bending it up or down to increase or decrease the gap. I use the term properly loosely as they do make spark plug gapping tools for ~$50. But it isn�t that hard and many people use needle nose pliers to change their gap.


9. Installation is the reversal of disassembly. Though care should be taken when putting the spark plug back in. Use your hands and the socket extension to finger tighten start the threading to avoid cross-threading. Some would advise to get a new spark plug crush washer/gasket though I have pulled mine over 20 times without replacing them so I don�t think it is a big deal. If you have a torque wrench, tighten to 15-22lb-ft. If you don�t have a torque wrench, a �guestimating rule of thumb� is to finger tighten until it stops, then go ~30� more (but also have an idea of what 22 lbs feels like if your ratchet wrench is 1� and DO NOT OVER TIGHTEN!!!
If you do use a new washer, rule of thumb is to tighten until it touches, then turn 90� more. One more time DO NOT OVERTIGHTEN!!!!!
This is a WAY more expensive mistake than if you snapped off all 4 electrodes of our plugs. This is if you are re-using the washers, if you have a new washer, I would recommend a torque wrench, it feels different when crushing is down.
It would be much eaiser to adjust using the angle notches that come with your spark plug gapper. I attempted this, but the angle notch would just bend, that is why I suggested needle nose pliers. But After getting new plugs and a new gapper, I tried this and it worked great. I would highly recommend attempting the angle notch for adjusting it open or close as you can make much more fine adjustments and it is much easier to use. Just take care that the notch is thin enough to fit around the ground and not touch the electrode as seen below.


Though this was very difficult to take a pic of, I think you get how to use them. Just put he notch around the grounding strap and bend it up or down.
This thread might help give a bit more insight on gap size and choice.
https://www.hyundaiaftermarket.org/f...o-changeclean/
Tools needed:
10mm socket or wrench
5/8 spark plug socket (it has a rubber lining in it to �grab� your plug and hold it so you can pull it out)
- In a pinch, you may be able to use a 16mm deep socket.
At least a 6� ratchet extension
Needle nose pliers (if you intend to change the gap)
Spark plug gap checking tool
1. Pull the negative terminal to your battery. This is always a good idea when working on anything under the hood. Make sure your alarm is off and doors unlocked or when you reconnect your alarm will go off right in your ear. I just leave mine hanging like this, making sure it doesn�t touch the positive (which has a cover on it so it isn�t very likely). It is ground and connected to metal, so it can touch metal.
2. Take off the 4 bolts (10mm) holding down your spark plug/engine cover. (Tightening specs not listed, but make it snug when re-installing.
3. Push the gray �lock� on the electric connector up. Then the black center of that (was covered by the gray) needs to be pushed down. Then pull the connector off, you don�t have to pull hard, just firmly on the connector, not the wire.
4. Unbolt the 10mm bolt holding down the spark plug coil plug. (Again no specs, make it snug).
5. Pull the coil plug off and set it aside. I like to do 1 at a time so I don�t confuse which one goes where.
6. Stick your 5/8� socket on at least 6� extender into the hole and over the spark plug. Take the spark plug out like and screw, turning counter clockwise. (It takes about 16-19 turns) Once you feel it loose, pull your ratchet out with the spark plug still in it. Sometimes your socket might come off the ratchet, in which case stick it back on and the spark plug probably wasn�t out the whole way. Put a clean rag or something over the hole so dirt/contaminants don�t get into your engine and take car that nothing drops in there.
7. Inspect your plug, clean the threads from any dirt in them while it is out. If the electrode has black looking soot on it, you probably need to clean or replace it. The electrode is the small tip coming from the center, and the ground strap is the metal rounded �L� coming off of the side. If the porcelain is chipped or cracked I would advise getting a new plug.
You can see me checking my gap here with a common spark plug tool. You can see the .040� fits in no problem, but the .044 won�t fit. So my gap is probably a .042�. Do not use a feeler gauge to check gap or a progressive sloped gapping tool. Also if it is very close to .04" using a gapping tool, don't force it through, you could rub some of the irrudium tip off.
Those have about 16,000 miles on them and you see the porcelain and electrode are clean. This means my plugs do have a proper heat range to burn off all the carbon, possibly too hot, since I have had light detonation before on my stock car, but that probably has more to do with the fuel tune than the heat range. I don�t have any pictures of �bad plugs� but you can Google �spark plug diagnosis� and find plenty of pictures and examples.
8. If you want to adjust your gap, you MUST TAKE CARE NOT TO TOUCH THE TIP or THE GROUND or THE ELECTRODE or THE PORCELAIN. This is an example of how to �properly� adjust the gap by pinching the ground strap and bending it up or down to increase or decrease the gap. I use the term properly loosely as they do make spark plug gapping tools for ~$50. But it isn�t that hard and many people use needle nose pliers to change their gap.
9. Installation is the reversal of disassembly. Though care should be taken when putting the spark plug back in. Use your hands and the socket extension to finger tighten start the threading to avoid cross-threading. Some would advise to get a new spark plug crush washer/gasket though I have pulled mine over 20 times without replacing them so I don�t think it is a big deal. If you have a torque wrench, tighten to 15-22lb-ft. If you don�t have a torque wrench, a �guestimating rule of thumb� is to finger tighten until it stops, then go ~30� more (but also have an idea of what 22 lbs feels like if your ratchet wrench is 1� and DO NOT OVER TIGHTEN!!!
If you do use a new washer, rule of thumb is to tighten until it touches, then turn 90� more. One more time DO NOT OVERTIGHTEN!!!!!
This is a WAY more expensive mistake than if you snapped off all 4 electrodes of our plugs. This is if you are re-using the washers, if you have a new washer, I would recommend a torque wrench, it feels different when crushing is down.
It would be much eaiser to adjust using the angle notches that come with your spark plug gapper. I attempted this, but the angle notch would just bend, that is why I suggested needle nose pliers. But After getting new plugs and a new gapper, I tried this and it worked great. I would highly recommend attempting the angle notch for adjusting it open or close as you can make much more fine adjustments and it is much easier to use. Just take care that the notch is thin enough to fit around the ground and not touch the electrode as seen below.
Though this was very difficult to take a pic of, I think you get how to use them. Just put he notch around the grounding strap and bend it up or down.
This thread might help give a bit more insight on gap size and choice.
https://www.hyundaiaftermarket.org/f...o-changeclean/

 props
props