
HOW-TO: Installing HEATED SEATS in 2001 LC

Thread Starter
Administrator

Joined: May 2001
Posts: 23,226
Likes: 9
From: Upstate NY
Vehicle: 2010 Genesis 2.0T
By AccentAE86 - Updated with pics hosted on HA's server
Heated Seat Installation on a 2001 Hyundai Accent
------------------------------------------------------------
Why put heated seats in an Accent? Canada is cold. Nuff said.
I called around to places that install them. C$750 to get them installed! Not a chance would I pay that, so it was decided that I would have to install them myself. Compared to other auto work I've done, it seemed like a walk in the park. I tried buying just the seat heaters locally, and they were $230 EACH. $460 was still too much for me, so I went to my favourite shopping mall.... ebay. I found a bunch there. I first bought some cadillac heaters for $15. After getting them, they didn't satisfy me with their design. I looked again and bought a set of two for $75, which is what will be used in this example.
Seat Heaters
------------------
There are different types of seat heaters available to the aftermarket. I've run into 3 types:
Straight Wire element
Single Wire curved element
Weave patten element
I'm sure there's more, but I haven't looked hard enough. The Straight wire is just one wire than runs under your butt, and another behind your back. Coverage is minimal, it's just one wire running across just once! Not worth the investment, if you ask me. The single wire curved element I found to be the most common, and found in most OEM seat heater applications. It's just a wire that kind of curves back and forth a bunch of times and gives decent coverage for good heat distribution. The weave pattern is the one I ended up choosing, and to me, seems FAR superior to the other types. I'll let the photo below show the difference between the single wire and the weave:
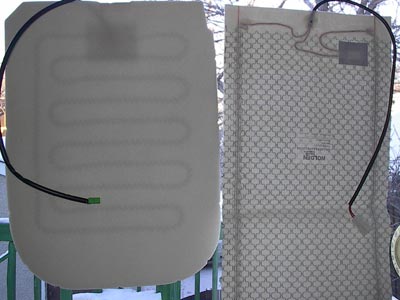
As you can see, coverage is much better with the weave and definietely more even. The best part, is that you can cut shapes or holes anywhere throughout the weave and it'll still work! With a single wire, if that wire were to break or be cut, you would get no more heat. In this example, we will be using the weave pattern.
Install
---------
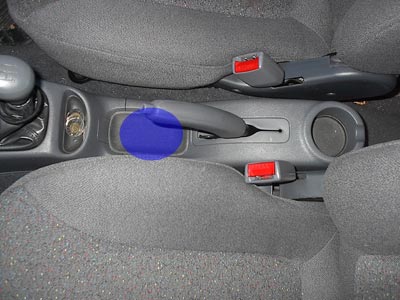
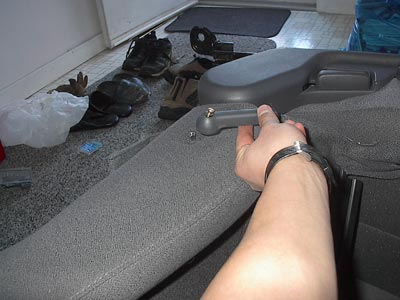
First off, remove the centre section where your shifter and rear cupholder sits:
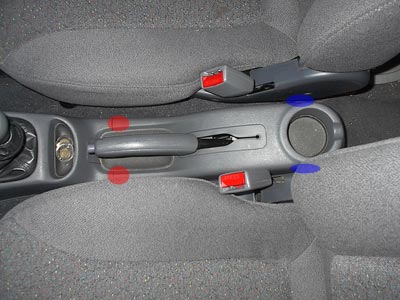
Blue: Remove these screws first
Pull the section towards the rear of the car, and it should slide off.
Red: Screws to undo that are hidden underneath
Blue: Screws to remove
Red: Remove shift knob
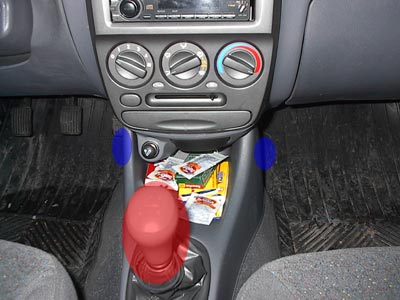
Now pull off that section, and you'll find ample room underneath to hide your wires, relays, and fuses for your heater system. I grounded my seat heater system on one of the bolts that holds the e-brake assembly down.
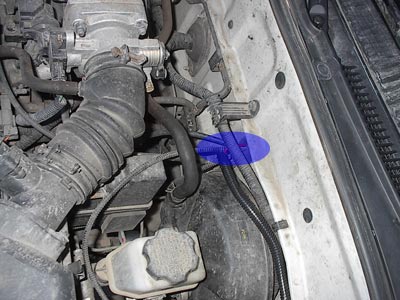
Now you'll need to pop your power wire through the firewall and to the battery.
Blue: I used the hole right beside the brake booster. Take a knife and cut a tiny slit in the rubber so you can pass your wire through.
Run the wire through your engine bay, avoiding anything that moves during operation. I covered mine up with cable wrap. Lots of mud and slush where I live, so I want to keep it away from that. Make sure it is secured throughout.

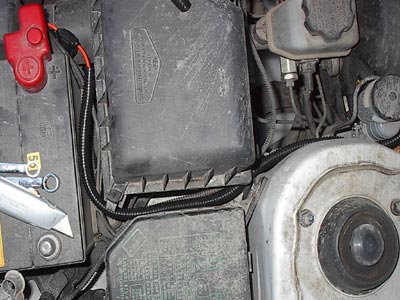
You'll need a knife to free the terminal cover from the battery. Once that is removed, add your heater wire to it and secure it well. Use a fat cable tie to replace the terminal cover back.
After that, all you have to do is connect your heater relay to your ignition so it is only on when the car is on. You can use many wires for this. Your stereo has one, the cigarette lighter, or the ignition wire itself. Whatever is most convenient for you.
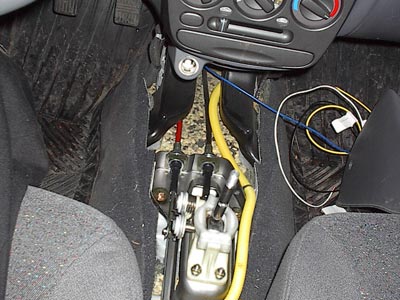
Now you are left with the wires that connect to your seat heater elements. I ran the wires underneath the carpet.
Blue: Under here is a hole in the carpet where I ran the wires under.
Blue: I fished the wire out where the rear hot air vents are.
Red: The wire harnesses for the seat heaters.
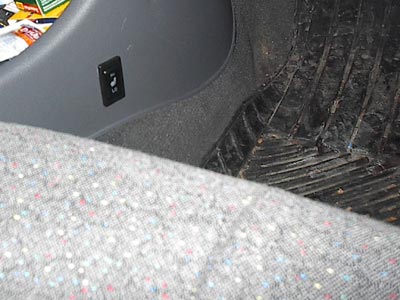
Next, I took the centre section, and cut out two rectangles that would fit the seat heater switches, using a utility knife. I chose these locations as it was one of the few flatter surfaces on an otherwise curvy interior.
Once you have done that, essentially, the wiring is done. Now the fun part begins.
The Upholstery
-------------------
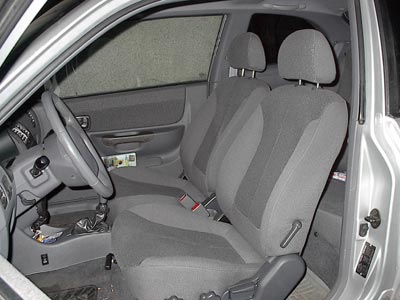
Bleah, I really didn't enjoy this part. It's difficult, and hard on the fingers. First, remove your seats by unscrewing the four bolts securing them to the floor. They are 14mm bolts. Move them to somewhere comfortable (or warm, in my case) to work.
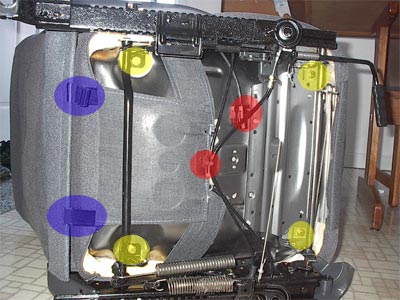
Blue: Undo these two clips. They secure the backrest fabric to the bottom.
Red: Undo the wiring harness for the seat belt sensor (only on driver's seat). Also, unsecure the seat rail cables from the bottom of the seat.
Yellow: Undo the 4 bolts (12mm) holding the seat bottom to the rail. The bottom should come right out now.
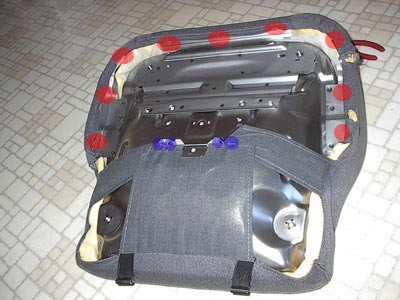
Blue: There are 4 hog rings to undo. You can either get a special tool for them, or hack your way through like I did with two needle nosed pliers to open the rings up enough for their removal.
Red: Using your fingers or pliers, bend back all the metal tabs holding the fabric to the seat.
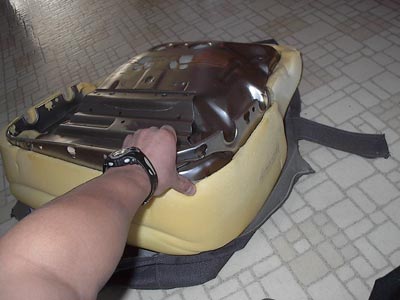
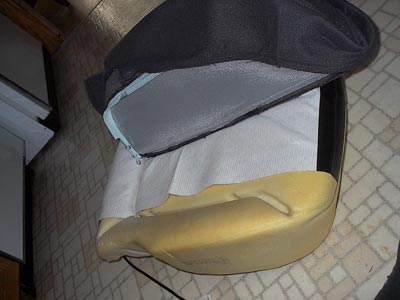
Now you can peel the outer edges of the upholstery off. You can also remove the metal seat bottom, but I found it easier to work with it on.
Blue: Now you have to deal with MORE hog rings. These things are the worst part.
There are 8 hog rings on that surface, but I only undid 6 of them as you can see. No way am I undoing more of these pains than I have to.
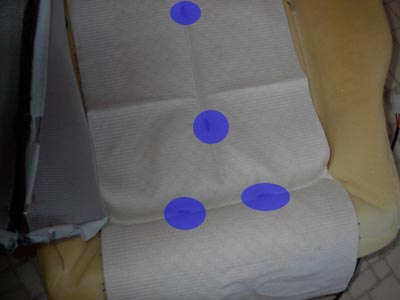
Now I placed the heating pad on the seat, and marked all the hog ring locations it interferes with.
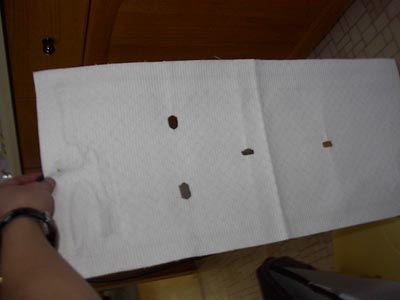
Now take some scissors and cut some holes out to accomodate. If you are using a single wire design, this part could be very tricky, or even impossible!
Now you can redo all the hog rings and replace the cloth. Be sure to close the rings tight enough!

Check it out, you can't even tell it's been opened, let alone had a seat heater added to it!
At this point, I reinstalled the seat bottom to the rail. I have found it's a good idea to have at least one piece installed to the rail/bracket at all times. The rails slide independently of each other and can make it a royal pain to re-assemble the seats!
Now for the seat back!
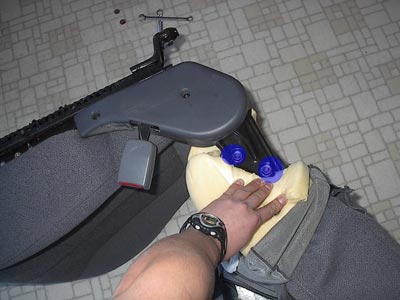
Unscrew the lumbar control handle and remove it.
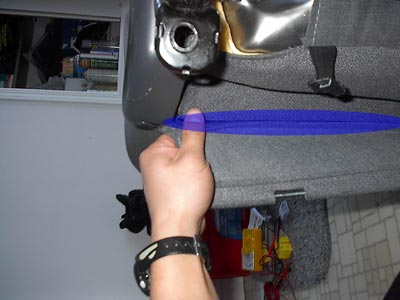
Blue: There is a plastic interface that keeps the fabric together at the bottom of the seat back. Find it.
Blue: Now pull on it gently to not break it! Plastic is too easy to break.
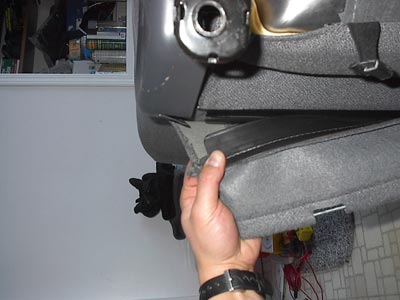
Once they've been separated, pull the fabric and plastic out towards the front of the seat. Now gently and slowly pull the fabric up toward the top of the seat back.
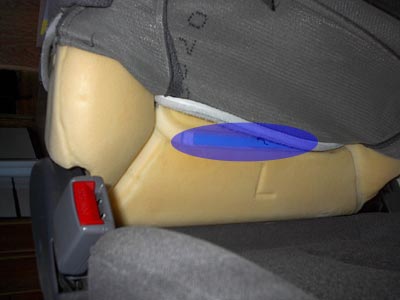
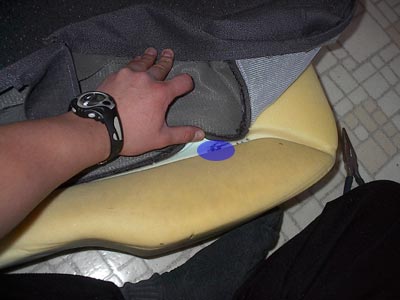
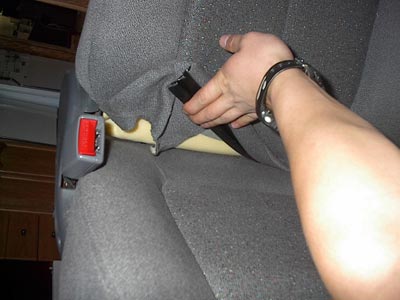
Blue: After you pull the fabric up a couple inches, you will run into velcro that holds the fabric to the seat cusion. CAREFULLY undo the velcro. It is VERY strong, and pulling them apart incorrectly will tear the velco right off the seat cusion. Put one finger on the seat cushion side to keep it from tearing the foam, and pull inch by inch on the fabric side. There is also velcro on the two sides where the bolsters start.
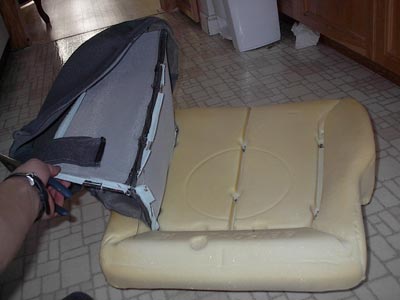
Once you've rolled up the fabric high enough, pull back the cushion on the bottom of the bolsters, and you'll find the bolts that hold the seat back. There are two on each side, and are 14mm.
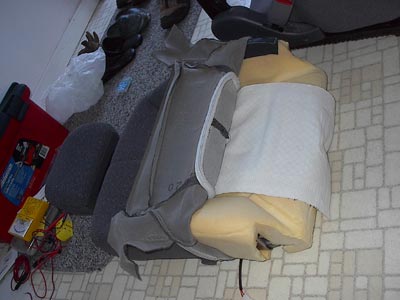
Once the backrest has been removed, you can roll up the fabric higher and higher until you have enough access to install the seat heater. I only needed to remove it halfway to get the job done.
Then reinstall the seat back, redo all the clips, and put them back into your car! (Don't forget to connect the wiring harnesses to the seat heaters!)
And voila, you are done. You can't even tell the seats were ever tampered with!
Impressions
---------------
I tried them out the night I installed them. It was cold, about -13 Celcius. (Around 19F???) I wasn't wearing a jacket either. I was shivering by the time I got into the car and started the motor. I turned the seat heater to High. After 20 seconds, I could feel the heat in the seats. After a minute, it was really quite warm, and so I turned it to the Low setting. Wow, it was really nice, and I was no longer cold! I've learned that seat heaters warm you up a LOT faster than your car's normal heater. I drove around that night without even turning the regular heater on! These things are amazing!
I have to admit, I thought seat heaters were stupid, but my fiancee kept asking for them. She is ALWAYS cold and always blasting the heater even though I am roasting. Then she said if she had a seat heater, she wouldn't have to blast the heater and bake me to death. That sold me on it right away. Now that I have them, I would recommend them to anyone who lives in a cold climate. They're fantastic! Worth every penny of the $75 I spent on them!
Heated Seat Installation on a 2001 Hyundai Accent
------------------------------------------------------------
Why put heated seats in an Accent? Canada is cold. Nuff said.
I called around to places that install them. C$750 to get them installed! Not a chance would I pay that, so it was decided that I would have to install them myself. Compared to other auto work I've done, it seemed like a walk in the park. I tried buying just the seat heaters locally, and they were $230 EACH. $460 was still too much for me, so I went to my favourite shopping mall.... ebay. I found a bunch there. I first bought some cadillac heaters for $15. After getting them, they didn't satisfy me with their design. I looked again and bought a set of two for $75, which is what will be used in this example.
Seat Heaters
------------------
There are different types of seat heaters available to the aftermarket. I've run into 3 types:
Straight Wire element
Single Wire curved element
Weave patten element
I'm sure there's more, but I haven't looked hard enough. The Straight wire is just one wire than runs under your butt, and another behind your back. Coverage is minimal, it's just one wire running across just once! Not worth the investment, if you ask me. The single wire curved element I found to be the most common, and found in most OEM seat heater applications. It's just a wire that kind of curves back and forth a bunch of times and gives decent coverage for good heat distribution. The weave pattern is the one I ended up choosing, and to me, seems FAR superior to the other types. I'll let the photo below show the difference between the single wire and the weave:
As you can see, coverage is much better with the weave and definietely more even. The best part, is that you can cut shapes or holes anywhere throughout the weave and it'll still work! With a single wire, if that wire were to break or be cut, you would get no more heat. In this example, we will be using the weave pattern.
Install
---------
First off, remove the centre section where your shifter and rear cupholder sits:
Blue: Remove these screws first
Pull the section towards the rear of the car, and it should slide off.
Red: Screws to undo that are hidden underneath
Blue: Screws to remove
Red: Remove shift knob
Now pull off that section, and you'll find ample room underneath to hide your wires, relays, and fuses for your heater system. I grounded my seat heater system on one of the bolts that holds the e-brake assembly down.
Now you'll need to pop your power wire through the firewall and to the battery.
Blue: I used the hole right beside the brake booster. Take a knife and cut a tiny slit in the rubber so you can pass your wire through.
Run the wire through your engine bay, avoiding anything that moves during operation. I covered mine up with cable wrap. Lots of mud and slush where I live, so I want to keep it away from that. Make sure it is secured throughout.
You'll need a knife to free the terminal cover from the battery. Once that is removed, add your heater wire to it and secure it well. Use a fat cable tie to replace the terminal cover back.
After that, all you have to do is connect your heater relay to your ignition so it is only on when the car is on. You can use many wires for this. Your stereo has one, the cigarette lighter, or the ignition wire itself. Whatever is most convenient for you.
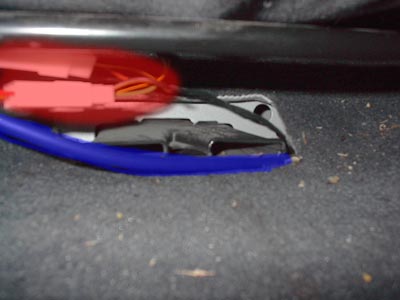
Now you are left with the wires that connect to your seat heater elements. I ran the wires underneath the carpet.
Blue: Under here is a hole in the carpet where I ran the wires under.
Blue: I fished the wire out where the rear hot air vents are.
Red: The wire harnesses for the seat heaters.
Next, I took the centre section, and cut out two rectangles that would fit the seat heater switches, using a utility knife. I chose these locations as it was one of the few flatter surfaces on an otherwise curvy interior.
Once you have done that, essentially, the wiring is done. Now the fun part begins.
The Upholstery
-------------------
Bleah, I really didn't enjoy this part. It's difficult, and hard on the fingers. First, remove your seats by unscrewing the four bolts securing them to the floor. They are 14mm bolts. Move them to somewhere comfortable (or warm, in my case) to work.
Blue: Undo these two clips. They secure the backrest fabric to the bottom.
Red: Undo the wiring harness for the seat belt sensor (only on driver's seat). Also, unsecure the seat rail cables from the bottom of the seat.
Yellow: Undo the 4 bolts (12mm) holding the seat bottom to the rail. The bottom should come right out now.
Blue: There are 4 hog rings to undo. You can either get a special tool for them, or hack your way through like I did with two needle nosed pliers to open the rings up enough for their removal.
Red: Using your fingers or pliers, bend back all the metal tabs holding the fabric to the seat.
Now you can peel the outer edges of the upholstery off. You can also remove the metal seat bottom, but I found it easier to work with it on.
Blue: Now you have to deal with MORE hog rings. These things are the worst part.
There are 8 hog rings on that surface, but I only undid 6 of them as you can see. No way am I undoing more of these pains than I have to.
Now I placed the heating pad on the seat, and marked all the hog ring locations it interferes with.
Now take some scissors and cut some holes out to accomodate. If you are using a single wire design, this part could be very tricky, or even impossible!
Now you can redo all the hog rings and replace the cloth. Be sure to close the rings tight enough!
Check it out, you can't even tell it's been opened, let alone had a seat heater added to it!
At this point, I reinstalled the seat bottom to the rail. I have found it's a good idea to have at least one piece installed to the rail/bracket at all times. The rails slide independently of each other and can make it a royal pain to re-assemble the seats!
Now for the seat back!
Unscrew the lumbar control handle and remove it.
Blue: There is a plastic interface that keeps the fabric together at the bottom of the seat back. Find it.
Blue: Now pull on it gently to not break it! Plastic is too easy to break.
Once they've been separated, pull the fabric and plastic out towards the front of the seat. Now gently and slowly pull the fabric up toward the top of the seat back.
Blue: After you pull the fabric up a couple inches, you will run into velcro that holds the fabric to the seat cusion. CAREFULLY undo the velcro. It is VERY strong, and pulling them apart incorrectly will tear the velco right off the seat cusion. Put one finger on the seat cushion side to keep it from tearing the foam, and pull inch by inch on the fabric side. There is also velcro on the two sides where the bolsters start.
Once you've rolled up the fabric high enough, pull back the cushion on the bottom of the bolsters, and you'll find the bolts that hold the seat back. There are two on each side, and are 14mm.
Once the backrest has been removed, you can roll up the fabric higher and higher until you have enough access to install the seat heater. I only needed to remove it halfway to get the job done.
Then reinstall the seat back, redo all the clips, and put them back into your car! (Don't forget to connect the wiring harnesses to the seat heaters!)
And voila, you are done. You can't even tell the seats were ever tampered with!
Impressions
---------------
I tried them out the night I installed them. It was cold, about -13 Celcius. (Around 19F???) I wasn't wearing a jacket either. I was shivering by the time I got into the car and started the motor. I turned the seat heater to High. After 20 seconds, I could feel the heat in the seats. After a minute, it was really quite warm, and so I turned it to the Low setting. Wow, it was really nice, and I was no longer cold! I've learned that seat heaters warm you up a LOT faster than your car's normal heater. I drove around that night without even turning the regular heater on! These things are amazing!
I have to admit, I thought seat heaters were stupid, but my fiancee kept asking for them. She is ALWAYS cold and always blasting the heater even though I am roasting. Then she said if she had a seat heater, she wouldn't have to blast the heater and bake me to death. That sold me on it right away. Now that I have them, I would recommend them to anyone who lives in a cold climate. They're fantastic! Worth every penny of the $75 I spent on them!

