
Genesis Coupe DIY : Nexus 7 Tablet Install


Thread Starter
Administrator

Joined: Oct 2002
Posts: 13,943
Likes: 0
From: ɯooɹpǝq ɹnoʎ
Vehicle: ǝdnoɔ sısǝuǝƃ
Tasker 4.01 came out and was a little different, so I threw together a quick How-To for it:
Click the + sign to add a profile.
+ -> State -> Power -> Power .. then back button
when I do this, it prompts to add a New Task. Click that +
name it POWER ON or wtf u want. Click the check
Press + to add a Task. Select Net -> Bluetooth -> Set ON (press BACK)
Press + to add another Task. Select Net -> WiFi -> Set ON (press Back)
Press + to add another Task. Press Display Timeout -> Change to 23h
do this all again, starting from the very beginning with adding a profile.
Just make sure to press the INVERT button on the Power Off profile when you create it.
Thread Starter
Administrator
Joined: Oct 2002
Posts: 13,943
Likes: 0
From: ɯooɹpǝq ɹnoʎ
Vehicle: ǝdnoɔ sısǝuǝƃ
Juice Defender has been reported to be a great app for reducing battery drain.
https://play.google.com/store/apps/d....juicedefender
https://play.google.com/store/apps/d....juicedefender
Administrator
Joined: May 2001
Posts: 23,226
Likes: 9
From: Upstate NY
Vehicle: 2010 Genesis 2.0T
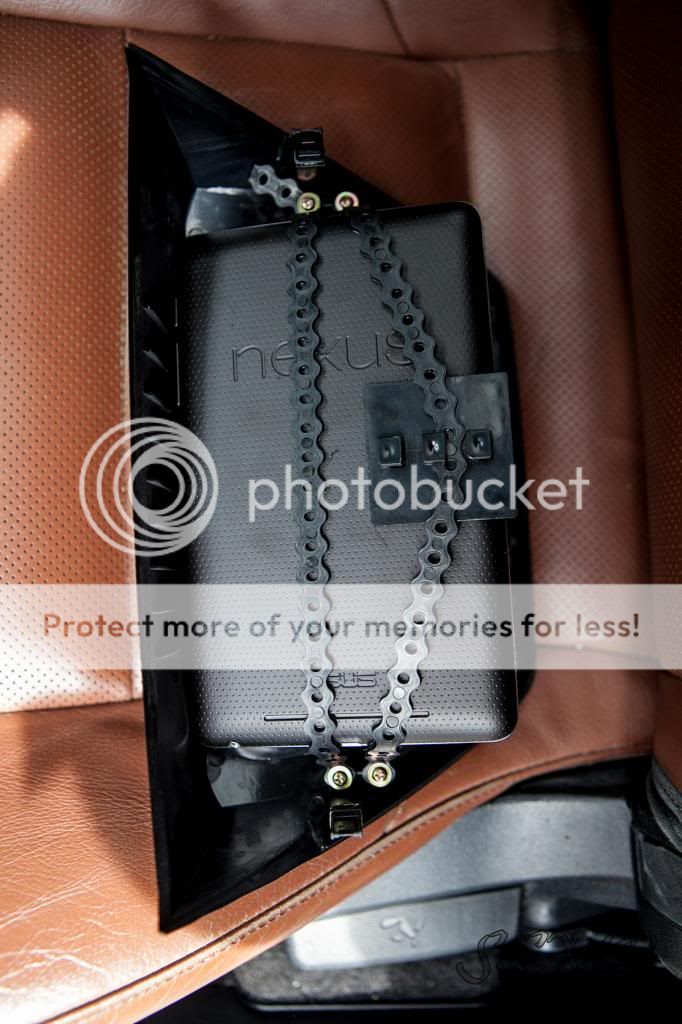
On the Nexus 7, the USB power port is obstructed by the clip that holds in the top right of the bezel. I cut this, and notched a hole in the receiving end behind the dash so the USB would fit without a problem. This leaves 3 prongs, which is plenty and has a snug fit. I did NOT put the white clips back on, as it fits snug without them and I wanted to be able to easily remove it without prying the dash.
Majik...do you have any pics of were you had to cut and notch?


Junior Member
Joined: Feb 2014
Posts: 1
Likes: 0
From: Frederick, MD
Vehicle: 2012 Genesis Coupe Premium
I am NOT moving the blue screen below. I have a question about splicing the usb cable. I just want to confirm something.
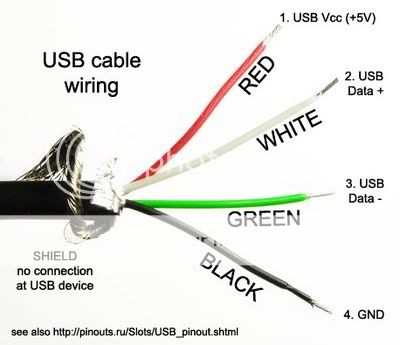
I would cut off the USB end of the cable, twist the white and green together. That is self explanatory. Do I then just splice the black to a ground, and red to a switched power (such as the back of the cigarette lighter)?
I would cut off the USB end of the cable, twist the white and green together. That is self explanatory. Do I then just splice the black to a ground, and red to a switched power (such as the back of the cigarette lighter)?
The Type-A fits better than the Type-B. For Nexus 7 owners, the Type-B provides difficult fitment and cuts off some of the top/bottom of the screen. The Type-A has flawless fitment. Also, the LCD relocator kit, black fits flawlessly and silver has slight issues with looking OEM (slightly tilted).
Type A:

Type B:

Splicing is required of USB cable so that it powers the device when the display is on. You can find a 2.1A USB charger with a [T] on it (click for example), or you can simply splice the USB wire.
Open the shielding of the USB cable, find the Green and White wires, splice, and tie them together so it creates a loop back to the tablet. That's all you have to do. Don't touch the red and black wires.
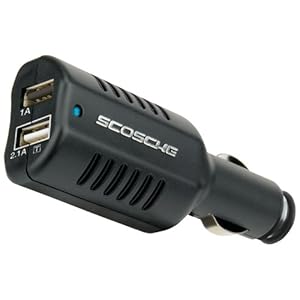
Ordering this charger will not require you to splice the USB Cable! It WILL charge the tablet while the display is on. http://www.amazon.com/Scosche-reVIVE.../dp/B004I44CHQ
Wrap the audio cable in aluminum shielding tape to reduce alternator whine. I bought it at Northern Tool + Equipment, a small roll for $2.50. Wrap the entire cable, and then tape it to the metal bar behind the dash. This ground it and gives it somewhere for the electromagnetic stuff to go somewhere.
http://www.northerntool.com/shop/too...6746_200326746

Note: I DO NOT think you need this if you get the Ground Loop Isolator!!
Type A:
Type B:
Splicing is required of USB cable so that it powers the device when the display is on. You can find a 2.1A USB charger with a [T] on it (click for example), or you can simply splice the USB wire.
Open the shielding of the USB cable, find the Green and White wires, splice, and tie them together so it creates a loop back to the tablet. That's all you have to do. Don't touch the red and black wires.
Ordering this charger will not require you to splice the USB Cable! It WILL charge the tablet while the display is on. http://www.amazon.com/Scosche-reVIVE.../dp/B004I44CHQ
Wrap the audio cable in aluminum shielding tape to reduce alternator whine. I bought it at Northern Tool + Equipment, a small roll for $2.50. Wrap the entire cable, and then tape it to the metal bar behind the dash. This ground it and gives it somewhere for the electromagnetic stuff to go somewhere.
http://www.northerntool.com/shop/too...6746_200326746
Note: I DO NOT think you need this if you get the Ground Loop Isolator!!