
Diy Rear Sway Bar Removal/replacement

Thread Starter
Super Moderator


Joined: Sep 2001
Posts: 10,795
Likes: 5
From: Pflugerville, TX
Vehicle: 2000 Elantra
This DIY is intended to tell how to remove and replace the rear (anti) swaybar on a Hyundai RD platform car (Elantra/Tiburon).
My '00 Elantra came from Korea with a 13mm sway bar. Red's Tiburon came from Korea with a 17mm sway bar. He sold me his for a good price after upgrading to a full Eibach suspension package. Be it stock from a dealer or junkyard, or from an aftermarket manufacturer like Eibach or Whiteline, this should work the same for you as it did for me. Price will range from Free to several hunner't dollars.
Tools: Aside from getting the car off the ground (jack and jackstands) I used . . .
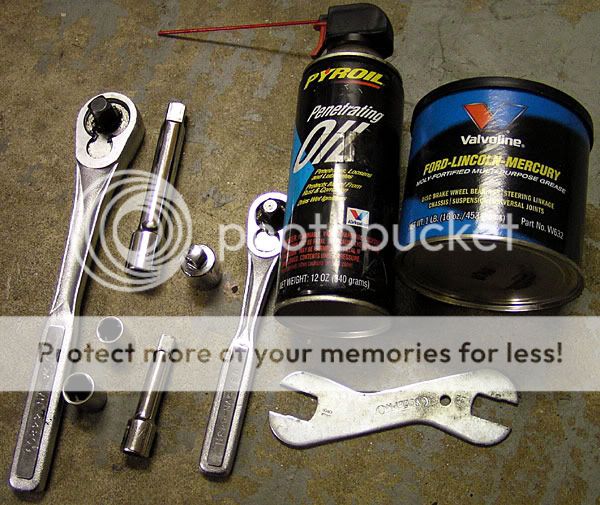
12mm and 14mm sockets
3/8" ratchet
3/8" socket extension
I used a 1/2" ratchet (and extension & adapter) because I thought I might need to put some big torque on the fasteners, but it turned out just 3/8" would have worked
14mm open-end wrench (the flat one shown here is a special bicycle tool, more on that in a minute)
Penetrating oil
Grease
Honestly, I don't drink (anymore), so no beers were harmed in the filming of this episode.
Time required: If during this process, you have to explain the concept of independent rear suspension to a 6 year-old, and get out your wife's and daughter's bike and air up the tires, it will take 2 hours. Otherwise, maybe an hour.
This is an easy job, aside from getting the old hardware off. Maybe a 3 out of 10 for difficulty. You don't really need an assistant.
Okay here we go, safety first! Skip this bit if you're using a lift or FOUR ramps. If you're using jacks, chock the front wheels so you don't get dead by accident. Then jack up the back of the car and INSERT JACKSTANDS. Seriously, a guy I knew got squished to death in his driveway by not using jackstands. Even my boy knows you need jack stands.

Spray penetrating oil on all the nuts and bolts you will be removing. Wait a few minutes to a few hours (depending on how much rust you see in there) for it to soak in.
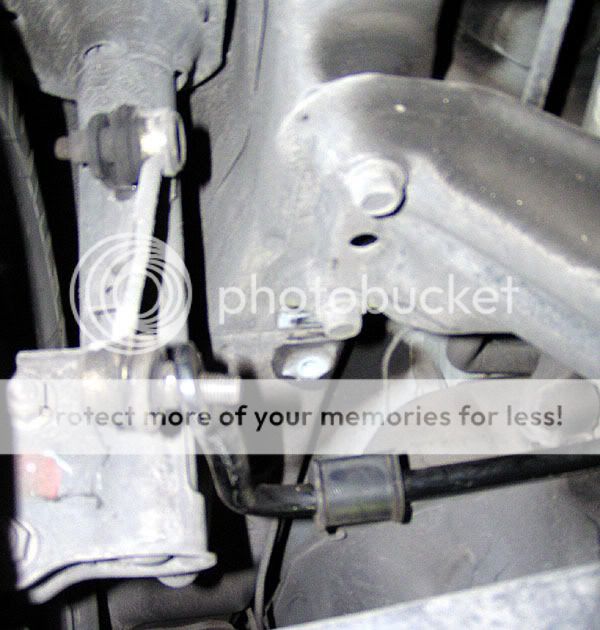
Here is what you see from the back of the car. The endlink is circled in blue, the bar is in red, and the bushing bracket is in green.
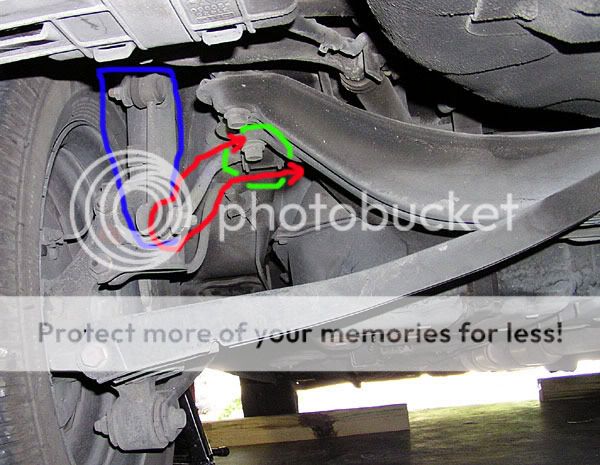
Slide underneath and look up, and you see the bushing bracket.
The endlink nut is where a lot of people screw themselves over. If you are using new endlinks, go ahead and use a vise grip wrench and don't worry about it. I needed to reuse my endlinks, so I elected to use this here special tool:
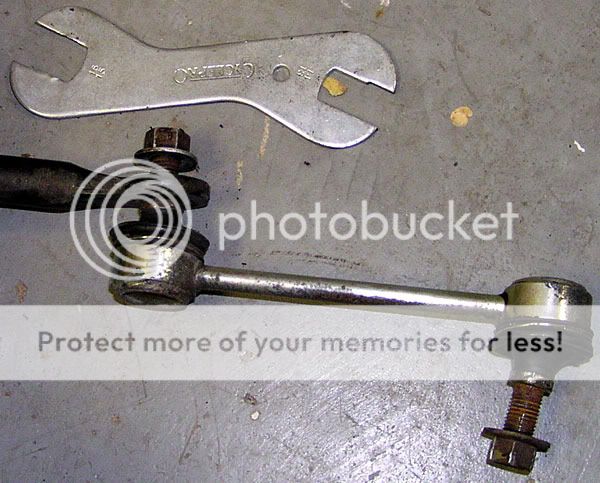
There is not much room to get a wrench in there, so I used a crank wrench for bicycles. This wrench really doesn't get much stress put on it, but you do need some way to keep the ball from rotating in the ball joint on the endlink. This was it for me. A regular 14mm open ended wrench may also fit but I didn't try it. Put your wrenches like so:
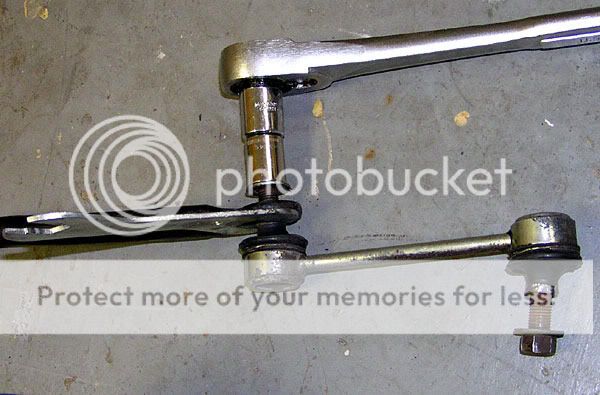
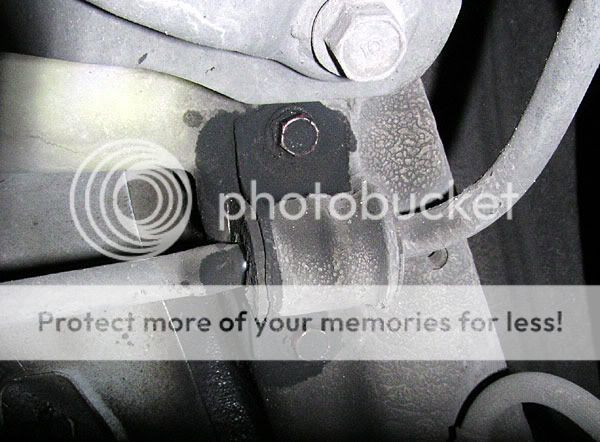
. . . and unbolt the endlinks. Unbolt the bushing brackets also.
Rotate the front corner of the bar down on the Driver's side and slip the corner of the bar out. The end of the bar will follow it. Then rotate the bar so the other end is pointing forward, along the exhaust pipe. Swing the now-free driver's side end of the bar toward the rear of the car a little, and the bar will be able to be pulled out.
Installation is the reverse of removal, with a few tips:
Once you get the new bar in, slip the ends onto the endlinks to hold the bar up until you get the bushings and brackets installed on the bar.
The bar is not symmetrical; be sure to get it on the right way. If you have it backwards, the bar will hit the underside of the car's body.
The bar is over your head, and covered in road grime. You do NOT want to be directly underneath it. The crap falls straight down. Watch out for your eyeballs.
Also watch your head. When the brackets are undone, the bar will fall several inches.
For RD (J2) Elantra owners, the Tiburon, XD Elantra GT, or Elantra wagon rear sway bars are all upgrades. See if you can tell why:
I probably forgot something. Feel free to chime in with your experiences, tips, and/or tricks.
My '00 Elantra came from Korea with a 13mm sway bar. Red's Tiburon came from Korea with a 17mm sway bar. He sold me his for a good price after upgrading to a full Eibach suspension package. Be it stock from a dealer or junkyard, or from an aftermarket manufacturer like Eibach or Whiteline, this should work the same for you as it did for me. Price will range from Free to several hunner't dollars.
Tools: Aside from getting the car off the ground (jack and jackstands) I used . . .
12mm and 14mm sockets
3/8" ratchet
3/8" socket extension
I used a 1/2" ratchet (and extension & adapter) because I thought I might need to put some big torque on the fasteners, but it turned out just 3/8" would have worked
14mm open-end wrench (the flat one shown here is a special bicycle tool, more on that in a minute)
Penetrating oil
Grease
Honestly, I don't drink (anymore), so no beers were harmed in the filming of this episode.
Time required: If during this process, you have to explain the concept of independent rear suspension to a 6 year-old, and get out your wife's and daughter's bike and air up the tires, it will take 2 hours. Otherwise, maybe an hour.
This is an easy job, aside from getting the old hardware off. Maybe a 3 out of 10 for difficulty. You don't really need an assistant.
Okay here we go, safety first! Skip this bit if you're using a lift or FOUR ramps. If you're using jacks, chock the front wheels so you don't get dead by accident. Then jack up the back of the car and INSERT JACKSTANDS. Seriously, a guy I knew got squished to death in his driveway by not using jackstands. Even my boy knows you need jack stands.
Spray penetrating oil on all the nuts and bolts you will be removing. Wait a few minutes to a few hours (depending on how much rust you see in there) for it to soak in.
Here is what you see from the back of the car. The endlink is circled in blue, the bar is in red, and the bushing bracket is in green.
Slide underneath and look up, and you see the bushing bracket.
The endlink nut is where a lot of people screw themselves over. If you are using new endlinks, go ahead and use a vise grip wrench and don't worry about it. I needed to reuse my endlinks, so I elected to use this here special tool:
There is not much room to get a wrench in there, so I used a crank wrench for bicycles. This wrench really doesn't get much stress put on it, but you do need some way to keep the ball from rotating in the ball joint on the endlink. This was it for me. A regular 14mm open ended wrench may also fit but I didn't try it. Put your wrenches like so:
. . . and unbolt the endlinks. Unbolt the bushing brackets also.
Rotate the front corner of the bar down on the Driver's side and slip the corner of the bar out. The end of the bar will follow it. Then rotate the bar so the other end is pointing forward, along the exhaust pipe. Swing the now-free driver's side end of the bar toward the rear of the car a little, and the bar will be able to be pulled out.
Installation is the reverse of removal, with a few tips:
Once you get the new bar in, slip the ends onto the endlinks to hold the bar up until you get the bushings and brackets installed on the bar.
The bar is not symmetrical; be sure to get it on the right way. If you have it backwards, the bar will hit the underside of the car's body.
The bar is over your head, and covered in road grime. You do NOT want to be directly underneath it. The crap falls straight down. Watch out for your eyeballs.
Also watch your head. When the brackets are undone, the bar will fall several inches.
For RD (J2) Elantra owners, the Tiburon, XD Elantra GT, or Elantra wagon rear sway bars are all upgrades. See if you can tell why:
I probably forgot something. Feel free to chime in with your experiences, tips, and/or tricks.
Senior Member
Joined: Mar 2002
Posts: 34,642
Likes: 0
From: Los Lunas, New Mexico, USA.
Vehicle: 2001 Hyundai Tiburon, 2004 Kia Sorento, 2010 Kia Soul
Nicely done, now go drive it!
As a side note, I've found that those pesky nuts can often be taken off easily by soaking them as mentioned, then TIGHTENING a bit, especially with a impact wrench, THEN loosening.
As a side note, I've found that those pesky nuts can often be taken off easily by soaking them as mentioned, then TIGHTENING a bit, especially with a impact wrench, THEN loosening.
Thread Starter
Super Moderator
Joined: Sep 2001
Posts: 10,795
Likes: 5
From: Pflugerville, TX
Vehicle: 2000 Elantra
It drives . . . like an aging Tiburon with worn out shocks. That is to say, it corners much flatter and harder than it did before, based on my morning commute. The safety mommies around here keep putting up lights and rerouting roads to eliminate high speed twisty streets, but the car definitely drives nicer now.

