
Diy Racing Seat Fitting


Thread Starter
Senior Member
Joined: May 2007
Posts: 869
Likes: 0
Vehicle: 1998 Tiburon
Ok, I have gone on about my seats and how cheaply I managed to install them.. Well, it would have been easy had I known what I know now and cheaper (I went through a few ideas before coming up with the final one).
If I forget anything here I will edit posts and add it.. any questions please ask I will incorporate them into the guide.
Tools needed are as follows :
Strong cordless drill (18v and over)
Drill bit and tapper (for cutting threads)
Angle Grinder with 3" cutting wheel and 3" grinding wheel.
Socket set.
Tape measure.
File.
Allen key (hex wrench U.S.A)
Things needed for install.
2 3 inch by 1 inch box section steel beams @ 19.5 inches long.
8 allen bolts (hex bolts) that fit into your seat sliders cleanly and dont stick up, make sure these are 1.5" long and hardened steel.
1 set of racing seats WITH harnesses (this install guide is assuming harnesses are in play here)
Ok, so let's assume you know how to remove your seats, and show a floorplan of what your RD1 or RD2 will look like seatless.
See FIG 1.
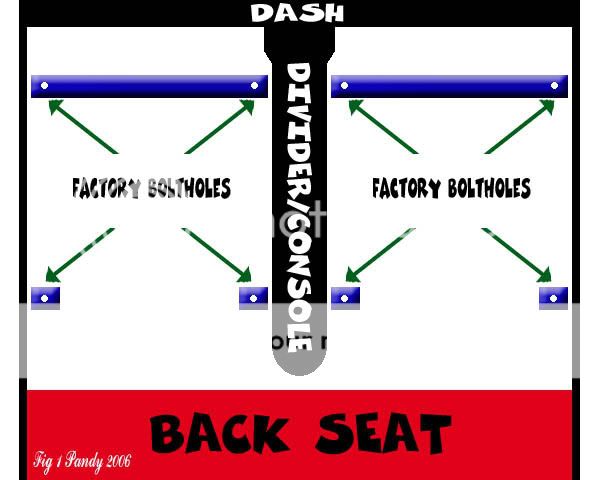
OK now In FIG 1 you will notice I have pointed out the factory bolt holes? well, the BLUE parts are the floor's mounting points.. NOTE how the front ones are all the way accross and the back ones are little islands?
Well, if you have been where I have you will know that mounting the front of the sliders to the Tib's floor is VERY easy. All you need to do is line them up at the front, centre the slider's holes over solid metal and drill and tap new bolt holes, bolting the sliders into the front beam.
The problem is that once you do that the sliders not only sit 1 inch too high above the back islands, but the slider mounting holes are about 1 inch inward of the factory holes.. not good ! We now need to bridge that gap !
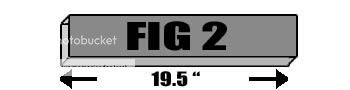
And here is what we will bridge it with ! FIG 2 shows the 3x1 inch box section we have now had cut at the steel yard (cost? TomOTEC paid $12).
OK.
Now we need to make these so that they're not just lumps of metal.
Clean them (they will be friggin filthy) and then take out one of your tib seats and turn it upside down, reclining it fully so that it sits stable on the ground.
Line the 3x1 up OVER THE BACK MOUNTING HOLES on the underside of the factory slider and duct tape it into position.
THIS PART IS CRUCIAL.. TAKE YOUR TIME !
Make sure that the 3x1 sits on the holes as close to the edge of the back of the 3x1 as you can, so that the whole bolt head will be in metal once these holes are drilled AND GRIND IT FLAT SO THAT YOUR SIDE HARNESS ANCHORS CAN SIT FLAT.
Mark the holes you need to drill BY GOING IN WITH A SHARPIE THROUGH THE HOLE IN THE TOP OF THE FACTORY SLIDER.
Remove the 3x1, drill a hole all the way through it and then cut out the corners (not too far, just so that you can get a socket in to do the bolts up later) and then repeat at the other end.
Do this proceedure twice and you should have 2 of these, shown in FIG 3.
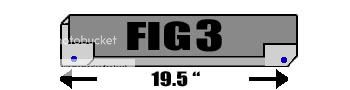
The blue holes shown in FIG 3 are exactly the same as your factory bolt holes from the real Tib seat's slider.
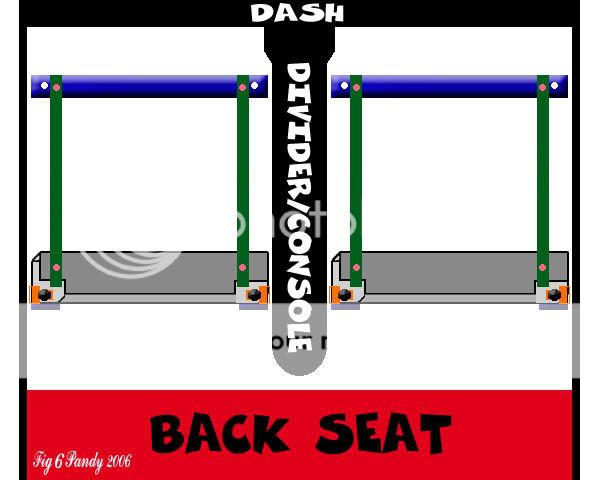
Now, take those 2 and lay them on the floor of the tib.. Now, insert the 4 ORIGINAL BOLTS (from the OEM seats) and put them through the side harness holsters and BOLT THESE BEAMS TO THE FLOOR.
As shown in FIG 4
HOLSTERS/ANCHORS ARE ORANGE !

Now, all we need to do now is place the racing seats IN POSITION, over the beams (the one at the front that was already there and our newly created one we just made) and drill and tap the 4 bolts (allen bolts) through the racing sliders and into the floor.. this will now anchor your seats in strong.
In this pic the harness anchors are depicted in orange, the racing sliders are in green (WARNING.. THE SEATS WILL COVER THIS IRL so beware that in this pic the seats are see through...)
Now, connect your side harnesses and then REMOVE THE REAR SEAT BELTS.
Once the rear seatbelts are gone mount the rear harness anchors into the holes there using the bolts you removed..
This isnt the best way but hey, it's free.. this way will take some adjusting of the rear harness tapes and one will need to be slightly longer than the other in adjustments.
I have sat in my seat and broke as hard as I can from 50 back down to 0 and they hold my 180lb ass firmly in place.
And, that should be it..
DISCLAIMER.
PANDY WILL NOT BE HELD RESPONSIBLE FOR ANY ACCIDENT/DEATH/DRILLING THROUGH IMPORTANT THINGS.
WITH THIS GUIDE I EXPECT AND TRUST THAT YOU KNOW WHAT YOU ARE DOING AND KNOW HOW TO OPERATE AN ANGLE GRINDER AND CAN WORK WITH POWER TOOLS SAFELY.
If I forget anything here I will edit posts and add it.. any questions please ask I will incorporate them into the guide.
Tools needed are as follows :
Strong cordless drill (18v and over)
Drill bit and tapper (for cutting threads)
Angle Grinder with 3" cutting wheel and 3" grinding wheel.
Socket set.
Tape measure.
File.
Allen key (hex wrench U.S.A)
Things needed for install.
2 3 inch by 1 inch box section steel beams @ 19.5 inches long.
8 allen bolts (hex bolts) that fit into your seat sliders cleanly and dont stick up, make sure these are 1.5" long and hardened steel.
1 set of racing seats WITH harnesses (this install guide is assuming harnesses are in play here)
Ok, so let's assume you know how to remove your seats, and show a floorplan of what your RD1 or RD2 will look like seatless.
See FIG 1.
OK now In FIG 1 you will notice I have pointed out the factory bolt holes? well, the BLUE parts are the floor's mounting points.. NOTE how the front ones are all the way accross and the back ones are little islands?
Well, if you have been where I have you will know that mounting the front of the sliders to the Tib's floor is VERY easy. All you need to do is line them up at the front, centre the slider's holes over solid metal and drill and tap new bolt holes, bolting the sliders into the front beam.
The problem is that once you do that the sliders not only sit 1 inch too high above the back islands, but the slider mounting holes are about 1 inch inward of the factory holes.. not good ! We now need to bridge that gap !
And here is what we will bridge it with ! FIG 2 shows the 3x1 inch box section we have now had cut at the steel yard (cost? TomOTEC paid $12).
OK.
Now we need to make these so that they're not just lumps of metal.
Clean them (they will be friggin filthy) and then take out one of your tib seats and turn it upside down, reclining it fully so that it sits stable on the ground.
Line the 3x1 up OVER THE BACK MOUNTING HOLES on the underside of the factory slider and duct tape it into position.
THIS PART IS CRUCIAL.. TAKE YOUR TIME !
Make sure that the 3x1 sits on the holes as close to the edge of the back of the 3x1 as you can, so that the whole bolt head will be in metal once these holes are drilled AND GRIND IT FLAT SO THAT YOUR SIDE HARNESS ANCHORS CAN SIT FLAT.
Mark the holes you need to drill BY GOING IN WITH A SHARPIE THROUGH THE HOLE IN THE TOP OF THE FACTORY SLIDER.
Remove the 3x1, drill a hole all the way through it and then cut out the corners (not too far, just so that you can get a socket in to do the bolts up later) and then repeat at the other end.
Do this proceedure twice and you should have 2 of these, shown in FIG 3.
The blue holes shown in FIG 3 are exactly the same as your factory bolt holes from the real Tib seat's slider.
Now, take those 2 and lay them on the floor of the tib.. Now, insert the 4 ORIGINAL BOLTS (from the OEM seats) and put them through the side harness holsters and BOLT THESE BEAMS TO THE FLOOR.
As shown in FIG 4
HOLSTERS/ANCHORS ARE ORANGE !
Now, all we need to do now is place the racing seats IN POSITION, over the beams (the one at the front that was already there and our newly created one we just made) and drill and tap the 4 bolts (allen bolts) through the racing sliders and into the floor.. this will now anchor your seats in strong.
In this pic the harness anchors are depicted in orange, the racing sliders are in green (WARNING.. THE SEATS WILL COVER THIS IRL so beware that in this pic the seats are see through...)
Now, connect your side harnesses and then REMOVE THE REAR SEAT BELTS.
Once the rear seatbelts are gone mount the rear harness anchors into the holes there using the bolts you removed..
This isnt the best way but hey, it's free.. this way will take some adjusting of the rear harness tapes and one will need to be slightly longer than the other in adjustments.
I have sat in my seat and broke as hard as I can from 50 back down to 0 and they hold my 180lb ass firmly in place.
And, that should be it..
DISCLAIMER.
PANDY WILL NOT BE HELD RESPONSIBLE FOR ANY ACCIDENT/DEATH/DRILLING THROUGH IMPORTANT THINGS.
WITH THIS GUIDE I EXPECT AND TRUST THAT YOU KNOW WHAT YOU ARE DOING AND KNOW HOW TO OPERATE AN ANGLE GRINDER AND CAN WORK WITH POWER TOOLS SAFELY.
Thread Starter
Senior Member
Joined: May 2007
Posts: 869
Likes: 0
Vehicle: 1998 Tiburon
OK, TomOTEC came over today and we attempted in vain to fit the seats he had bought.
Sadly the seats were shot (a bit old like) and refused to slide once the front bolts were in the tib's floor, well if we cant do that we cant get the back bolt holes accessible so after many hours we ducked out and Tom took the seats back, got a refund and is going to roll with new seats smile.gif
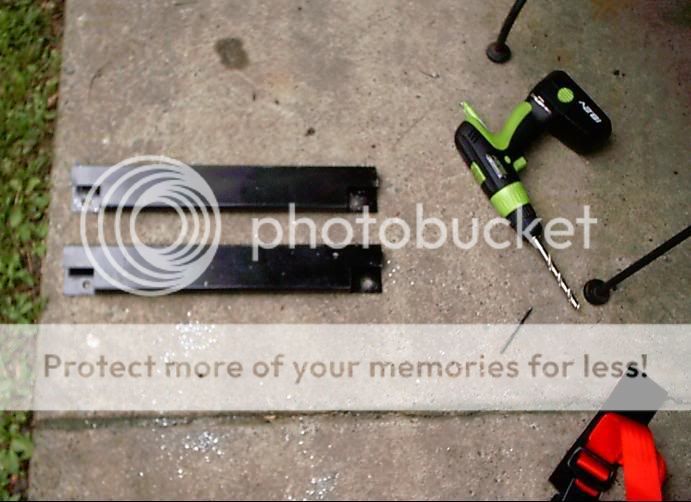
So here are the fabbed 3x1" box section beams that you will need to do this job (in photos)
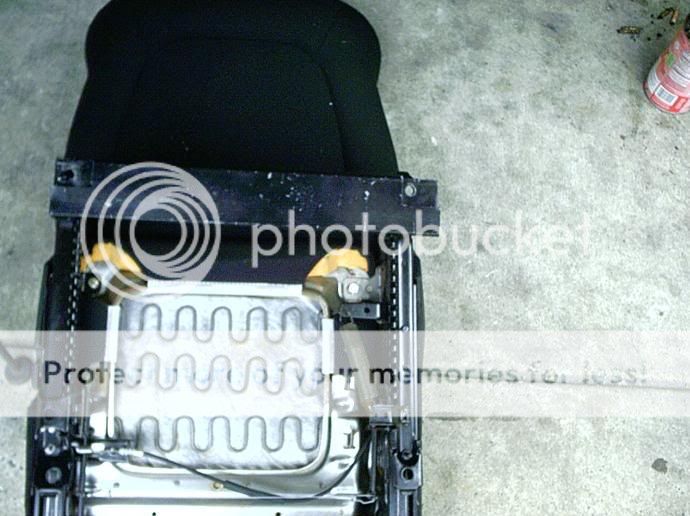
And to mark the drill holes you would do some of this, line up your OEM seat's sliders and flatten the seat.
Then lay the beam over the holes, pull it so that it's well straight (get someone to hold it like me or Tom laugh.gif ) and then mark from the underneath with a stubby sharpy.. Or, if you're Tom and you got them painted tarty black you can scratch the holes.. then drill them..
Marking pic shown here (so you know what Im on about,likes)
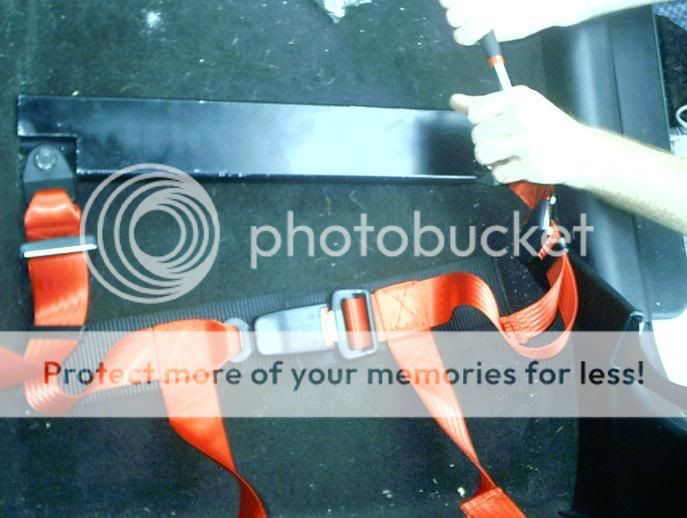
And these bolt into your rear seat 'islands' shown here smile.gif

"Let's get busy....."
And ta daaaa !
Then you put the racing seat in it's new position and mark the front holes (slider holes, sliders will be bolted directly to the front floorbeam that's already there)
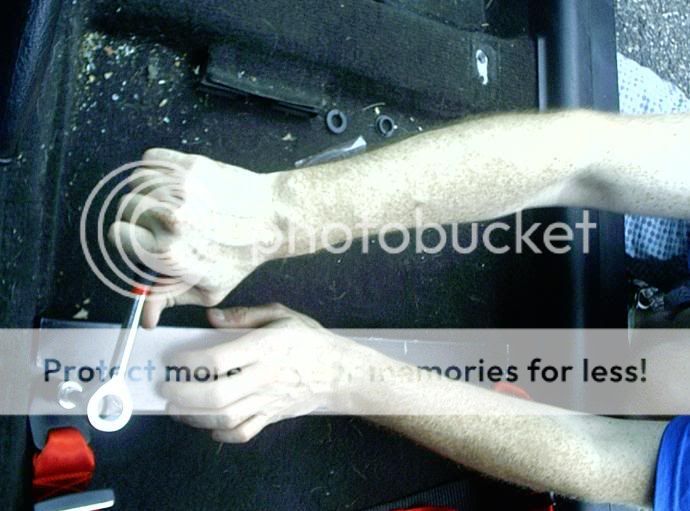
Mark them and drill them, then use a tap as shown here.. repeat with both bolt holes.
Note Im doing this ghetto with a tap and a adjustable wrench, but hey it works and saves you $13 for the thing that twists the tap smile.gif

I'll post the rest when Tom's new seats arrive and we get to carry out the rest.. bit bummed out TBH as we spunked 4 hours down to crapola seats 02.gif
Back soon with part 2 ! fing02.gif
Sadly the seats were shot (a bit old like) and refused to slide once the front bolts were in the tib's floor, well if we cant do that we cant get the back bolt holes accessible so after many hours we ducked out and Tom took the seats back, got a refund and is going to roll with new seats smile.gif
So here are the fabbed 3x1" box section beams that you will need to do this job (in photos)
And to mark the drill holes you would do some of this, line up your OEM seat's sliders and flatten the seat.
Then lay the beam over the holes, pull it so that it's well straight (get someone to hold it like me or Tom laugh.gif ) and then mark from the underneath with a stubby sharpy.. Or, if you're Tom and you got them painted tarty black you can scratch the holes.. then drill them..
Marking pic shown here (so you know what Im on about,likes)
And these bolt into your rear seat 'islands' shown here smile.gif
"Let's get busy....."
And ta daaaa !
Then you put the racing seat in it's new position and mark the front holes (slider holes, sliders will be bolted directly to the front floorbeam that's already there)
Mark them and drill them, then use a tap as shown here.. repeat with both bolt holes.
Note Im doing this ghetto with a tap and a adjustable wrench, but hey it works and saves you $13 for the thing that twists the tap smile.gif
I'll post the rest when Tom's new seats arrive and we get to carry out the rest.. bit bummed out TBH as we spunked 4 hours down to crapola seats 02.gif
Back soon with part 2 ! fing02.gif

