Diy: Pivot Raizin Voltage Stabilizer
 08-12-2005, 04:59 PM
#1
Senior Member

Thread Starter
Join Date: Mar 2002
Location: Los Lunas, New Mexico, USA.
Posts: 34,642
Likes: 0
Received 0 Likes
on
0 Posts
Vehicle: 2001 Hyundai Tiburon, 2004 Kia Sorento, 2010 Kia Soul
Well, I installed this system before I left for my Las Vegas trip, and to say the least, it makes a minor difference. To say the MOST, my gas miliage went up by about 4 MPG city, 6 MPG Highway.
First though, the pics.
^^^
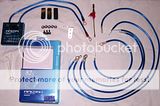
Included, from top to bottom, left to right.
1 Voltage Stabilizer System
12 Zip Ties
3 Double Sided Sticky Pads
5 Stainless Nuts
3 Bolts
1 Box
1 Negative Terminal Extension (For grounding wires [included])
1 Ark Performance present (Some strange Tiwaneese weapon)
5 Grounding wires of various lengths
<u>TOOLS NEEDED</u>
Small ratchet with long extension
10 MM and maybe 12MM Sockets
Beer of choice
Multimeter to find good grounds
A friend to help you install and laugh at you.

^^^
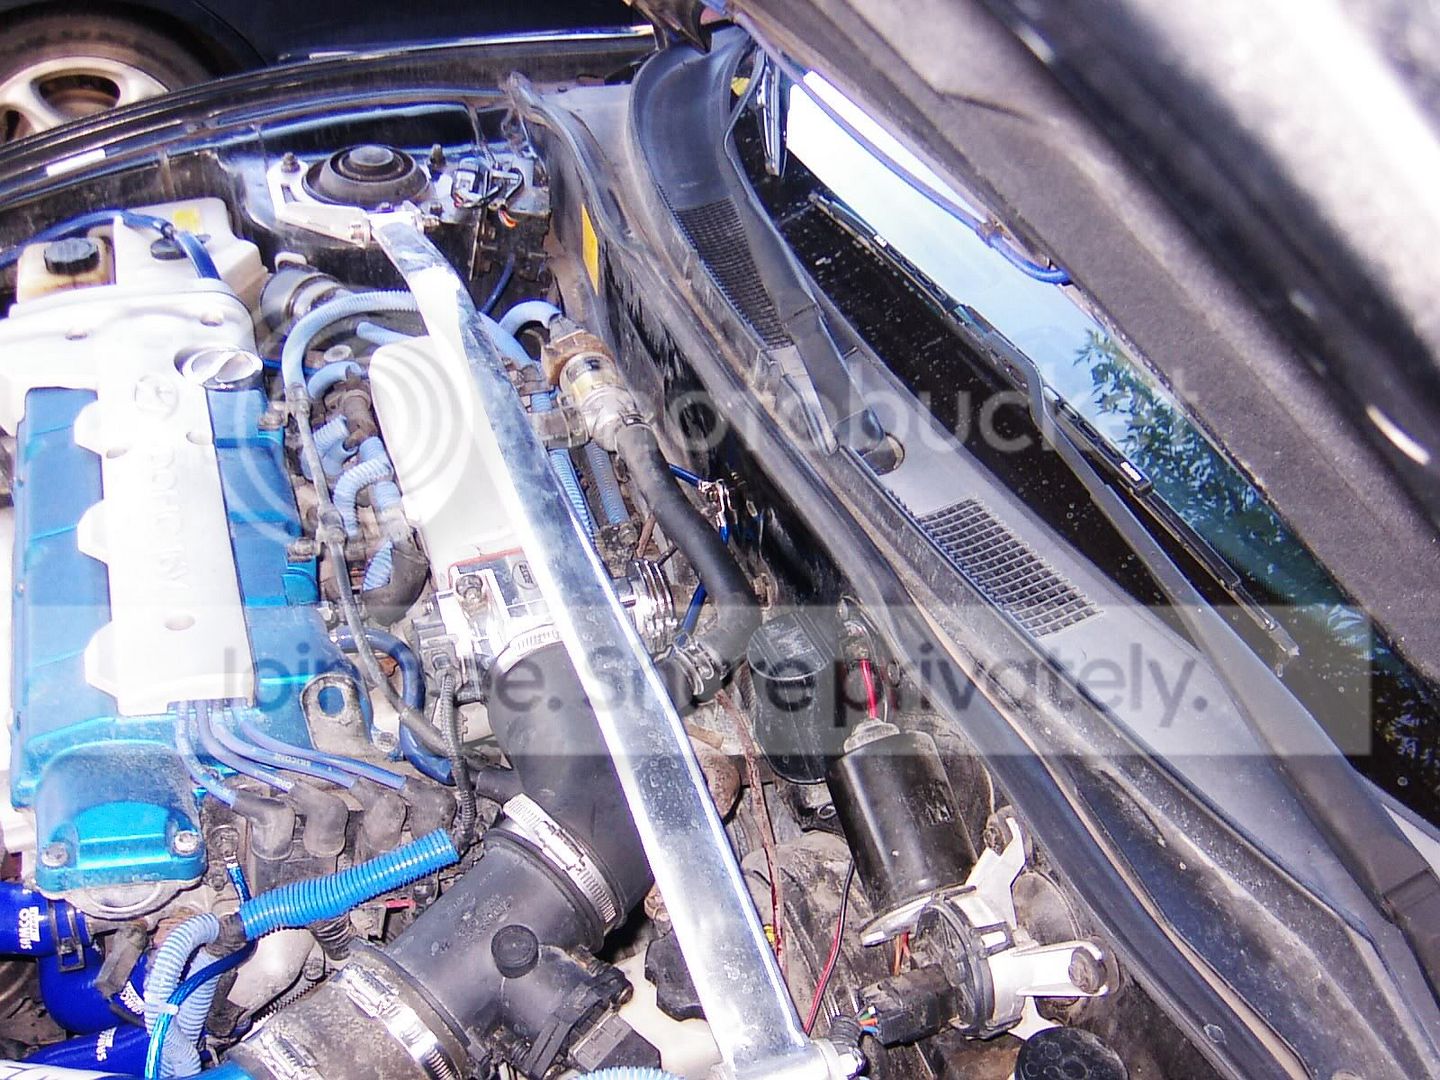
I started out by placing 1 and a half strips of the double sided tape on the CLEANED flat mount that the OEM Intake used to bolt to. Make sure before you mount the unit, or even expose the other side of the tape that you have allowed enough slack in the wires to reach the battery. (Optima Blue Top Owners will have a VERY easy time.)

^^^
I exposed the other side of the tape and lined up the unit on top of the tape, pressing down firmly. I then ran both wires to the terminals and put them in place. The positive side was tightened down, and the Negative Terminal Extension was added to the negative spare terminal as shown in the pic. The negative side was then tightened. Look at the next picture for more clarity.


^^^
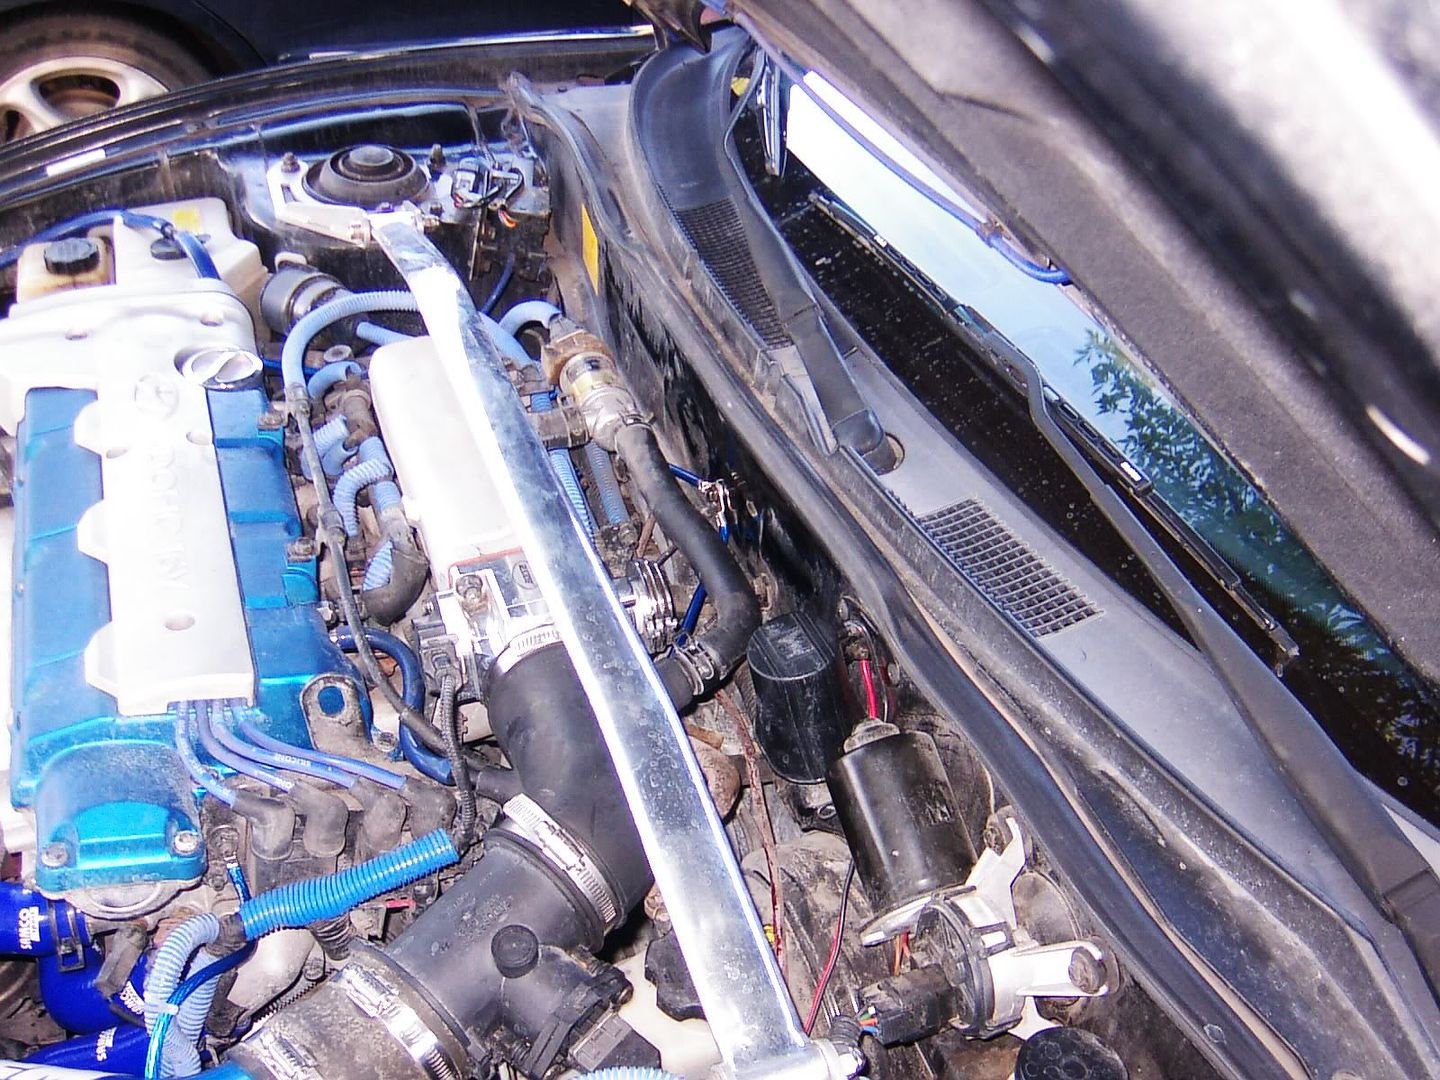
The grounding wires were mounted on 2 of the 3 available bolting holes, as to get enough grounding points back to the battery, I wanted to run most of them in a chain. The smallest cable went from the Extension to the body near the fuze box. One went to the engine block near the coils as seen in this picture. Another went from the battery to behind the intake manifold grounding point as seen in the next picture. Zip ties were used as seen to help keep the wires from swinging in contact with moving parts or the hot engine.
^^^
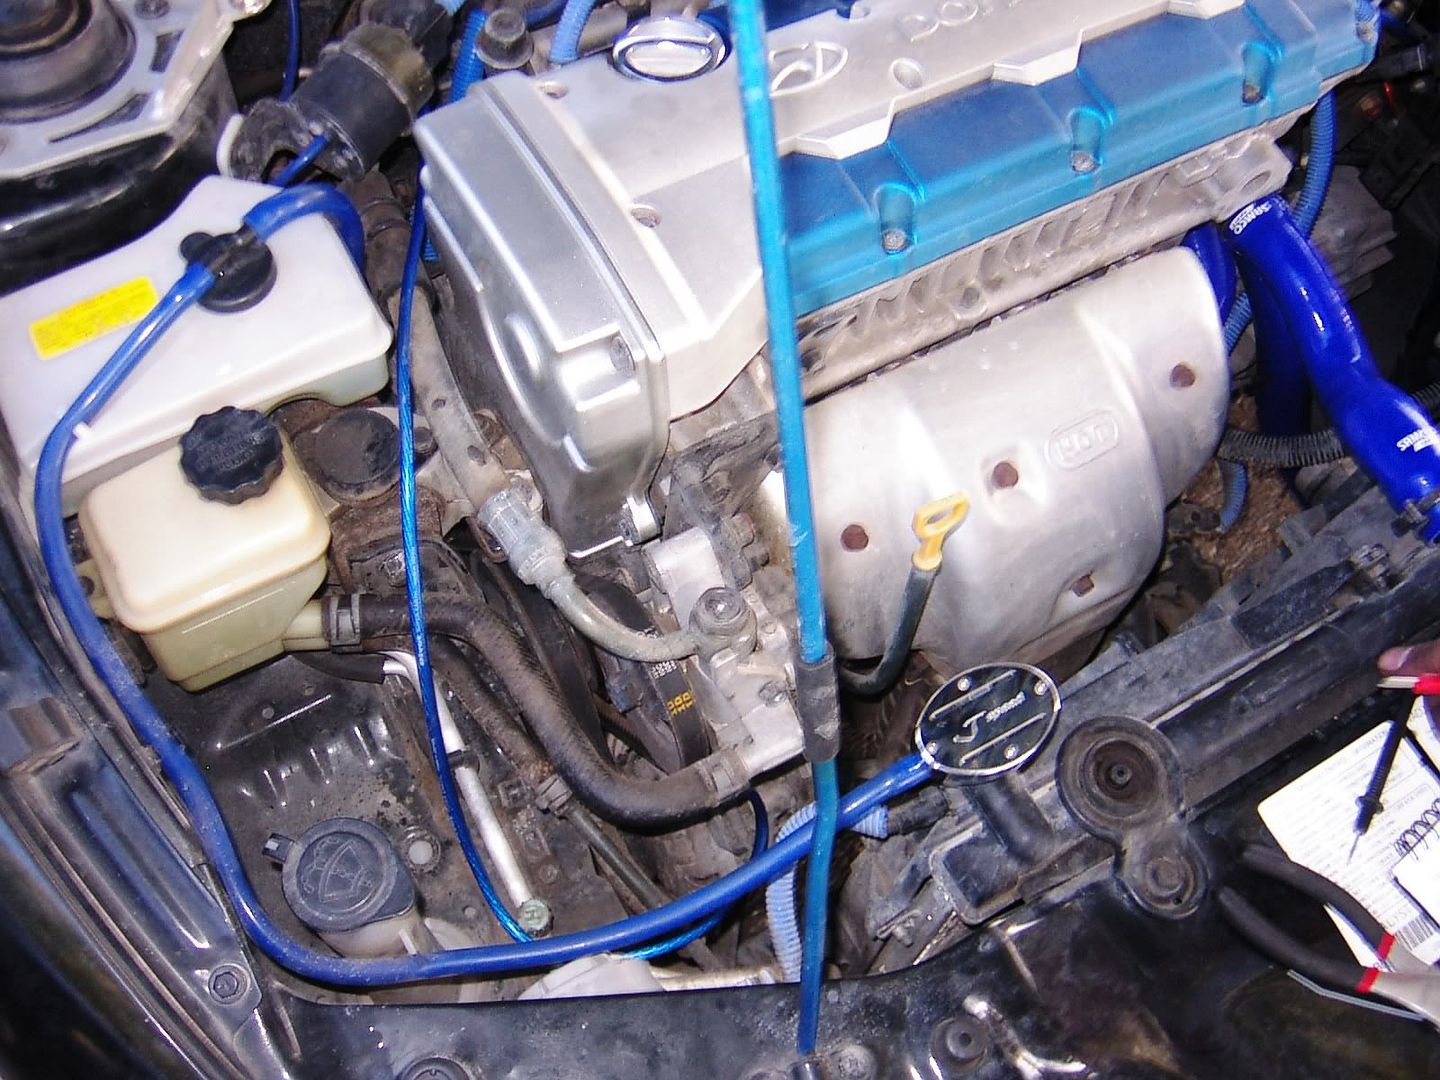
Behind the IM, there is a grounding point. I connected 2 cables here, one from the battery, and the other to the Intake Manifold itself (Not shown), If you look at the passenger side of the IM, you'll see a grounding strap going there, this is where I connected this cable.

^^^
My last cable went from the IM grounding point to near the alternator. Zip ties were used to keep it in place.
As for gains?
We took some numbers before and after the kit, then after the grounding kit was added.
<u>Without Kit</u>
Not Running = 12.75
Running = 14.5
Running W/AC (HIGH) = 13.3
Low Beams (No AC) = 14.5
Low Beams/Fogs (No AC) = 14.45
High Beams (No AC) = 14.3
ALL (High Beams, AC on high, stereo at 22) = 12.95
WITH KIT
Not Running = 13.1
Running = 14.4
Running W/AC (HIGH) = 14.48
Low Beams (No AC) = 14.46
Low Beams/Fogs (No AC) = 14.43
High Beams (No AC) = 14.48
ALL (High Beams, AC on high, stereo at 22) = 12.98
<u>WITH KIT & GROUNDS</u>
Not Running = 12.72
Running = 14.65
Running W/AC (HIGH) = 14.56
Low Beams (No AC) = 14.59
Low Beams/Fogs (No AC) = 14.57
High Beams (No AC) = 14.58
ALL (High Beams, AC on high, stereo at 22) = 12.90
I had no way to check the voltage under DRIVING load, but to say the least, my lights don't dim with the AC on anymore, my AC is MUCH colder (12 degrees according to the new RDTiburon.com Temperature Gun), my MPG is up, and the response seems MUCH nicer. No slow to go anymore. I can actually drive with my AC on all day and it's not a CHORE. Also, my low fuel light used to dim badly when my turn signal was on, it doesn't do that anymore.
Here is a set of scans of the instructions.


First though, the pics.

^^^
Included, from top to bottom, left to right.
1 Voltage Stabilizer System
12 Zip Ties
3 Double Sided Sticky Pads
5 Stainless Nuts
3 Bolts
1 Box
1 Negative Terminal Extension (For grounding wires [included])
1 Ark Performance present (Some strange Tiwaneese weapon)
5 Grounding wires of various lengths
<u>TOOLS NEEDED</u>
Small ratchet with long extension
10 MM and maybe 12MM Sockets
Beer of choice
Multimeter to find good grounds
A friend to help you install and laugh at you.

^^^
I started out by placing 1 and a half strips of the double sided tape on the CLEANED flat mount that the OEM Intake used to bolt to. Make sure before you mount the unit, or even expose the other side of the tape that you have allowed enough slack in the wires to reach the battery. (Optima Blue Top Owners will have a VERY easy time.)

^^^
I exposed the other side of the tape and lined up the unit on top of the tape, pressing down firmly. I then ran both wires to the terminals and put them in place. The positive side was tightened down, and the Negative Terminal Extension was added to the negative spare terminal as shown in the pic. The negative side was then tightened. Look at the next picture for more clarity.


^^^
The grounding wires were mounted on 2 of the 3 available bolting holes, as to get enough grounding points back to the battery, I wanted to run most of them in a chain. The smallest cable went from the Extension to the body near the fuze box. One went to the engine block near the coils as seen in this picture. Another went from the battery to behind the intake manifold grounding point as seen in the next picture. Zip ties were used as seen to help keep the wires from swinging in contact with moving parts or the hot engine.
^^^
Behind the IM, there is a grounding point. I connected 2 cables here, one from the battery, and the other to the Intake Manifold itself (Not shown), If you look at the passenger side of the IM, you'll see a grounding strap going there, this is where I connected this cable.
^^^
My last cable went from the IM grounding point to near the alternator. Zip ties were used to keep it in place.
As for gains?
We took some numbers before and after the kit, then after the grounding kit was added.
<u>Without Kit</u>
Not Running = 12.75
Running = 14.5
Running W/AC (HIGH) = 13.3
Low Beams (No AC) = 14.5
Low Beams/Fogs (No AC) = 14.45
High Beams (No AC) = 14.3
ALL (High Beams, AC on high, stereo at 22) = 12.95
WITH KIT
Not Running = 13.1
Running = 14.4
Running W/AC (HIGH) = 14.48
Low Beams (No AC) = 14.46
Low Beams/Fogs (No AC) = 14.43
High Beams (No AC) = 14.48
ALL (High Beams, AC on high, stereo at 22) = 12.98
<u>WITH KIT & GROUNDS</u>
Not Running = 12.72
Running = 14.65
Running W/AC (HIGH) = 14.56
Low Beams (No AC) = 14.59
Low Beams/Fogs (No AC) = 14.57
High Beams (No AC) = 14.58
ALL (High Beams, AC on high, stereo at 22) = 12.90
I had no way to check the voltage under DRIVING load, but to say the least, my lights don't dim with the AC on anymore, my AC is MUCH colder (12 degrees according to the new RDTiburon.com Temperature Gun), my MPG is up, and the response seems MUCH nicer. No slow to go anymore. I can actually drive with my AC on all day and it's not a CHORE. Also, my low fuel light used to dim badly when my turn signal was on, it doesn't do that anymore.
Here is a set of scans of the instructions.


 08-12-2005, 05:07 PM
#2
Senior Member

Join Date: Mar 2006
Posts: 5,754
Likes: 0
Received 0 Likes
on
0 Posts
Vehicle: 1997 Tiburon
fing02.gif hail.gif hail.gif
VERY NICE.
Now where did you get that evil thingy.
Also what guage wires are those. They don't seem like 2 or 4 guage like you see on other kits.
Do they work better then 2 or 4 or worse? Whats the benefit? I'd rather use those then a biggo dabber sized wires.
VERY NICE.
Now where did you get that evil thingy.
Also what guage wires are those. They don't seem like 2 or 4 guage like you see on other kits.
Do they work better then 2 or 4 or worse? Whats the benefit? I'd rather use those then a biggo dabber sized wires.
08-12-2005, 05:35 PM
#3
Senior Member
Thread Starter
Join Date: Mar 2002
Location: Los Lunas, New Mexico, USA.
Posts: 34,642
Likes: 0
Received 0 Likes
on
0 Posts
Vehicle: 2001 Hyundai Tiburon, 2004 Kia Sorento, 2010 Kia Soul
I got it from the Group Buy thru Ark Performance here on the site.
The gauge of the wires I'm not sure, Faithofadragon should know. I'd say about 8 gauge? Maybe bigger?
They work great, it improves the overall grounding of the system. Look at some of the OEM grounds, you are talking 16 Gauge wire or smaller.
The gauge of the wires I'm not sure, Faithofadragon should know. I'd say about 8 gauge? Maybe bigger?
They work great, it improves the overall grounding of the system. Look at some of the OEM grounds, you are talking 16 Gauge wire or smaller.
08-12-2005, 06:17 PM
#4
Senior Member
Join Date: Mar 2006
Location: tacos
Posts: 9,533
Likes: 0
Received 0 Likes
on
0 Posts
Vehicle: 2000 Elantra
yeah there 8 guage wires
realize that this isnt a ground wire setup but a voltage stabilizer so its set up different
the stock wires are like 16 guage so it is a huge step up
and i only laughed at you when you kept forgetting to turn stuff off when i was testing...
tongue.gif
realize that this isnt a ground wire setup but a voltage stabilizer so its set up different
the stock wires are like 16 guage so it is a huge step up
and i only laughed at you when you kept forgetting to turn stuff off when i was testing...
tongue.gif

 08-14-2005, 10:18 PM
#7
Senior Member
Thread Starter
Join Date: Mar 2002
Location: Los Lunas, New Mexico, USA.
Posts: 34,642
Likes: 0
Received 0 Likes
on
0 Posts
Vehicle: 2001 Hyundai Tiburon, 2004 Kia Sorento, 2010 Kia Soul
<div class='quotetop'>QUOTE (ARKPerfomance @ Aug 14 2005, 04:05 PM)</div><div class='quotemain'>dude...make those pictures larger...haha i can't see a thing
<div align='right'><{POST_SNAPBACK}></div></div>
<div class='quotetop'>QUOTE (zoned019 @ Aug 14 2005, 04:16 PM)</div><div class='quotemain'>ARK, click to enlarge man^^
<div align='right'><{POST_SNAPBACK}></div></div>
lmao.gif haha.gif fing02.gif hail.gif drillsergeant.gif
owned.gif owned.gif owned.gif
<div align='right'><{POST_SNAPBACK}></div></div>
<div class='quotetop'>QUOTE (zoned019 @ Aug 14 2005, 04:16 PM)</div><div class='quotemain'>ARK, click to enlarge man^^
<div align='right'><{POST_SNAPBACK}></div></div>
lmao.gif haha.gif fing02.gif hail.gif drillsergeant.gif
owned.gif owned.gif owned.gif
08-15-2005, 09:21 AM
#10
Senior Member
Thread Starter
Join Date: Mar 2002
Location: Los Lunas, New Mexico, USA.
Posts: 34,642
Likes: 0
Received 0 Likes
on
0 Posts
Vehicle: 2001 Hyundai Tiburon, 2004 Kia Sorento, 2010 Kia Soul
<div class='quotetop'>QUOTE (javageek @ Aug 15 2005, 04:38 AM)</div><div class='quotemain'>I'm gonna say it since no one else has yet, CLEAN YOUR ENGINE!
The new addition looks good though... tongue.gif
<div align='right'><{POST_SNAPBACK}></div></div>
I just DID clean it! That goddamned Citrus Engine Bright completely ruined the look of the engine bay. I just bought some other stuff and am going to try it.
The new addition looks good though... tongue.gif
<div align='right'><{POST_SNAPBACK}></div></div>
I just DID clean it! That goddamned Citrus Engine Bright completely ruined the look of the engine bay. I just bought some other stuff and am going to try it.