
Diy Install Nitrous Oxide - Zex


Thread Starter
Moderator


Joined: Feb 2009
Posts: 11,732
Likes: 5
From: Leesville, Louisiana
Vehicle: 2001 Hyundai Tiburon
<span style="font-size:14pt;line-height:100%">Introduction:</span>
Nitrous Oxide is a non-flamable gas. It is an oxidizer. An oxidizer will add oxygen to an existing flame. All Nitrous Oxide, on it’s own, will do is lean out your air fuel ratio. You cannot run Nitrous Oxide without additional fuel! The purpose of Nitrous Oxide is to support a more explosive combustion in your engine. More O2 and more fuel = more power.
Nitrous Oxide can be injected in 3 methods:<blockquote>1. Dry- Nitrous is injected into the intake and the car’s computer is used to add fuel.
2. Wet-Nitrous and fuel are injected into the intake and the Throttle Body gets “wetâ€
3. Multi-Port- Nitrous is injected into all cylinders through either the Intake Manifold, or the fuel injectors
</blockquote>Using Nitrous Oxide is basically the same concept as turbo charging or super charging, but when you use Nitrous, instead of cramming more 21% oxygen enriched air into your chambers, you’re allowing the oxygen ratio to rise to as much as 33%. See this wikipedia article for more information. http://en.wikipedia.org/wiki/Nitrous
Using Nitrous Oxide will raise engine temperatures and can cause damage with prolonged use. Typically, nitrous use is between 10-20 secconds and not nearly long enough to cause any heat outside tolerances. With a 50HP shot of Nitrous Oxide (AKA 50 shot) you should be able to daily drive your car and use it for a boost on hills, or to get on the freeway faster.
<span style="font-size:14pt;line-height:100%">Scope:</span>
This DIY will cover installation of a wet ZEX system PN: 82021 and some auxiliary kits. But the same principals are used for ANY wet injected Nitrous Oxide system. This DIY is not meant to be a replacement for a operators manual/installation manual. It should only supplement the specifics not provided by the manufacturer for a RD and give you a better idea of what you’re working with. I take no liability in your installation.
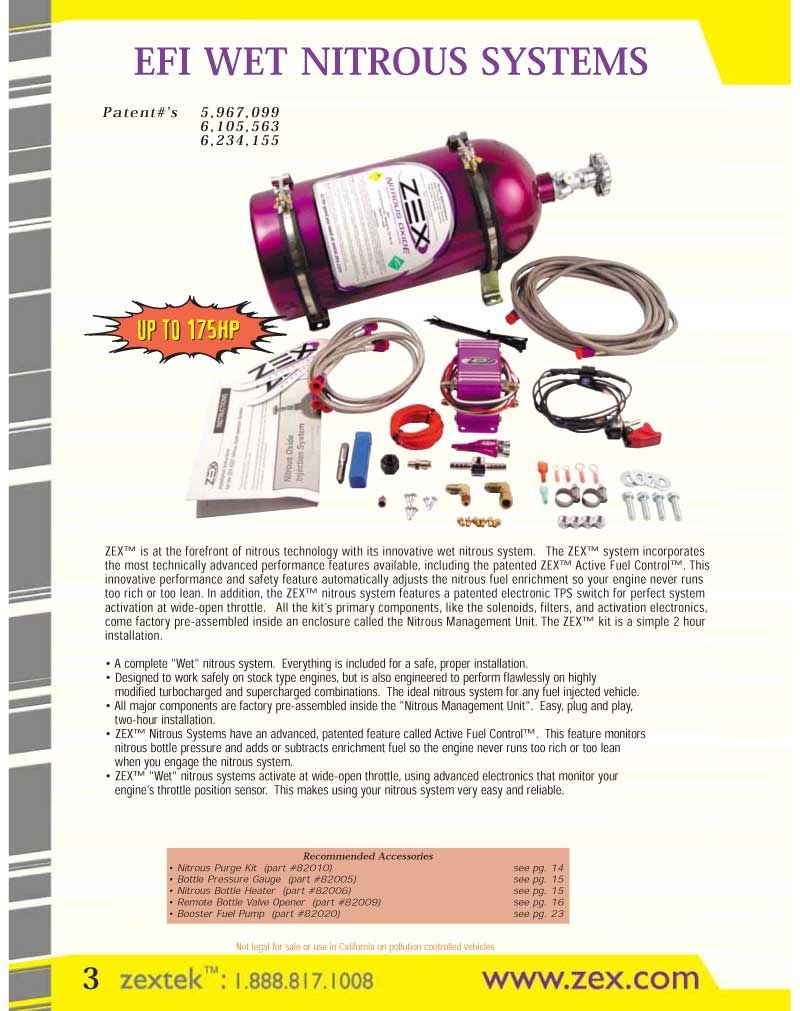
<span style="font-size:14pt;line-height:100%">Zex Wet Kit:</span>
The ZEX system is a kit designed for use with a wide range of cars including ours. It is a throttle activated system that, when armed and at Wide Open Throttle, will inject Nitrous and fuel into your intake in a manner which is quite similar to the way a carburetor injects fuel into a engine. When activated, the fuel pours into the cup and the nitrous blasts it and turns it into a fuel vapor. It is then sent through your intake piping into the engine.
The ZEX is designed to supply an adjustable horsepower level between 50-75HP. Without changing timing angles, the manufacturer recommends keeping the kit at a moderate level of 50HP. In order to prevent detonation at higher levels of power you must adjust cam timing.
The ZEX kit consists of 3 major parts
<blockquote>1. Nitrous Oxide tank- A reservoir for Nitrous Oxide. The tank, or bottle, is equipped with a safety system. The safety system is a piece of metal which will rupture under excessive pressure. I recommend that you install a safety blow-down valve so that gas is vented outside the vehicle in case of rupture. In our cars, anywhere you install the bottle aside from outside the vehicle, is sharing the same airspace as the driver. This is the same with any kit.
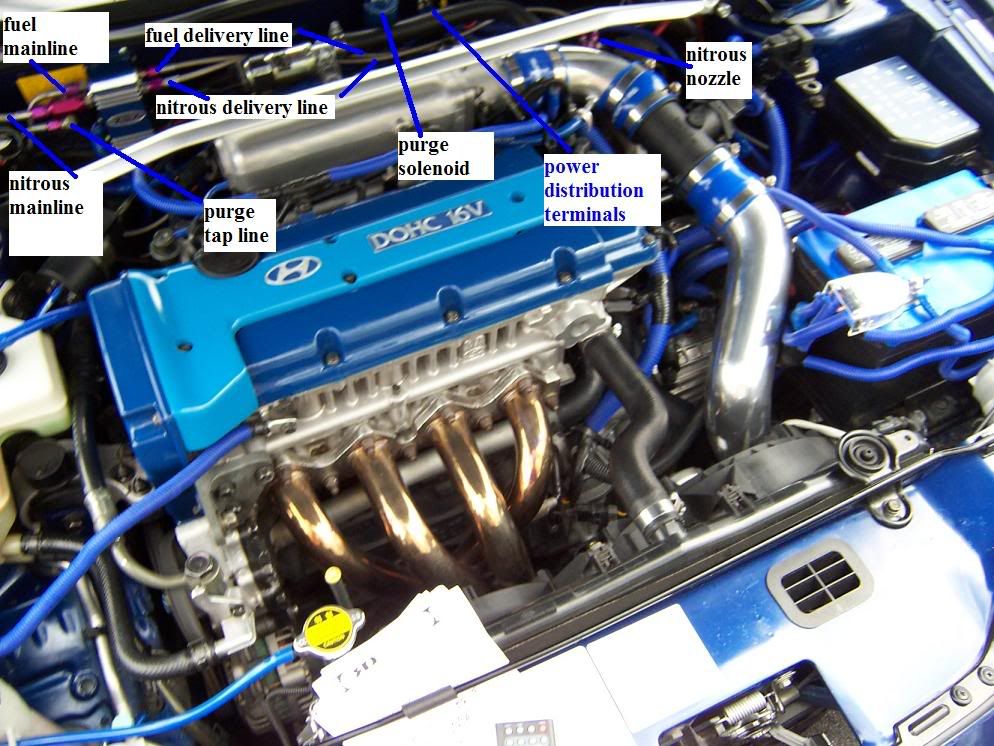
2. The Nitrous Nozzle- Regulates the Nitrous/Fuel mixture by use of interchangeable (“tunableâ€) jets and injects Nitrous into the upper air intake. This is the same with any kit.
3. The Nitrous management unit- monitors the Throttle Positioning Sensor and opens it’s solenoids when armed, which are contained in a neat housing, to let fuel and Nitrous pass from the tank and fuel lines into the Nitrous nozzle. In a base kit from Nitrous Oxide Systems, this is a push-button and 2 open-air solenoids. NOS sucks.</blockquote>
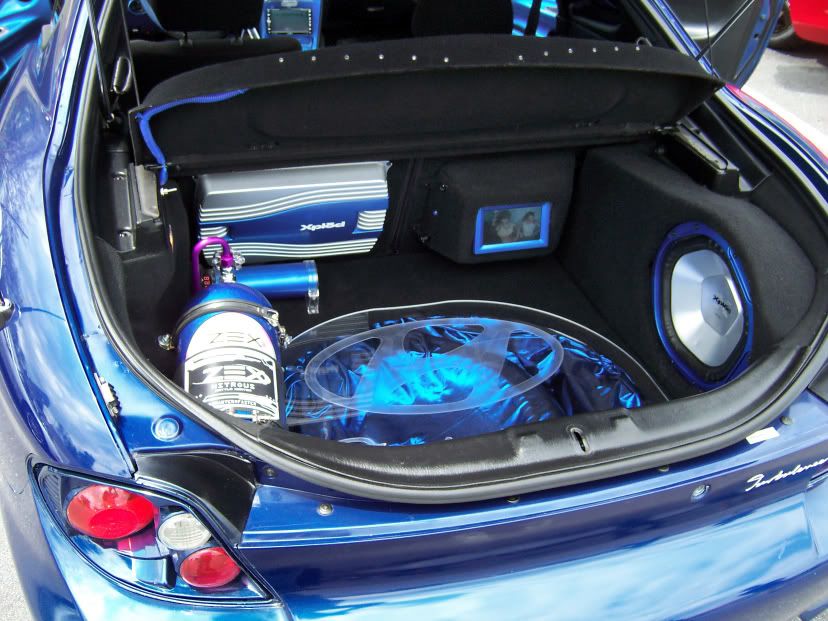
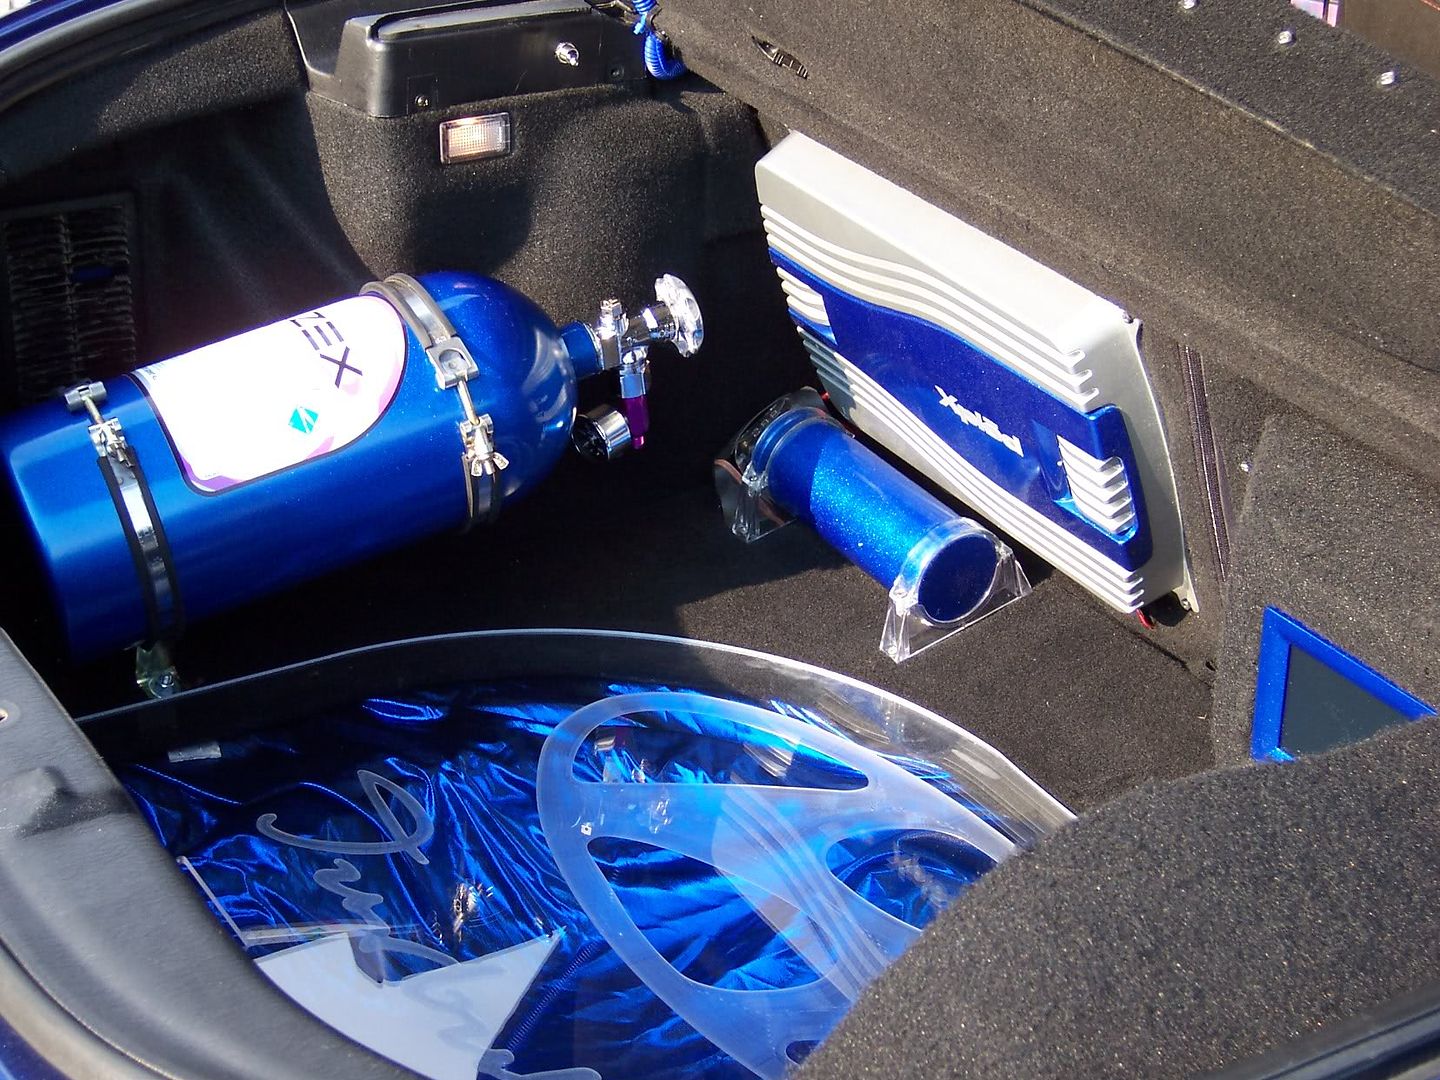
In this picture you can see the entire ZEX nitrous oxide kit
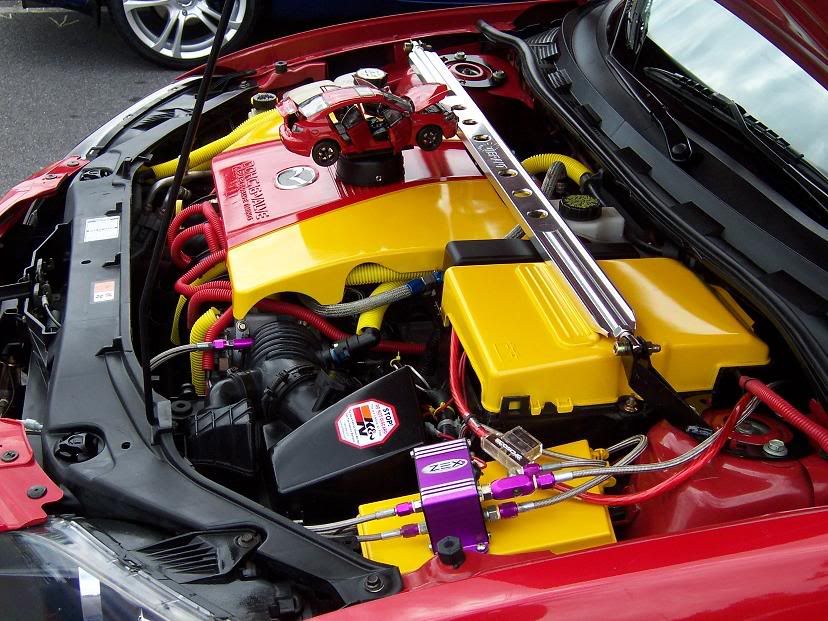
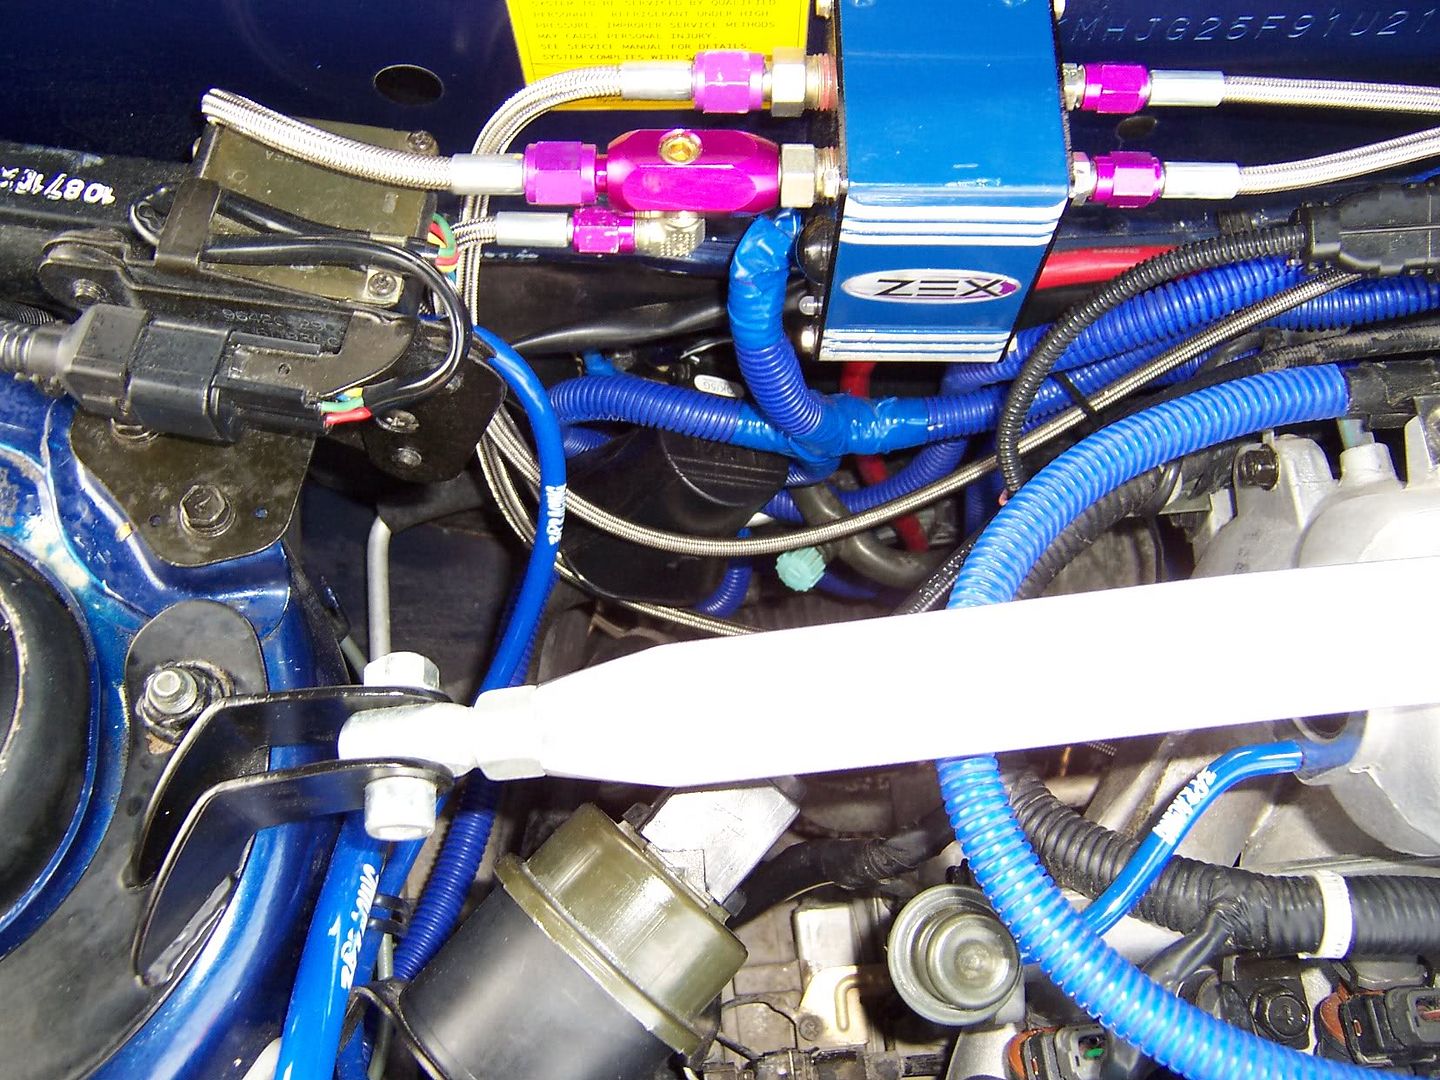
In this picture you can see the ZEX NMU and the Nitrous Nozzle installed in a car with 3 modifications and 20 manufacturer’s stickers. Off topic: the hood does not close with that strut bar on there… They had to take it off after the show. LOL. This is an example of a well installed completely stock ZEX Nitrous Oxide kit with a custom mount for the bottle. I do not like the rest of the car, but I like the custom mount and will be doing something out of fiberglass soon.
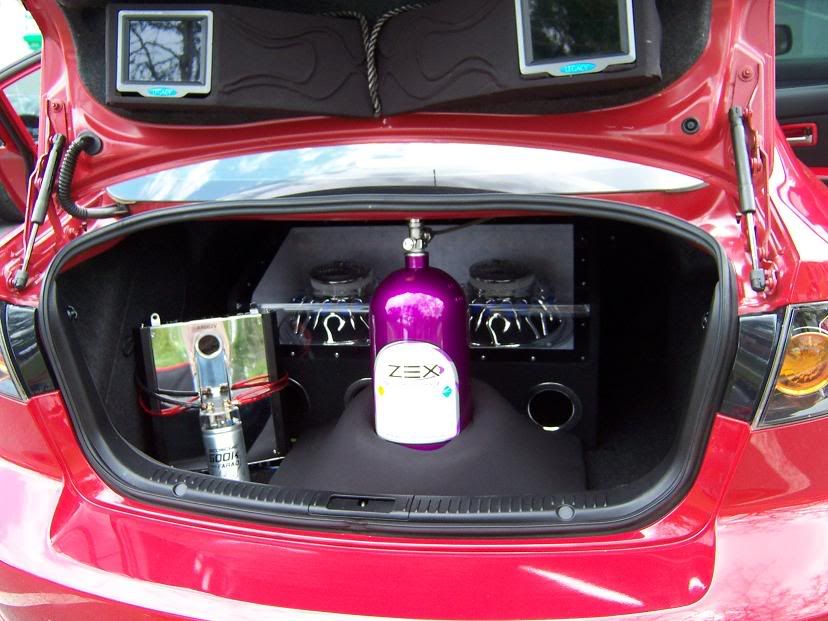
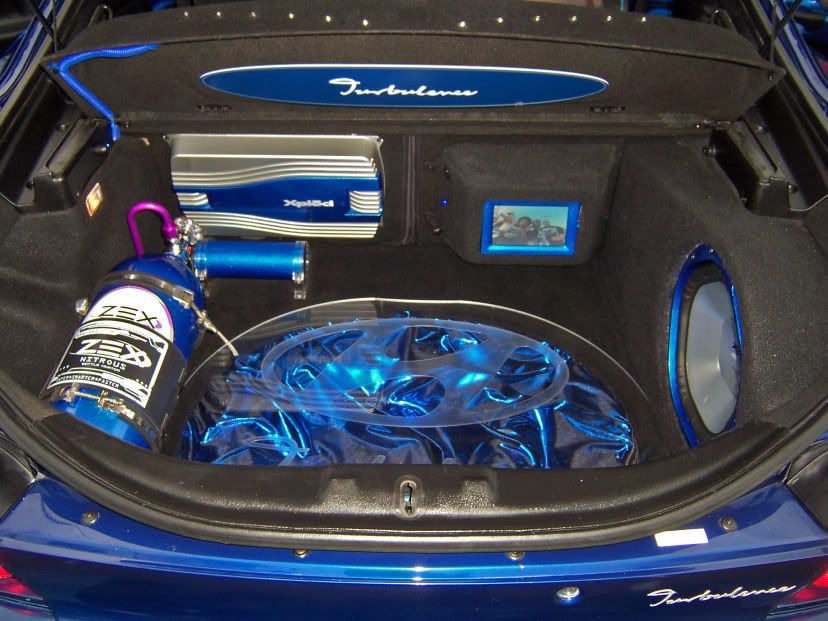
In this picture you can see the ZEX bottle along with an unsecured amplifier and a capacitor
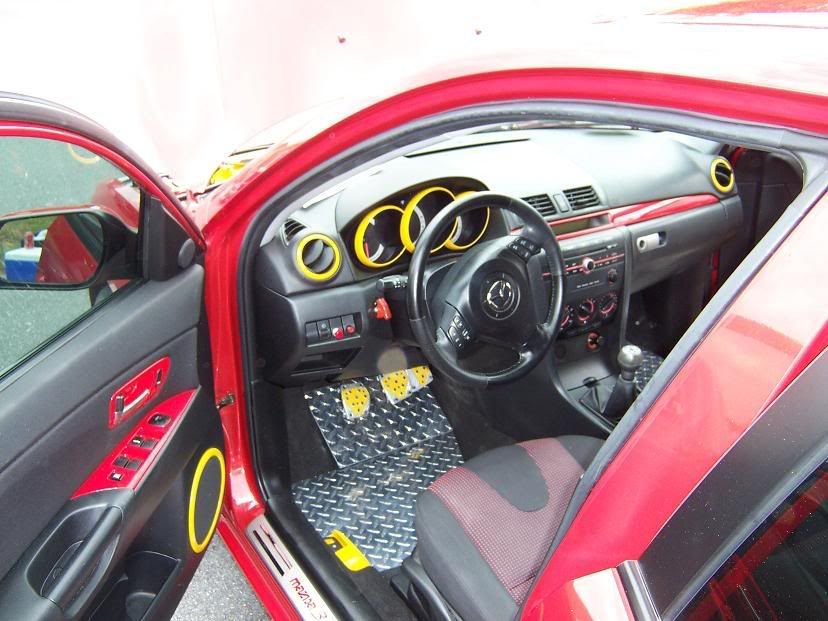
In this picture you can see the ZEX arm safety switch.
Currently you can buy the kit directly from ZEX here http://www.compperformancegroupstores.com/...=NITROUSSYSTEMS
<span style="font-size:14pt;line-height:100%">You will need:</span>
Durables (you will need this):
Crimper tool
Stripper tool
Standard line wrench set (like a box wrench with a portion cut out, for use with all fittings)
Screw driver set
Drill
Drill bits
Hammer
Plyers
Big adjustable wrench for nitrous bottle
Expendables (most are optional as the kit comes with the absolute bare essentials)
Extra zip ties Not Optional (home depot)
Thread sealant Not Optional(black or red would be best on the purple connections, I got white and it is too obvious)
1/2" size 8 sheet metal screws and washers (home depot)
Aluminum stock (home depot)
A 12V 30A or higher relay for running hot-at-on power
A terminal board for running hot-at-on power
<span style="font-size:14pt;line-height:100%">Installation:</span>
I’m a firm believer in examining what I am getting into and doing easy stuff first. I always like to keep my car’s “down time†to a minimum. I use Zip-ties like candy. Buy 100 of them and use them throughout the project. zip-tie something to hold it in place for a few minutes then cut the zip-tie later. It’s just a zip-tie.
This project can be done by 4 different people working in 4 different locations in the car. I, unfortunately, had myself, and a buddy who was all about cutting my fuel line. That’s about all he did… thanks buddy!!
You will need to be familiar with how to hook up crimp connectors. This kit uses crimp rings, male disconnects, female disconnects, wire taps and a lot of other electronic parts. If you are not familiar with how to properly crimp connections, you may wish to get some technical assistance or have a shop install this equipment for you. After crimping connections, you should tug on them to make sure that they won’t fall out later. A good crimp should be able to withstand a good pull on the wire.
You will need to drill a hole in your firewall, or use a pre-existing hole to run wires to the passenger compartment where you can control the system. You will need to drill holes for mounting the bottle. You will need to use sheet metal screws to mount the Nitrous Management Unit.
Most of all, you need to review and review the installation manual, then try to adapt the instructions to work with the car. The instructions tell you how to hook it up. They do not get specific. The instructions are a guideline in this installation. The instructions will not tell you how or where to run wires, place components, nor any tricky parts.
Almost all of the steps in this DIY guide are independent of each other and can come together at any time you like.
<span style="font-size:14pt;line-height:100%">Install Nitrous main-line.</span>
You want to run it at least an inch above the car’s chassis. The way I accomplished this was to drill small holes and zip-tie the braded steel hose to my frame. Zipties are the manufacturer’s recommended way of installing this line. They recommend using 6 of them. I used somewhere around 30. Mine was mounted on the passenger side. I went through as many “virtual installations†as possible and this seems to be the best way. I do not like this picture but I will include it anyways so that you will know what it will look like.
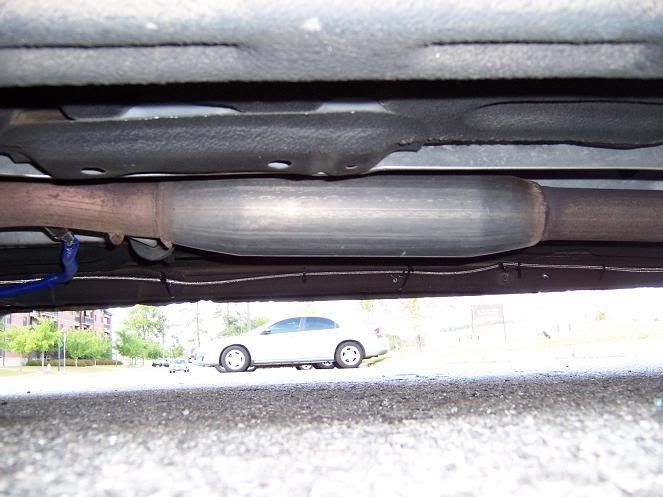
A cleaner method might be to buy some sheet metal screws and cable mounts, then drill starter holes and use the sheet metal screws to hold the cable mounts to the frame.
Again, the manufacturer recommends zip ties.
<span style="font-size:14pt;line-height:100%">Install Tank: </span>
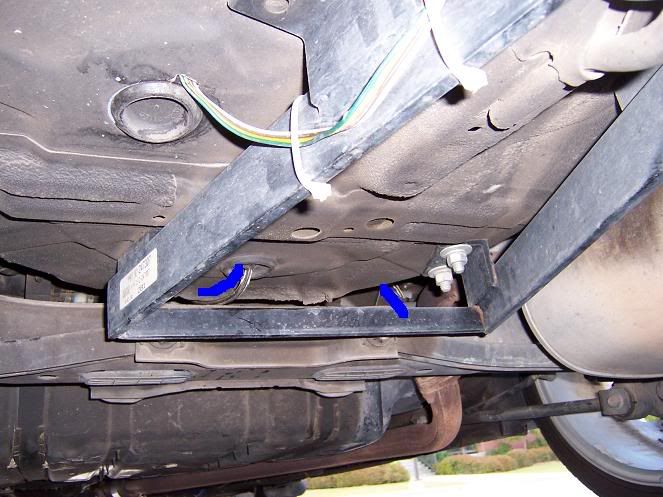
This was the trickiest part of the installation. It seemed easy, so I just had at it. These instructions should help you mount your bottle better then I did the first time. My major mistake was thinking that I could just secure one mount and then let the other one fall where it wanted. You need to plan out both mounts at the same time.
The Nitrous Tank should be mounted firmly so that it does not have too much free play and will not fall. The Nitrous tank should be mounted at an angle with the safety device mounted at the top and the nozzle at the bottom, and the top of the bottle should be above the bottom. This is because the delivery system inside the bottle is angled to get liquid Nitrous from the bottom instead of Nitrous gas from the top.
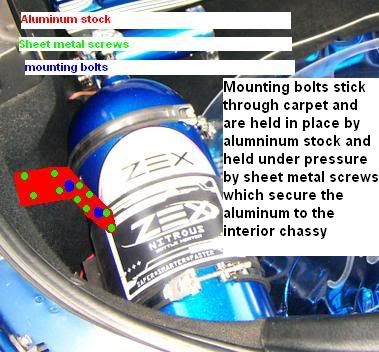
In order to mount the bottle and still have access to the spare tire it was necessary to place one of the bottle mounts on the floor and the other on the wall at an angle.
You will need to drill holes, put bolts through the floor of the car and mount the bottle to the holes. The way I accomplished this was to make another layer of metal, aluminum stock, on the car instead of trying to get wrenches behind the evap canister lines and all that junk in the wheel well.
<blockquote>1. mount the mounts to the bottle
2. position the bottle the way you want it and make the mount line up with the carpet
3. mark the holes and drill through the carpet until you start scratching the body below
4. remove the carpet (lots of screws and pop-ins, it takes some time.)
5. place a piece of aluminum stock down
6. beat the aluminum to the shape of the interior body with a hammer
7. drill 2 holes for the bolts to line up with the scratches previously laid down with the drill
8. put the bolts through the piece of aluminum stock
9. use many self-tapping sheet metal screws to hold the aluminum stock mount to the sheet metal body
10. replace the carpet
11. place the mounts on the bolts and use the nuts to screw it in.
12. secure the bottle in place to verify that your mounts did not shift from the planned position.</blockquote>
If you did it right the bottle should be secure enough that you can pull on it as hard as you can and it will not move more then 1 inch or so. The bands should be flexible but not floppy.
<span style="font-size:14pt;line-height:100%">Install Nitrous Nozzle. </span>
The Nitrous Nozzle should be installed on your Y pipe as close to the intake air controller pipe as possible Leave the jets out for now, until you install the NMU. If you don’t have a metal Y pipe, you’ll just poke it through the rubber. Otherwise you get to use the bulkhead connector to attatch the Nitrous Nozzle to the Y pipe
<blockquote>1. Remove the Y pipe
2. drill a hole in the Y pipe for the bulkhead connection if you have a metal Y pipe or the nozzle for a rubber Y pipe
3. If you have a metal Y pipe screw the bulkhead connection to the Y pipe and screw the bulkhead nut to the connection
4. Install the nozzle </blockquote>

<span style="font-size:14pt;line-height:100%">
<span style="font-size:14pt;line-height:100%"></span>
Install arm safety switch(and others if you have them):</span>
I recommend using the dashboard, but you may select your own site.
<blockquote>1. Take off panel
2. Drill ½ inch hole in panel
3. place switch in hole
4. use nuts provided to hold switch in hole
5. hook-up switch and replace panel</blockquote>
<span style="font-size:14pt;line-height:100%">Install the Nitrous management unit. </span>
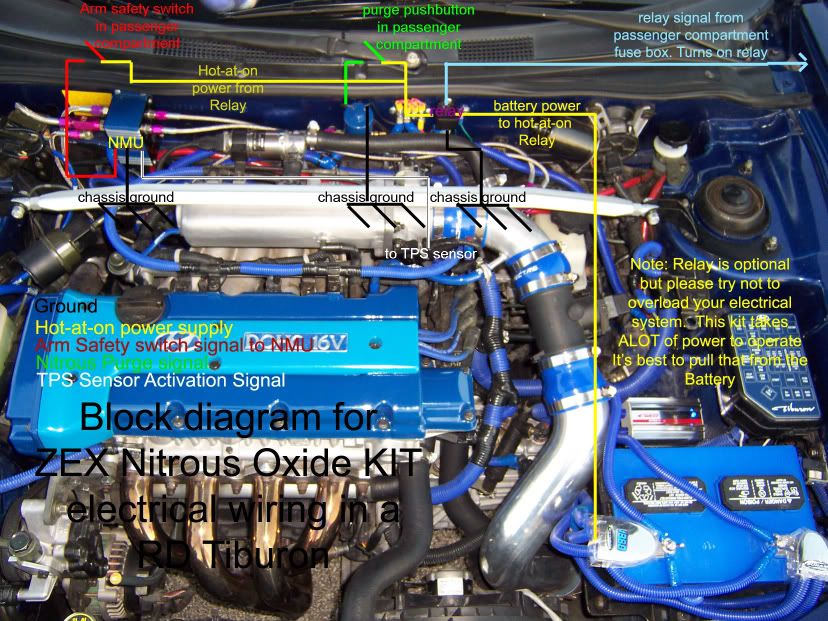
This is the most difficult part as it requires a lot of wires to be run to different parts of the car. Instead of telling you, I’m going to include this picture and show you. Basicaly, red goes to the switch and then to 12V source, black goes to ground, and the white wire goes to the TPS blue wire.
To test the NMU, you will need to turn it on, push the button, depress your throttle for 10 secconds, then verify the light is flashing red, green, off. This indicates your throttle is learned. Turn the activation switch off, then on. Push your throttle to the floor and listen for a click, then release and listen for another click. If it does not click once and then click when you let go, you may have a bad ground or improperly learned the throttle positon switch.
<span style="font-size:14pt;line-height:100%">Install fuel line. </span>
This is the part where your car will be immobilized for a bit. My buddy decided to relieve fuel pressure with a knife and a rag.
<blockquote>1. Locate the fuel line (not the return) It has a portion of rubber hose and is located right below the return line
2. Poke a knife into the fuel line and then place the rag over it to absorb the fuel until the pressure is relieved from the line
3. Cut the rubber hose
4. Install the barbed T fitting and use hose clamps or zipties to secure it
5. use thread sealant to connect the L fitting
6. Run your fuel hose to the NMU
</blockquote>
This is the last time you’ll ever have to get creative in relieving fuel pressure. From this point on, you’ll have a fuel pressure relief by turning your Nitrous Oxide off and activating the NMU. This is quite handy when changing a fuel filter. Make sure you wash your hands RIGHT after touching fuel, my buddy got fuel poisoning and could not help through the rest of the project.
<span style="font-size:14pt;line-height:100%">Hook up lines and jets. </span>
<blockquote>1. Connect the Nitrous mainline to the Nitrous tank. From here on out you will need to use thread sealant.
2. Thread seal and connect the Nitrous mainline to the NMU.
3. Threads seal and connect the fuel delivery line to the NMU.
4. Thread seal and connect the Nitrous delivery line to the NMU.
5. Install the 32 Nitrous jet into the Nitrous delivery line hole on the Nitrous Nozzle.
6. Thread seal and connect the Nitrous delivery line to the Nitrous jet.
7. Install the 17 Fuel jet into the hole on the Nitrous Nozzle.
8. Thread seal and connect the fuel delivery line to the Nitrous Jet
</blockquote>
<span style="font-size:14pt;line-height:100%">Congratulations:</span>
You now have a fully operational 50WHP nitrous kit.
<span style="font-size:14pt;line-height:100%">Auxiliary kits:</span>
These are some of the auxiliary kits available from ZEX. I placed the order for the base kit, pressure gauge, safety blow down, bottle heater and purge all at the same time. You do not need to buy a bottle heater, but I’d recommend all the rest.
Purge kit:
The function of the purge is to clear the old separated/settled nitrous oxide from the lines before you use it. Otherwise it will bog you down for about a second before it kicks on the hosepower. I purged mine in the center of the car at the washer cowling. You will need to get creative if you want to do something else.
<blockquote>1. decide how you want to place your purge line, keep in mind how long the purge line is from the solenoid (about 1 ½ foot)
2. stick a coat hanger through the purge line and bend it to suit your needs
3. pull the coat hanger out with a pair of plyers
4. use thread sealant and install the fitting adapters on the purge solenoid
5. mount your purge solenoid where you want it
6. install the purge pressure fitting. Do not use thread sealant on the nitrous purge line, it is a pressure fitting.
7. disconnect the Nitrous mainline from the NMU
8. use thread sealant and connect the purge T fitting
9. replace the Nitrous mainline to the purge T fitting
10. run the purge mainline to the purge solenoid and use thread sealant on both ends
11. use thread sealant and run the nitrous mainline to the purge solenoid
12. hook up one of the two purge solenoid power wires to ground (it does not matter which one)
13. hook up the other purge solenoid power wire to the switch.
14. hook up the free end of the purge switch to power
15. test the purge solenoid for a click</blockquote>
Safety blow down kit:
This kit prevents the safety blowoff from filling the cab with nitrous oxide in the event it is activated.
<blockquote>1. ensure your bottle is not filled
2. remove the safety relief valve and diaphragm from the bottle
3. install the smaller diaphragm onto the safety fitting
4. use thread sealant and install the proper safety blow off fitting onto the safety fitting
5. decide where you want your safety blow off tube to run (kinda limited to a circle unless you do some custom bends)
6. drill a ½ inch hole for the safety blow down tube
7. install safety blow down tube onto bottle</blockquote>
Bottle heater kit:
This kit allows you to raise the bottle temperature so that you get more nitrous oxide use when your bottle is low on pressure. It raises the temperature which expands the nitrous gas in the bottle and increases pressure which allows you to get more out of a nitrous oxide filling. Ensure you turn it off for about 12 hours before you fill your bottle or the service tech who fills your bottle will turn you away, or purge your bottle completely before filling it.
The bottle heater will not feel warm to the touch when turned on and installed on the bottle. If you need to test it, you must remove the heater from the bottle otherwise the bottle’s large metal surface will heat-sink the heater pad. When removed it warms up quickly and may even burn you.
I used constant 12V power in this situation because I can turn it on and let it start warming up before I turn on my car. It automatically turns off when proper temperature is reached.
<blockquote>1. install the bottle heater onto the nitrous bottle
2. decide where you want the wires to run so they are inconspicuous.
3. mount your switch
4. run power from the battery or amplifier to the switch
5. Run switched power from the switch to the bottle heater red wire
6. run the bottle heater black wire to ground
7. remove the bottle heater and turn it on to test.</blockquote>
Bottle gauge kit:
This kit allows you to see the pressure which is in your bottle. If you don’t have one of these, it’s kinda a guessing game as to why you’re not getting much pressure. I was not satisfied with mine as it broke within a couple days of use. I replaced it with a generic gauge from a different application. I attempted a repair and was unsuccessful. Regardless, it’s easy to put on.
<blockquote>1. remove nitrous mainline fitting from bottle
2. using thread sealant install gauge on bottle
3. using thread sealant install nitrous mainline on gauge fitting</blockquote>
<span style="font-size:14pt;line-height:100%">Custom install stuff:</span>
The first thing I did, before anything else, was to paint the NMU. I do not like the stock ZEX purple color. To take apart the NMU, there’s 4 bolts on both sides. Remove the bolts, paint the NMU cover, Sand the paint from the high-spots, reinstall the NMU cover and then replace the bolts. http://i45.photobucket.com/albums/f100/out...am/100_2072.jpg
I don’t like the look of wires dangling in my engine bay, so I bought some blue wire looms and made wiring harnesses out of the dangling wires to clean them up. http://i45.photobucket.com/albums/f100/out...am/100_2072.jpg
I painted my Nitrous bottle to match the rest of my interior work.
http://i45.photobucket.com/albums/f100/out.../100_2006-1.jpg
I also painted my purge solenoid as it was the only brass colored thing in the engine bay. http://i45.photobucket.com/albums/f100/out...am/100_2096.jpg
I painted the Nitrous arm safety switch cover to match the interior http://i45.photobucket.com/albums/f100/out...am/100_2077.jpg
I made silent wirelooms for the arm and purge switch DIY here: http://www.rdtiburon.com/index.php?showtopic=21893
I bought a LED power switch for my bottle heater because it’s easier to see if it’s on with an LED. Not to mention it looks a lot cleaner having a black plastic switch in my trunk then a shiny metal toggle.
My purple fittings are covered with braded wire-loom terminated at one end with shrink wrap. This allows me to “peel†back the wire loom and access the fitting, then let it spring back into place over the fitting.
Custom power solution:
In order to run hot-at-on power to all my devices in the engine bay, I decided it would be best to run hot-at-on power from a relay to a terminal board. This was the best soloution because I was already running a 10AWG wire to my 110V power inverter under the passenger seat. All I had to do was break the line and add a few components. You may find a better method, but in case you don’t this is a good way to get hot-at-on power to the engine bay. Again, you do not need to do this, but I thought it was a good idea as I am running a lot of other electronics. You may just use the relay to power this system without a terminal board.
<blockquote>1. Mount a 12V 30A or higher relay to the firewall
2. Next to the relay mount a terminal board
3. run power from the battery to a relay
4. run power from the fuse box in the passenger compartment via a fuse tap to the relay
5. run a ground to the relay
6. run power from the relay to a terminal board
7. cut the line between the relay and the battery then add a inline fuse</blockquote>
<span style="font-size:14pt;line-height:100%">Testing:</span>
The first time you turn on your car after installing the fuel line, you need to check for any leaks. If you have a leak, immediately correct it. It would be very bad if your car caught on fire because some fuel dripped onto your hot exhaust pipe.
To test your NMU, go through the learning procedure, then arm it and press the gas pedal down. You should hear a click when you depress the pedal and another when you release the pedal.
To test your purge, you will simply press the purge button with the bottle turned off. You should hear a click when you press it and a click when you release it.
To test your bottle heater, remove it from the bottle and turn it on. If it gets hot, then it works.
When you have your bottle filled, you can check for leaks in the nitrous mainline by hooking up your bottle, opening it then listening and checking for parts of the hose that freeze over. Nitrous is really cold when it decompresses and will tend to leave a white frost on things it touches. You can hear leaks as well for the most part. If any leaks are detected, turn the bottle off and correct them.
To test your pressure gauge, verify the bottle pressure when you get your bottle from the service tech. When you pressurize the line, it should read roughly the same. You may also bring it to a service tech and have him verify the gauge with his machine.
It’s also a good idea to have the service technician help you out when you first hook up your bottle. He will be able to diagnose any problems you have much quicker then you will. They will most likely recommend dyno tuning. I did not dyno tune my car because the service technician said he’s never seen a problem with ZEX tuning before. It is a good idea to have your car dyno tuned. Tuning is recommended, but not required and it will test the o2/fuel mixture.
<span style="font-size:14pt;line-height:100%">Cool stuff with nitrous:</span>
Illuminated nitrous purge http://zex.com/Base/Video/PurgeLight_002.wmv
Machine gun purge kit- http://zex.com/Base/Video/ZexMachineGunPurgeKitWEB1.wmv
<span style="font-size:14pt;line-height:100%">Conclusion:</span>
That’s how I installed a ZEX nitrous system in my 01 Tiburon. There’s many ways to do this. If you choose to install a nitrous system, then take your time and do it right. There should be no reason to rush a project like this. It took me about 9 days to complete the project including 5 day drying times for the nitrous bottle and other parts of the system. So basically, you should be able to install the base system in a day or two on your own, and the auxiliary systems in a day or two as well. It may be quicker with a buddy.
You should have your self-installed system inspected by a trained professional to ensure that everything is done correctly before filling your system. Be sure your bottle is mounted firmly! That’s the one thing that can kill you!
Feel free to post your ideas, suggestions and questions!
Have fun with your nitrous setup and don’t do anything I wouldn’t do. wink1.gif
Nitrous Oxide is a non-flamable gas. It is an oxidizer. An oxidizer will add oxygen to an existing flame. All Nitrous Oxide, on it’s own, will do is lean out your air fuel ratio. You cannot run Nitrous Oxide without additional fuel! The purpose of Nitrous Oxide is to support a more explosive combustion in your engine. More O2 and more fuel = more power.
Nitrous Oxide can be injected in 3 methods:<blockquote>1. Dry- Nitrous is injected into the intake and the car’s computer is used to add fuel.
2. Wet-Nitrous and fuel are injected into the intake and the Throttle Body gets “wetâ€
3. Multi-Port- Nitrous is injected into all cylinders through either the Intake Manifold, or the fuel injectors
</blockquote>Using Nitrous Oxide is basically the same concept as turbo charging or super charging, but when you use Nitrous, instead of cramming more 21% oxygen enriched air into your chambers, you’re allowing the oxygen ratio to rise to as much as 33%. See this wikipedia article for more information. http://en.wikipedia.org/wiki/Nitrous
Using Nitrous Oxide will raise engine temperatures and can cause damage with prolonged use. Typically, nitrous use is between 10-20 secconds and not nearly long enough to cause any heat outside tolerances. With a 50HP shot of Nitrous Oxide (AKA 50 shot) you should be able to daily drive your car and use it for a boost on hills, or to get on the freeway faster.
<span style="font-size:14pt;line-height:100%">Scope:</span>
This DIY will cover installation of a wet ZEX system PN: 82021 and some auxiliary kits. But the same principals are used for ANY wet injected Nitrous Oxide system. This DIY is not meant to be a replacement for a operators manual/installation manual. It should only supplement the specifics not provided by the manufacturer for a RD and give you a better idea of what you’re working with. I take no liability in your installation.
<span style="font-size:14pt;line-height:100%">Zex Wet Kit:</span>
The ZEX system is a kit designed for use with a wide range of cars including ours. It is a throttle activated system that, when armed and at Wide Open Throttle, will inject Nitrous and fuel into your intake in a manner which is quite similar to the way a carburetor injects fuel into a engine. When activated, the fuel pours into the cup and the nitrous blasts it and turns it into a fuel vapor. It is then sent through your intake piping into the engine.
The ZEX is designed to supply an adjustable horsepower level between 50-75HP. Without changing timing angles, the manufacturer recommends keeping the kit at a moderate level of 50HP. In order to prevent detonation at higher levels of power you must adjust cam timing.
The ZEX kit consists of 3 major parts
<blockquote>1. Nitrous Oxide tank- A reservoir for Nitrous Oxide. The tank, or bottle, is equipped with a safety system. The safety system is a piece of metal which will rupture under excessive pressure. I recommend that you install a safety blow-down valve so that gas is vented outside the vehicle in case of rupture. In our cars, anywhere you install the bottle aside from outside the vehicle, is sharing the same airspace as the driver. This is the same with any kit.
2. The Nitrous Nozzle- Regulates the Nitrous/Fuel mixture by use of interchangeable (“tunableâ€) jets and injects Nitrous into the upper air intake. This is the same with any kit.
3. The Nitrous management unit- monitors the Throttle Positioning Sensor and opens it’s solenoids when armed, which are contained in a neat housing, to let fuel and Nitrous pass from the tank and fuel lines into the Nitrous nozzle. In a base kit from Nitrous Oxide Systems, this is a push-button and 2 open-air solenoids. NOS sucks.</blockquote>
In this picture you can see the entire ZEX nitrous oxide kit
In this picture you can see the ZEX NMU and the Nitrous Nozzle installed in a car with 3 modifications and 20 manufacturer’s stickers. Off topic: the hood does not close with that strut bar on there… They had to take it off after the show. LOL. This is an example of a well installed completely stock ZEX Nitrous Oxide kit with a custom mount for the bottle. I do not like the rest of the car, but I like the custom mount and will be doing something out of fiberglass soon.
In this picture you can see the ZEX bottle along with an unsecured amplifier and a capacitor
In this picture you can see the ZEX arm safety switch.
Currently you can buy the kit directly from ZEX here http://www.compperformancegroupstores.com/...=NITROUSSYSTEMS
<span style="font-size:14pt;line-height:100%">You will need:</span>
Durables (you will need this):
Crimper tool
Stripper tool
Standard line wrench set (like a box wrench with a portion cut out, for use with all fittings)
Screw driver set
Drill
Drill bits
Hammer
Plyers
Big adjustable wrench for nitrous bottle
Expendables (most are optional as the kit comes with the absolute bare essentials)
Extra zip ties Not Optional (home depot)
Thread sealant Not Optional(black or red would be best on the purple connections, I got white and it is too obvious)
1/2" size 8 sheet metal screws and washers (home depot)
Aluminum stock (home depot)
A 12V 30A or higher relay for running hot-at-on power
A terminal board for running hot-at-on power
<span style="font-size:14pt;line-height:100%">Installation:</span>
I’m a firm believer in examining what I am getting into and doing easy stuff first. I always like to keep my car’s “down time†to a minimum. I use Zip-ties like candy. Buy 100 of them and use them throughout the project. zip-tie something to hold it in place for a few minutes then cut the zip-tie later. It’s just a zip-tie.
This project can be done by 4 different people working in 4 different locations in the car. I, unfortunately, had myself, and a buddy who was all about cutting my fuel line. That’s about all he did… thanks buddy!!
You will need to be familiar with how to hook up crimp connectors. This kit uses crimp rings, male disconnects, female disconnects, wire taps and a lot of other electronic parts. If you are not familiar with how to properly crimp connections, you may wish to get some technical assistance or have a shop install this equipment for you. After crimping connections, you should tug on them to make sure that they won’t fall out later. A good crimp should be able to withstand a good pull on the wire.
You will need to drill a hole in your firewall, or use a pre-existing hole to run wires to the passenger compartment where you can control the system. You will need to drill holes for mounting the bottle. You will need to use sheet metal screws to mount the Nitrous Management Unit.
Most of all, you need to review and review the installation manual, then try to adapt the instructions to work with the car. The instructions tell you how to hook it up. They do not get specific. The instructions are a guideline in this installation. The instructions will not tell you how or where to run wires, place components, nor any tricky parts.
Almost all of the steps in this DIY guide are independent of each other and can come together at any time you like.
<span style="font-size:14pt;line-height:100%">Install Nitrous main-line.</span>
You want to run it at least an inch above the car’s chassis. The way I accomplished this was to drill small holes and zip-tie the braded steel hose to my frame. Zipties are the manufacturer’s recommended way of installing this line. They recommend using 6 of them. I used somewhere around 30. Mine was mounted on the passenger side. I went through as many “virtual installations†as possible and this seems to be the best way. I do not like this picture but I will include it anyways so that you will know what it will look like.
A cleaner method might be to buy some sheet metal screws and cable mounts, then drill starter holes and use the sheet metal screws to hold the cable mounts to the frame.
Again, the manufacturer recommends zip ties.
<span style="font-size:14pt;line-height:100%">Install Tank: </span>
This was the trickiest part of the installation. It seemed easy, so I just had at it. These instructions should help you mount your bottle better then I did the first time. My major mistake was thinking that I could just secure one mount and then let the other one fall where it wanted. You need to plan out both mounts at the same time.
The Nitrous Tank should be mounted firmly so that it does not have too much free play and will not fall. The Nitrous tank should be mounted at an angle with the safety device mounted at the top and the nozzle at the bottom, and the top of the bottle should be above the bottom. This is because the delivery system inside the bottle is angled to get liquid Nitrous from the bottom instead of Nitrous gas from the top.
In order to mount the bottle and still have access to the spare tire it was necessary to place one of the bottle mounts on the floor and the other on the wall at an angle.
You will need to drill holes, put bolts through the floor of the car and mount the bottle to the holes. The way I accomplished this was to make another layer of metal, aluminum stock, on the car instead of trying to get wrenches behind the evap canister lines and all that junk in the wheel well.
<blockquote>1. mount the mounts to the bottle
2. position the bottle the way you want it and make the mount line up with the carpet
3. mark the holes and drill through the carpet until you start scratching the body below
4. remove the carpet (lots of screws and pop-ins, it takes some time.)
5. place a piece of aluminum stock down
6. beat the aluminum to the shape of the interior body with a hammer
7. drill 2 holes for the bolts to line up with the scratches previously laid down with the drill
8. put the bolts through the piece of aluminum stock
9. use many self-tapping sheet metal screws to hold the aluminum stock mount to the sheet metal body
10. replace the carpet
11. place the mounts on the bolts and use the nuts to screw it in.
12. secure the bottle in place to verify that your mounts did not shift from the planned position.</blockquote>
If you did it right the bottle should be secure enough that you can pull on it as hard as you can and it will not move more then 1 inch or so. The bands should be flexible but not floppy.
<span style="font-size:14pt;line-height:100%">Install Nitrous Nozzle. </span>
The Nitrous Nozzle should be installed on your Y pipe as close to the intake air controller pipe as possible Leave the jets out for now, until you install the NMU. If you don’t have a metal Y pipe, you’ll just poke it through the rubber. Otherwise you get to use the bulkhead connector to attatch the Nitrous Nozzle to the Y pipe
<blockquote>1. Remove the Y pipe
2. drill a hole in the Y pipe for the bulkhead connection if you have a metal Y pipe or the nozzle for a rubber Y pipe
3. If you have a metal Y pipe screw the bulkhead connection to the Y pipe and screw the bulkhead nut to the connection
4. Install the nozzle </blockquote>
<span style="font-size:14pt;line-height:100%">
<span style="font-size:14pt;line-height:100%"></span>
Install arm safety switch(and others if you have them):</span>
I recommend using the dashboard, but you may select your own site.
<blockquote>1. Take off panel
2. Drill ½ inch hole in panel
3. place switch in hole
4. use nuts provided to hold switch in hole
5. hook-up switch and replace panel</blockquote>
<span style="font-size:14pt;line-height:100%">Install the Nitrous management unit. </span>
This is the most difficult part as it requires a lot of wires to be run to different parts of the car. Instead of telling you, I’m going to include this picture and show you. Basicaly, red goes to the switch and then to 12V source, black goes to ground, and the white wire goes to the TPS blue wire.
To test the NMU, you will need to turn it on, push the button, depress your throttle for 10 secconds, then verify the light is flashing red, green, off. This indicates your throttle is learned. Turn the activation switch off, then on. Push your throttle to the floor and listen for a click, then release and listen for another click. If it does not click once and then click when you let go, you may have a bad ground or improperly learned the throttle positon switch.
<span style="font-size:14pt;line-height:100%">Install fuel line. </span>
This is the part where your car will be immobilized for a bit. My buddy decided to relieve fuel pressure with a knife and a rag.
<blockquote>1. Locate the fuel line (not the return) It has a portion of rubber hose and is located right below the return line
2. Poke a knife into the fuel line and then place the rag over it to absorb the fuel until the pressure is relieved from the line
3. Cut the rubber hose
4. Install the barbed T fitting and use hose clamps or zipties to secure it
5. use thread sealant to connect the L fitting
6. Run your fuel hose to the NMU
</blockquote>
This is the last time you’ll ever have to get creative in relieving fuel pressure. From this point on, you’ll have a fuel pressure relief by turning your Nitrous Oxide off and activating the NMU. This is quite handy when changing a fuel filter. Make sure you wash your hands RIGHT after touching fuel, my buddy got fuel poisoning and could not help through the rest of the project.
<span style="font-size:14pt;line-height:100%">Hook up lines and jets. </span>
<blockquote>1. Connect the Nitrous mainline to the Nitrous tank. From here on out you will need to use thread sealant.
2. Thread seal and connect the Nitrous mainline to the NMU.
3. Threads seal and connect the fuel delivery line to the NMU.
4. Thread seal and connect the Nitrous delivery line to the NMU.
5. Install the 32 Nitrous jet into the Nitrous delivery line hole on the Nitrous Nozzle.
6. Thread seal and connect the Nitrous delivery line to the Nitrous jet.
7. Install the 17 Fuel jet into the hole on the Nitrous Nozzle.
8. Thread seal and connect the fuel delivery line to the Nitrous Jet
</blockquote>
<span style="font-size:14pt;line-height:100%">Congratulations:</span>
You now have a fully operational 50WHP nitrous kit.
<span style="font-size:14pt;line-height:100%">Auxiliary kits:</span>
These are some of the auxiliary kits available from ZEX. I placed the order for the base kit, pressure gauge, safety blow down, bottle heater and purge all at the same time. You do not need to buy a bottle heater, but I’d recommend all the rest.
Purge kit:
The function of the purge is to clear the old separated/settled nitrous oxide from the lines before you use it. Otherwise it will bog you down for about a second before it kicks on the hosepower. I purged mine in the center of the car at the washer cowling. You will need to get creative if you want to do something else.
<blockquote>1. decide how you want to place your purge line, keep in mind how long the purge line is from the solenoid (about 1 ½ foot)
2. stick a coat hanger through the purge line and bend it to suit your needs
3. pull the coat hanger out with a pair of plyers
4. use thread sealant and install the fitting adapters on the purge solenoid
5. mount your purge solenoid where you want it
6. install the purge pressure fitting. Do not use thread sealant on the nitrous purge line, it is a pressure fitting.
7. disconnect the Nitrous mainline from the NMU
8. use thread sealant and connect the purge T fitting
9. replace the Nitrous mainline to the purge T fitting
10. run the purge mainline to the purge solenoid and use thread sealant on both ends
11. use thread sealant and run the nitrous mainline to the purge solenoid
12. hook up one of the two purge solenoid power wires to ground (it does not matter which one)
13. hook up the other purge solenoid power wire to the switch.
14. hook up the free end of the purge switch to power
15. test the purge solenoid for a click</blockquote>
Safety blow down kit:
This kit prevents the safety blowoff from filling the cab with nitrous oxide in the event it is activated.
<blockquote>1. ensure your bottle is not filled
2. remove the safety relief valve and diaphragm from the bottle
3. install the smaller diaphragm onto the safety fitting
4. use thread sealant and install the proper safety blow off fitting onto the safety fitting
5. decide where you want your safety blow off tube to run (kinda limited to a circle unless you do some custom bends)
6. drill a ½ inch hole for the safety blow down tube
7. install safety blow down tube onto bottle</blockquote>
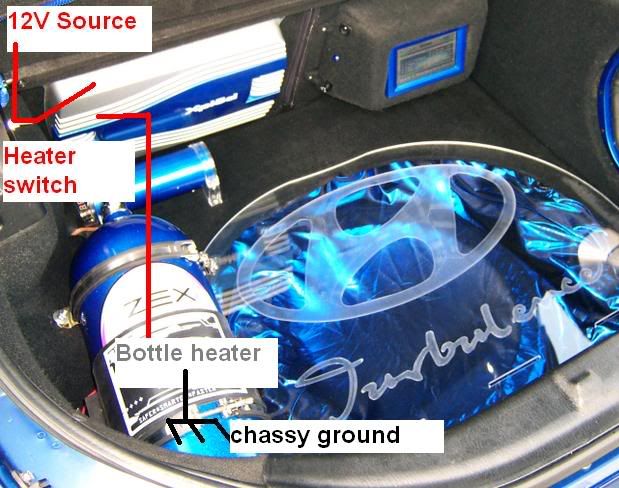
Bottle heater kit:
This kit allows you to raise the bottle temperature so that you get more nitrous oxide use when your bottle is low on pressure. It raises the temperature which expands the nitrous gas in the bottle and increases pressure which allows you to get more out of a nitrous oxide filling. Ensure you turn it off for about 12 hours before you fill your bottle or the service tech who fills your bottle will turn you away, or purge your bottle completely before filling it.
The bottle heater will not feel warm to the touch when turned on and installed on the bottle. If you need to test it, you must remove the heater from the bottle otherwise the bottle’s large metal surface will heat-sink the heater pad. When removed it warms up quickly and may even burn you.
I used constant 12V power in this situation because I can turn it on and let it start warming up before I turn on my car. It automatically turns off when proper temperature is reached.
<blockquote>1. install the bottle heater onto the nitrous bottle
2. decide where you want the wires to run so they are inconspicuous.
3. mount your switch
4. run power from the battery or amplifier to the switch
5. Run switched power from the switch to the bottle heater red wire
6. run the bottle heater black wire to ground
7. remove the bottle heater and turn it on to test.</blockquote>
Bottle gauge kit:
This kit allows you to see the pressure which is in your bottle. If you don’t have one of these, it’s kinda a guessing game as to why you’re not getting much pressure. I was not satisfied with mine as it broke within a couple days of use. I replaced it with a generic gauge from a different application. I attempted a repair and was unsuccessful. Regardless, it’s easy to put on.
<blockquote>1. remove nitrous mainline fitting from bottle
2. using thread sealant install gauge on bottle
3. using thread sealant install nitrous mainline on gauge fitting</blockquote>
<span style="font-size:14pt;line-height:100%">Custom install stuff:</span>
The first thing I did, before anything else, was to paint the NMU. I do not like the stock ZEX purple color. To take apart the NMU, there’s 4 bolts on both sides. Remove the bolts, paint the NMU cover, Sand the paint from the high-spots, reinstall the NMU cover and then replace the bolts. http://i45.photobucket.com/albums/f100/out...am/100_2072.jpg
I don’t like the look of wires dangling in my engine bay, so I bought some blue wire looms and made wiring harnesses out of the dangling wires to clean them up. http://i45.photobucket.com/albums/f100/out...am/100_2072.jpg
I painted my Nitrous bottle to match the rest of my interior work.
http://i45.photobucket.com/albums/f100/out.../100_2006-1.jpg
I also painted my purge solenoid as it was the only brass colored thing in the engine bay. http://i45.photobucket.com/albums/f100/out...am/100_2096.jpg
I painted the Nitrous arm safety switch cover to match the interior http://i45.photobucket.com/albums/f100/out...am/100_2077.jpg
I made silent wirelooms for the arm and purge switch DIY here: http://www.rdtiburon.com/index.php?showtopic=21893
I bought a LED power switch for my bottle heater because it’s easier to see if it’s on with an LED. Not to mention it looks a lot cleaner having a black plastic switch in my trunk then a shiny metal toggle.
My purple fittings are covered with braded wire-loom terminated at one end with shrink wrap. This allows me to “peel†back the wire loom and access the fitting, then let it spring back into place over the fitting.
Custom power solution:
In order to run hot-at-on power to all my devices in the engine bay, I decided it would be best to run hot-at-on power from a relay to a terminal board. This was the best soloution because I was already running a 10AWG wire to my 110V power inverter under the passenger seat. All I had to do was break the line and add a few components. You may find a better method, but in case you don’t this is a good way to get hot-at-on power to the engine bay. Again, you do not need to do this, but I thought it was a good idea as I am running a lot of other electronics. You may just use the relay to power this system without a terminal board.
<blockquote>1. Mount a 12V 30A or higher relay to the firewall
2. Next to the relay mount a terminal board
3. run power from the battery to a relay
4. run power from the fuse box in the passenger compartment via a fuse tap to the relay
5. run a ground to the relay
6. run power from the relay to a terminal board
7. cut the line between the relay and the battery then add a inline fuse</blockquote>
<span style="font-size:14pt;line-height:100%">Testing:</span>
The first time you turn on your car after installing the fuel line, you need to check for any leaks. If you have a leak, immediately correct it. It would be very bad if your car caught on fire because some fuel dripped onto your hot exhaust pipe.
To test your NMU, go through the learning procedure, then arm it and press the gas pedal down. You should hear a click when you depress the pedal and another when you release the pedal.
To test your purge, you will simply press the purge button with the bottle turned off. You should hear a click when you press it and a click when you release it.
To test your bottle heater, remove it from the bottle and turn it on. If it gets hot, then it works.
When you have your bottle filled, you can check for leaks in the nitrous mainline by hooking up your bottle, opening it then listening and checking for parts of the hose that freeze over. Nitrous is really cold when it decompresses and will tend to leave a white frost on things it touches. You can hear leaks as well for the most part. If any leaks are detected, turn the bottle off and correct them.
To test your pressure gauge, verify the bottle pressure when you get your bottle from the service tech. When you pressurize the line, it should read roughly the same. You may also bring it to a service tech and have him verify the gauge with his machine.
It’s also a good idea to have the service technician help you out when you first hook up your bottle. He will be able to diagnose any problems you have much quicker then you will. They will most likely recommend dyno tuning. I did not dyno tune my car because the service technician said he’s never seen a problem with ZEX tuning before. It is a good idea to have your car dyno tuned. Tuning is recommended, but not required and it will test the o2/fuel mixture.
<span style="font-size:14pt;line-height:100%">Cool stuff with nitrous:</span>
Illuminated nitrous purge http://zex.com/Base/Video/PurgeLight_002.wmv
Machine gun purge kit- http://zex.com/Base/Video/ZexMachineGunPurgeKitWEB1.wmv
<span style="font-size:14pt;line-height:100%">Conclusion:</span>
That’s how I installed a ZEX nitrous system in my 01 Tiburon. There’s many ways to do this. If you choose to install a nitrous system, then take your time and do it right. There should be no reason to rush a project like this. It took me about 9 days to complete the project including 5 day drying times for the nitrous bottle and other parts of the system. So basically, you should be able to install the base system in a day or two on your own, and the auxiliary systems in a day or two as well. It may be quicker with a buddy.
You should have your self-installed system inspected by a trained professional to ensure that everything is done correctly before filling your system. Be sure your bottle is mounted firmly! That’s the one thing that can kill you!
Feel free to post your ideas, suggestions and questions!
Have fun with your nitrous setup and don’t do anything I wouldn’t do. wink1.gif


Thread Starter
Moderator
Joined: Feb 2009
Posts: 11,732
Likes: 5
From: Leesville, Louisiana
Vehicle: 2001 Hyundai Tiburon
This kit comes with a 10LB bottle. It's enough to last about 3 minutes of boost.
<div class='quotetop'>QUOTE (KustomizedTiburon @ May 11 2007, 01:11 AM) <{POST_SNAPBACK}></div><div class='quotemain'>Very nice write up... but DAMN is that kit expensive.. I'd love to get my hands on one though.</div>
It's a good price. You can spend more on the NOS name. This ZEX kit does extra stuff like regulate fuel output to match Nitrous bottle pressure, and it's more neat and clean then a NOS system.
Edit: changed time


Senior Member
Joined: May 2002
Posts: 1,782
Likes: 0
From: tampa, FL
Vehicle: 2000 Tiburon
holy shit man, nice write up !! thats how you do a DIY !!
shit you could make a few bux just selling a template on how to write up a DIY !!
looks sweet !! have you dynoed yet with spray ??
shit you could make a few bux just selling a template on how to write up a DIY !!
looks sweet !! have you dynoed yet with spray ??