
Diy Install High/low Halos


Thread Starter
Moderator


Joined: Feb 2009
Posts: 11,732
Likes: 5
From: Leesville, Louisiana
Vehicle: 2001 Hyundai Tiburon
<span style="font-size:14pt;line-height:100%">Scope: </span>
This DIY will cover installation of DTN's High/Low Halos. The same principals can be applied to any set of after market DIY install headlamp halos. I've included links to other DIYs, pictures, and alot of other additional information to help you out.
<span style="font-size:14pt;line-height:100%">
Introduction: </span>
Headlamp halos, also known as Angel eyes, or Corona Rings, are becoming more and more popular these days. They range in price from $100-250 per set. They can be obtained through most after market parts suppliers. Newer model BMW vehicles are equipped with angel eyes.
Here is a basic breakdown of Headlamp halos. They consist of an optic channel which is ridged with disturbances, LEDs or a light source of some kind, and a wiring harness to supply power.
If you have any questions, just ask! Each part of the DIY has been broken down into an objective and individual steps. This way you will know exactaly what you're doing and why you're doing it. The pictures still need some work.
<span style="font-size:14pt;line-height:100%">DTN's High/Low Halos:
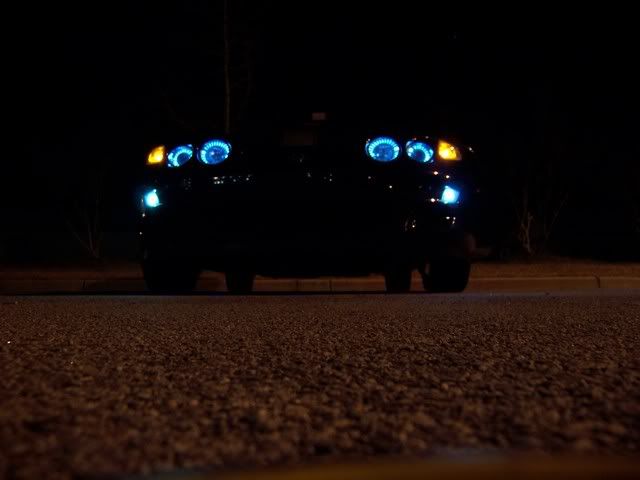
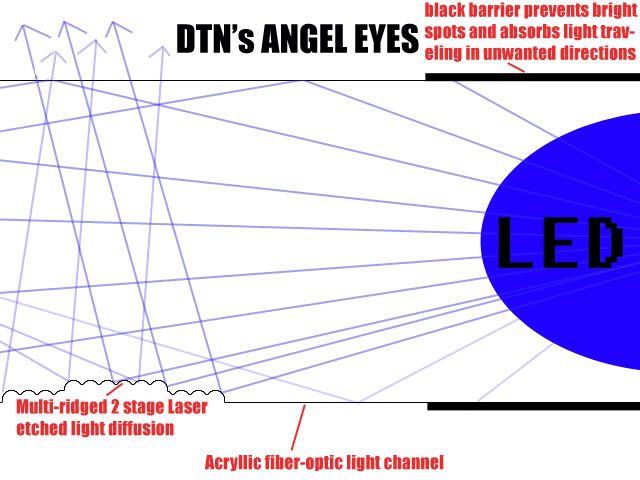
</span>These Halos are Laser Etched and much R&D has gone into creating a uniformly bright light channel. Unlike machined angel eyes, they remain mostly clear when turned off and emit light from each disturbance when turned on. A light barrier is incorporated to remove most of the unwanted brightness from the LED itself leaving just the disturbances illuminated.
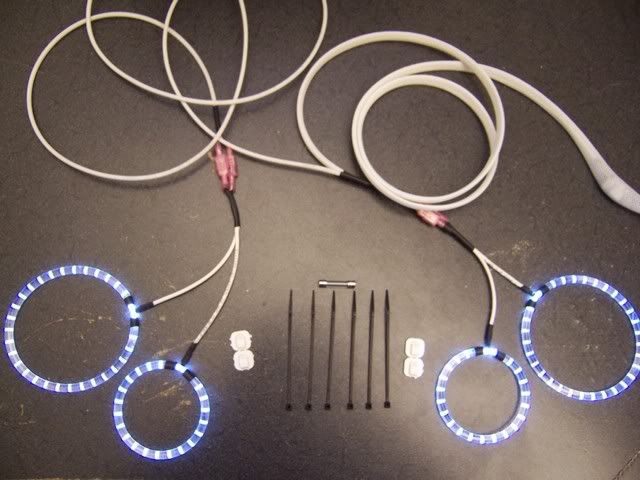
The wiring harness provided consists of high quality 20 AWG wire. The wires are individually protected by their own insulation, bundled by a 2nd insulation and protected by a braided wire loom. This ensures maximum pinch protection. All electrical connections with the exception of main power and ground hookups are quick disconnect and can be removed without tools. The power is hooked up to the corner lights via snap-in wire tap and ground is hooked up to a stock bolt.
I personally tested the LEDs under the worst possible conditions for any electronics, heat and percussion at the same time. The LEDs have been heat tested under 250F for 10 minutes and repeatedly banged against a hard surface with no damage sustained. These tested TOUGH! They are currently being road tested.
The acrylic should be treated as any jewel or fiber optic device should be treated. They are rugged and will not break if dropped from an altitude of 30 feet, but they will scratch if mistreated.
The goal which started this kit was to provide high quality angel eyes at a decent price. There is no reason to charge $200 a kit when most of the time and money goes towards R&D of the angel eyes.
<span style="font-size:14pt;line-height:100%">You will need:</span>
Durables:
standard ratchet
small ratchet or ratchet with adjustable handle
6" ratchet extension
Socket set 10mm, 12mm and 8mm
cross tip screw driver
flathead screw driver
pliers
dremmel or drill w/small bits
Scissors
heat gun or hair dryer
expendables:
glass cleaner
paper towels
silicone sealant
You can get all tools and expendable items from Walmart or your local auto parts store.
First before anything else, make sure everything that is supposed to be in the kit is present and make sure you have all of the necessary items to complete the installation.
<span style="font-size:14pt;line-height:100%">Remove corner lights, marker light bulbs and fogs:</span>
The objective of this part is to remove all electrical wires and lamps which interfere with removal of the bumper cover
See mrpsxplyr's DIY for more info http://www.rdtiburon.com/index.php?showtopic=4875
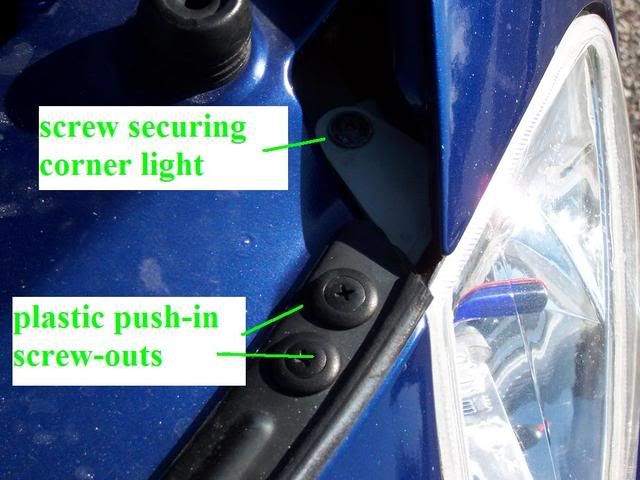
1. remove screw securing corner light to body
2. pop corner light out of place by prying on the tab, it will pop out straight forward
3. disconnect corner light wiring
4. disconnect marker light by twisting counter-clockwise on the back of the connector
5. disconnect fog lights
better pix needed
<span style="font-size:14pt;line-height:100%">Remove the bumper cover:</span>
The objective of this part is to remove the bumper cover and head lights. This is the most mechanical step of the entire process and should take you approximately 30 minutes max. You basically remove all pieces securing the bumper cover to the bumper and then pull the bumper off.
See Phorq's DIY for more info http://www.rdtiburon.com/index.php?showtopic=62
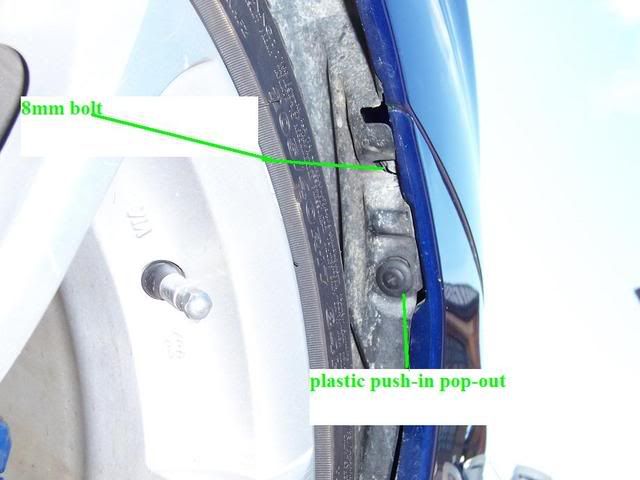
1. start by removing the plastic pop-in screw-outs on top of the bumper cover
2. remove the 2 plastic pop-in screw-outs from the edge of the bumper cover inside the fender well which secure the bumper cover to the fender
3. remove the 2 plastic pop-in screw-outs from the back side of the bumper cover which secure the bumper cover to the bumper
4. remove 2 12mm bolts which secure the bumper cover to the bumper
5. remove 2 8mm bolts which secure the bumper cover to the fender
6. remove 2 10mm nuts which secure the bumper cover to the fender behind where you removed the corner lamps.
7. have a friend help you remove the bumper to ensure no scratches occur and all electronic wires are clear.
8. remove 4 10mm bolts securing headlamps to chassis and remove headlamps
better pix needed
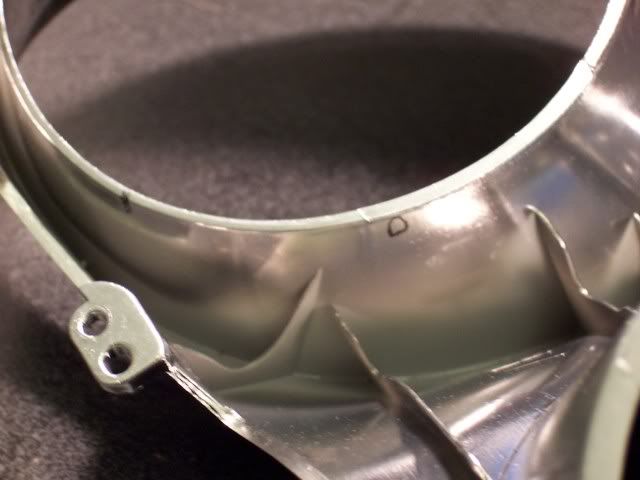
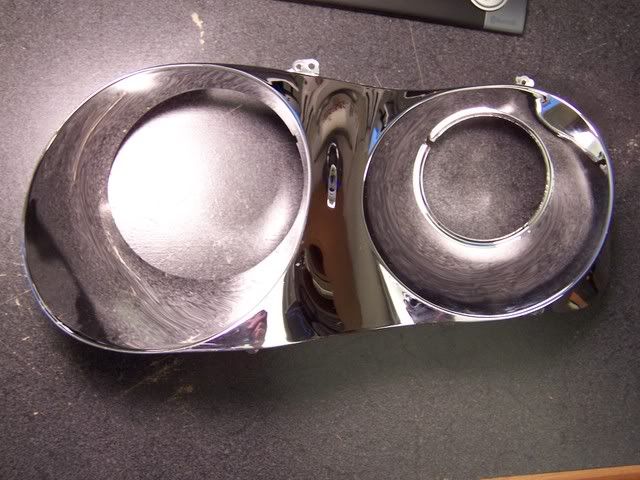
<span style="font-size:14pt;line-height:100%">Remove headlamp bezel from headlamp:</span>
The objective of this part is to remove the headlamp bezel from the headlamp. You basically heat the headlamp for 3 minutes to loosen the glue, then pry around the edges lightly until the glue releases it's hold. Then you use a phillips screwdriver to remove the screws which secure the bezel to the headlamp cover.
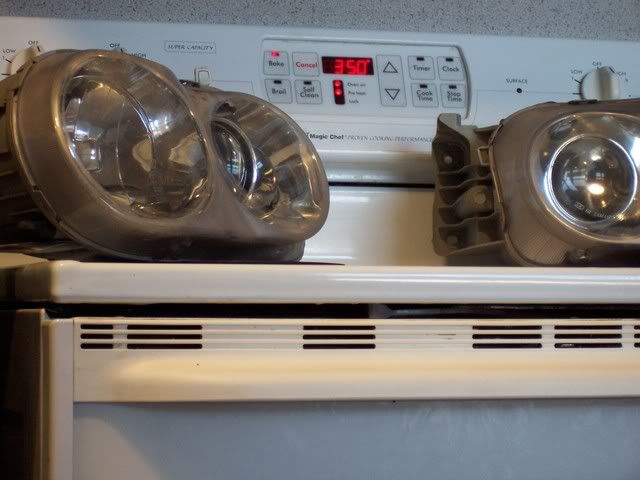
1. preheat oven to 350F
2. place headlamp on cookie sheet right side up and place in oven with door closed for 2 minutes
3. open oven door, flip headlamp up side down and close door for 1 minute
4. remove cookie sheet with headlamp from oven
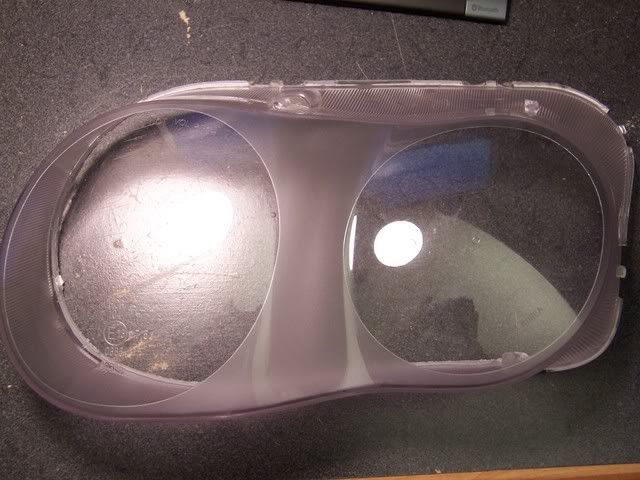
5. gently pry on tabs and work your way around to separate clear plastic from headlamp housing without bending housing
6. remove headlamp cover from housing.
7. remove 4 phillips screws from headlamp cover which secure bezel to headlamp cover
note: at this point you should perform any maintenance needed on the headlamps. None of this is required.
Make your headlamps brighter: http://www.rdtiburon.com/index.php?showtopic=26230
Remove headlamp vibration: http://www.rdtiburon.com/index.php?showtopic=26114&hl=
patreezy's Cleaning headlights with mcguires: http://www.rdtiburon.com/index.php?showtopic=11544
Tibby01's Easy headlamp adjustment: http://www.rdtiburon.com/index.php?showtopic=12963
<span style="font-size:14pt;line-height:100%">
Marking the mounts:</span>
The objective of this part is to mark the mounts evenly. You've probly heard the expression measure twice and cut once. This expression is important at this step because it would look bad if you mounted the low beam angel eyes of the two headlamps at different angles. Basically, compare the two to make sure everything is even.
The high beams will only fit in one way. The ovals for the high beams are slightly triangular. The mounting straps should be marked at the 1/2mm gaps and pull the high beam angel eyes tight against the bezel. The low beam should be marked at an opposing angle to the high beams and even on both headlamps.
1. Fit the high beam Halo acryllic into the bottom of the high beam bezel
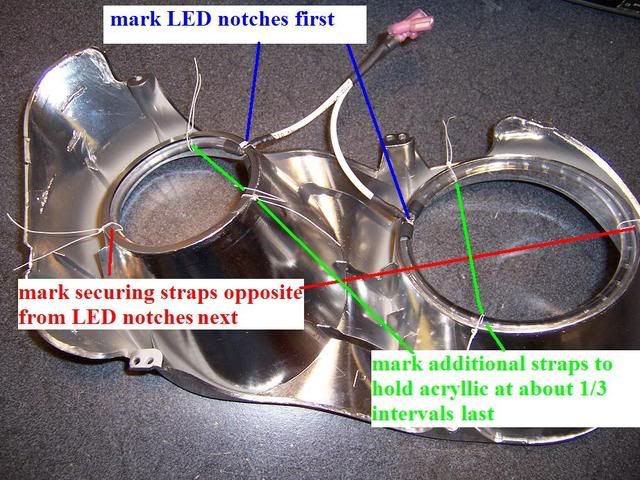
2. mark notch for LED with your marker.
3. opposite from LED mark, mark the 1st holding strap with your marker approximately 1mm from the edge of the bezel
4. at approximately 1/3 intervals from the 1st holding strap, mark the 2 additional holding straps approximately 1mm from the edge of the bezel
5. repeat for low beams ensuring LED is mounted at opposing angle
6. *important* Place angel eyes inside bezels, line up the LED marks with the area in which the LEDs will be placed and have someone else compare both headlamp bezels for equality before making any holes. 2 sets of eyes are better then 1.
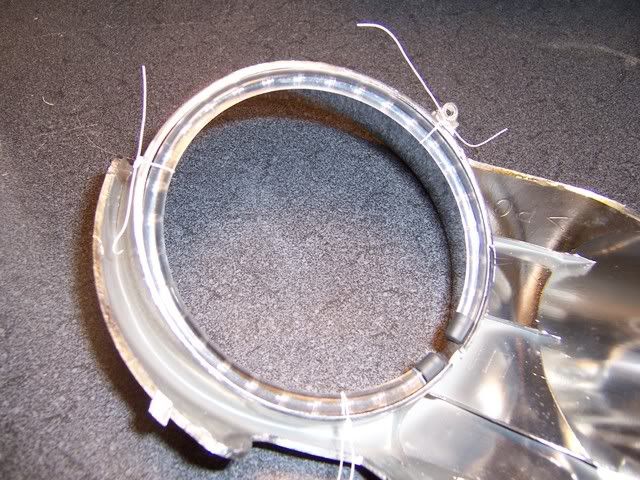
<span style="font-size:14pt;line-height:100%">Mounting the High/Low Halos eyes:</span>
The objective of this part is to mount the Halos into the headlamp bezels. Now that everything is marked off, it's pretty clear what has to happen. You'll need to use a dremmel to make 1mm or smaller hole for each of the mounting straps and a notch for the edge of the led lamp wiring. right where you marked them in the previous step. Then use your finger nail to clean up any rough edges. It is possible to use a drill if a dremmel is not available.You will then secure the halos and LED sets to the bezels and reattach the headlamp bezel to the housing.
1. make small holes for the mounting straps, less then 1mm diameter approximately 1mm from the edge of the bezel in the locations you marked in the previous step.
2. make a notch approximately 5mm wide and 5mm deep in the bezel at the location you marked in the previous step.
3. attach an LED set to the acryllic halos and verify fitments
4. use your finger nail to clean up the edges of the plastic bezel if needed.
5. use the 30 gauge straps to secure the angel eye to the bezel.
6. replace the housing into the clear plastic cover using the phillips screws you removed
7. cut the excess strap with a pair of scissors and discard.
8. secure wires to clear plastic cover using provided clips
Note: If using a drill you must heat up the drill bit to the point where it will melt plastic. Use a lighter or use the grills on top of your oven.
Note: if you put the LEDs into the halos after securing it, you may need to retighten the straps. Do not cut straps until you have secured the LED into the halo.

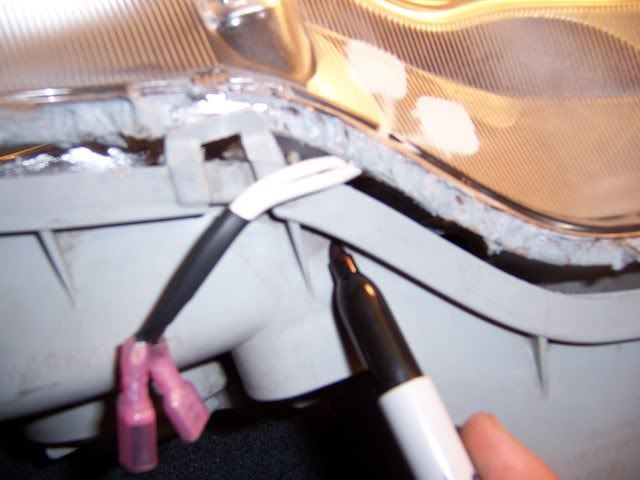
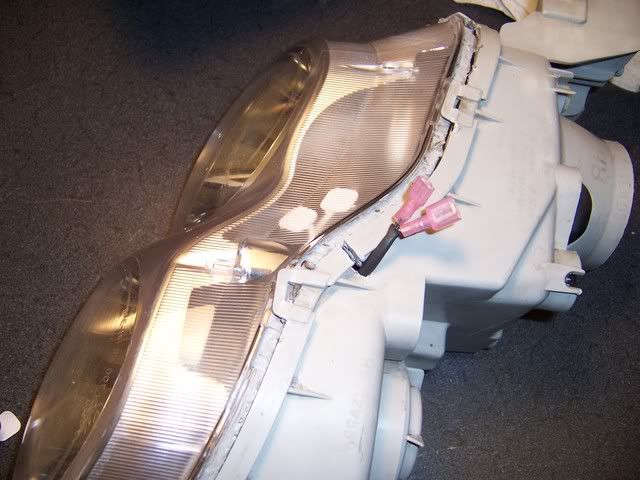
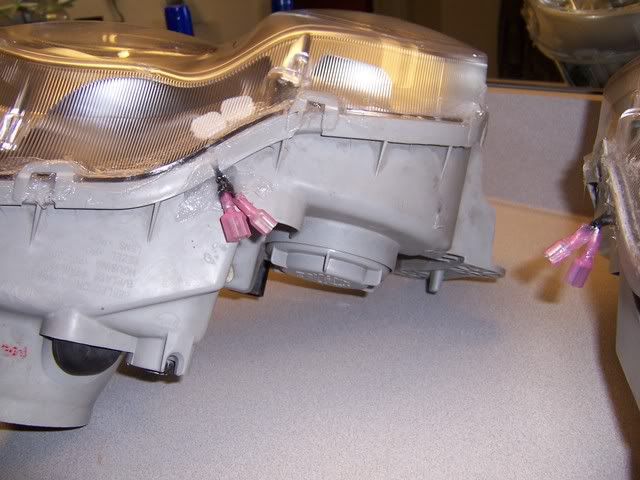
<span style="font-size:14pt;line-height:100%">Closing up the housing:</span>
The objective of this step is to reseal the headlamp housing. You'll need to make a notch at the top of the housing just large enough for the wiring to fit into the area behind the lip of the housing, heat up the glue, press the cover back onto the headlamp housing, and seal it up with silicone sealant to ensure extra protection.
1. make a notch approximately 5mm wide and 15mm deep into the top of the housing at the location which the LED wiring sticks out.
2. fit the LED wiring into the notch you just made
3. clean out the headlamp with paper towels and glass cleaner before you seal it.
4. use a hair dryer or a heat gun to heat the glue around the edge of the housing and on the clear plastic cover
5. press headlamp assembly together and ensure tabs meet up and lock in place.
6. Run a bead of silicone around the entire lamp for extra protection, and then seal off the Halos wiring notch.
7. Let headlamp sit for 1 hour before re-installing
*note: if using a drill, heat up the drill bit with a lighter or stove before drilling so that you do not crack the plastic housing.
<span style="font-size:14pt;line-height:100%">
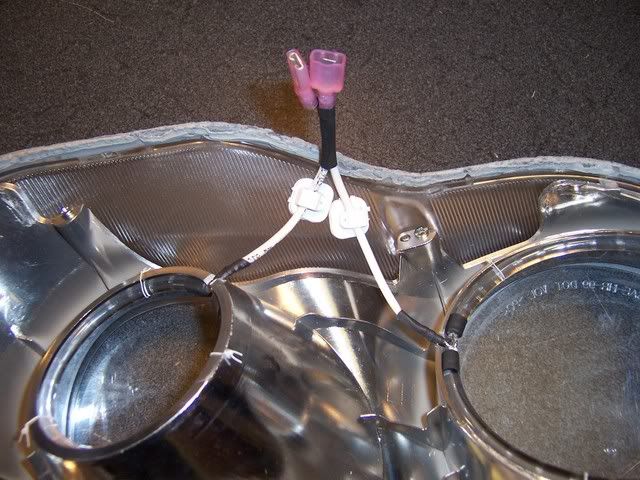
Hooking up the High/Low Halos:</span>
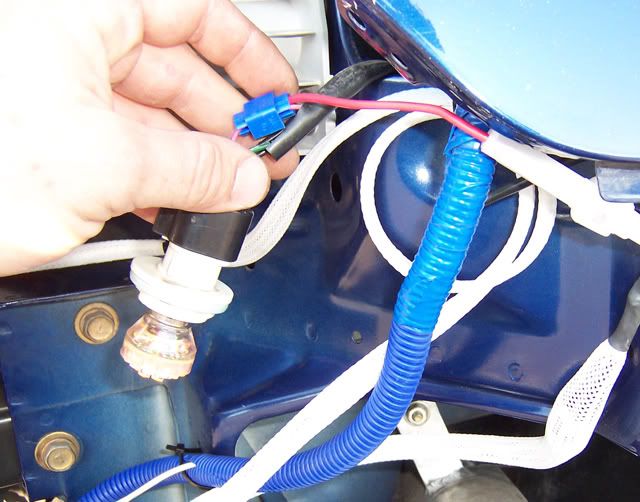
The objective of this step is to hook up the halos, replace the headlamps and finally the bumper. Start by hooking up power to the pink wire on your corner lights. Use the wiretap provided to make a good connection between the red wire from the fuse and the pink wire from the corner lights.
Connect up everything and then replace the headlamp using one of the bolts to connect the ring terminal on the black wire to ground. Finally, Secure the wiring harness in any way possible. Personally, I used a drill to make small holes in the rubber bumper (not the bumper cover), and then zip tied the wiring harness to the back side of the bumper and some available holes in the frame at about 1 foot intervals.
1. slide the blue wire tap's open end over the pink wire and the red wire into the wire tap
2. use a pair of pliers to crimp the wire tap onto the pink wire and the red wire.
3. Connect the quick disconnect power to the LEDs on the headlamp closest to the wire tap
4. select the closest headlamp bolt, slide the black wire ring terminal onto the bolt and secure the headlamp using that bolt
5. attach the other 3 headlamp bolts
6. Hook up the quick disconnect power to the LEDs on the 2nd headlamp.
7. replace 2nd headlamp
8. secure wiring anywhere possible using zip ties provided in kit.
*note: although throughout the rest of the car green/white means illumination +, for some reason it is the wire used for blinkers. Hyundai used the smaller pink wire instead.
More pix are needed
<span style="font-size:14pt;line-height:100%">Finishing up:</span>
See the sections labeled Remove the bumper cover and Remove corner lights, marker light bulbs and fogs for reassembly. Installation is reverse of removal.
at this point you may need to realign your headlamps as they have been removed from the vehicle and remounted. Use Omega's DIY to realign your headlamps if needed http://www.rdtiburon.com/index.php?showtopic=5892
I hope everything was stated clearly and in a manner that was easily understandable. This will be updated as questions and concerns arise and as more pictures become available
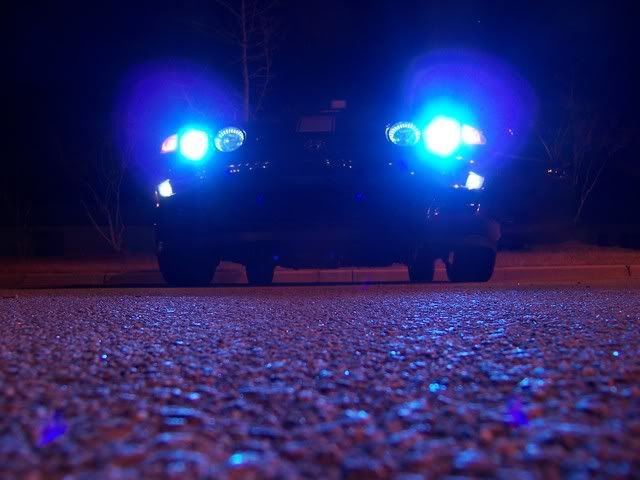
Enjoy your new Angel Eyes!
See Joshuwa's DIY for a different method of installing halos http://www.rdtiburon.com/index.php?showtopic=333
This DIY will cover installation of DTN's High/Low Halos. The same principals can be applied to any set of after market DIY install headlamp halos. I've included links to other DIYs, pictures, and alot of other additional information to help you out.
<span style="font-size:14pt;line-height:100%">
Introduction: </span>
Headlamp halos, also known as Angel eyes, or Corona Rings, are becoming more and more popular these days. They range in price from $100-250 per set. They can be obtained through most after market parts suppliers. Newer model BMW vehicles are equipped with angel eyes.
Here is a basic breakdown of Headlamp halos. They consist of an optic channel which is ridged with disturbances, LEDs or a light source of some kind, and a wiring harness to supply power.
If you have any questions, just ask! Each part of the DIY has been broken down into an objective and individual steps. This way you will know exactaly what you're doing and why you're doing it. The pictures still need some work.
<span style="font-size:14pt;line-height:100%">DTN's High/Low Halos:
</span>These Halos are Laser Etched and much R&D has gone into creating a uniformly bright light channel. Unlike machined angel eyes, they remain mostly clear when turned off and emit light from each disturbance when turned on. A light barrier is incorporated to remove most of the unwanted brightness from the LED itself leaving just the disturbances illuminated.
The wiring harness provided consists of high quality 20 AWG wire. The wires are individually protected by their own insulation, bundled by a 2nd insulation and protected by a braided wire loom. This ensures maximum pinch protection. All electrical connections with the exception of main power and ground hookups are quick disconnect and can be removed without tools. The power is hooked up to the corner lights via snap-in wire tap and ground is hooked up to a stock bolt.
I personally tested the LEDs under the worst possible conditions for any electronics, heat and percussion at the same time. The LEDs have been heat tested under 250F for 10 minutes and repeatedly banged against a hard surface with no damage sustained. These tested TOUGH! They are currently being road tested.
The acrylic should be treated as any jewel or fiber optic device should be treated. They are rugged and will not break if dropped from an altitude of 30 feet, but they will scratch if mistreated.
The goal which started this kit was to provide high quality angel eyes at a decent price. There is no reason to charge $200 a kit when most of the time and money goes towards R&D of the angel eyes.
<span style="font-size:14pt;line-height:100%">You will need:</span>
Durables:
standard ratchet
small ratchet or ratchet with adjustable handle
6" ratchet extension
Socket set 10mm, 12mm and 8mm
cross tip screw driver
flathead screw driver
pliers
dremmel or drill w/small bits
Scissors
heat gun or hair dryer
expendables:
glass cleaner
paper towels
silicone sealant
You can get all tools and expendable items from Walmart or your local auto parts store.
First before anything else, make sure everything that is supposed to be in the kit is present and make sure you have all of the necessary items to complete the installation.
<span style="font-size:14pt;line-height:100%">Remove corner lights, marker light bulbs and fogs:</span>
The objective of this part is to remove all electrical wires and lamps which interfere with removal of the bumper cover
See mrpsxplyr's DIY for more info http://www.rdtiburon.com/index.php?showtopic=4875
1. remove screw securing corner light to body
2. pop corner light out of place by prying on the tab, it will pop out straight forward
3. disconnect corner light wiring
4. disconnect marker light by twisting counter-clockwise on the back of the connector
5. disconnect fog lights
better pix needed
<span style="font-size:14pt;line-height:100%">Remove the bumper cover:</span>
The objective of this part is to remove the bumper cover and head lights. This is the most mechanical step of the entire process and should take you approximately 30 minutes max. You basically remove all pieces securing the bumper cover to the bumper and then pull the bumper off.
See Phorq's DIY for more info http://www.rdtiburon.com/index.php?showtopic=62
1. start by removing the plastic pop-in screw-outs on top of the bumper cover
2. remove the 2 plastic pop-in screw-outs from the edge of the bumper cover inside the fender well which secure the bumper cover to the fender
3. remove the 2 plastic pop-in screw-outs from the back side of the bumper cover which secure the bumper cover to the bumper
4. remove 2 12mm bolts which secure the bumper cover to the bumper
5. remove 2 8mm bolts which secure the bumper cover to the fender
6. remove 2 10mm nuts which secure the bumper cover to the fender behind where you removed the corner lamps.
7. have a friend help you remove the bumper to ensure no scratches occur and all electronic wires are clear.
8. remove 4 10mm bolts securing headlamps to chassis and remove headlamps
better pix needed
<span style="font-size:14pt;line-height:100%">Remove headlamp bezel from headlamp:</span>
The objective of this part is to remove the headlamp bezel from the headlamp. You basically heat the headlamp for 3 minutes to loosen the glue, then pry around the edges lightly until the glue releases it's hold. Then you use a phillips screwdriver to remove the screws which secure the bezel to the headlamp cover.
1. preheat oven to 350F
2. place headlamp on cookie sheet right side up and place in oven with door closed for 2 minutes
3. open oven door, flip headlamp up side down and close door for 1 minute
4. remove cookie sheet with headlamp from oven
5. gently pry on tabs and work your way around to separate clear plastic from headlamp housing without bending housing
6. remove headlamp cover from housing.
7. remove 4 phillips screws from headlamp cover which secure bezel to headlamp cover
note: at this point you should perform any maintenance needed on the headlamps. None of this is required.
Make your headlamps brighter: http://www.rdtiburon.com/index.php?showtopic=26230
Remove headlamp vibration: http://www.rdtiburon.com/index.php?showtopic=26114&hl=
patreezy's Cleaning headlights with mcguires: http://www.rdtiburon.com/index.php?showtopic=11544
Tibby01's Easy headlamp adjustment: http://www.rdtiburon.com/index.php?showtopic=12963
<span style="font-size:14pt;line-height:100%">
Marking the mounts:</span>
The objective of this part is to mark the mounts evenly. You've probly heard the expression measure twice and cut once. This expression is important at this step because it would look bad if you mounted the low beam angel eyes of the two headlamps at different angles. Basically, compare the two to make sure everything is even.
The high beams will only fit in one way. The ovals for the high beams are slightly triangular. The mounting straps should be marked at the 1/2mm gaps and pull the high beam angel eyes tight against the bezel. The low beam should be marked at an opposing angle to the high beams and even on both headlamps.
1. Fit the high beam Halo acryllic into the bottom of the high beam bezel
2. mark notch for LED with your marker.
3. opposite from LED mark, mark the 1st holding strap with your marker approximately 1mm from the edge of the bezel
4. at approximately 1/3 intervals from the 1st holding strap, mark the 2 additional holding straps approximately 1mm from the edge of the bezel
5. repeat for low beams ensuring LED is mounted at opposing angle
6. *important* Place angel eyes inside bezels, line up the LED marks with the area in which the LEDs will be placed and have someone else compare both headlamp bezels for equality before making any holes. 2 sets of eyes are better then 1.
<span style="font-size:14pt;line-height:100%">Mounting the High/Low Halos eyes:</span>
The objective of this part is to mount the Halos into the headlamp bezels. Now that everything is marked off, it's pretty clear what has to happen. You'll need to use a dremmel to make 1mm or smaller hole for each of the mounting straps and a notch for the edge of the led lamp wiring. right where you marked them in the previous step. Then use your finger nail to clean up any rough edges. It is possible to use a drill if a dremmel is not available.You will then secure the halos and LED sets to the bezels and reattach the headlamp bezel to the housing.
1. make small holes for the mounting straps, less then 1mm diameter approximately 1mm from the edge of the bezel in the locations you marked in the previous step.
2. make a notch approximately 5mm wide and 5mm deep in the bezel at the location you marked in the previous step.
3. attach an LED set to the acryllic halos and verify fitments
4. use your finger nail to clean up the edges of the plastic bezel if needed.
5. use the 30 gauge straps to secure the angel eye to the bezel.
6. replace the housing into the clear plastic cover using the phillips screws you removed
7. cut the excess strap with a pair of scissors and discard.
8. secure wires to clear plastic cover using provided clips
Note: If using a drill you must heat up the drill bit to the point where it will melt plastic. Use a lighter or use the grills on top of your oven.
Note: if you put the LEDs into the halos after securing it, you may need to retighten the straps. Do not cut straps until you have secured the LED into the halo.
<span style="font-size:14pt;line-height:100%">Closing up the housing:</span>
The objective of this step is to reseal the headlamp housing. You'll need to make a notch at the top of the housing just large enough for the wiring to fit into the area behind the lip of the housing, heat up the glue, press the cover back onto the headlamp housing, and seal it up with silicone sealant to ensure extra protection.
1. make a notch approximately 5mm wide and 15mm deep into the top of the housing at the location which the LED wiring sticks out.
2. fit the LED wiring into the notch you just made
3. clean out the headlamp with paper towels and glass cleaner before you seal it.
4. use a hair dryer or a heat gun to heat the glue around the edge of the housing and on the clear plastic cover
5. press headlamp assembly together and ensure tabs meet up and lock in place.
6. Run a bead of silicone around the entire lamp for extra protection, and then seal off the Halos wiring notch.
7. Let headlamp sit for 1 hour before re-installing
*note: if using a drill, heat up the drill bit with a lighter or stove before drilling so that you do not crack the plastic housing.
<span style="font-size:14pt;line-height:100%">
Hooking up the High/Low Halos:</span>
The objective of this step is to hook up the halos, replace the headlamps and finally the bumper. Start by hooking up power to the pink wire on your corner lights. Use the wiretap provided to make a good connection between the red wire from the fuse and the pink wire from the corner lights.
Connect up everything and then replace the headlamp using one of the bolts to connect the ring terminal on the black wire to ground. Finally, Secure the wiring harness in any way possible. Personally, I used a drill to make small holes in the rubber bumper (not the bumper cover), and then zip tied the wiring harness to the back side of the bumper and some available holes in the frame at about 1 foot intervals.
1. slide the blue wire tap's open end over the pink wire and the red wire into the wire tap
2. use a pair of pliers to crimp the wire tap onto the pink wire and the red wire.
3. Connect the quick disconnect power to the LEDs on the headlamp closest to the wire tap
4. select the closest headlamp bolt, slide the black wire ring terminal onto the bolt and secure the headlamp using that bolt
5. attach the other 3 headlamp bolts
6. Hook up the quick disconnect power to the LEDs on the 2nd headlamp.
7. replace 2nd headlamp
8. secure wiring anywhere possible using zip ties provided in kit.
*note: although throughout the rest of the car green/white means illumination +, for some reason it is the wire used for blinkers. Hyundai used the smaller pink wire instead.
More pix are needed
<span style="font-size:14pt;line-height:100%">Finishing up:</span>
See the sections labeled Remove the bumper cover and Remove corner lights, marker light bulbs and fogs for reassembly. Installation is reverse of removal.
at this point you may need to realign your headlamps as they have been removed from the vehicle and remounted. Use Omega's DIY to realign your headlamps if needed http://www.rdtiburon.com/index.php?showtopic=5892
I hope everything was stated clearly and in a manner that was easily understandable. This will be updated as questions and concerns arise and as more pictures become available
Enjoy your new Angel Eyes!
See Joshuwa's DIY for a different method of installing halos http://www.rdtiburon.com/index.php?showtopic=333


Senior Member
Joined: Sep 2007
Posts: 612
Likes: 0
From: Boca Raton, Florida
Nice DIY I used my friends heat gun when i replaced my headlight lense, soo you gonna make a few sets of those to sell to us (the halos)? How are they standing up to you HIDs too? And what did u use to seal them back up at the end, hot glue? Im the best at hot glueing things.
Thread Starter
Moderator
Joined: Feb 2009
Posts: 11,732
Likes: 5
From: Leesville, Louisiana
Vehicle: 2001 Hyundai Tiburon
^^ Silicone sealant is the best way to seal up anything. The glue will really seal it back up on it's own. Use silicone sealant for a 2nd layer of protection.
<div class='quotetop'>QUOTE (Blank_00Tib @ Jan 30 2008, 11:04 PM) <{POST_SNAPBACK}></div><div class='quotemain'>So the LED's don't won' be harmed going in the oven in the last step to closing them back up i'm assuming. Nice DIY.</div>
No. They wont if you follow the times correctly. Make sure you do not leave them in for too long. 2 minutes and only 2 minutes. I tailored this DIY for those with a limited ammount of tools. Personally, I used a heat gun to put mine back together. The inside of the bezel will not get to 300 degrees from a short time in the oven.

Senior Member
Joined: Aug 2008
Posts: 336
Likes: 0
Vehicle: 2001/Hyundai/Tiburon
where do you get the angel eye rings??? are they a standard size or is there a specific size for the rd tib??
ive been lookin at gettin these done for a while now but have no idea where to go
ive been lookin at gettin these done for a while now but have no idea where to go

Senior Member
Joined: Apr 2007
Posts: 358
Likes: 0
From: Plant City, Florida
^^ DTN has been making his own kind so just ask him(person who wrote the DIY).
And DTN for the quick wiretap clamps that you used to splice into the corner lights constant power source where did you get those I have been trying to find some smaller ones for my passenger side since I broke mine and have been unable to locate any. Radio shack didnt have them and neither did auto zone.
And DTN for the quick wiretap clamps that you used to splice into the corner lights constant power source where did you get those I have been trying to find some smaller ones for my passenger side since I broke mine and have been unable to locate any. Radio shack didnt have them and neither did auto zone.
Thread Starter
Moderator
Joined: Feb 2009
Posts: 11,732
Likes: 5
From: Leesville, Louisiana
Vehicle: 2001 Hyundai Tiburon
The angel eyes are a speciffic size. I had to play around with the high beams quite a bit to get the sizing just right. IT's an oval, but, at the same time it's triangluar. I am not selling them just yet. About a month from now they'll be on sale for around $100 shipped. Currently, I'm selling just one set http://www.rdtiburon.com/index.php?showtopic=26461&hl= for the price of $40 and some clean pictures of the install process
They will launch with 2 models available, "Starburst" as shown above, aproximately 0.1" double layered spaced out laser etching, and "glowing ring" currently in R&D, will be 0.004" lines spaced aproximately .003" apart. There will initially be the choice of Blue and White. Requests will expand the selection.
They will launch with 2 models available, "Starburst" as shown above, aproximately 0.1" double layered spaced out laser etching, and "glowing ring" currently in R&D, will be 0.004" lines spaced aproximately .003" apart. There will initially be the choice of Blue and White. Requests will expand the selection.