
Diy: Header Install


Thread Starter
Senior Member
Joined: May 2008
Posts: 594
Likes: 0
From: Winchester, VA
Vehicle: 2001 Tiburon
Ok, this is my first DIY guys but I have lots of pictures and I plan on making it as fool-proof as possible.
First we need to know what were talking about here. I am installing the OBX 4-2-1 Headers you can get off e-Bay for about $100. Some of the other headers may be a little different but should be pretty much the same as for the install. The eBay headers <span style="color:#FF0000">ARE NOT A BOLT ON PART, WELDING WILL BE REQUIRED.</span>
Second you need a list of parts, tools and required beer.
As far as parts you will want to have the new headers and three new flange gaskets. One for in between the headers and the cylinder head, one for in between the downpipe and headers, and one more for in between the downpipe and your exhaust/2nd cat.


Flange gaskets are not shown in the above pictures
Tools needed:
Metric Socket Set
Breaker Bar
22 MM open faced wrench
14 MM open faced wrench
Rubber Mallet
Flathead Screwdriver
Pliers
Cooler or Fridge for beer
If your headers are not bolt on like mine you will also need:
Grinder or Chop Saw with a Cut Off Blade and a Welder that can weld exhaust on low wire heat(My brother tried to weld it with an ARC Welder and melted through the pipe so I am taking it to someone today to do the welding for me)
Or you can just make some marks and take your downpipe to an exhaust shop and have them do the cutting and welding for a cheap price. Maybe $50
Beer Required:
12 Pack of Yuengling or 6 scotchs on the rocks if your a sophisticated full blown drunk mechanic
Okay now for the steps to taking off your old exhaust manifold and installing your new headers. Follow my steps and you should have no problems and everything will be done in the right order.
1. Jack the car up and put it on jackstands, the higher you can get your car the better. If you know someone with a lift then make them your best buddy...

2. Car is jacked up and the engine is cool now so we can start to disassemble the downpipe.
Grab your 19mm socket and breaker bar and loosen the four bolts (two at each flange) holding the downpipe in place. Notice a rubber fitting holding the exhaust in place by a metal hanger, DO NOT TOUCH THIS YET. Here is a pics of the bolts
Back Flange
Front Flange (bolts already out)
Here is a pic showing the breaker bar attached
3. Now your down pipe is loose but still held on by a rubber piece and a metal bracket
 (notice the rubber piece behind the exhaust/downpipe in this picture)
Before removing these disconnect your rear O2 bung located after the flex pipe.
 Just follow the line up and find the plastic connectors and disconnect them.
4. Grab your 22mm open faced wrench and wrench off the rear O2 bung shown. You may need to hit the wrench with a rubber mallet. If the bolt still won't go you can heat it with a butane/propane torch. If this doesn't go well for you but you do have the plug disconnected you can wait to pull the O2 bung out until later. Just make sure it is unplugged and proceed to the next step, I will remind you later when it's time to try this again.
5. Using your socket wrench or breaker bar and I believe it was a 19mm maybe 17mm socket loosen the clamp that holds the downpipe at the front and slide it off the bracket.
Your downpipe should now be held on only by the 4 studs and a rubber piece. No rocket science needed here just pull the rubber piece off and pull out the downpipe.
6. Now you have your downpipe off and set aside with your O2 bung which may or may not be pulled yet. <span style="color:#FF0000">DO NOT THROW AWAY YOUR OLD DOWN PIPE OR O2 BUNG!!!</span> It's time to go for the exhaust manifold. First take off the heat shield. It is held on by three bolts 12mm or 14mm. I do not have a picture because I took mine off a while ago. Next find the upper O2 bung located on the top of the exhaust manifold and follow the line to the plug and disconnect them. You can try and wrench the bung off with a 22mm open-faced wrench but it's easier if you wait on this.
7. Now you need to make room to get the stock mani out and to put the new headers in. This means you will need to drain and remove your radiator and fans. I will not provide directions/instructions on this. It's two bolts(on the core support), two screws (one on each hose), two fan plugs and a drain plug. Remove the radiator with the fans attached.
8. We still need some more room so loosen the four bolts holding your power steering pump and then push it to the left so its no longer blocking the exhaust manifold flange.

9. Now you have complete access to your exhaust manifold so lets take it off. Get you socket wrench and a 14mm socket, and start to loosen the 9 nuts that hold the mani on. Notice one of my nine is shiny, these are the 9 nuts you need to take off. After you take the nuts off you should be able to slide the manifold off of the studs and remove it from the vehicle.
10. Once the manifold has been removed you will have access to the bracket that held your downpipe in place. You will not be able to use this for the new setup so take it off and put the bolts back in place.
11. Now that you have your stock exhaust manifold taken off the car and your stock downpipe take a chance to line them up next to your new parts and examine the differences. Notice the placements of the O2 bungs in the old and new setup. If your downpipes are majorly off like mine are in this picture then you will need a pipe to go from your downpipe to your exhaust/2nd cat or you can do what I did which is just toss the new downpipe and cut the new downpipe to the correct length.
12. To correct the downpipe size make your marks as to flange location (horizontal, slanted, whatever direction to make sure you can line up the bolts) and cutoff length. Now cut out the 5 or 6 inches you have marked that you don't need. You should use a grinder or chop saw with the right blade and hack out the extra length.
13. Weld the two parts back together. It is very important that the flange is welded on with the bolt holes at the right angle so that the flange will line up and bolt up. Notice the leftover piece to the upper right, that is the 5 or 6 inches I cutoff.
14. Lets get back to the O2 bungs. Make sure you have two bung holes! If you have not removed the 02 bung from the downpipe and you do not plan on reusing the stock downpipe then lets remove that now. Lay the downpipe on the ground and wrench loose the bung with a 22mm open faced wrench. If necessary give the wrench a few hard taps with a rubber mallet. If it still doesn't budge then put some heat on it with a torch. Now lets take off the O2 bung on the exhaust manifold. Follow the same procedure as above. Here is a picture of the best way to place the manifold so that you don't hurt yourself.
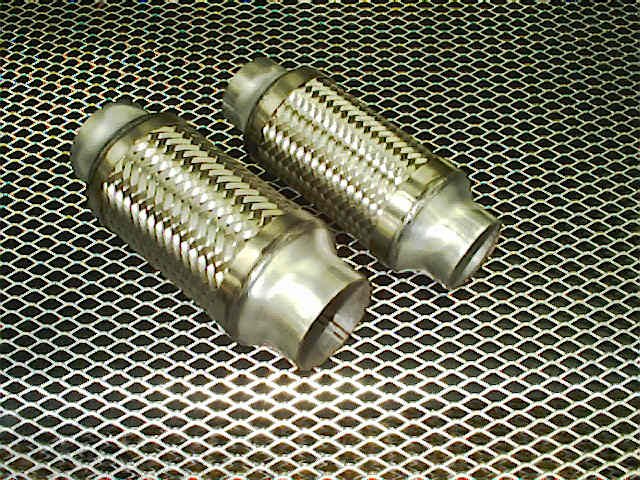
When you are done you should have two O2 bungs like this The longer one is for the rear and the shorter one(downpipe) is for the front(manifold)
15. Now fit the O2 bungs into the properly associated bung holes on the new headers and new downpipe (unless you are using the stock downpipe, then leave it in the stocker).
16. Now your new headers and old or new downpipe is ready to be installed. Put the new headers flange gasket in first. If you have gloves you may want to wear them so that you don't get oil and sweat all over the headers. Now install the headers so that it rest on the studs coming out the cylinder head. Once they are in place line up your downpipe and check to make sure everything lines up. Once you are sure everything will line up you can start putting bolts back on. Start with the bottom row on your headers and bolt all nine in a zig zag like pattern. It is best to use a torque wrench and torque these to spec but I didn't know the torque spec so I did not.
17. Now your ready to install your downpipe. Put the flange gaskets on the studs and line up the downpipe. Reattach the rubber piece for the exhaust hanger. Now put the nuts on the bolt studs and tighten them. Once everything is tight plug your rear O2 bung in.
18. Plug in your upper O2 bung if you have not yet plugged it in yet. Wipe down your headers really good with a sweat and oil free t shirt or rag.
19. Reinstall your power steering pump.
20. Reinstall your radiator and fans...hopefully you still have room.
21. Start your car up and see how you did. Black smoke at first is expected as your headers heat up and the oils on them will burn off and discolor them some.
22. Drink any and all remaining beer.
After installing these I do notice a buzz but it's as bad as most headers I have heard. I think it sounds a little more beastly but it's not too loud going down the road. I don't have a camera with audio recording but if I can ever borrow one from someone I will upload some clips. Here is the installed pics:


First we need to know what were talking about here. I am installing the OBX 4-2-1 Headers you can get off e-Bay for about $100. Some of the other headers may be a little different but should be pretty much the same as for the install. The eBay headers <span style="color:#FF0000">ARE NOT A BOLT ON PART, WELDING WILL BE REQUIRED.</span>
Second you need a list of parts, tools and required beer.
As far as parts you will want to have the new headers and three new flange gaskets. One for in between the headers and the cylinder head, one for in between the downpipe and headers, and one more for in between the downpipe and your exhaust/2nd cat.
Flange gaskets are not shown in the above pictures
Tools needed:
Metric Socket Set
Breaker Bar
22 MM open faced wrench
14 MM open faced wrench
Rubber Mallet
Flathead Screwdriver
Pliers
Cooler or Fridge for beer
If your headers are not bolt on like mine you will also need:
Grinder or Chop Saw with a Cut Off Blade and a Welder that can weld exhaust on low wire heat(My brother tried to weld it with an ARC Welder and melted through the pipe so I am taking it to someone today to do the welding for me)
Or you can just make some marks and take your downpipe to an exhaust shop and have them do the cutting and welding for a cheap price. Maybe $50
Beer Required:
12 Pack of Yuengling or 6 scotchs on the rocks if your a sophisticated full blown drunk mechanic
Okay now for the steps to taking off your old exhaust manifold and installing your new headers. Follow my steps and you should have no problems and everything will be done in the right order.
1. Jack the car up and put it on jackstands, the higher you can get your car the better. If you know someone with a lift then make them your best buddy...
2. Car is jacked up and the engine is cool now so we can start to disassemble the downpipe.
Grab your 19mm socket and breaker bar and loosen the four bolts (two at each flange) holding the downpipe in place. Notice a rubber fitting holding the exhaust in place by a metal hanger, DO NOT TOUCH THIS YET. Here is a pics of the bolts
Back Flange
Front Flange (bolts already out)
Here is a pic showing the breaker bar attached
3. Now your down pipe is loose but still held on by a rubber piece and a metal bracket
(notice the rubber piece behind the exhaust/downpipe in this picture)Before removing these disconnect your rear O2 bung located after the flex pipe.
Just follow the line up and find the plastic connectors and disconnect them. 4. Grab your 22mm open faced wrench and wrench off the rear O2 bung shown. You may need to hit the wrench with a rubber mallet. If the bolt still won't go you can heat it with a butane/propane torch.
If this doesn't go well for you but you do have the plug disconnected you can wait to pull the O2 bung out until later. Just make sure it is unplugged and proceed to the next step, I will remind you later when it's time to try this again.5. Using your socket wrench or breaker bar and I believe it was a 19mm maybe 17mm socket loosen the clamp that holds the downpipe at the front and slide it off the bracket.
Your downpipe should now be held on only by the 4 studs and a rubber piece. No rocket science needed here just pull the rubber piece off and pull out the downpipe.
6. Now you have your downpipe off and set aside with your O2 bung which may or may not be pulled yet. <span style="color:#FF0000">DO NOT THROW AWAY YOUR OLD DOWN PIPE OR O2 BUNG!!!</span> It's time to go for the exhaust manifold. First take off the heat shield. It is held on by three bolts 12mm or 14mm. I do not have a picture because I took mine off a while ago. Next find the upper O2 bung located on the top of the exhaust manifold and follow the line to the plug and disconnect them.
You can try and wrench the bung off with a 22mm open-faced wrench but it's easier if you wait on this.7. Now you need to make room to get the stock mani out and to put the new headers in. This means you will need to drain and remove your radiator and fans. I will not provide directions/instructions on this. It's two bolts(on the core support), two screws (one on each hose), two fan plugs and a drain plug. Remove the radiator with the fans attached.
8. We still need some more room so loosen the four bolts holding your power steering pump and then push it to the left so its no longer blocking the exhaust manifold flange.
9. Now you have complete access to your exhaust manifold so lets take it off. Get you socket wrench and a 14mm socket, and start to loosen the 9 nuts that hold the mani on.
Notice one of my nine is shiny, these are the 9 nuts you need to take off. After you take the nuts off you should be able to slide the manifold off of the studs and remove it from the vehicle. 10. Once the manifold has been removed you will have access to the bracket that held your downpipe in place. You will not be able to use this for the new setup so take it off and put the bolts back in place.
11. Now that you have your stock exhaust manifold taken off the car and your stock downpipe take a chance to line them up next to your new parts and examine the differences. Notice the placements of the O2 bungs in the old and new setup. If your downpipes are majorly off like mine are in this picture
then you will need a pipe to go from your downpipe to your exhaust/2nd cat or you can do what I did which is just toss the new downpipe and cut the new downpipe to the correct length. 12. To correct the downpipe size make your marks as to flange location (horizontal, slanted, whatever direction to make sure you can line up the bolts) and cutoff length. Now cut out the 5 or 6 inches you have marked that you don't need. You should use a grinder or chop saw with the right blade and hack out the extra length.
13. Weld the two parts back together. It is very important that the flange is welded on with the bolt holes at the right angle so that the flange will line up and bolt up.
Notice the leftover piece to the upper right, that is the 5 or 6 inches I cutoff.14. Lets get back to the O2 bungs. Make sure you have two bung holes! If you have not removed the 02 bung from the downpipe and you do not plan on reusing the stock downpipe then lets remove that now. Lay the downpipe on the ground and wrench loose the bung with a 22mm open faced wrench. If necessary give the wrench a few hard taps with a rubber mallet. If it still doesn't budge then put some heat on it with a torch. Now lets take off the O2 bung on the exhaust manifold. Follow the same procedure as above. Here is a picture of the best way to place the manifold so that you don't hurt yourself.
When you are done you should have two O2 bungs like this
The longer one is for the rear and the shorter one(downpipe) is for the front(manifold)15. Now fit the O2 bungs into the properly associated bung holes on the new headers and new downpipe (unless you are using the stock downpipe, then leave it in the stocker).
16. Now your new headers and old or new downpipe is ready to be installed. Put the new headers flange gasket in first. If you have gloves you may want to wear them so that you don't get oil and sweat all over the headers. Now install the headers so that it rest on the studs coming out the cylinder head. Once they are in place line up your downpipe and check to make sure everything lines up. Once you are sure everything will line up you can start putting bolts back on. Start with the bottom row on your headers and bolt all nine in a zig zag like pattern. It is best to use a torque wrench and torque these to spec but I didn't know the torque spec so I did not.
17. Now your ready to install your downpipe. Put the flange gaskets on the studs and line up the downpipe. Reattach the rubber piece for the exhaust hanger. Now put the nuts on the bolt studs and tighten them. Once everything is tight plug your rear O2 bung in.
18. Plug in your upper O2 bung if you have not yet plugged it in yet. Wipe down your headers really good with a sweat and oil free t shirt or rag.
19. Reinstall your power steering pump.
20. Reinstall your radiator and fans...hopefully you still have room.
21. Start your car up and see how you did. Black smoke at first is expected as your headers heat up and the oils on them will burn off and discolor them some.
22. Drink any and all remaining beer.
After installing these I do notice a buzz but it's as bad as most headers I have heard. I think it sounds a little more beastly but it's not too loud going down the road. I don't have a camera with audio recording but if I can ever borrow one from someone I will upload some clips. Here is the installed pics:

Member
Joined: Sep 2007
Posts: 54
Likes: 0
Vehicle: 2000/Hyundai/Tiburon
I wish I had this when i put my header on, but it took me about 3 to 4 hours and driving my blood pressure out the roof. I felt like chunking the thing thru the windshield and just walking away. of course it would have been easier if I had all the tools I needed to do it with but sometimes you gotta work with that ya got.


Senior Member

Joined: Jul 2004
Posts: 5,155
Likes: 0
From: Eau Claire, WI
Vehicle: 97 Tib
"Down pipe" = FLEX pipe
Also, if you get headers that have the o2 sensors in those locations, you should really modify it. The 1st o2 sensor should not go in a runner, it should go somewhere after the collector. I would suggest blocking off the o2 bung in the header, putting the 1st o2 sensor in the flex pipe, and putting the 2nd o2 somewhere after the cat (the cat should come right after the flex pipe). Note that this may require you to lengthen the wires.
Also, if you get headers that have the o2 sensors in those locations, you should really modify it. The 1st o2 sensor should not go in a runner, it should go somewhere after the collector. I would suggest blocking off the o2 bung in the header, putting the 1st o2 sensor in the flex pipe, and putting the 2nd o2 somewhere after the cat (the cat should come right after the flex pipe). Note that this may require you to lengthen the wires.


Thread Starter
Senior Member
Joined: May 2008
Posts: 594
Likes: 0
From: Winchester, VA
Vehicle: 2001 Tiburon
^^^^read the damn post man or at least look at the pictures??? Do some research on the header you intend on installing because this post is only for OBX headers sold on chEapBAY. The KFX headers are directly bolt-up and will require no welding or cutting of the stock exhaust system.

Senior Member
Joined: Mar 2009
Posts: 1,014
Likes: 0
From: Pa
Vehicle: 2000 Hyundai Tiburon
<div class='quotetop'>QUOTE (capn tibs @ Jun 30 2008, 01:21 PM) <{POST_SNAPBACK}></div><div class='quotemain'>Okay now for the steps to taking off your old exhaust manifold and installing your new headers. Follow my steps and you should have no problems and everything will be done in the right order.</div>
I think If you follow his steps you might find the answer to your question.....
I think If you follow his steps you might find the answer to your question.....
Senior Member
Joined: Apr 2008
Posts: 2,087
Likes: 0
From: Western PA
Vehicle: 2001 Tiburon
Keeping the DIY in tact.
Modified you really need to start searching bud. We have a section on our site that shows you how, there is built in help as well. We don't mind helping a brother out sometimes but the info is on the site.
locked.gif
Modified you really need to start searching bud. We have a section on our site that shows you how, there is built in help as well. We don't mind helping a brother out sometimes but the info is on the site.
locked.gif