
Diy: Cleaning Your Aem Cai Filter


Thread Starter
Senior Member
Joined: Jul 2004
Posts: 1,632
Likes: 0
well... i got bored this afternoon and thought to myself... i bet my filter needs a cleanin. went to autozone and bought the recharge kit for the K&N filter there for ten bucks.
This is actually a long process... well not really, it just takes some time so be prepared to not be able to drive your car for at least two hours.
STEP 1: remove filter... duh
STEP 2: spray contents of the filter cleaner to the outside and inside of cleaner THOROUGHLY.. its the spray bottle in the pic below... wait ten minutes
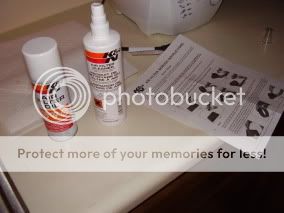
STEP 3: rinse... THOROUGHLY... this is a process that must be done correctly otherwise its worthless. let the water run (low pressure) down the lines of the filter from the INSIDE ONLY. here is a pic of what it looks like after a drop falls out of my filter, notice the nasty brown shizz to the left
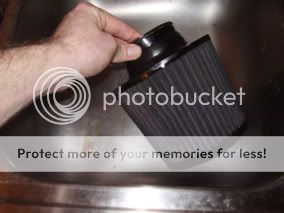
also... in this picture below notice what my friggin fingers look like after running them along the filter after a single wash... still pretty dirty

STEP 4: let dry completely and naturally... no hair dryers or vents to let this sucker sit on... let it sit on a paper towel for about an hour or so until completely dry.
STEP 5: spray the oil onto the filter. light coats.. about 3 of em... like you did the water thing, down the lines of the filter. If you overdo the oil you must redo the entire process... no oil should drip from the filter.
STEP 6: let dry for 20 minutes
STEP 7: re-install
STEP 8: drive
STEP 9: drive harder
FINAL STEP: enjoy by driving even more even harder
overall a good thing to do... mine went without a cleaning for a year and obviously needed it... i guess i would recommend doing this about once every six months or so depending on where you live... and what conditions your cold air intake endures. good luck
This is actually a long process... well not really, it just takes some time so be prepared to not be able to drive your car for at least two hours.
STEP 1: remove filter... duh
STEP 2: spray contents of the filter cleaner to the outside and inside of cleaner THOROUGHLY.. its the spray bottle in the pic below... wait ten minutes
STEP 3: rinse... THOROUGHLY... this is a process that must be done correctly otherwise its worthless. let the water run (low pressure) down the lines of the filter from the INSIDE ONLY. here is a pic of what it looks like after a drop falls out of my filter, notice the nasty brown shizz to the left
also... in this picture below notice what my friggin fingers look like after running them along the filter after a single wash... still pretty dirty
STEP 4: let dry completely and naturally... no hair dryers or vents to let this sucker sit on... let it sit on a paper towel for about an hour or so until completely dry.
STEP 5: spray the oil onto the filter. light coats.. about 3 of em... like you did the water thing, down the lines of the filter. If you overdo the oil you must redo the entire process... no oil should drip from the filter.
STEP 6: let dry for 20 minutes
STEP 7: re-install
STEP 8: drive
STEP 9: drive harder
FINAL STEP: enjoy by driving even more even harder
overall a good thing to do... mine went without a cleaning for a year and obviously needed it... i guess i would recommend doing this about once every six months or so depending on where you live... and what conditions your cold air intake endures. good luck


Moderator


Joined: Feb 2009
Posts: 11,732
Likes: 5
From: Leesville, Louisiana
Vehicle: 2001 Hyundai Tiburon
just out of curiosity, was that AEM style or Injen style? My ingen used to get very dirty, i just changed over to AEM and am hoping that it will stay a bit cleaner as it is better protected.

Super Moderator

Joined: Sep 2001
Posts: 10,795
Likes: 5
From: Pflugerville, TX
Vehicle: 2000 Elantra
It also looks like a dirty-ass K&N that needs a cleaning. I know, I've had 3 of them on different cars and they always get that gray/purple tint to 'em.
Follow the directions that come with the recharge kit, it's not rocket science.
Follow the directions that come with the recharge kit, it's not rocket science.