
Diy 2 Seater Conversion


Thread Starter
Senior Member
Joined: Jul 2004
Posts: 547
Likes: 0
From: New London, Tx AKA The Middle of Nowhere
DIY two seater conversion
Difficulty: Moderate/time consuming
What you'll need:
Materials:
Staples or spray on adhesive.
3'X 6' piece of carpet, you're choice of color-I got mine from PepBoys for around $15).
1/4" plywood, minimum of 30"X 60" piece.
Plummer Strap or a bendable metal for brackets-Hardware store
Spray paint(optional, makes it look better)-Wal-Mart
Either a big box or a big piece of card board.
Some very short screws(you don't want them going threw the plywood), I used 8-Hardware Store
Tools:
10mm, 12mm, 14mm w/ ratchet(1/4" and 1/2" for seat belt bolts).
Skill saw.
Rotorary saw.
Tape Measure.
Razor blade or knife(razor blade works better).
Screw driver(flat and Philips).
Nail gun or some other method of mounting(Optional, for step 15).
1. Start by putting you're seats down, then pull back the carpet at the very bottom of them(it's just tucked under rear deck).
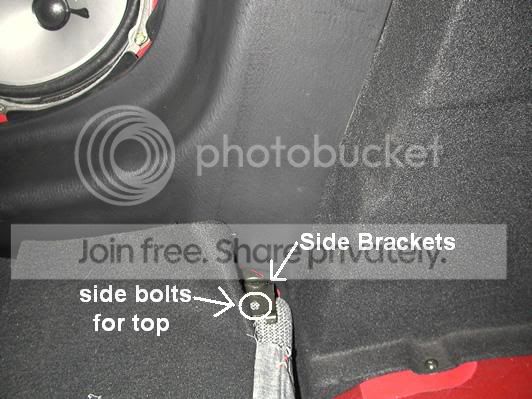
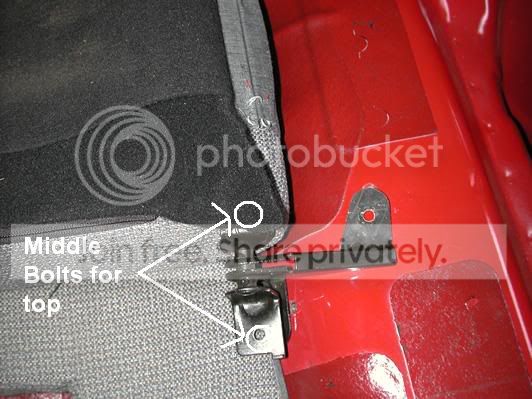
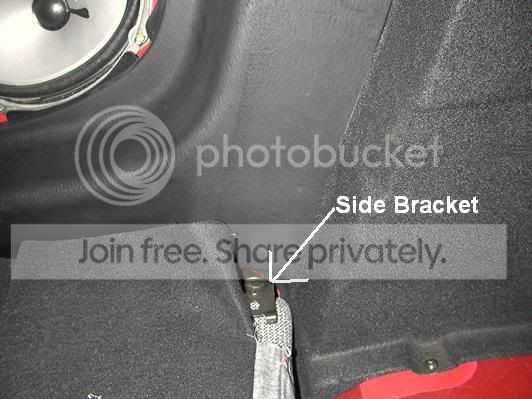
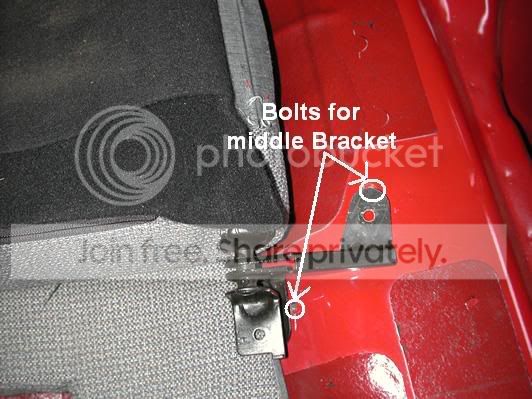
2. then take out the 12mm bolts holding the top on, there should be 4 of them - one on each side bracket, and 2 on the middle bracket
Now you should be able to just lift them out.
3. Remove the brackets on either side(should be 2 10mm bolts for each side), and the bracket in the middle(you have to lift up the back deck to see it). Next remove the 2 bolts that hold the bottom part of the seat on.
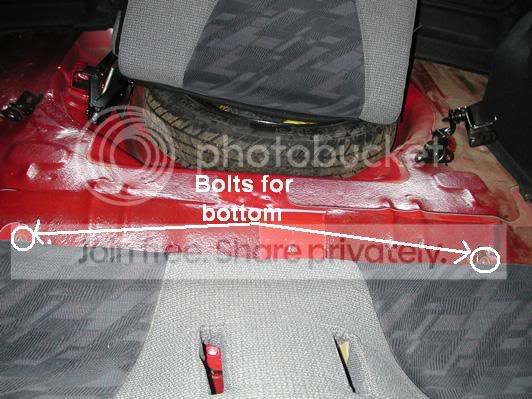
The front part of the bottom only has some brackets sitting down in slots. Give it tug(up) and it should just pop out.
To remove the seat belts you'll have to take off the back quarter panel. I recommend that you only do one side at a time, and have you're trunk propped open or someone holding it, it WILL fall on you when you remove the shock absorbers(as I found out).
To remove the quarter panel:
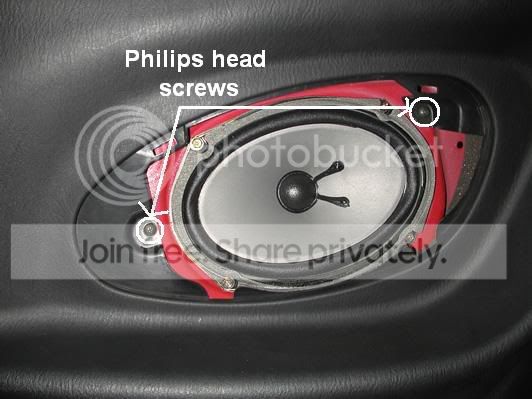
4. Take off the back speaker covers, they just pop off(use a flat bladed screwdriver). Remove the 2 screw on either side of the speakers.
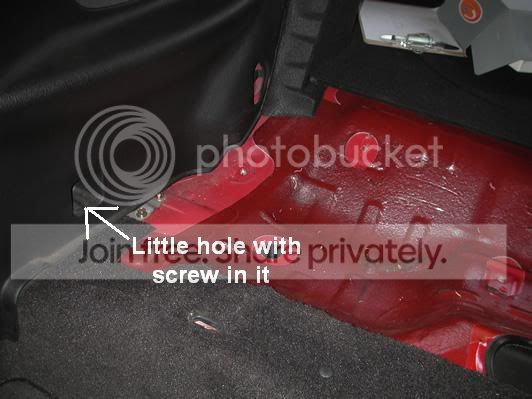
5. Remove the screws that are in the little cut out things(see pic)
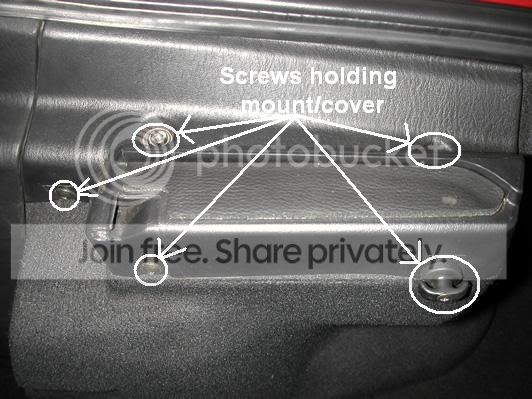
6. Next remove the 5 screws that are holding the mount for the cargo cover, and remove the Philips screw behind it that's holding the quarter panel down.
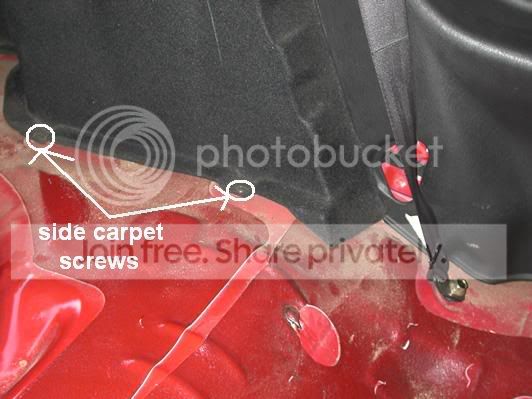
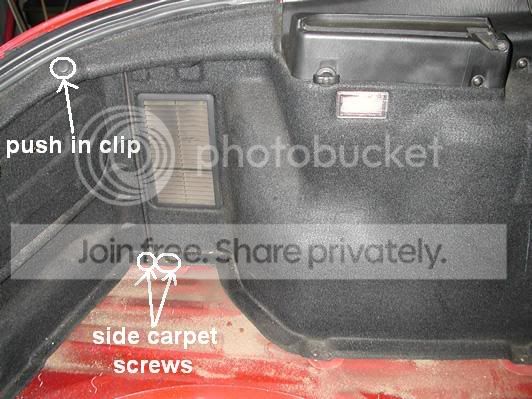
7. Remove the screws, and push in clip that's holding down the side carpet, this gives you more room to work with.
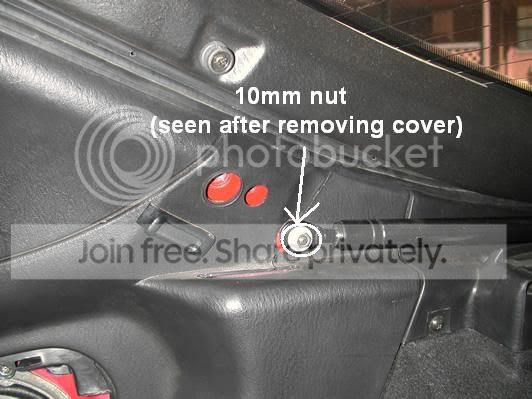
8. Pop off the little cap that's covering where the shock absorber mounts, and remove the nut(10mm).
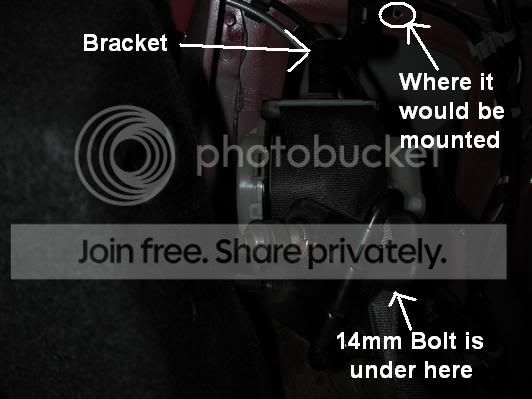
9. Remove the cover that's over the seat belt hook, and take out the bolt(14mm).

Now you should be able to pull the quarter panel off enough to get to the seat belt.
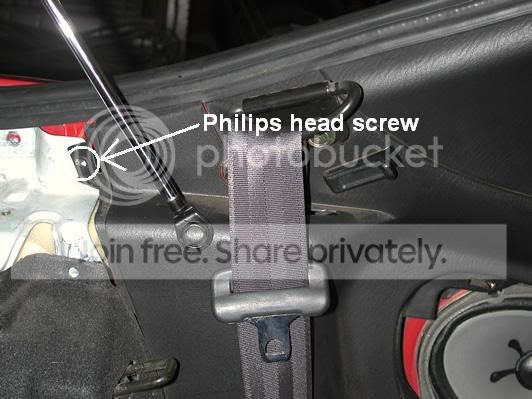
10. To remove it take out the Philips head screw at the top(it's holding down a small bracket), next remove the 14mm bolt underneath it.
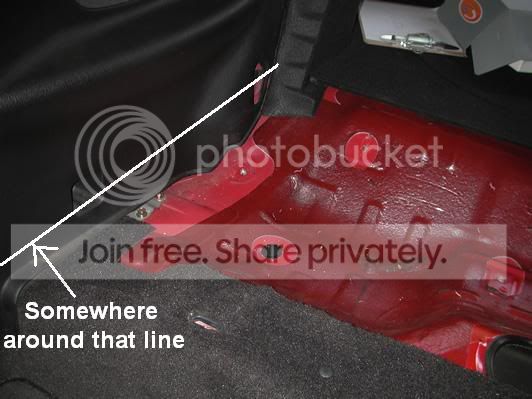
Sorry about the pic... I couldn't get it to come out better.
While I had everything out I took out the hoops/brackets the seats fold up and lock to. It's 2 12mm(I think) bolts that are easy enough to see. Sorry no pic for this.
Repeat steps 4-10 for other side. Reverse the steps to put it everything back together.
Building the deck:
11. Start by measuring:
Front to back
Side to side(Front, NOT the back)
From the side to the holes that the bottom of the seat sits in
From front to the same holes.

Heres what I got:
Front to back: 23 1/2'
Side to side(Front): 51"
Side to side(Back): 43"
Side to holes: 10 1/2"
Front to holes: 1 7/8"
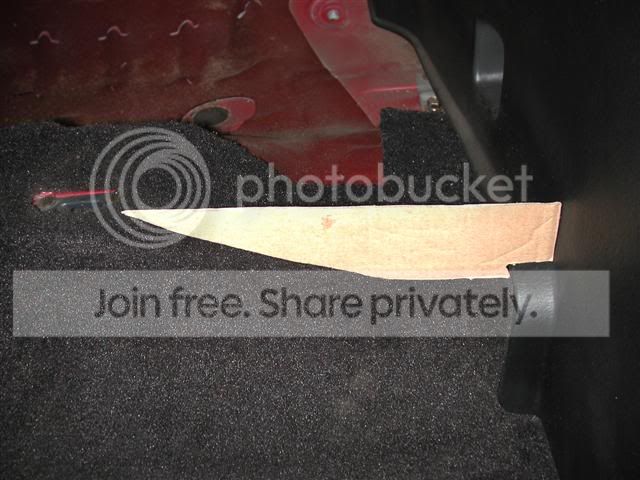
12. Cut the card board to fit in the sides(see pic), you will still have to do some trimming but try and make the card board fit as well as you can.
Should look something like:

13. Cut the plywood in a square to: The measurement you got for the side to side, and front to back.
14. Trace the cut out on to the plywood(so that you're cutting on what would be the sides). Be careful you don't want to have 2 right hand sides or vise versa wink1.gif. Cut along the trace and test fit it, carefully or you WILL scratch the crap out of you're quarter panels. Trim as needed.
15.(Optional) You can use some card board and cut out a piece to go in the gap that's left on the sides. Use the same method you just used to make the deck, and attach the to the FRONT of the deck. I used a nail gun to mount them with.
16. Carpet the deck, you can use adhesive or staples(not recommended) for this.
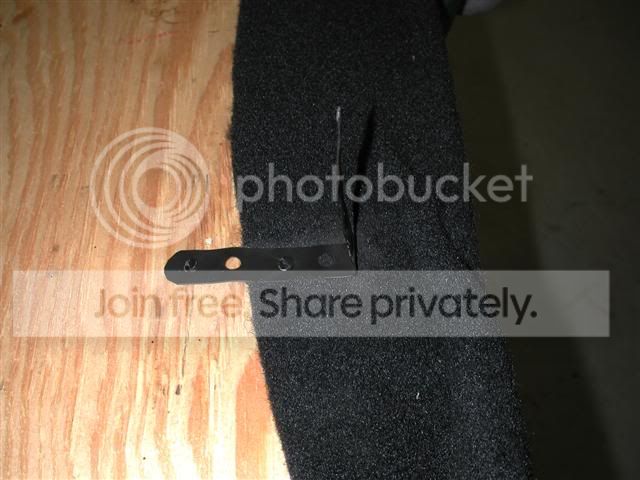
17. Use the metal to build a bracket to sit down in the holes the bottom set into. I used plummer strap(doesn't have to be that strong) and bent it into a L, I also made 2 that fit under the back deck, and painted them all black
18. Use the measurement you got from the:
Front to the holes, for how far back on the front of the deck to place the brackets.
Side to holes, for how far over to place them.
You may have to move the brackets around to get them just right.
19. Put you're new deck in nana.gif. It should come out looking something like this:

I hope you enjoy you're new 2 seater cool.gif.
Difficulty: Moderate/time consuming
What you'll need:
Materials:
Staples or spray on adhesive.
3'X 6' piece of carpet, you're choice of color-I got mine from PepBoys for around $15).
1/4" plywood, minimum of 30"X 60" piece.
Plummer Strap or a bendable metal for brackets-Hardware store
Spray paint(optional, makes it look better)-Wal-Mart
Either a big box or a big piece of card board.
Some very short screws(you don't want them going threw the plywood), I used 8-Hardware Store
Tools:
10mm, 12mm, 14mm w/ ratchet(1/4" and 1/2" for seat belt bolts).
Skill saw.
Rotorary saw.
Tape Measure.
Razor blade or knife(razor blade works better).
Screw driver(flat and Philips).
Nail gun or some other method of mounting(Optional, for step 15).
1. Start by putting you're seats down, then pull back the carpet at the very bottom of them(it's just tucked under rear deck).
2. then take out the 12mm bolts holding the top on, there should be 4 of them - one on each side bracket, and 2 on the middle bracket
Now you should be able to just lift them out.
3. Remove the brackets on either side(should be 2 10mm bolts for each side), and the bracket in the middle(you have to lift up the back deck to see it). Next remove the 2 bolts that hold the bottom part of the seat on.
The front part of the bottom only has some brackets sitting down in slots. Give it tug(up) and it should just pop out.
To remove the seat belts you'll have to take off the back quarter panel. I recommend that you only do one side at a time, and have you're trunk propped open or someone holding it, it WILL fall on you when you remove the shock absorbers(as I found out).
To remove the quarter panel:
4. Take off the back speaker covers, they just pop off(use a flat bladed screwdriver). Remove the 2 screw on either side of the speakers.
5. Remove the screws that are in the little cut out things(see pic)
6. Next remove the 5 screws that are holding the mount for the cargo cover, and remove the Philips screw behind it that's holding the quarter panel down.
7. Remove the screws, and push in clip that's holding down the side carpet, this gives you more room to work with.
8. Pop off the little cap that's covering where the shock absorber mounts, and remove the nut(10mm).
9. Remove the cover that's over the seat belt hook, and take out the bolt(14mm).
Now you should be able to pull the quarter panel off enough to get to the seat belt.
10. To remove it take out the Philips head screw at the top(it's holding down a small bracket), next remove the 14mm bolt underneath it.
Sorry about the pic... I couldn't get it to come out better.
While I had everything out I took out the hoops/brackets the seats fold up and lock to. It's 2 12mm(I think) bolts that are easy enough to see. Sorry no pic for this.
Repeat steps 4-10 for other side. Reverse the steps to put it everything back together.
Building the deck:
11. Start by measuring:
Front to back
Side to side(Front, NOT the back)
From the side to the holes that the bottom of the seat sits in
From front to the same holes.
Heres what I got:
Front to back: 23 1/2'
Side to side(Front): 51"
Side to side(Back): 43"
Side to holes: 10 1/2"
Front to holes: 1 7/8"
12. Cut the card board to fit in the sides(see pic), you will still have to do some trimming but try and make the card board fit as well as you can.
Should look something like:
13. Cut the plywood in a square to: The measurement you got for the side to side, and front to back.
14. Trace the cut out on to the plywood(so that you're cutting on what would be the sides). Be careful you don't want to have 2 right hand sides or vise versa wink1.gif. Cut along the trace and test fit it, carefully or you WILL scratch the crap out of you're quarter panels. Trim as needed.
15.(Optional) You can use some card board and cut out a piece to go in the gap that's left on the sides. Use the same method you just used to make the deck, and attach the to the FRONT of the deck. I used a nail gun to mount them with.
16. Carpet the deck, you can use adhesive or staples(not recommended) for this.
17. Use the metal to build a bracket to sit down in the holes the bottom set into. I used plummer strap(doesn't have to be that strong) and bent it into a L, I also made 2 that fit under the back deck, and painted them all black
18. Use the measurement you got from the:
Front to the holes, for how far back on the front of the deck to place the brackets.
Side to holes, for how far over to place them.
You may have to move the brackets around to get them just right.
19. Put you're new deck in nana.gif. It should come out looking something like this:
I hope you enjoy you're new 2 seater cool.gif.


Senior Member

Joined: Mar 2006
Posts: 5,754
Likes: 0
Vehicle: 1997 Tiburon
It's a good DIY.
But, the one thing I do not like is that hallow space leading into your trunk. Anything in your drunk is going to slide around like MC Hammer on crack. What I have a sub, and I had no backseats for a week because I had fuel pump work to do. Everytime I'd put the brake box would slide around like it's on rollers. Ever if you secure the sub box. What can you use the space where the plywood is now for? Maybe a bit of banana2.gif on your bed in the back smile.gif
But, the one thing I do not like is that hallow space leading into your trunk. Anything in your drunk is going to slide around like MC Hammer on crack. What I have a sub, and I had no backseats for a week because I had fuel pump work to do. Everytime I'd put the brake box would slide around like it's on rollers. Ever if you secure the sub box. What can you use the space where the plywood is now for? Maybe a bit of banana2.gif on your bed in the back smile.gif

Thread Starter
Senior Member
Joined: Jul 2004
Posts: 547
Likes: 0
From: New London, Tx AKA The Middle of Nowhere
Nope. But I did try and estimate it... It shaved 10-15 pounds max.
I'm going to use it to mount amps on lol.
Also I forgot to add that if you want to cover up where the side brackets are you can cut a small piece of carpet and trim it to fit in the side bracket holes(as seen in the last pic).
I'm going to use it to mount amps on lol.
Also I forgot to add that if you want to cover up where the side brackets are you can cut a small piece of carpet and trim it to fit in the side bracket holes(as seen in the last pic).

Senior Member
Joined: Dec 2005
Posts: 124
Likes: 0
I hate to be a pest, but by any chance, do have or can get pictures fo steps 14-17? I ask only because perfection and accuacy are things I like to make sure I ensure happen. You know? Very awsome DIY tho. Definatly going to do after the full tune up. In the words of "Bruce all mighty," B-E-A-UTIFUL.

Senior Member
Joined: Sep 2009
Posts: 4,185
Likes: 0
Vehicle: Elantra HD / 2007
<span style="font-size:14pt;line-height:100%">Just FYI, when you will put something in your trunk with rear seat removed. Please secure it well, cause when you brake hard it will fly inside the cabin hard.</span>
Thread Starter
Senior Member
Joined: Jul 2004
Posts: 547
Likes: 0
From: New London, Tx AKA The Middle of Nowhere
^Yes it will... Be very careful about what you put in the back without a cargo net or straps.
Sorry about how slow I got you the pics, just got really busy sad.gif, but here are the ones I could get:
Cardboard outline for front peices:
Front mounts:
Back Mounts:
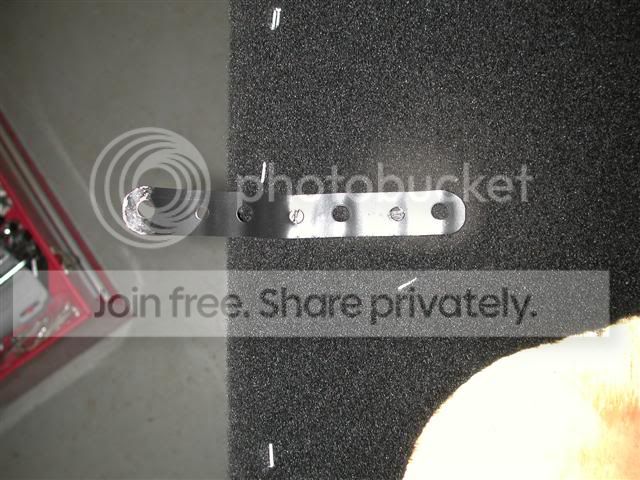
I put the back mounts on thinking I could screw them down, then realized I had do idea what the screw would go into, so I didn't.
Couldn't get any of cutting/marking the plywood... I don't have any plywood to mark tongue.gif.
Sorry about how slow I got you the pics, just got really busy sad.gif, but here are the ones I could get:
Cardboard outline for front peices:
Front mounts:
Back Mounts:
I put the back mounts on thinking I could screw them down, then realized I had do idea what the screw would go into, so I didn't.
Couldn't get any of cutting/marking the plywood... I don't have any plywood to mark tongue.gif.

Senior Member
Joined: Mar 2006
Posts: 1,012
Likes: 0
Vehicle: 2000 Hyundai Tiburon
I'm attempting this later this week. Thanks for the all the info. I completely gutted the interior today, and mounted the bolts for my harnesses for the new front seats.
The only changes I'm going to have to make to your design is cutting holes for the straps to go through, but it should look ok.
I'm gonna pick up a ton of Dynamat and put it down first.
I'll post up some pics when its all finished.
The only changes I'm going to have to make to your design is cutting holes for the straps to go through, but it should look ok.
I'm gonna pick up a ton of Dynamat and put it down first.
I'll post up some pics when its all finished.