
DIY - 1.8L CAM


Thread Starter
Senior Member
Joined: May 2004
Posts: 2,214
Likes: 0
From: Bel Air, MD
1.8L Intake Cam Install
This install is only for BETA 1 engines. The installation of a 1.8L Intake Cam in a 2.0L engine is the advance of the intake timing by about 6 degrees. The 2.0L Exhaust Cam is identical to the one found on the 1.8L so there is no reason for the swap. The newer GT Intake Cam has been found to work on Beta 1 engines but most people believe it will cause faster engine internal wear.
This is a fairly simple swap. So here's the info:
Parts Needed:
- Metric Socket Set
- Torque Wrench (5-15lb/ft is all that is needed)
- (11) New Cam-Journal Bolts (Only needed if you feel you will break yours)
- (1) quart of oil (same flavor as whatever you have currently in the car)
- A clean and dust free place to work (Preferably not out doors)
- Grease rags
- 1.8L Intake Cam (KSpec.com)
- (1) New Valve Cover Gasket (Current gasket could be reused but replacement is preferred)
Step 1: Valve Cover Removal
- Remove the spark plug cover
- Remove plug wires
- Remove the two bolts from the top part of the timing belt cover (The two that are screwed sideways into the valve cover)
- Remove the valve cover (If you plan on reusing the valve gasket remove the cover very carefully)
Step 2: Intake Cam Removal
- There is an index mark on the exhaust and intake cam (A painted or raised dot). If the dots are not facing straight up you need to either hand crank the engine or blip the starter extremely fast until it does.
- Removal all journal bolts on the intake side
- Remove the #5 lower journal bolt on the exhaust side (Connected to the chain guide)
- Lift the Cam out gently and “un-twist� it off of the chain
Step 3: Intake Cam Installation
- Use the quart of oil and lather the new intake cam
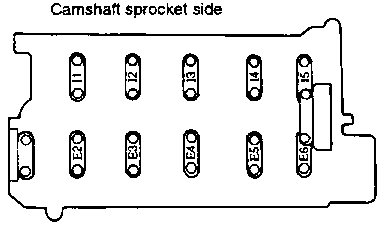
- The index make on the intake cam needs to be five full links from the exhaust cam index mark (Pictured below)

- Once index marks are lined up lay the cam in the motor
- The cam will not sit flat for now. That is fine
- Install all intake journals as depicted below (10 lb/ft torque)
- Install the chain guide and the remaining exhaust journal bolt (10 lb/ft torque)
Step 4: Finalizing Project
- Either hand crank or blip the starter to make the cam spin. If installed correctly everything should spin freely without hitting anything else
- Install Valve Gasket / Cover (15 lb/ft torque)
- Install plug wires
- Install spark plug cover
- Reset the ECU by removing the negative battery terminal for 10-15 minutes
- Leave car run approx. 15 minutes to allow oil to circulate through head
- Drive gently for the next 200-300 miles to allow ECU to correctly realign itself
This install is only for BETA 1 engines. The installation of a 1.8L Intake Cam in a 2.0L engine is the advance of the intake timing by about 6 degrees. The 2.0L Exhaust Cam is identical to the one found on the 1.8L so there is no reason for the swap. The newer GT Intake Cam has been found to work on Beta 1 engines but most people believe it will cause faster engine internal wear.
This is a fairly simple swap. So here's the info:
Parts Needed:
- Metric Socket Set
- Torque Wrench (5-15lb/ft is all that is needed)
- (11) New Cam-Journal Bolts (Only needed if you feel you will break yours)
- (1) quart of oil (same flavor as whatever you have currently in the car)
- A clean and dust free place to work (Preferably not out doors)
- Grease rags
- 1.8L Intake Cam (KSpec.com)
- (1) New Valve Cover Gasket (Current gasket could be reused but replacement is preferred)
Step 1: Valve Cover Removal
- Remove the spark plug cover
- Remove plug wires
- Remove the two bolts from the top part of the timing belt cover (The two that are screwed sideways into the valve cover)
- Remove the valve cover (If you plan on reusing the valve gasket remove the cover very carefully)
Step 2: Intake Cam Removal
- There is an index mark on the exhaust and intake cam (A painted or raised dot). If the dots are not facing straight up you need to either hand crank the engine or blip the starter extremely fast until it does.
- Removal all journal bolts on the intake side
- Remove the #5 lower journal bolt on the exhaust side (Connected to the chain guide)
- Lift the Cam out gently and “un-twist� it off of the chain
Step 3: Intake Cam Installation
- Use the quart of oil and lather the new intake cam
- The index make on the intake cam needs to be five full links from the exhaust cam index mark (Pictured below)
- Once index marks are lined up lay the cam in the motor
- The cam will not sit flat for now. That is fine
- Install all intake journals as depicted below (10 lb/ft torque)
- Install the chain guide and the remaining exhaust journal bolt (10 lb/ft torque)
Step 4: Finalizing Project
- Either hand crank or blip the starter to make the cam spin. If installed correctly everything should spin freely without hitting anything else
- Install Valve Gasket / Cover (15 lb/ft torque)
- Install plug wires
- Install spark plug cover
- Reset the ECU by removing the negative battery terminal for 10-15 minutes
- Leave car run approx. 15 minutes to allow oil to circulate through head
- Drive gently for the next 200-300 miles to allow ECU to correctly realign itself

Senior Member
Joined: Jul 2004
Posts: 835
Likes: 0
<div class='quotetop'>QUOTE (UltraTibby)</div><div class='quotemain'>- Drive gently for the next 200-300 miles to allow ECU to correctly realign itself</div>
Wouldn't it be better to reset the ECU?
Wouldn't it be better to reset the ECU?

Junior Member
Joined: Jul 2004
Posts: 13
Likes: 0
hey got a question seeing as this is the first hyundai i ever owned (recovering chevyhallic, its been 3 days since my last burnout in my 1980 z28 camaro ) beta 1 engines were in the 2000-2001 tibs right?
Senior Member

Joined: Mar 2002
Posts: 34,642
Likes: 0
From: Los Lunas, New Mexico, USA.
Vehicle: 2001 Hyundai Tiburon, 2004 Kia Sorento, 2010 Kia Soul
LMAO!
Way too funny mang.
The Beta 1 is the 2.0 engine in all RD series Tiburons. Also, several of the Elantra's up to 99 I belive also have the same motor. The Beta 2 started in... Actually 2001 for the Elantra and 2003 for the Tiburon.
Way too funny mang.
The Beta 1 is the 2.0 engine in all RD series Tiburons. Also, several of the Elantra's up to 99 I belive also have the same motor. The Beta 2 started in... Actually 2001 for the Elantra and 2003 for the Tiburon.


Senior Member
Joined: Aug 2006
Posts: 1,276
Likes: 0
Vehicle: 2000 Hyundai Tiburon
i added this to hyundaipedia.com
direct link is here...
http://hyundaipedia.com/wiki/1.8l_cam_install
direct link is here...
http://hyundaipedia.com/wiki/1.8l_cam_install
Senior Member
Joined: Sep 2006
Posts: 1,419
Likes: 0
From: WI
Vehicle: 06 suby impreza outback sport
my advice before you remove it mark the chain where the marks on the cam is, so you know it's timed correctly. i forgot to do that and advanced it a chain. had more torque but lack response.