
Ark Short Shifter Diy


Thread Starter
Senior Member
Joined: Dec 2007
Posts: 1,377
Likes: 0
From: home
Vehicle: car
This is my first DIY, it's not the greatest one ever, so I'm sorry for that.
DIFFICULTY - 2 out of 5 (IMO)
I didn't get pics of the install, but once you get it apart, it's easy to put back together, I'll explain.
<u>Things you need</u>
Ratchet with 14mm shallow socket (can use 14mm open end wrench I suppose, ratchet is easier)
Flash Light, LED bar light, some sort of light that is bright
Grease
Band aids (I cut my poor finger 02.gif )
Step one - you want to do is put your steering wheel tilt all the way up, easier to work with.
Step two - hang your light so your whole work area is lit up well, that way you don't lose parts (hopefully)
Step Three - Screw shift knob off, then push your fingers down on your shift boot until you grab the underside of the surround, you have to pull up on that carefully so you don't break the tabs that hold the shift surround down. It should pop fairly easy.


Step Four - Now go on the opposite side of the shift surround and pop that side up. I found it easier to reach your hand under the shift surround and pop the tabs out from under it. Here I have my hand on top, but reach your hand under it instead.

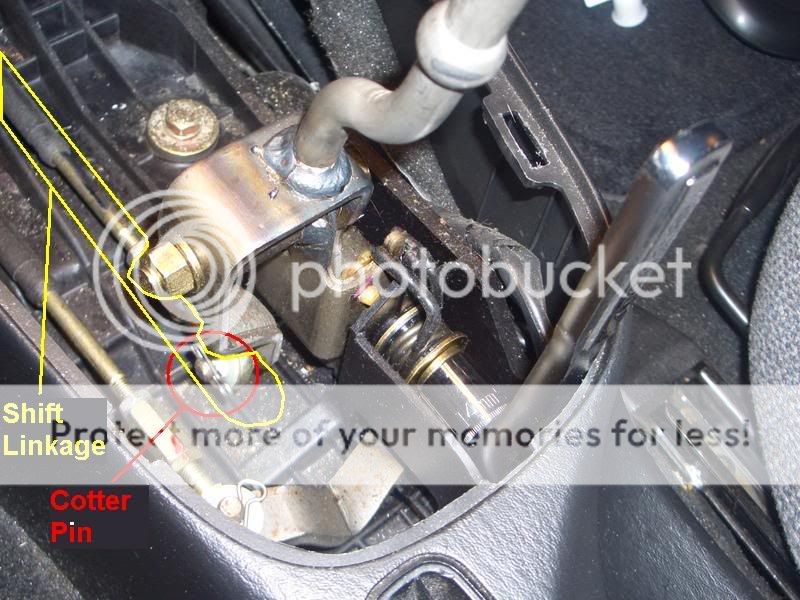
Step Five - Take the surround off and place it aside for now, you won't need it again until you're done. It should look like this when it's all the way off.


Step Six - Remove the cotter pin from the shift linkage, and pull the linkage off of your shifter. To take the cotter pin off, you push up one end of it, then it slides out like a normal one, I guess it's a locking type. This is the cotter pin you take off.
Step Seven - Now that you have the surround off, get a 14mm Shallow socket with a ratchet, place the socket on the larger bolt on the bottom of your stock shifter. You may have to move a black wire over to fit the socket on. Make sure it is set to loosen, and start taking it off.

Step Eight - Once you get the nut off, place in a spot where you know you wont lose it. Then carefully take off all of the washers and make note of how you took them off, this is the order, I just hung them on a pen so you could see them better. The order goes like this from left to right though... (the order you put them back together in)
Flat washer, black washer, long metal spacer, spring, black plastic washer, flat washer, lock washer, nut.

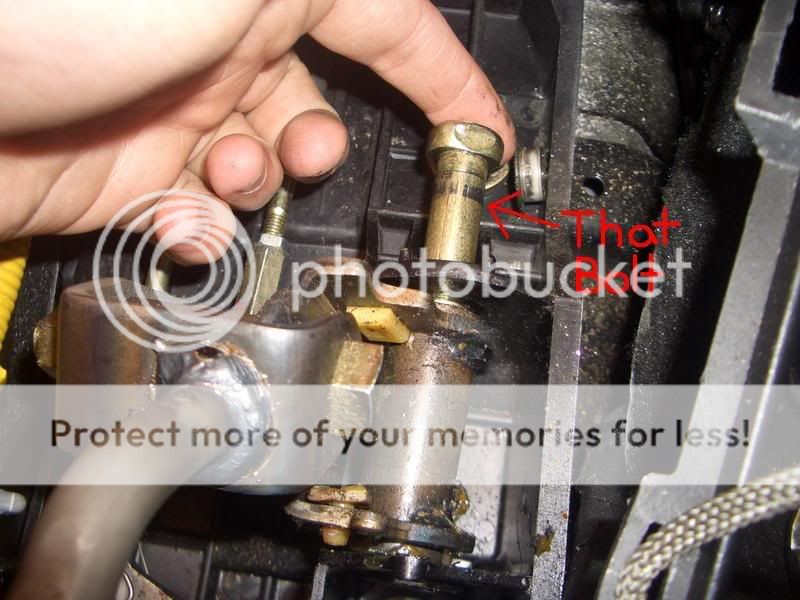
Step Nine - Remove the long brass bolt, it was tough on my car because it was stuck. It does just push out though.

Step Ten - Remove old Shifter and take out the two plastic pieces in the old shifter. Clean off the old grease, re-grease, and put the now greased plastic fittings in the ARK shifter.

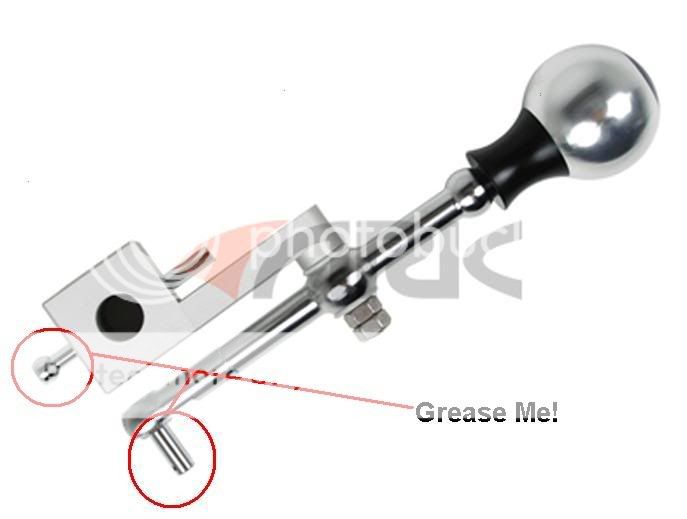
Step Eleven - Now put the new ARK shifter in the same place you took your stock one from. Before you install it, you should grease it up though. Grease the following pieces (At least I did).
Step Twelve - After you Grease these two parts, place your new shiny ARK shifter into the same spot as your old shifter. It's self explanatory as to where it goes, so no pics on this one.
Step Thirteen - Reconnect shift linkage to new shifter, the part that connects should be greased as I said, and replace the cotter pin. Sorry, no pic of my actually doing it, but after you install the new shifter in the right spot, you can see how it connects as well. The linkage just slides right on again, and you put the cotter pin back. (For pic, refer to Step Six)
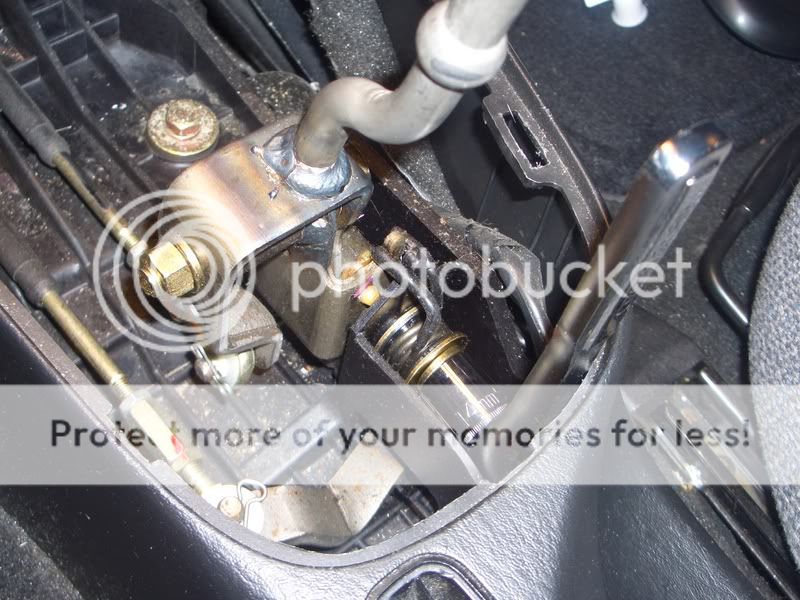
Step Fourteen - Now you have you linkage hooked up again, you are almost done!! Now, Grease the main bolt that goes through the shifter (block?) that had all of the washers and stuff on it. This one.
Step Fifteen - After you grease the bolt, put it back through the the shifter (block?) on the ARK shifter, and the shifter should now be held in place. Once you got the bolt on, you start to put all of the washers back on in the order I stated. It should be the brass flat washer, then the black washer with the lip facing your back seat, then the metal spacer, the the spring (those two ends should be facing your engine, and upwards), the other black washer with the lip facing your engine, the brass flat washer, the lock washer, then the nut. One thing you will have to do which is important, when you took off the spring the first time, it collapsed. So when you put it back on, you need to spread it so you get tension with your shifter. Should look like this again.
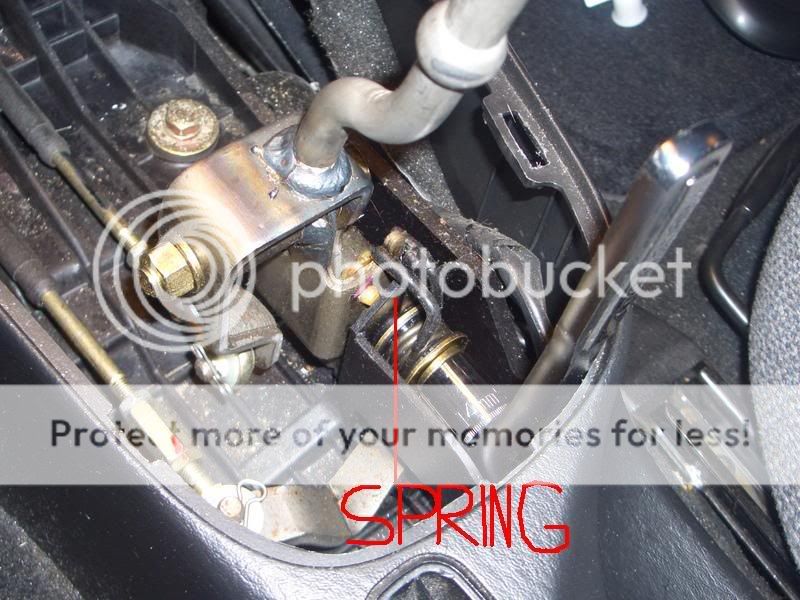
And Here's the order of the washers.
Step Sixteen - Tighten the nut back up until its real tight, but don't break it. Once you tighten the nut, everything should be together and your new ARK short shifter should work perfectly.
Step Seventeen - All that's left after that is to replace the shift surround with he boot on it, so reverse steps 3, 4, and 5. Screw the knob on too!
I hope this DIY goes well, sorry for the lack of pictures towards the install, but it's pretty straight forward. If you could take it apart without breaking it, you can put it back together too. Hope This helps you guys! Have fun shifting!
I was very pleased with he feel of this shifter, it feels like a whole new trans. The gears are so close and precise, the best shifter out there, no doubt, there's no need to even try the others. ARK is where it's at.
DIFFICULTY - 2 out of 5 (IMO)
I didn't get pics of the install, but once you get it apart, it's easy to put back together, I'll explain.
<u>Things you need</u>
Ratchet with 14mm shallow socket (can use 14mm open end wrench I suppose, ratchet is easier)
Flash Light, LED bar light, some sort of light that is bright
Grease
Band aids (I cut my poor finger 02.gif )
Step one - you want to do is put your steering wheel tilt all the way up, easier to work with.
Step two - hang your light so your whole work area is lit up well, that way you don't lose parts (hopefully)
Step Three - Screw shift knob off, then push your fingers down on your shift boot until you grab the underside of the surround, you have to pull up on that carefully so you don't break the tabs that hold the shift surround down. It should pop fairly easy.
Step Four - Now go on the opposite side of the shift surround and pop that side up. I found it easier to reach your hand under the shift surround and pop the tabs out from under it. Here I have my hand on top, but reach your hand under it instead.
Step Five - Take the surround off and place it aside for now, you won't need it again until you're done. It should look like this when it's all the way off.
Step Six - Remove the cotter pin from the shift linkage, and pull the linkage off of your shifter. To take the cotter pin off, you push up one end of it, then it slides out like a normal one, I guess it's a locking type. This is the cotter pin you take off.
Step Seven - Now that you have the surround off, get a 14mm Shallow socket with a ratchet, place the socket on the larger bolt on the bottom of your stock shifter. You may have to move a black wire over to fit the socket on. Make sure it is set to loosen, and start taking it off.
Step Eight - Once you get the nut off, place in a spot where you know you wont lose it. Then carefully take off all of the washers and make note of how you took them off, this is the order, I just hung them on a pen so you could see them better. The order goes like this from left to right though... (the order you put them back together in)
Flat washer, black washer, long metal spacer, spring, black plastic washer, flat washer, lock washer, nut.
Step Nine - Remove the long brass bolt, it was tough on my car because it was stuck. It does just push out though.
Step Ten - Remove old Shifter and take out the two plastic pieces in the old shifter. Clean off the old grease, re-grease, and put the now greased plastic fittings in the ARK shifter.
Step Eleven - Now put the new ARK shifter in the same place you took your stock one from. Before you install it, you should grease it up though. Grease the following pieces (At least I did).
Step Twelve - After you Grease these two parts, place your new shiny ARK shifter into the same spot as your old shifter. It's self explanatory as to where it goes, so no pics on this one.
Step Thirteen - Reconnect shift linkage to new shifter, the part that connects should be greased as I said, and replace the cotter pin. Sorry, no pic of my actually doing it, but after you install the new shifter in the right spot, you can see how it connects as well. The linkage just slides right on again, and you put the cotter pin back. (For pic, refer to Step Six)
Step Fourteen - Now you have you linkage hooked up again, you are almost done!! Now, Grease the main bolt that goes through the shifter (block?) that had all of the washers and stuff on it. This one.
Step Fifteen - After you grease the bolt, put it back through the the shifter (block?) on the ARK shifter, and the shifter should now be held in place. Once you got the bolt on, you start to put all of the washers back on in the order I stated. It should be the brass flat washer, then the black washer with the lip facing your back seat, then the metal spacer, the the spring (those two ends should be facing your engine, and upwards), the other black washer with the lip facing your engine, the brass flat washer, the lock washer, then the nut. One thing you will have to do which is important, when you took off the spring the first time, it collapsed. So when you put it back on, you need to spread it so you get tension with your shifter. Should look like this again.
And Here's the order of the washers.
Step Sixteen - Tighten the nut back up until its real tight, but don't break it. Once you tighten the nut, everything should be together and your new ARK short shifter should work perfectly.
Step Seventeen - All that's left after that is to replace the shift surround with he boot on it, so reverse steps 3, 4, and 5. Screw the knob on too!
I hope this DIY goes well, sorry for the lack of pictures towards the install, but it's pretty straight forward. If you could take it apart without breaking it, you can put it back together too. Hope This helps you guys! Have fun shifting!
I was very pleased with he feel of this shifter, it feels like a whole new trans. The gears are so close and precise, the best shifter out there, no doubt, there's no need to even try the others. ARK is where it's at.


Senior Member

Joined: Mar 2006
Posts: 111
Likes: 0
From: Charleston, SC
Vehicle: 2001/Hyundai/Tiburon
I installed my ark shifter about two weeks ago, and the black collar thing is used if you want to make the shifter taller. Ther should have been a metal piece that's male threaded on one side and female on the other. If you put this on the the black plastic piece should be used otherwise just put the knob on without it. It'll screw all the way down.
Senior Member
Joined: Mar 2002
Posts: 34,642
Likes: 0
From: Los Lunas, New Mexico, USA.
Vehicle: 2001 Hyundai Tiburon, 2004 Kia Sorento, 2010 Kia Soul
You could also get a big drill bit, or a hole bore, and cut the hole in the plastic collar a bit wider at the bottom, it'll thread onbetter then.
I just leftmine off.
I just leftmine off.

Senior Member
Joined: Jan 2008
Posts: 741
Likes: 0
Vehicle: 2001 Tiburon
Just a couple things to add.
1. Install is the exact same on an RD2 (judging from the pics, it seems like there is a bit more room to work with on the rd2).
2. I didn't see anything mentioned in your diy about the little white piece included with the shifter. I ended up re-using the old one (because I'm a knob) until I realised what it was for and replaced it. See pics.
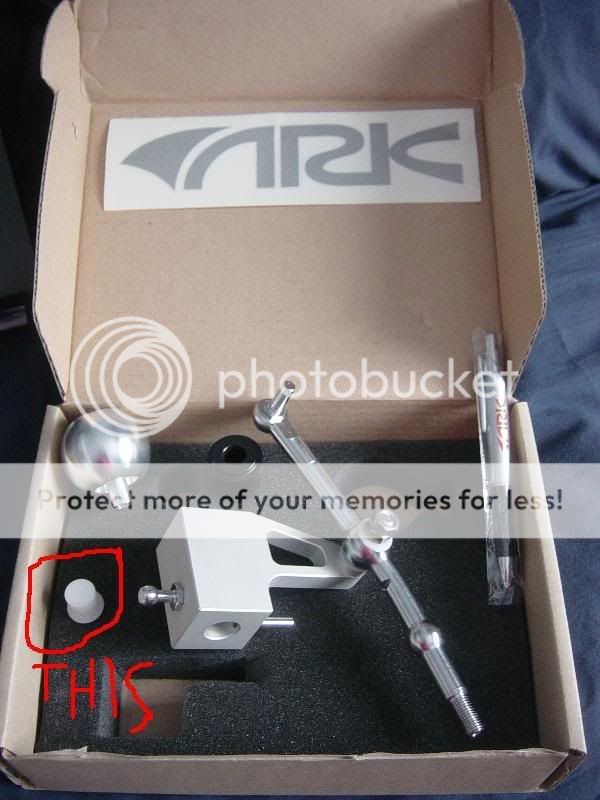
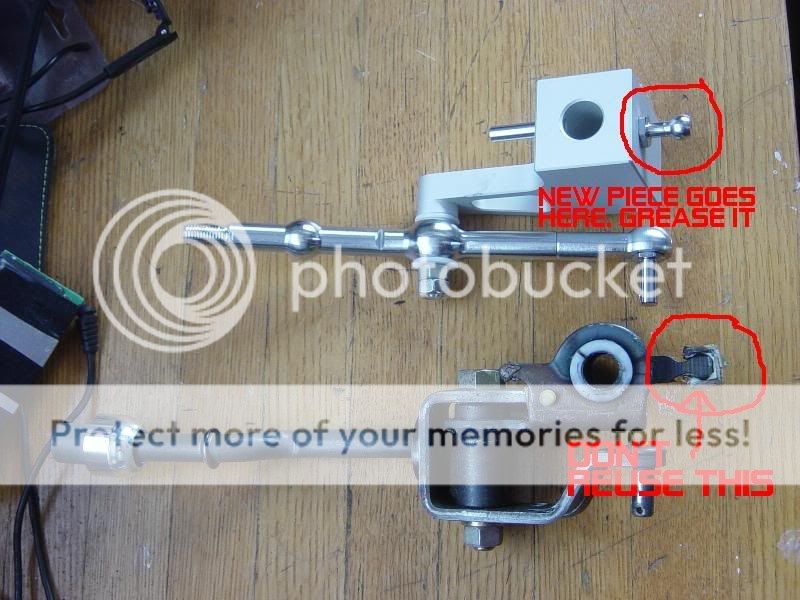
Shifting was very sloppy with the old piece tongue.gif
1. Install is the exact same on an RD2 (judging from the pics, it seems like there is a bit more room to work with on the rd2).
2. I didn't see anything mentioned in your diy about the little white piece included with the shifter. I ended up re-using the old one (because I'm a knob) until I realised what it was for and replaced it. See pics.
Shifting was very sloppy with the old piece tongue.gif
