Tom's single slammer - the piglet


 02-09-2012, 09:07 AM
#12
Senior Member

Thread Starter
Join Date: Dec 2008
Location: Floating around the AUDM
Posts: 3,837
Likes: 0
Received 0 Likes
on
0 Posts
Vehicle: X3 Sprint, S-Coupe Turbo
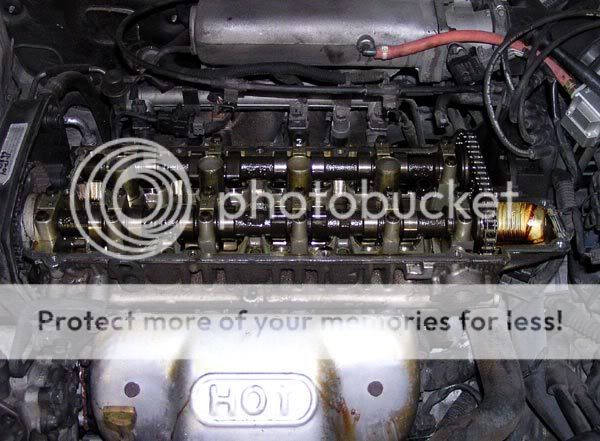
Cheers stocker! Thanks to my 2 year old nephew coughing directly in my face, I've come down with a generic cold/flu, which has hampered progress. Anyways, today I changed the rocker cover gasket, and installed the new splug leads.

Everything seemed to be okay under here, especially the timing belt which is nice. Unfortunately the rockers look a little burnt/dirty, which I think is because it was run low on oil for quite a long while.

It was pretty foul under here. In in the very centre of the panel, there is a hook-shaped oil pickup pipe, which has a very fine bore. You can't really see it in this photo. Due to the pretty horrendous levels of dirt, I decided to thouroughly clean the whole metal plate/oil pickup unit as well. Here is another shot of the dirt.

Aaand the backside of the plate. Yucky.

So I cleaned it all with WD-40 and my sister's toothbrush. Man, is there anything that combo can't do? I couldn't find a particular wear point/hole in the old rocker gasket, but the whole thing was pretty hard and old. After lightly sanding the mating surface of the head, I put everything back toghether and took it for a test drive.
The car drives really well! I think that miss is completely cured! Even being silly and pulling out of corners at 15 kph in second gear couldn't get the engine to stumble at all. Plus it has lots more power everywhere, I'd say a solid 5-10 hp has easily been gained. I am well pleased with these results so early in the repair process.
Other than that, I just started draining the gearbox oil before I had to go into work. It looks like some crazy fool has put ATF in there, because it is exactly the same colour and smell. Here are some of the dregs.

Plus I think my fuel level sender is cooked. Once I reach about 2/3rds of a tank remaining, the needle just drops to zero, then fluctuates all over the place. The problem seems to go away once I fill it to the brim again? Strange...
I should get lots more done tomorrow.
Everything seemed to be okay under here, especially the timing belt which is nice. Unfortunately the rockers look a little burnt/dirty, which I think is because it was run low on oil for quite a long while.
It was pretty foul under here. In in the very centre of the panel, there is a hook-shaped oil pickup pipe, which has a very fine bore. You can't really see it in this photo. Due to the pretty horrendous levels of dirt, I decided to thouroughly clean the whole metal plate/oil pickup unit as well. Here is another shot of the dirt.
Aaand the backside of the plate. Yucky.
So I cleaned it all with WD-40 and my sister's toothbrush. Man, is there anything that combo can't do? I couldn't find a particular wear point/hole in the old rocker gasket, but the whole thing was pretty hard and old. After lightly sanding the mating surface of the head, I put everything back toghether and took it for a test drive.
The car drives really well! I think that miss is completely cured! Even being silly and pulling out of corners at 15 kph in second gear couldn't get the engine to stumble at all. Plus it has lots more power everywhere, I'd say a solid 5-10 hp has easily been gained. I am well pleased with these results so early in the repair process.
Other than that, I just started draining the gearbox oil before I had to go into work. It looks like some crazy fool has put ATF in there, because it is exactly the same colour and smell. Here are some of the dregs.
Plus I think my fuel level sender is cooked. Once I reach about 2/3rds of a tank remaining, the needle just drops to zero, then fluctuates all over the place. The problem seems to go away once I fill it to the brim again? Strange...
I should get lots more done tomorrow.
02-09-2012, 09:14 AM
#13
Senior Member
Join Date: Jul 2011
Location: Illinois
Posts: 1,021
Likes: 0
Received 1 Like
on
1 Post
Vehicle: 2010 Genesis Coupe 2L track
ATF is normal for Asian transmissions sometimes. My Festiva took ATF in the states, regular gear oil elsewhere. My Taurus SHO takes ATF in the gear box. You can even use it in the Genesis Coupe craptastic 6 speed manual.
02-09-2012, 09:08 PM
#14
Super Moderator

Running low on cheap oil will get you that funky brown/red caked on residue. Run an oil flush, change the oil, and if you were local I'd say run a 1/2qt. of Marvel Mystery Oil and fill the crankcase the rest of the way with Pennzoil Platinum synthetic.
I put a cam that was used and orange into my engine . . . a couple weeks later, it was just as like-new as the other one:
I put a cam that was used and orange into my engine . . . a couple weeks later, it was just as like-new as the other one:
02-09-2012, 09:17 PM
#15
Senior Member
Join Date: Jul 2011
Location: Illinois
Posts: 1,021
Likes: 0
Received 1 Like
on
1 Post
Vehicle: 2010 Genesis Coupe 2L track
The best stuff for cleaning out the oil gunk is Auto-RX. It takes a while but really does the job and safely. Also gets the carbon out from the rings making them seal a lot better.
 ... its all about the x3
02-10-2012, 06:46 PM
... its all about the x3
02-10-2012, 06:46 PM
#17
Senior Member
Thread Starter
Join Date: Dec 2008
Location: Floating around the AUDM
Posts: 3,837
Likes: 0
Received 0 Likes
on
0 Posts
Vehicle: X3 Sprint, S-Coupe Turbo
-Trans oil change: check
-Brake/clutch fluid bleed and flush: check
-Coolant system and radiator flush and change: check
-Battery cleanup/levels check: check
-Coolant system flush: check
-Heater hose and rad hoses replaced: check
Thankfully, yesterday was only 105 degrees out, so I had a really nice time working in direct sunlight. Stocker, I see your fuel filter and raise you a rear heater hose. It literally took 45 minutes to simply remove the damned thing, let alone install the new one! My hands look five years older because of that BS hose. The cooling system was in a sorry state, just barely holding on for dear life.

As was the battery.

A little sodium bicarb fixed that right up though! At least it looks like it isn't about to die now. On a side note, sodium bicarb solution stings like buggery when you spill it on cuts in your hand...

After doing all of this work, the car is driving really nicely. Interestingly enough, after replacing the gear oil with brand new Nulon 75W-90, 2nd gear crunches on fast shifts. I'll monitor that because it might just need a couple of heat cycles to break in the oil? I took the fuel economy over a 25 mile freeway trip, and I got 58 mpg... I think I will have to continue testing because I'm pretty sure that exceeds factory fuel economy estimates. Anyhoo, there are only two more stages of work left on the car. The first is just finishing off my existing list of 'things to do':
-Wiper blade replacement
-Immobiliser remote repair
-Air cleaner replacement
-Fuel filter replacement
-Rear fog light gasket replacement
-Roof rack removal
-Parking light and number plate light blown
They are all pretty mundane though. The final stage of work will have to wait for a couple of weeks until I have some spare savings again, but these are some more serious problems that need fixing:
-Outer left CV boot is torn
-Rear, and probably front, shock absorbers are destroyed
-Front, and probably rear, wheel bearings are very noisy
Pretty serious stuff. Depending on the cost of the shocks, the final stage should only cost around 400-500 dollars to repair. After that is done, the car will be literally faultless, and completely ready for some GT goodies
-Brake/clutch fluid bleed and flush: check
-Coolant system and radiator flush and change: check
-Battery cleanup/levels check: check
-Coolant system flush: check
-Heater hose and rad hoses replaced: check
Thankfully, yesterday was only 105 degrees out, so I had a really nice time working in direct sunlight. Stocker, I see your fuel filter and raise you a rear heater hose. It literally took 45 minutes to simply remove the damned thing, let alone install the new one! My hands look five years older because of that BS hose. The cooling system was in a sorry state, just barely holding on for dear life.
As was the battery.
A little sodium bicarb fixed that right up though! At least it looks like it isn't about to die now. On a side note, sodium bicarb solution stings like buggery when you spill it on cuts in your hand...
After doing all of this work, the car is driving really nicely. Interestingly enough, after replacing the gear oil with brand new Nulon 75W-90, 2nd gear crunches on fast shifts. I'll monitor that because it might just need a couple of heat cycles to break in the oil? I took the fuel economy over a 25 mile freeway trip, and I got 58 mpg... I think I will have to continue testing because I'm pretty sure that exceeds factory fuel economy estimates. Anyhoo, there are only two more stages of work left on the car. The first is just finishing off my existing list of 'things to do':
-Wiper blade replacement
-Immobiliser remote repair
-Air cleaner replacement
-Fuel filter replacement
-Rear fog light gasket replacement
-Roof rack removal
-Parking light and number plate light blown
They are all pretty mundane though. The final stage of work will have to wait for a couple of weeks until I have some spare savings again, but these are some more serious problems that need fixing:
-Outer left CV boot is torn
-Rear, and probably front, shock absorbers are destroyed
-Front, and probably rear, wheel bearings are very noisy
Pretty serious stuff. Depending on the cost of the shocks, the final stage should only cost around 400-500 dollars to repair. After that is done, the car will be literally faultless, and completely ready for some GT goodies
02-14-2012, 08:13 AM
#18
Senior Member
Thread Starter
Join Date: Dec 2008
Location: Floating around the AUDM
Posts: 3,837
Likes: 0
Received 0 Likes
on
0 Posts
Vehicle: X3 Sprint, S-Coupe Turbo
-Wipers replaced
-Immobiliser repaired
-Rear fog light replaced/modded
-Redundant 3rd brake light removed
-Fuel and air filter arrived this afternoon
So, this rear fog light has been ticking me off.

I thought it was just going to be a case of prying off a gasket, but no. The cracked black part actually forms part of the casing itself. The light is screwed to a the bumper, but it is well up behind cobwebs and the bumper support. Here is my spare light disassembled.

Okay, that is all pretty straightforward. But I just can't keep my hands still. Here is a close up of the existing lamp:

Notice how it doesn't illuminate the sections of housing around the lense screws? This is what inspired me to pull apart the spare lamp and look at the reflector:

I guess it was designed this way for easy casting or something. Anyway, that reflector design has been annoying me ever since my brother bought an elantra wagon back when I was 14. Yes,I am anally retentive about my OCD. So, I busted out the dremel and experimented with a LOT of patterns and reflector colours until I could get it just right on my spare unit I had lying around... it sure took lots of false starts...

Once I got it right though, I copied that design to the actual replacement. Basically, I just removed the high-gloss centre reflector, then painted over my dremel work with white paint. It is a white/silver hybrid super spaceship reflector now, money can't buy this sort of custom work.
The aim was to fill the whole housing with even, red light no brighter than the regular tail lights. We get barely any fog in Australia, especially Perth, so I figured I may as well turn it into a functional marker/position light that I can use legally. Anyways, I put it all back together, and after a trip to Radioshack, I pieced together a little resistor pack to get the brightness just right. I was originally going to use a variable resistor to set it, but none of the available pots could handle the current that the fog demanded. They all just burnt out as soon as the light was barely lit. I mounted my resistor pack behind the trunk vent panel, for discretion + airflow to the resistor pack.


Nice and neat! So, after a solid morning's work, this here are the end results:
BEFORE

AFTER


I'm quite content with that! Inbetween all those shenanigans, I removed the defunct centre brake light for +5 rear vision. Nothing revolutionary there. Oh, the last two fuel economies I've got have been 30.5, then 29.5 mpg. That's with a bit more A/C and peak hour driving than usual, but still... That is the same economy that the beta accent is getting. I will keep an eye on it. Also, I went to the dealer today to chase up some OEM AUDM 'Excel' and 'Sprint' bubble badges, but they want $75 for them. Pffft!
Still to come is a foamectomy on both front seats, fuel and air filter replacements, and the famous slave cylinder mod. I should get some or all of that done this thursday if it all goes to plan. Stay tuned! Cheers for reading!
-Immobiliser repaired
-Rear fog light replaced/modded
-Redundant 3rd brake light removed
-Fuel and air filter arrived this afternoon
So, this rear fog light has been ticking me off.
I thought it was just going to be a case of prying off a gasket, but no. The cracked black part actually forms part of the casing itself. The light is screwed to a the bumper, but it is well up behind cobwebs and the bumper support. Here is my spare light disassembled.
Okay, that is all pretty straightforward. But I just can't keep my hands still. Here is a close up of the existing lamp:
Notice how it doesn't illuminate the sections of housing around the lense screws? This is what inspired me to pull apart the spare lamp and look at the reflector:
I guess it was designed this way for easy casting or something. Anyway, that reflector design has been annoying me ever since my brother bought an elantra wagon back when I was 14. Yes,I am anally retentive about my OCD. So, I busted out the dremel and experimented with a LOT of patterns and reflector colours until I could get it just right on my spare unit I had lying around... it sure took lots of false starts...
Once I got it right though, I copied that design to the actual replacement. Basically, I just removed the high-gloss centre reflector, then painted over my dremel work with white paint. It is a white/silver hybrid super spaceship reflector now, money can't buy this sort of custom work.
The aim was to fill the whole housing with even, red light no brighter than the regular tail lights. We get barely any fog in Australia, especially Perth, so I figured I may as well turn it into a functional marker/position light that I can use legally. Anyways, I put it all back together, and after a trip to Radioshack, I pieced together a little resistor pack to get the brightness just right. I was originally going to use a variable resistor to set it, but none of the available pots could handle the current that the fog demanded. They all just burnt out as soon as the light was barely lit. I mounted my resistor pack behind the trunk vent panel, for discretion + airflow to the resistor pack.
Nice and neat! So, after a solid morning's work, this here are the end results:
BEFORE
AFTER
I'm quite content with that! Inbetween all those shenanigans, I removed the defunct centre brake light for +5 rear vision. Nothing revolutionary there. Oh, the last two fuel economies I've got have been 30.5, then 29.5 mpg. That's with a bit more A/C and peak hour driving than usual, but still... That is the same economy that the beta accent is getting. I will keep an eye on it. Also, I went to the dealer today to chase up some OEM AUDM 'Excel' and 'Sprint' bubble badges, but they want $75 for them. Pffft!
Still to come is a foamectomy on both front seats, fuel and air filter replacements, and the famous slave cylinder mod. I should get some or all of that done this thursday if it all goes to plan. Stay tuned! Cheers for reading!
02-14-2012, 08:51 PM
#19
Super Moderator
More work than I'd have done for fog lights but it does look better.
I'd caution you about the resistors . . . run the lights for a while with the engine on and see that you still have a safe resistor temperature before forgetting about the modification.
I'd caution you about the resistors . . . run the lights for a while with the engine on and see that you still have a safe resistor temperature before forgetting about the modification.
02-14-2012, 10:05 PM
#20
Senior Member
Thread Starter
Join Date: Dec 2008
Location: Floating around the AUDM
Posts: 3,837
Likes: 0
Received 0 Likes
on
0 Posts
Vehicle: X3 Sprint, S-Coupe Turbo
I agree Stocker, I shall be watching them with caution.
The reason I made a resistor pack was that the original 5 ohm, 10w resistor got too hot to touch after about thirty seconds of operation. The combined wattage rating of the pack is 25w, which combined with a bit of ventilation, should prevent any fires/melting. I can always wire up a computer fan or mount it on a heatsink somewhere if things get desperate.
The reason I made a resistor pack was that the original 5 ohm, 10w resistor got too hot to touch after about thirty seconds of operation. The combined wattage rating of the pack is 25w, which combined with a bit of ventilation, should prevent any fires/melting. I can always wire up a computer fan or mount it on a heatsink somewhere if things get desperate.