
DIY: Remove/Re-Install Power Steering Pressure Hose

Thread Starter
Super Moderator


Joined: Sep 2001
Posts: 10,795
Likes: 5
From: Pflugerville, TX
Vehicle: 2000 Elantra
This DIY is to show you how to remove and reinstall the pressure hose for the power steering system. This hose ranges from $50 to well over $100 so it's no joke if you screw it up on accident. I did my homework and took my time (and pictures) to make it easier for you. This applies directly to all 1996-2000 Elantras and 1997-2001 Tiburons.
Tools/parts required:
I got the main steps from hyundaitechinfo.com, but they make it sound WAY easier than it actually is. If you have the engine out, or even just the intake manifold, this becomes significantly less hassle. With the engine in, and taking pictures, it took me a couple of hours.
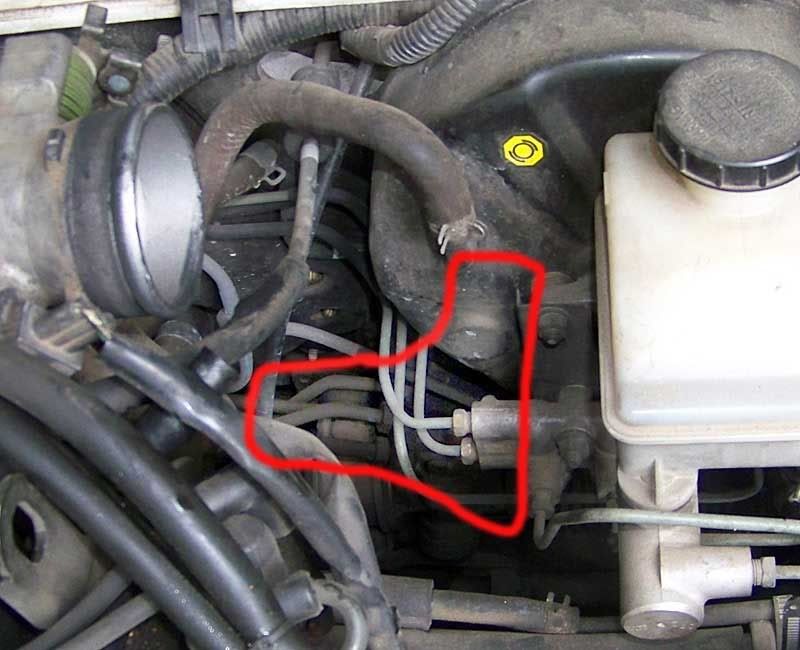
Remove the air intake tract all the way back to the throttle body. This means your cold air intake or stock intake elbows with resonators, filter housing, MAF, and the big rubber elbow with hoses going into it from the IAC and valve cover. All of this is necessary because the outlet end of the hose you are replacing is basically totally inaccessible otherwise. This is what it looks like when it is taken-apart enough.
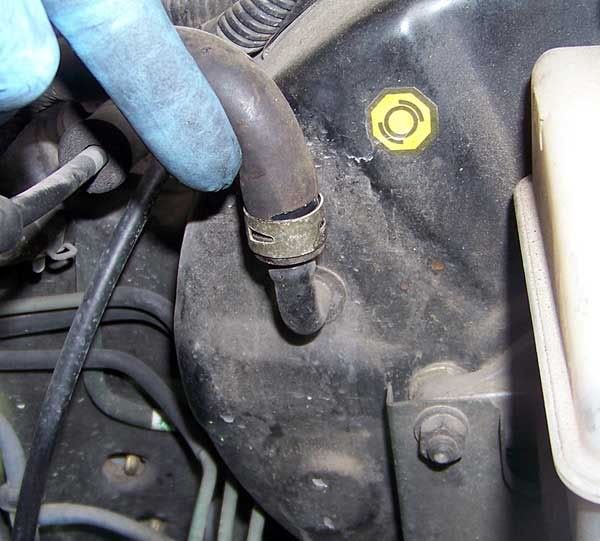
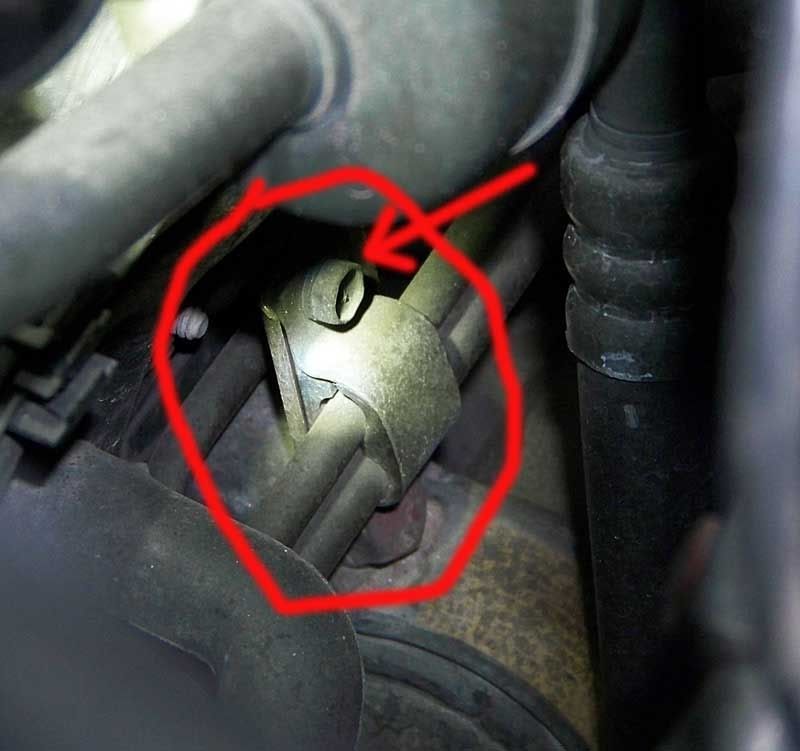
What webtech did NOT say was that you will slice your arms to ribbons on the spring clamp on the brake booster's big vacuum line. See the above image . . . the two prongs are sharp. Turn that sucker around.
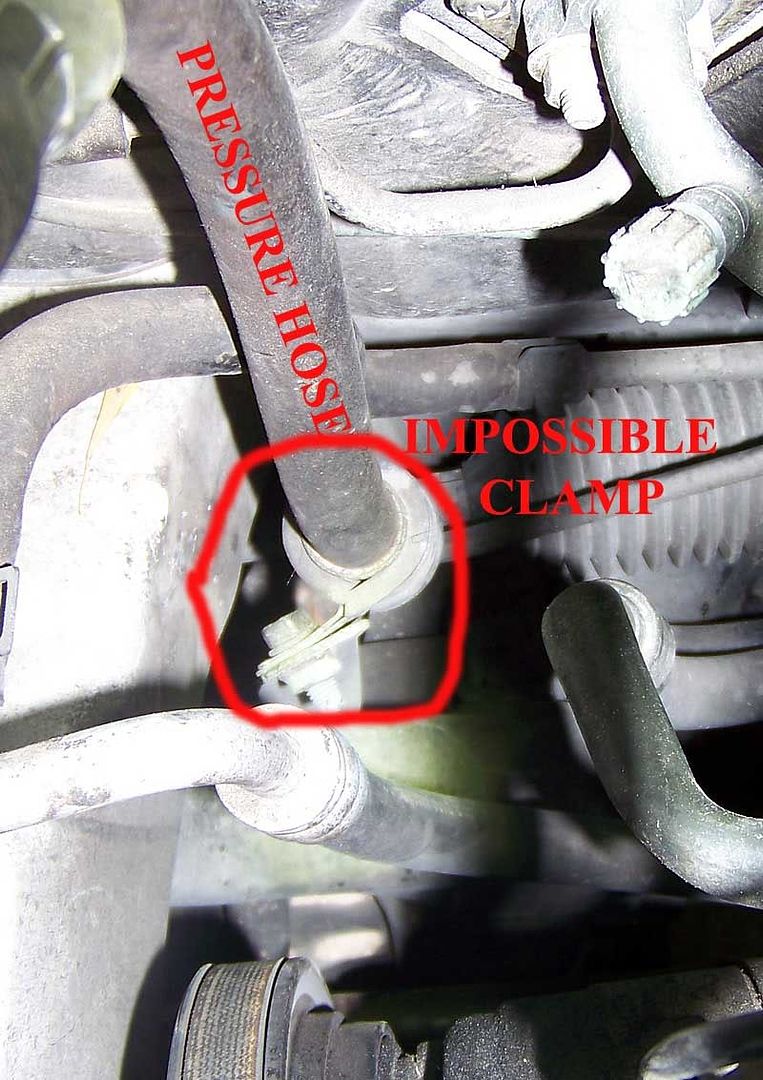
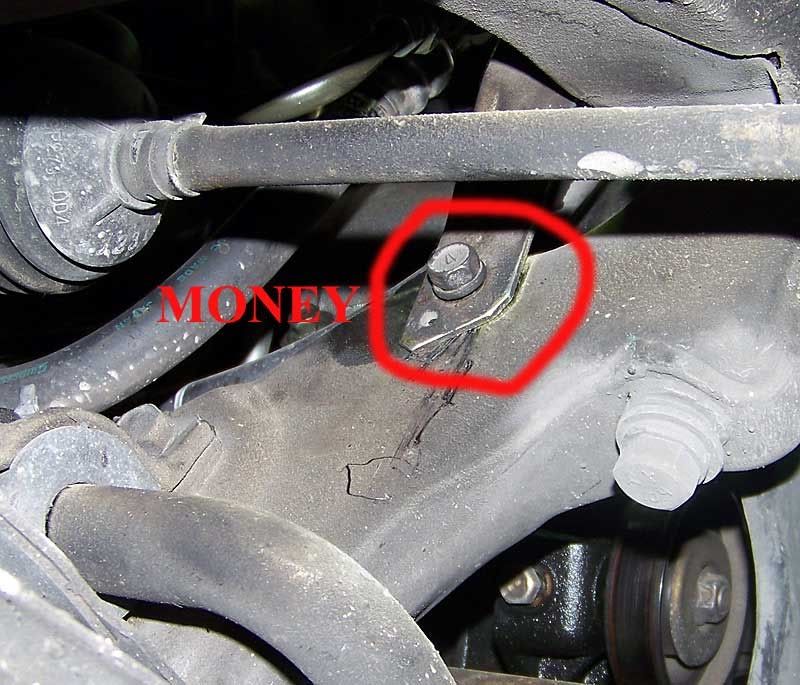
Detach the pressure hose mounting clamp bracket holding the hose to the car, over by the air conditioning compressor. The clamp on the hose is just shy of impossible to remove.
So scoot under the bottom of the car and unbolt the whole bracket. Save the bracket, you will need it later.
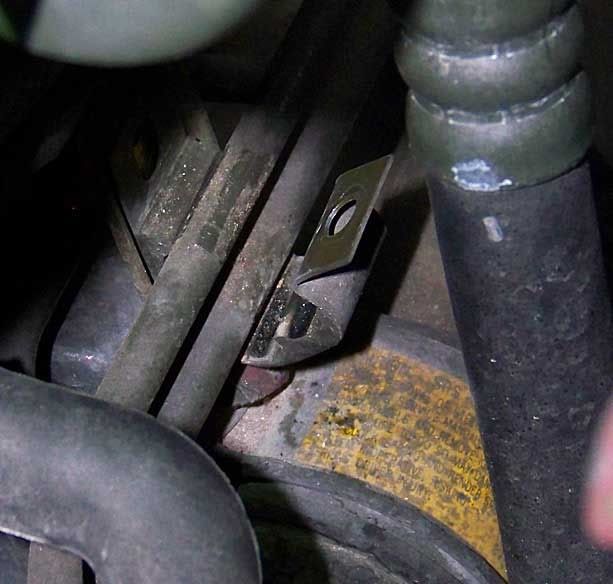
Open the clamp holding the pressure & return lines together under the intake manifold. This clamp is supposed to be removed, which would be simple without the engine in place. With the engine installed, getting the big (24mm?) bolt off is more than I cared to attempt. As i do not intend to be in there very frequently, I took the risk and only opened the top of the clamp (10mm bolt) and bent/spread the clamp apart.
This more than enough clamp-opening for this job:
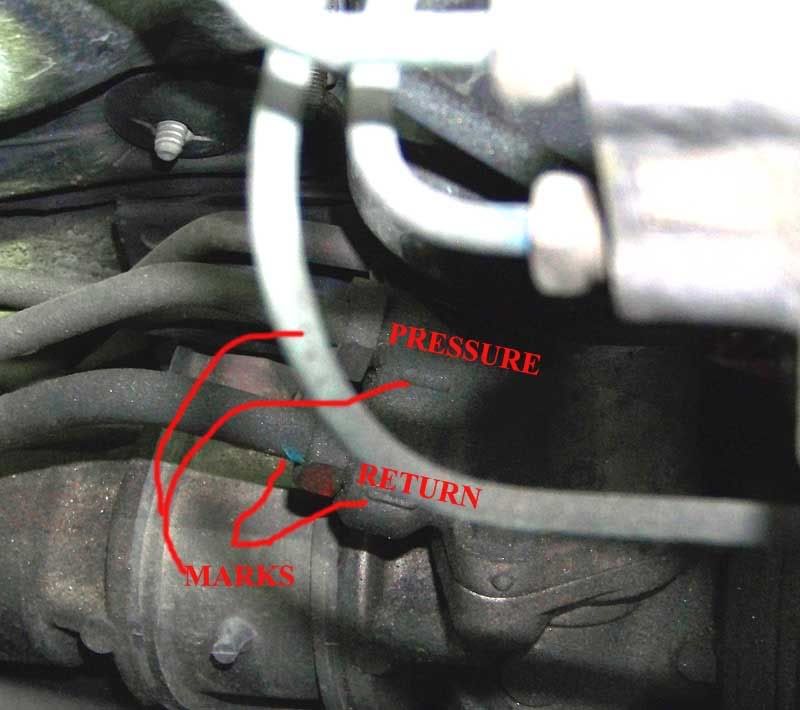
The official way to drain the power steering system is to crank the engine and turn the wheel with the ignition disconnected and spray the oil into a catch can . . . my system was pretty well drained already and the following way will work anyhow, so I totally skipped the step of intentionally draining the whole system. It probably let me skip a little bit on the other end of the job (air bleeding) as well. Put your biggish catch pan under the car and try to eyeball it so the pan is directly under the spot where the end of the pressure hose will disconnect by the gear box. The object is to catch as much ATF as possible without letting it run all over the steering rack and your paint job (because ATF eats paint for lunch). When the catch pan is in position, disconnect the pressure tube fitting at the gear box. The pressure line is the one on top. The bottom fitting is the return line. Confirm this for yourself if you like, by following the tube with your eyeball until you reach the power steering pump.
This is a tight squeeze. If you do not have a crowsfoot wrench, this is one of those things where you barely-turn the fastener, rotate the wrench, barely turn, rotate the wrench, barely turn, etc. until it comes loose enough to turn by hand. The manual says to be careful when you reinstall the line that you line up the marks on the hose and gear box. I found this totally un-necessary because when it is bolted in place the line holds itself perfectly in position, but the marks are there anyhow so whatever.
Jam a bunch of paper towels in between the lines and the car, and in the drip-path on the way to over the catch pan. This saves huge on cleanup time later.
I used a wrench to hold the line out over the opening while the hose drained ATF into my pan.
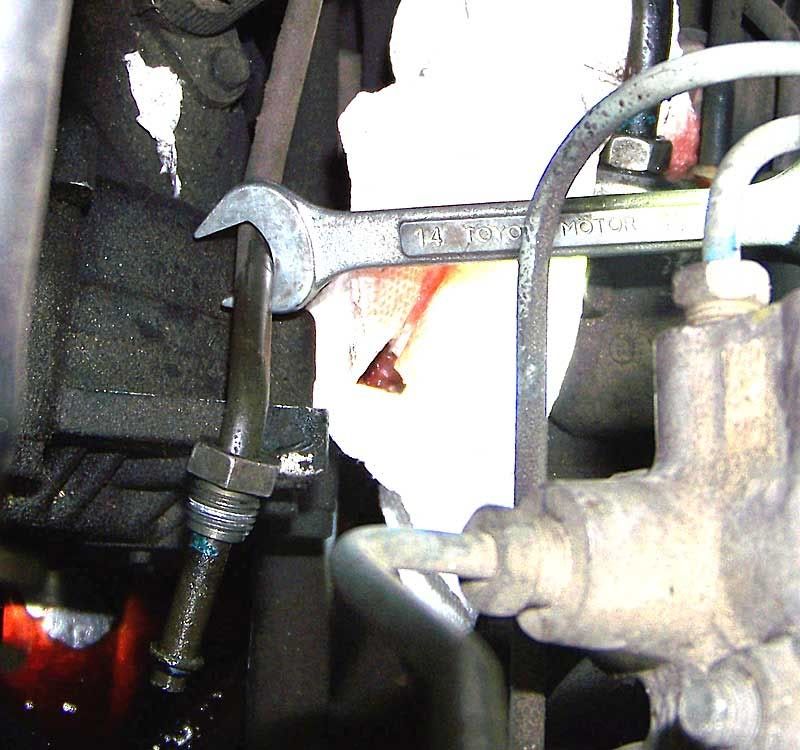
Yes it is a Toyota wrench. Deal with it.
Disconnect the banjo bolt on top of the power steering pump. Let it drain for a minute. Lift up the pump end of the line and let it drain some more.
If you are going to reuse the hose, protect the threads and the end of the hard line by wrapping it in a bit of a rag or something, and pull the hose up and out from the passenger side of the engine bay. If you do not cap the line, it will spray ATF droplets everywyere, trust me.
Interesting factoid about this line: The hard line could stay in place if you could get your hands on the flexible part that looks like a rubber hose. It's not a rubber hose, there is a flexible steel hose in there. I think the rubber is just to protect this mission-critical part from rubbing/breaking against the engine. This is what both ends of the hard line look like, one with old and one with new seals:
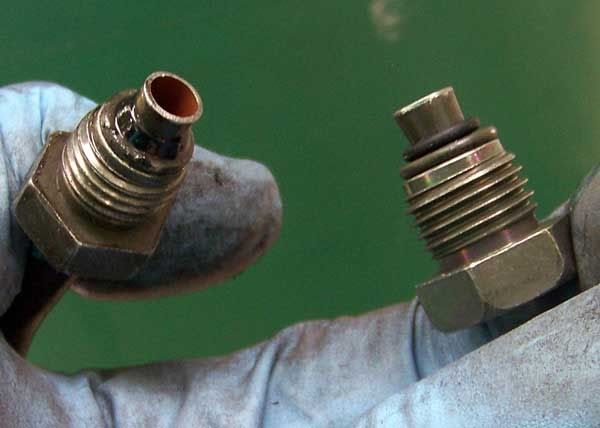
I would NOT want to replace this hose assembly without at least replacing that smashed-to-flat O-ring. The line is coppery metal inside, not stained, in case you were wondering.
Installation is reverse of removal.
Transfer the mounting bracket over to the new pressure line while the new line is still out of the car. Carefully compare relative orientation . . . the clamp on my new hose had rotated in shipping, making it more difficult to install the hose (with mis-oriented bracket) in the car. Snake the replacement hose back under the intake manifold. It does not want to go in there, but it will. Reattach the hard line to the gear box at the power steering rack.
Pressure tube to gear box torque: 9-13 ft-lbs
At this point I used a syringe and injected ATF into the line from the pump end until it wouldn't take any more, in an attempt to cut the requirement for bleeding the system to a bare minimum. I also filled the PS oil reservoir and worked the pump until the suction line and pump were both full of oil.
Bolt the pressure line to the pump. Be sure to observe the torque specification:
Pressure hose to pump torque 40-48 ft-lbs
The bolt that holds the middle clamp (behind the intake manifold) together is pretty short. You will have to push ridiculously hard at an angle to get it back together if you bent the clamp. The clamp that holds the pressure line to the unibody by the air conditioner compressor is easy to bolt up.
Your intake tract is taken apart. When was the last time you cleaned your throttle body? This is a great time to clean out your throttle body. Hey do you think this is good for your idle quality?
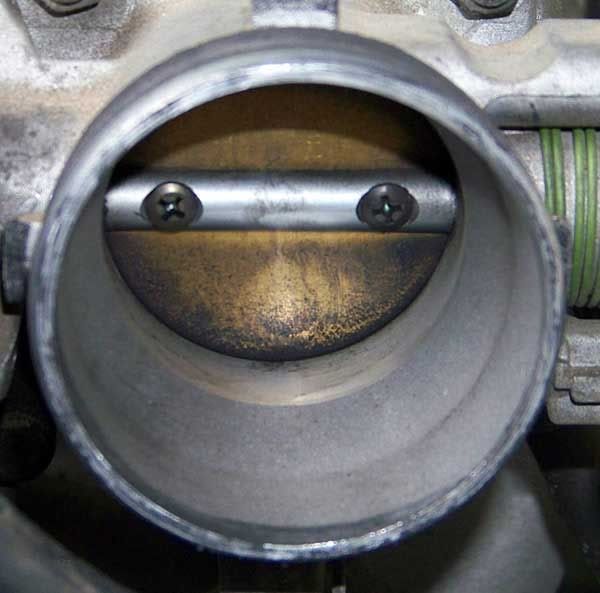
I used isopropanol on paper towels to clean out my TB before reassembling the intake. Don't forget to orient the MAF sensor properly (arrow points to the intake manifold) and don't forget to reconnect any sensors you disconnected. Re-rotate the brake booster clip if you want to. My power steering belt was off (so was the pump) and now is the time to reinstall the belt. The belt is supposed to have 6-9mm deflection when you push the middle of the top run with 22lbs of force. Practically speaking, this means REALLY FRIKKEN TIGHT. I used a wrench wedged between the head and power steering pump to push out on the pump, while tightening the pump mounting bolts (26-37 ft-lbs same as the pump bracket-to-cylinder head bolts). If, after starting your car, you get belt squeal, the belt is too loose. I had surface rust on my pulley so I sanded the belt contact area AND I sanded the smooth sides of the belt with 220 grit sandpaper. If the belt squeals after you do all that, when you turn the wheel to full lock in either direction, the belt is still too loose. This belt has to be stupid tight.
Bleed the air out of the power steering system. The manual says to disconnect the high voltage connector on the coil pack . . . mine started cracking so I stopped taking it apart. Instead I disconnected the Crank Position Sensor. The CKP being disconnected means the car will crank but not start, which is the same as having no spark with the coils disconnected. Be aware: this will give you a CEL that goes away after three drive cycles. If you leave the car in a condition that the engine will run, when the engine starts it will churn the air into the power steering oil and give you headaches later until you let it settle/separate again and bleed it properly (at low engine/pump speed).
Fill the oil reservoir. I over-filled mine to spare me having to top it off, but that is your call. Crank the engine with the starter, and crank the steering wheel lock-to-lock back and forth 5 or 6 times to circulate the oil in the power steering system. Replenish the oil if required to keep the proper level in the power steering fluid reservoir. If you didn't pre-fill the line and pump I expect it would need to be topped-off quite a bit. Replace the connector you disconnected and start the car. Turn the wheel all the way left/right repeatedly until there are no more bubbles in the reservoir. If the pump is chattering for more than a second or three, stop the engine and bleed the lines at cranking speed again. Too many bubbles in the pump will cause it to chatter (and eventually destroy itself). Your steering wheel, with the air bled out of the system, should have 1.1" of play (max.) when 1.1lbs of force are applied.
It would be a good idea to check the fluid after a short trip, then after a few days' driving. To check the fluid level, crank the wheel a few times to raise the oil temperature, and have a peek. If it varies >5mm bleed it again. If the level rises when the engine is shut off, bleed it again. If the oil is cloudy, you likely have entrained air. Let it sit for a while and bleed it again. If you tightened everything properly, you should not have to worry about oil leaks when you are done.
Power steering system general information:
The power steering pump is belt-driven by the water pump pulley. The water pump pulley is belt-driven by the crank pulley. The power steering pump always spins and always is producing pressure when the engine is turning. This steals (from online research) around 5 or 6 horsepower from your engine's output. The power steering pump is a somewhat unremarkable little tiny hydraulic oil pump. The internal relief is supposed to be set to 1000PSI. You should not block the pressure port OR hold your steering wheel at the end-of-travel stop for >10 seconds to help preserve the pump.
The high pressure hydraulic oil goes through the pressure hose to the steering gearbox, where it does nothing until you turn the wheel. Through the magic of hydraulic valves, the system adds pressure to one side or the other of the gear box depending on how you turn the steering wheel. The steering wheel and powered gear box work in concert to drive the steering rack. The steering rack is what provides lateral force to turn the wheels.
From the gear box, the hydraulic oil goes to the return hose, then to the power steering oil cooler in front of the A/C condenser. The oil cooler is just a loop of exposed metal pipe that catches cool air. From the cooler, the oil goes to the reservoir. The suction hose is the large diameter pre-formed rubber hose connecting the reservoir to the pump. When the pump turns, it creates both pressure and suction (at the outlet and inlet, respectively) and draws cooled, low-pressure oil from the power steering fluid reservoir through the suction hose. The pressure hose connects at the "banjo bolt" fitting on top of the pump, goes down through the passenger side of the engine bay, and back across to the steering gear behind the engine.
The power steering oil is hydraulic oil, and the manual recommends Dexron II Automatic Transmission Fluid. This has been superseded by Dex III, and it should not make much difference what fluid you use, as long as it meets the Dex III specification. Hyundai also sells their own house-brand unicorn whiz for a premium if you want pay a premium to use what they sell at the parts counter.
Go for a test drive. Frosty beverages must wait until after the drive or you might just get
Tools/parts required:
- 17, 10mm open wrenches
- Torque wrench
- Flathead screwdriver
- Pliers for spring clamps
- 14, 12, 10mm sockets
- Catch pan
- Nice to have: socket extensions and 10mm nut driver
- 1 quart of power steering oil (Dexron III equivalent Automatic Transmission Fluid $2 at the nearest NON-AutoZone car parts store)
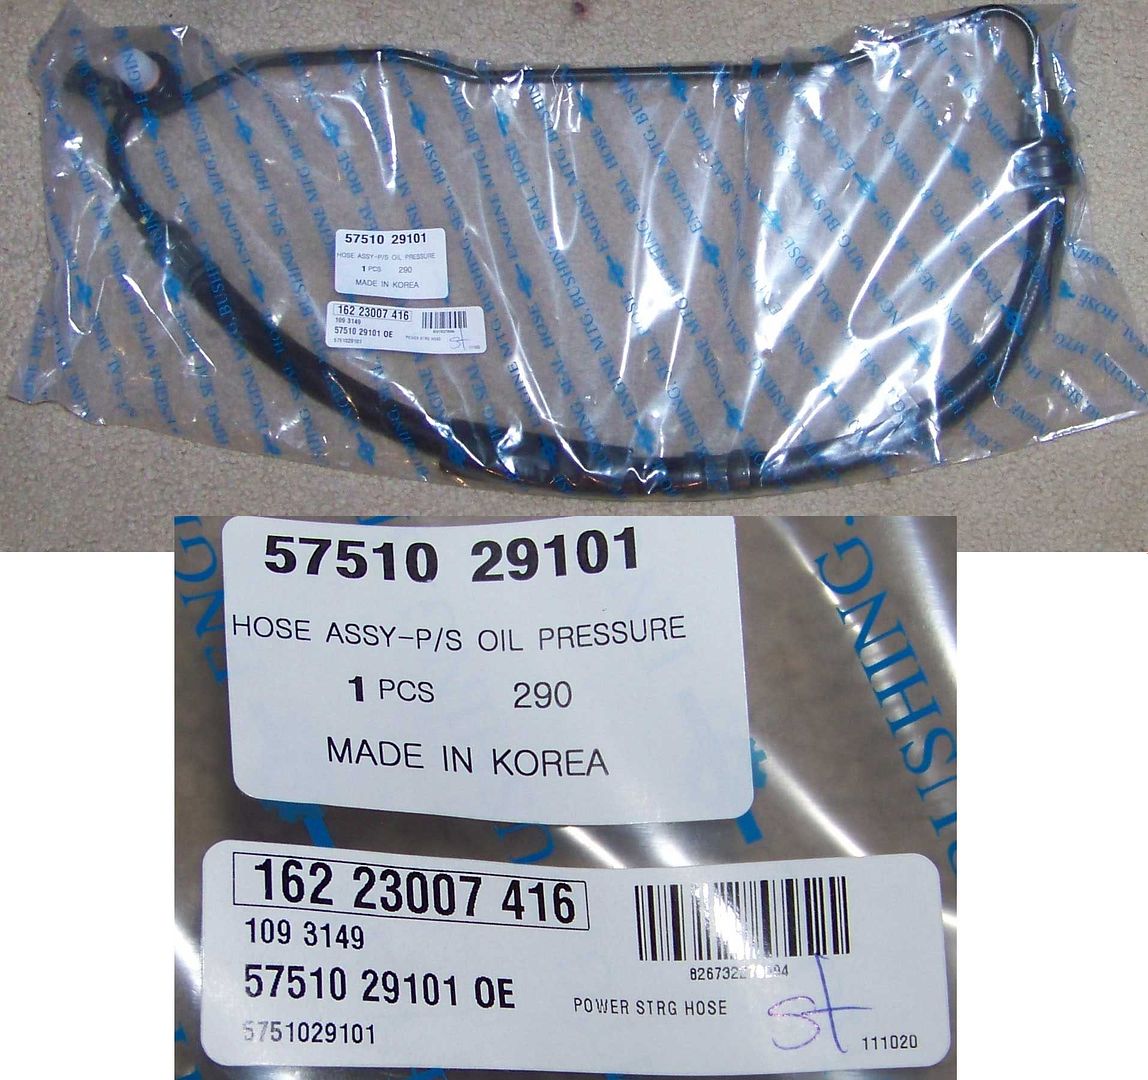
- (if replacing the hose) 57510 29101 Pressure Hose (this one was $55 on eBay)
I got the main steps from hyundaitechinfo.com, but they make it sound WAY easier than it actually is. If you have the engine out, or even just the intake manifold, this becomes significantly less hassle. With the engine in, and taking pictures, it took me a couple of hours.
Remove the air intake tract all the way back to the throttle body. This means your cold air intake or stock intake elbows with resonators, filter housing, MAF, and the big rubber elbow with hoses going into it from the IAC and valve cover. All of this is necessary because the outlet end of the hose you are replacing is basically totally inaccessible otherwise. This is what it looks like when it is taken-apart enough.
What webtech did NOT say was that you will slice your arms to ribbons on the spring clamp on the brake booster's big vacuum line. See the above image . . . the two prongs are sharp. Turn that sucker around.
Detach the pressure hose mounting clamp bracket holding the hose to the car, over by the air conditioning compressor. The clamp on the hose is just shy of impossible to remove.
So scoot under the bottom of the car and unbolt the whole bracket. Save the bracket, you will need it later.
Open the clamp holding the pressure & return lines together under the intake manifold. This clamp is supposed to be removed, which would be simple without the engine in place. With the engine installed, getting the big (24mm?) bolt off is more than I cared to attempt. As i do not intend to be in there very frequently, I took the risk and only opened the top of the clamp (10mm bolt) and bent/spread the clamp apart.
This more than enough clamp-opening for this job:
The official way to drain the power steering system is to crank the engine and turn the wheel with the ignition disconnected and spray the oil into a catch can . . . my system was pretty well drained already and the following way will work anyhow, so I totally skipped the step of intentionally draining the whole system. It probably let me skip a little bit on the other end of the job (air bleeding) as well. Put your biggish catch pan under the car and try to eyeball it so the pan is directly under the spot where the end of the pressure hose will disconnect by the gear box. The object is to catch as much ATF as possible without letting it run all over the steering rack and your paint job (because ATF eats paint for lunch). When the catch pan is in position, disconnect the pressure tube fitting at the gear box. The pressure line is the one on top. The bottom fitting is the return line. Confirm this for yourself if you like, by following the tube with your eyeball until you reach the power steering pump.
This is a tight squeeze. If you do not have a crowsfoot wrench, this is one of those things where you barely-turn the fastener, rotate the wrench, barely turn, rotate the wrench, barely turn, etc. until it comes loose enough to turn by hand. The manual says to be careful when you reinstall the line that you line up the marks on the hose and gear box. I found this totally un-necessary because when it is bolted in place the line holds itself perfectly in position, but the marks are there anyhow so whatever.
Jam a bunch of paper towels in between the lines and the car, and in the drip-path on the way to over the catch pan. This saves huge on cleanup time later.
I used a wrench to hold the line out over the opening while the hose drained ATF into my pan.
Yes it is a Toyota wrench. Deal with it.
Disconnect the banjo bolt on top of the power steering pump. Let it drain for a minute. Lift up the pump end of the line and let it drain some more.
If you are going to reuse the hose, protect the threads and the end of the hard line by wrapping it in a bit of a rag or something, and pull the hose up and out from the passenger side of the engine bay. If you do not cap the line, it will spray ATF droplets everywyere, trust me.
Interesting factoid about this line: The hard line could stay in place if you could get your hands on the flexible part that looks like a rubber hose. It's not a rubber hose, there is a flexible steel hose in there. I think the rubber is just to protect this mission-critical part from rubbing/breaking against the engine. This is what both ends of the hard line look like, one with old and one with new seals:
I would NOT want to replace this hose assembly without at least replacing that smashed-to-flat O-ring. The line is coppery metal inside, not stained, in case you were wondering.
Installation is reverse of removal.
Transfer the mounting bracket over to the new pressure line while the new line is still out of the car. Carefully compare relative orientation . . . the clamp on my new hose had rotated in shipping, making it more difficult to install the hose (with mis-oriented bracket) in the car. Snake the replacement hose back under the intake manifold. It does not want to go in there, but it will. Reattach the hard line to the gear box at the power steering rack.
Pressure tube to gear box torque: 9-13 ft-lbs
At this point I used a syringe and injected ATF into the line from the pump end until it wouldn't take any more, in an attempt to cut the requirement for bleeding the system to a bare minimum. I also filled the PS oil reservoir and worked the pump until the suction line and pump were both full of oil.
Bolt the pressure line to the pump. Be sure to observe the torque specification:
Pressure hose to pump torque 40-48 ft-lbs
The bolt that holds the middle clamp (behind the intake manifold) together is pretty short. You will have to push ridiculously hard at an angle to get it back together if you bent the clamp. The clamp that holds the pressure line to the unibody by the air conditioner compressor is easy to bolt up.
Your intake tract is taken apart. When was the last time you cleaned your throttle body? This is a great time to clean out your throttle body. Hey do you think this is good for your idle quality?
I used isopropanol on paper towels to clean out my TB before reassembling the intake. Don't forget to orient the MAF sensor properly (arrow points to the intake manifold) and don't forget to reconnect any sensors you disconnected. Re-rotate the brake booster clip if you want to. My power steering belt was off (so was the pump) and now is the time to reinstall the belt. The belt is supposed to have 6-9mm deflection when you push the middle of the top run with 22lbs of force. Practically speaking, this means REALLY FRIKKEN TIGHT. I used a wrench wedged between the head and power steering pump to push out on the pump, while tightening the pump mounting bolts (26-37 ft-lbs same as the pump bracket-to-cylinder head bolts). If, after starting your car, you get belt squeal, the belt is too loose. I had surface rust on my pulley so I sanded the belt contact area AND I sanded the smooth sides of the belt with 220 grit sandpaper. If the belt squeals after you do all that, when you turn the wheel to full lock in either direction, the belt is still too loose. This belt has to be stupid tight.
Bleed the air out of the power steering system. The manual says to disconnect the high voltage connector on the coil pack . . . mine started cracking so I stopped taking it apart. Instead I disconnected the Crank Position Sensor. The CKP being disconnected means the car will crank but not start, which is the same as having no spark with the coils disconnected. Be aware: this will give you a CEL that goes away after three drive cycles. If you leave the car in a condition that the engine will run, when the engine starts it will churn the air into the power steering oil and give you headaches later until you let it settle/separate again and bleed it properly (at low engine/pump speed).
Fill the oil reservoir. I over-filled mine to spare me having to top it off, but that is your call. Crank the engine with the starter, and crank the steering wheel lock-to-lock back and forth 5 or 6 times to circulate the oil in the power steering system. Replenish the oil if required to keep the proper level in the power steering fluid reservoir. If you didn't pre-fill the line and pump I expect it would need to be topped-off quite a bit. Replace the connector you disconnected and start the car. Turn the wheel all the way left/right repeatedly until there are no more bubbles in the reservoir. If the pump is chattering for more than a second or three, stop the engine and bleed the lines at cranking speed again. Too many bubbles in the pump will cause it to chatter (and eventually destroy itself). Your steering wheel, with the air bled out of the system, should have 1.1" of play (max.) when 1.1lbs of force are applied.
It would be a good idea to check the fluid after a short trip, then after a few days' driving. To check the fluid level, crank the wheel a few times to raise the oil temperature, and have a peek. If it varies >5mm bleed it again. If the level rises when the engine is shut off, bleed it again. If the oil is cloudy, you likely have entrained air. Let it sit for a while and bleed it again. If you tightened everything properly, you should not have to worry about oil leaks when you are done.
Power steering system general information:
The power steering pump is belt-driven by the water pump pulley. The water pump pulley is belt-driven by the crank pulley. The power steering pump always spins and always is producing pressure when the engine is turning. This steals (from online research) around 5 or 6 horsepower from your engine's output. The power steering pump is a somewhat unremarkable little tiny hydraulic oil pump. The internal relief is supposed to be set to 1000PSI. You should not block the pressure port OR hold your steering wheel at the end-of-travel stop for >10 seconds to help preserve the pump.
The high pressure hydraulic oil goes through the pressure hose to the steering gearbox, where it does nothing until you turn the wheel. Through the magic of hydraulic valves, the system adds pressure to one side or the other of the gear box depending on how you turn the steering wheel. The steering wheel and powered gear box work in concert to drive the steering rack. The steering rack is what provides lateral force to turn the wheels.
From the gear box, the hydraulic oil goes to the return hose, then to the power steering oil cooler in front of the A/C condenser. The oil cooler is just a loop of exposed metal pipe that catches cool air. From the cooler, the oil goes to the reservoir. The suction hose is the large diameter pre-formed rubber hose connecting the reservoir to the pump. When the pump turns, it creates both pressure and suction (at the outlet and inlet, respectively) and draws cooled, low-pressure oil from the power steering fluid reservoir through the suction hose. The pressure hose connects at the "banjo bolt" fitting on top of the pump, goes down through the passenger side of the engine bay, and back across to the steering gear behind the engine.
The power steering oil is hydraulic oil, and the manual recommends Dexron II Automatic Transmission Fluid. This has been superseded by Dex III, and it should not make much difference what fluid you use, as long as it meets the Dex III specification. Hyundai also sells their own house-brand unicorn whiz for a premium if you want pay a premium to use what they sell at the parts counter.
Go for a test drive. Frosty beverages must wait until after the drive or you might just get

Senior Member
Joined: Jul 2008
Posts: 649
Likes: 0
From: seacoast (New Hampshire)
Vehicle: 01/hyundai/tiburon
great pics and funny too!
thanks dude, i get the occational squeel if i hit the bump at the end of the steering travel a little fast...
this gives me motivation to fix it, hope the sh*t doesnt look like junk in there.
thanks dude, i get the occational squeel if i hit the bump at the end of the steering travel a little fast...
this gives me motivation to fix it, hope the sh*t doesnt look like junk in there.

Thread Starter
Super Moderator
Joined: Sep 2001
Posts: 10,795
Likes: 5
From: Pflugerville, TX
Vehicle: 2000 Elantra
I hope it does, bigfishmoney. I am actually looking forward to the day when we get a "back from the dead" thread when your car is officially (finally) done.