Genesis Coupe DIY : Nexus 7 Tablet Install
 10-15-2012, 11:19 AM
#1
Administrator

Thread Starter
Join Date: Oct 2002
Location: ɯooɹpǝq ɹnoʎ
Posts: 13,943
Likes: 0
Received 0 Likes
on
0 Posts
Vehicle: ǝdnoɔ sısǝuǝƃ
Parts:
Nexus 7 Tablet
Type-A or Type-B Bezel with LCD Relocator Kit (Contact PowerAxel for pricing on the Type B or get the Type A here http://www.jycustomusa.com/product_detail.php?no=33)
3ft. USB Cable -
6ft. Audio Cable - http://www.monoprice.com/products/pr...seq=1&format=2
2.0A or 2.1A USB Charger - http://www.monoprice.com/products/pr...seq=1&format=2
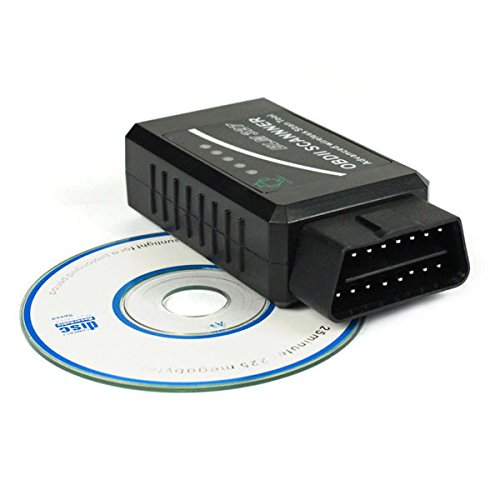
Bluetooth OBD-II dongle (eBay): http://www.ebay.com/itm/Interfuse-Mi...-/320968592359
Ground Loop Isolator: http://www.walmart.com/ip/Pyle-PLGI3...lator/21607547
Type-B Bezel Only - Small 8"x10" acrylic sheet http://www.homedepot.com/Building-Ma...0053&langId=-1
Type-A Bezel:
Type-B Bezel: By far 3x harder to install than the Type-A.
LCD Relocator:
Nexus 7 Tablet
Type-A or Type-B Bezel with LCD Relocator Kit (Contact PowerAxel for pricing on the Type B or get the Type A here http://www.jycustomusa.com/product_detail.php?no=33)
3ft. USB Cable -
6ft. Audio Cable - http://www.monoprice.com/products/pr...seq=1&format=2
2.0A or 2.1A USB Charger - http://www.monoprice.com/products/pr...seq=1&format=2
Bluetooth OBD-II dongle (eBay): http://www.ebay.com/itm/Interfuse-Mi...-/320968592359
Ground Loop Isolator: http://www.walmart.com/ip/Pyle-PLGI3...lator/21607547
Type-B Bezel Only - Small 8"x10" acrylic sheet http://www.homedepot.com/Building-Ma...0053&langId=-1
Type-A Bezel:
- On the Nexus 7, the USB power port is obstructed by the clip that holds in the top right of the bezel. I cut this, and notched a hole in the receiving end behind the dash so the USB would fit without a problem. This leaves 3 prongs, which is plenty and has a snug fit. I did NOT put the white clips back on, as it fits snug without them and I wanted to be able to easily remove it without prying the dash.
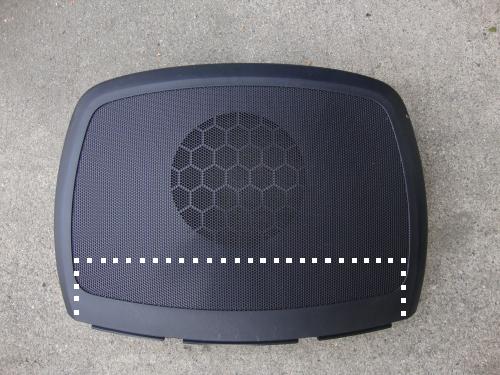
- The Type-A fits over the factory speaker cover. To make it fit, you must cut part of the speaker cover.
Type-B Bezel: By far 3x harder to install than the Type-A.
- First, you must find a way to secure the tablet without using the metal bracket that comes with it. The metal bracket blocks virtually the entire GPS signal. I bought a small acrylic sheet from Home Depot for $1.97 and sandwiched the tablet to the back of the bezel.
- Next, You have to cut. I cut the two lower clip receivers, since the Type-B doesn't have prongs there. Then, I cut the plastic pieces that run to those clips. These prevent the bezel from sitting flush at the bottom. If you keep having problems, keep cutting. See images:
 and
and  and
and 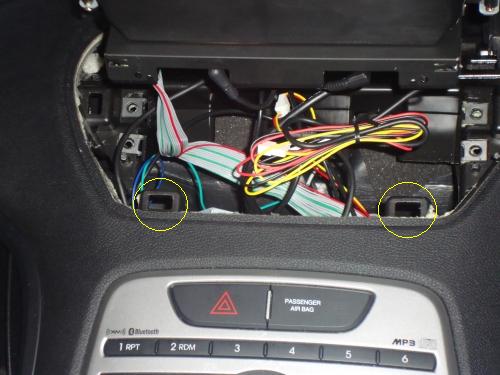
LCD Relocator:
- Remove the LCD screen (4 screws).
- Cut the two small zip ties holding the top LCD wiring harness in place.
- Remove the head unit (don't remove plugs, just hold it out of the way temporarily). Caution: Lock washer were used and screws strip easily. Make sure you use a phillips head large enough.
- Route the wiring harness from the top to bottom, along the left side so that it doesn't go behind head unit (won't be enough room)
- Take this opportunity to run USB and Audio cable from top to bottom. Audio cable will run along eBrake (pop the cover under the handle).
- reinstall head unit - don't tighten in case you have to remove again
- unscrew keyfob plug. Remove cigarette lighter, cut tabs if you have to. Both of these can be left under the shifter for use later.
- REMOVE the bracket on the LCD screen. Replace with new bracket. Mount bracket and square LCD surround TO THE BACK OF DASH SURROUND. This does not and will not mount to the car.
- You may need to cut two small sections from where the bottom of the LCD screen sits.
 10-15-2012, 11:29 AM
#2
Administrator
Thread Starter
Join Date: Oct 2002
Location: ɯooɹpǝq ɹnoʎ
Posts: 13,943
Likes: 0
Received 0 Likes
on
0 Posts
Vehicle: ǝdnoɔ sısǝuǝƃ
The Type-A fits better than the Type-B. For Nexus 7 owners, the Type-B provides difficult fitment and cuts off some of the top/bottom of the screen. The Type-A has flawless fitment. Also, the LCD relocator kit, black fits flawlessly and silver has slight issues with looking OEM (slightly tilted).
Type A:

Type B:

Splicing is required of USB cable so that it powers the device when the display is on. You can find a 2.1A USB charger with a [T] on it (click for example), or you can simply splice the USB wire.
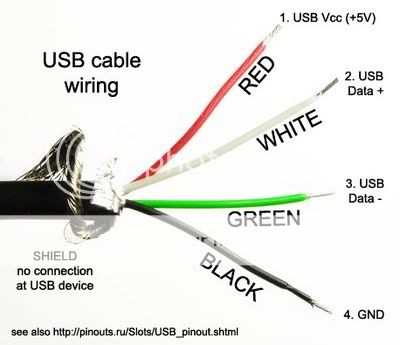
Open the shielding of the USB cable, find the Green and White wires, splice, and tie them together so it creates a loop back to the tablet. That's all you have to do. Don't touch the red and black wires.
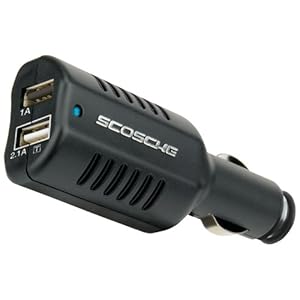
Ordering this charger will not require you to splice the USB Cable! It WILL charge the tablet while the display is on. http://www.amazon.com/Scosche-reVIVE.../dp/B004I44CHQ
Wrap the audio cable in aluminum shielding tape to reduce alternator whine. I bought it at Northern Tool + Equipment, a small roll for $2.50. Wrap the entire cable, and then tape it to the metal bar behind the dash. This ground it and gives it somewhere for the electromagnetic stuff to go somewhere.
http://www.northerntool.com/shop/too...6746_200326746

Note: I DO NOT think you need this if you get the Ground Loop Isolator!!
Type A:
Type B:
Splicing is required of USB cable so that it powers the device when the display is on. You can find a 2.1A USB charger with a [T] on it (click for example), or you can simply splice the USB wire.
Open the shielding of the USB cable, find the Green and White wires, splice, and tie them together so it creates a loop back to the tablet. That's all you have to do. Don't touch the red and black wires.
Ordering this charger will not require you to splice the USB Cable! It WILL charge the tablet while the display is on. http://www.amazon.com/Scosche-reVIVE.../dp/B004I44CHQ
Wrap the audio cable in aluminum shielding tape to reduce alternator whine. I bought it at Northern Tool + Equipment, a small roll for $2.50. Wrap the entire cable, and then tape it to the metal bar behind the dash. This ground it and gives it somewhere for the electromagnetic stuff to go somewhere.
http://www.northerntool.com/shop/too...6746_200326746
Note: I DO NOT think you need this if you get the Ground Loop Isolator!!
10-15-2012, 11:30 AM
#3
Administrator
Thread Starter
Join Date: Oct 2002
Location: ɯooɹpǝq ɹnoʎ
Posts: 13,943
Likes: 0
Received 0 Likes
on
0 Posts
Vehicle: ǝdnoɔ sısǝuǝƃ
Purchase:
Bluetooth OBD-II dongle: http://www.ebay.com/itm/Interfuse-Mi...-/320968592359

To Root Tablet: (not necessary, but why not?)
Download Here:http://www.wugfresh.com/dev/nexus-root-toolkit/
http://www.youtube.com/watch?v=Lg_QU9w5xCU
Apps:
Apex Launcher - notification bar accessed via double tap, custom screen size 6x6, 7x7, etc.
ES File Explorer - File Manager, View files on device and share via Bluetooth between phone/tablet
HD Widgets High Res (custom clock, custom switches)
SwiftKey 3 (tablet version separates keyboard, I didn't like it. Used regular version. Custom keyboard colors)
Sygic GPS or NavFree (offline GPS)
Torque Pro
Ultimate Rotation Control - Landscape Mode locked
WiFi File Explorer - transfer files between PC and tablet
Jumpgate Free Live Wallpaper (it's just cool)
Volume Control + or Slider Widget - Volumes (control volume without button access)
"Reboot Widget (root)" - Restart tablet without button access if it messes up
I used MusixMatch for audio at first, but then realized that Google Music automatically syncs when you upload it to the cloud. So, upload music to Google then sync it when your tablet is on WiFi. You can manage playlists and such from the web and it will automatically update on the tablet.
Download the Tasker app to control power. Turn Bluetooth, WiFi, and Display off when power disconnects. Turn them on when power connects. This is a free trial app, but then it prevents you from editing/viewing your tasks once trial runs out. Worth purchasing.
Bluetooth OBD-II dongle: http://www.ebay.com/itm/Interfuse-Mi...-/320968592359
To Root Tablet: (not necessary, but why not?)
Download Here:http://www.wugfresh.com/dev/nexus-root-toolkit/
http://www.youtube.com/watch?v=Lg_QU9w5xCU
Apps:
Apex Launcher - notification bar accessed via double tap, custom screen size 6x6, 7x7, etc.
ES File Explorer - File Manager, View files on device and share via Bluetooth between phone/tablet
HD Widgets High Res (custom clock, custom switches)
SwiftKey 3 (tablet version separates keyboard, I didn't like it. Used regular version. Custom keyboard colors)
Sygic GPS or NavFree (offline GPS)
Torque Pro
Ultimate Rotation Control - Landscape Mode locked
WiFi File Explorer - transfer files between PC and tablet
Jumpgate Free Live Wallpaper (it's just cool)
Volume Control + or Slider Widget - Volumes (control volume without button access)
"Reboot Widget (root)" - Restart tablet without button access if it messes up
I used MusixMatch for audio at first, but then realized that Google Music automatically syncs when you upload it to the cloud. So, upload music to Google then sync it when your tablet is on WiFi. You can manage playlists and such from the web and it will automatically update on the tablet.
Download the Tasker app to control power. Turn Bluetooth, WiFi, and Display off when power disconnects. Turn them on when power connects. This is a free trial app, but then it prevents you from editing/viewing your tasks once trial runs out. Worth purchasing.
01-13-2013, 10:37 AM
#4
Administrator
Thread Starter
Join Date: Oct 2002
Location: ɯooɹpǝq ɹnoʎ
Posts: 13,943
Likes: 0
Received 0 Likes
on
0 Posts
Vehicle: ǝdnoɔ sısǝuǝƃ
01-15-2013, 08:06 AM
#6
Administrator
Thread Starter
Join Date: Oct 2002
Location: ɯooɹpǝq ɹnoʎ
Posts: 13,943
Likes: 0
Received 0 Likes
on
0 Posts
Vehicle: ǝdnoɔ sısǝuǝƃ
I didn't cut it, I bought the Type-A used and asked the seller to give me the one he cut. A dremel would be my choice, though. The Type-A bezel overlaps the top of the speaker cover, so even if it isn't a perfect cut it would be covered. I was told it's $30 from the dealership for a replacement, so if you want to go back to stock it's easy.
You have to cut some of the mounting slots for the Type-A to fit, but it still fits snug. I did NOT use the white clips that make the bezel snap into place - it fits fine, no rattle or anything, it just makes it easy to remove it if I want to take it in the house and do anything (charge it, transfer files, etc). The Type-B has more cutting involved than the Type-A and takes a little more trial and error (sand here, cut there) to make it fit perfectly flush.
Also, others are saying they used the metal mounting bracket without any trouble on the Acer A100. I guess the Nexus 7 has the radio in a different location that causes the signal to conflict with the metal bracket.
01-18-2013, 04:47 PM
#7
Administrator
Thread Starter
Join Date: Oct 2002
Location: ɯooɹpǝq ɹnoʎ
Posts: 13,943
Likes: 0
Received 0 Likes
on
0 Posts
Vehicle: ǝdnoɔ sısǝuǝƃ
I'm going to keep all my mental notes here so others can learn from it.
If you're using the Torque app:
1. Never leave it at the opening menu screen (with the different option buttons). The tablet will NOT sleep while on this screen, even if you have Tasker programmed to sleep. (This screen: Click Link)
2. Don't change the options to Automatically Sleep on power disconnect. It's fine until you run into certain problems. What appears to happen is the tablet will sleep and turn off WiFi (and maybe Bluetooth?) but it won't give Tasker time to run and shut down the other stuff (in my particular predicament, the music app).
What I experienced over time was that the music app will continue to run and play all songs in the playlist. This (in my case) may include 2,000+ songs, meaning it will practically never stop playing. This tends to drain it anywhere from 4-8% in a day, so if your car sits over the weekend it may drain it 15% or more. Not to fear, it'll charge up fine, unless you do this continually and it drains more overnight than it charges during the day.
Something to consider is having Tasker close the Torque app. This may or may not work, and may or may not require rooting. It's worth attempting.
Tablet Completely Drains and Won't turn back on
The above situation caused my tablet to drain completely. I came out to the car, started it, and the "Charging" icon came onto the screen. After 5 seconds, the screen went blank. OMG WTF?! It did this for two days, obviously having enough time to charge up, right?
Well, here's a (slight) problem: You have to remove it from the dash and access the physical buttons.
Taken from here: https://plus.google.com/+DerekRoss/posts/563EVVEPMDS
For me, I merely had to hold the power button for a few seconds and it rebooted. It had charged to 25% and I saw no problems. Just something to be aware of.
If you're using the Torque app:
1. Never leave it at the opening menu screen (with the different option buttons). The tablet will NOT sleep while on this screen, even if you have Tasker programmed to sleep. (This screen: Click Link)
2. Don't change the options to Automatically Sleep on power disconnect. It's fine until you run into certain problems. What appears to happen is the tablet will sleep and turn off WiFi (and maybe Bluetooth?) but it won't give Tasker time to run and shut down the other stuff (in my particular predicament, the music app).
What I experienced over time was that the music app will continue to run and play all songs in the playlist. This (in my case) may include 2,000+ songs, meaning it will practically never stop playing. This tends to drain it anywhere from 4-8% in a day, so if your car sits over the weekend it may drain it 15% or more. Not to fear, it'll charge up fine, unless you do this continually and it drains more overnight than it charges during the day.
Something to consider is having Tasker close the Torque app. This may or may not work, and may or may not require rooting. It's worth attempting.
Tablet Completely Drains and Won't turn back on
The above situation caused my tablet to drain completely. I came out to the car, started it, and the "Charging" icon came onto the screen. After 5 seconds, the screen went blank. OMG WTF?! It did this for two days, obviously having enough time to charge up, right?
Well, here's a (slight) problem: You have to remove it from the dash and access the physical buttons.
Taken from here: https://plus.google.com/+DerekRoss/posts/563EVVEPMDS
If you let your Nexus 7 go completely dead, to the point where it has virtually no juice left, you may have issues charging. This bug has plagued me a few times in the past. Here's the fix:
To charge a dead Nexus 7:
1. Plug-in your dead N7 to a wall charger. (Jump immediately to step 2.)
2. Immediately after plugging it in, press Volume Down and Power at the same time.
3. Once in the bootloader menu, use Volume Down until you see �Power Off Device.�
4. Choose that option with the Power button.
5. Once your device is off, unplug the charger and then plug it back into the device.
6. You should now see the battery meter (pictured above) with your device returning to life.
For me, I merely had to hold the power button for a few seconds and it rebooted. It had charged to 25% and I saw no problems. Just something to be aware of.
04-10-2013, 12:23 PM
#8
Administrator
Thread Starter
Join Date: Oct 2002
Location: ɯooɹpǝq ɹnoʎ
Posts: 13,943
Likes: 0
Received 0 Likes
on
0 Posts
Vehicle: ǝdnoɔ sısǝuǝƃ
I just rewrote the entire install from memory. Hopefully it's completely accurate and I didn't leave anything out.
1. Remove shifter surround, radio surround, and LCD cover.
For LCD cover, be very careful! I typically use a flat head screwdriver to pop it up from the bottom, but the dash material is VERY soft and you can make permanent indentions, so pull up on the ledge above the LCD screen while you're trying to sneak your screwdriver under to pop it up.
2. Remove the LCD screen, unplug the A/C, Radio, airbag light, hazard button, cigarette lighter, and key fob holder.
While removing the radio, be sure to press inward while loosening the screws. They are easily stripped, which will only make things harder in subsequent steps. They are also easily lost. There are two at the bottom that come out straight, but two on top (accessed from LCD opening) remove upward.
The cigarette lighter must be removed. You have to cut the tabs of the black plastic piece on the holder, backside of the assembly. You can either cut this, or go to Pep Boys and buy another for $3. You may have to mess with wiring if you buy one as the plug probably won't fit.
3. The top wiring harness for the LCD screen needs to be relocated to the bottom. There is a zip tie clip directly under the LCD screen that needs to be cut. There is a second clip back a little and to the left (driver side). It's hard to see/get to, but needs to be cut. This allows enough room for you to route the plug to the very bottom where the key fob and cigarette lighter used to be. Make sure it is routed in a manner that the radio doesn't interfere (shorten the wires) when you put it back in. Take this time to put your 3.5mm audio and USB cables at the top LCD area and bring them down to the bottom.
4. With the cigarette lighter removed from the assembly, plug it into the connector and leave it behind the dash. It's fine to just sit there. Plug your charger into the port, turn the car to ON and test the power connection. The USB wire needs to be only 3 ft. to reach to the cig. lighter.
5. Route the 3.5mm audio cable from the top down to the eBrake. Pop the cover up that sits under the eBrake. The center console has a false floor - pop it up and the cables underneath will be exposed. It is best to use a thick cable/wire or a coat hanger down the false floor and try to reach it to the eBrake where it's visible. If you can see it, tape the 3.5mm audio cable to whatever instrument you used and pull it the rest of the way. Plug the 3.5mm jack into the AUX input in the center console.
6. Relocate the LCD screen. Your Bezel should have come with a relocator kit that includes the surround and a metal bracket. REMOVE the OEM metal bracket from the LCD screen and replace it with the new one. OEM has 4 screws, new bracket only uses 2. Screw the bracket to the back of the radio surround - it does NOT install to the car itself, just screw it in to the surround. Make sure it visually lines up perfectly. Perhaps plug it in and turn the car ON to make sure it isn't upside down and you can see the entire screen easily. Unplug it after confirming it works.
7. CUTTING. You will need to cut behind the new LCD area (former key fob area). You will notice two silver bolts (screws maybe?) at the bottom that keep the new LCD screen from going in. Cut the plastic on the side of these screws and in front. Don't be afraid, it won't harm the fitment of anything or the ability to return it to stock.
8. MORE CUTTING. You will need to cut behind the OLD LCD area, where your tablet will now sit. Place the bezel (no tablet yet) at the top and see how it fits. You will likely have to cut in the front/bottom of the opening and the female end of the clips used by the OEM LCD surround. Also, on the right side (passenger) you may find it best to cut the other opening for the clip - your USB cable will sit in this area and may cause loose connections if you don't.
Now -- let's recap. You've relocated your LCD from top to bottom by allowing the wiring harness to reach that far. You've removed the cigarette lighter from the assembly and have it plugged in behind the dash area, charger connected, and USB cable routed to the tablet area. You have an audio cable running from tablet area down behind radio, along the eBrake, and into the center console. This should plug into a Ground Loop Isolator and then into your AUX input.
You've cut the low portion behind the new LCD location and you've cut behind the new tablet bezel area. As long as everything fits, you're done.
9. MAKE SURE TABLET INSTALLS with bezel, and that it charges with the car on. Test Tasker to ensure the tablet comes on, connects to bluetooth and WiFi, and turns it all off with the display when the car is turned off. If everything works as intended, turn the car off and proceed to the next step. If the tablet is not charging while the screen is on, you likely purchased the wrong cigarette lighter charger and now have to splice the USB cable. To do this, splice it up to exposure the contents. Find the green and white wires (Data wires), cut them, and connect them so that they create a loop back to the tablet. This will allow it to charge while the screen is on.
10. Reinstall radio - connect plugs and secure in place with the four screws. Careful to apply pressure while tightening and not to strip. Reconnect all remaining plugs starting at the top with the Airbag light. It's the most difficult to see and line up. Hazard plug is next, A/C controls, and finally LCD screen. Pop the dash back in place and hope that you cut enough for the LCD to fit, because if you didn't then you're gonna have to unplug everything you just connected.
-- IMPORTANT: FOR AUTOMATICS ONLY --
Before reinstalling the shifter surround, you will notice that there is a plastic "tongue" of sorts that sticks out above the shifter. This will hit the LCD screen and may direct it upward showing it in front of the screen. Don't fret! This is an easy fix. Just get a small piece of cardboard ripped off of a box, about as wide and long as the tongue. Tape it to the shifter (out of sight when the surround reinstalled) just to deflect the tongue downward below the LCD. This is an easy fix, should only take 5 seconds. You can see the tongue move as you shift it through the gears and it'll make sense when you see it.
11. Pop the shifter surround back on, sit back, and smile.
04-12-2013, 05:03 PM
#9
Administrator
Thread Starter
Join Date: Oct 2002
Location: ɯooɹpǝq ɹnoʎ
Posts: 13,943
Likes: 0
Received 0 Likes
on
0 Posts
Vehicle: ǝdnoɔ sısǝuǝƃ
TASKER INFO:
Tasker can be tricky. Start with creating a profile, named "Power On" and have it Trigger by State -> Power (Any).
Next, you'll want to generate a TASK. Name this similarly, "Power On" and add the tasks as:
1. Display Timeout 23hr 59 min 59sec
2. Bluetooth On (may be found under Net)
3. WiFi On
I wouldn't suggest messing with Airplane Mode or GPS as these have been iffy in the past. Airplane mode simply controls BT and WiFi so using that in conjunction with items 2 and 3 may create conflicts with the tablet going OMG WHAT R U DOING!
Next, create another profile. Name it "Power Off" and the trigger should be State -> Power (Any), but this time check the Invert check box!! This will do the opposite of the first profile, so it will trigger when power is removed from the device (turning off the car).
Next, more tasks! Name this group of tasks "Power Off":
1. Display Timeout 7 seconds (that's as low as you can go).
2. Bluetooth Off
3. WiFi Off
That's all there is to it. Really, you're done. Now, if you want to get all creative and stuff you can search the intarweb for a fun midi or wav file to put on your tablet. You can throw it in the Tasker Power On tasks to play a file when your car starts and have the A-Team theme song come through your speakers. Okay, maybe that's a little much, but for a while I had some chick saying "Initiating Startup Sequence" and then I would have the Music Trigger to Play so my audio would automatically be on and I wouldn't have to manually do it. Just remember to put in a Music Stop on the shut down so it doesn't play all night long and drain your battery.

