Follow Along W/ My Auto To Manual Swap!
 08-05-2008, 01:02 PM
#31
Super Moderator


Thread Starter
I've been looking at all the threads I could find and nobody mentioned overcharging the battery... what all wiring needs to be changed at the ECU for that? Do you remember the pin numbers?
And how have you all been reworking the wiring? I'm guessing cut/splice into the harness, not pull/exchange pins.
Did you ever swap from an early 1.8 to a later 2.0, and encounter the flywheel mounting dimension variance? I have a hunch I need a 2.0L flywheel, which would be nice to avoid but you need what you need eh.
 08-06-2008, 11:47 PM
#32
Super Moderator
Thread Starter
Crankshaft and Flywheel interface/mounting changes. From hyundaitechinfo.com ( username kitfoxer password Rg== the same as webtech, courtesy of bugmenot.com)
TSB 99-20-004 1996-2000 1.8L AND 2.0L ELANTRA/TIBURON ENGINE PARTS CHANGES
Several component changes have been made that apply to the 1.8L and 2.0L engines used in the 1996 - 2000 Elantra and Tiburon. These changes involve the following parts:
*Crankshaft
*Flywheel and Flex Plate and Mounting Parts
service information:
CRANKSHAFT
The new crankshafts
(P/N 23110-23710 for the 2.0L); P/N 23110-23510 for the 1.8L) released July 8, 1999 have the following dimensional changes.
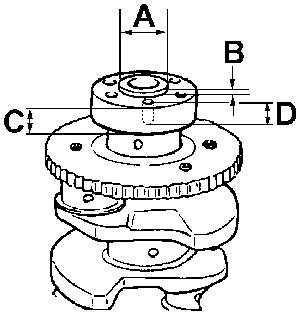
A. The flywheel mounting flange (pilot) diameter has been reduced from 41 mm to 35 mm.
B. The flywheel mounting flange (pilot) height has been increased from 4 mm to 6.5 mm.
C. The crankshaft rear flange thickness has been reduced from 20.5 mm to 18 mm.
D. The crankshaft rear flange bolt hole depth has been reduced from 15 mm (± 1.5mm) to 12.5 mm (± 1.5 mm).
NOTE
The new crankshafts are not interchangable
with the previous ones. However, a crankshaft spacer (P/N 23112-23900) can be attached to the new crankshafts to make them interchangeable
with the older crankshafts.
FLYWHEEL AND FLEX PLATE
The flywheel and flex plate assemblies have been changed to fit the new crankshaft. The new flywheel and flex plate assembliesare not backward compatible
with the older crankshaft. However, the older flywheel and flex plate can be made interchangeable
by mounting a crankshaft spacer (P/N 23112-23900) onto the new style crankshaft.
A. The flywheel and flex plate assembly pilot bore diameter has been reduced from 41 mm to 35 mm.
B. The flywheel pilot bore depth has been increased from 5.0 mm to 7.5 mm. Dimension B is recessed.

MOUNTING HARDWARE: FLYWHEEL AND FLEXPLATE
Each crankshaft and flywheel / flexplate combination necessitates that specific mounting bolts to the crankshaft are used. Tables 1 and 2 identify the different combinations for manual and automatic tranaxles.
NOTE
Crankshaft P/N 23110-23710 for the 2.0L is part of Short Block Sub-Assembly P/N 21102-23C01. Also, crankshaft P/N 23110-23510 for the 1.8L is part of Short Block Sub-Assembly P/N 21102-23B01. These short blocks also require the use of Tables 1 and 2.
Table 1: Manual Transaxle
Table 1: Manual Transaxle
Crankshaft / Flywheel / Spacer / Flywheel Mounting Bolt
New / Old / New / Old
23110-23510 (1.8L) / 23200-23010 (1.8L) / 23112-23900 / 23311-23000
23110-23710 (2.0L) / 23200-23210 (2.0L) / 23112-23900 / 23311-23000
Old / Old / N/A / Old
23110-23030 (1.8L) / 23200-23010 (1.8L) / N/A / 23311-23000
23110-23220 (2.0L) / 23200-23210 (2.0L) / N/A / 23311-23000
New / New / N/A / New
23110-23510 (1.8L) / UNAVAILABLE / N/A / UNAVAILABLE
23110-23710 (2.0L) / 23200-23700 (2.0L) / N/A / 23311-23000
Table 2: Automatic Transaxle
Crankshaft / Drive Plate (Flexplate) / Spacer / Adapter Plate (2) / Drive Plate Mounting Bolts
New / Old / New / Old / Old
23110-23510 (1.8L) / 23211-32650 / 23112-23900 / 23226-32600 / 23311-26050
23110-23710 (2.0L) / 23211-32650 / 23112-23900 / 23226-32600 / 23311-26050
Old / Old / N/A / Old / Old
23110-23030 (1.8L) / 23211-32650 / N/A / 23226-32600 / 23311-26050
23110-23220 (2.0L) / 23211-32650 / N/A / 23226-32600 / 23311-26050
New / New / N/A / New / New
23110-23510 (1.8L) / 23211-23060 / N/A / 23226-23550 / 23311-23550
23110-23710 (2.0L) / 23211-23060 / N/A / 23226-23550 / 23311-23550
INTERCHANGEABILITY: See Below
Old to New = NO
New to Old = Only with spacer/adapter! See tables for details.
Note: Sorry about the tables. It all lined up on my screen when I typed it up.
It's WAY past my bedtime, but I think this means they machined the A/B dimension part to be narrower and longer, the C/D part to be thinner, and the resulting crank needs an adapter to use with the old flywheel. If I can order this part from the dealer for a reasonable number of dollars I will be thanking Jesus (again)
TSB 99-20-004 1996-2000 1.8L AND 2.0L ELANTRA/TIBURON ENGINE PARTS CHANGES
Several component changes have been made that apply to the 1.8L and 2.0L engines used in the 1996 - 2000 Elantra and Tiburon. These changes involve the following parts:
*Crankshaft
*Flywheel and Flex Plate and Mounting Parts
service information:
CRANKSHAFT
The new crankshafts
(P/N 23110-23710 for the 2.0L); P/N 23110-23510 for the 1.8L) released July 8, 1999 have the following dimensional changes.
A. The flywheel mounting flange (pilot) diameter has been reduced from 41 mm to 35 mm.
B. The flywheel mounting flange (pilot) height has been increased from 4 mm to 6.5 mm.
C. The crankshaft rear flange thickness has been reduced from 20.5 mm to 18 mm.
D. The crankshaft rear flange bolt hole depth has been reduced from 15 mm (± 1.5mm) to 12.5 mm (± 1.5 mm).
NOTE
The new crankshafts are not interchangable
with the previous ones. However, a crankshaft spacer (P/N 23112-23900) can be attached to the new crankshafts to make them interchangeable
with the older crankshafts.
FLYWHEEL AND FLEX PLATE
The flywheel and flex plate assemblies have been changed to fit the new crankshaft. The new flywheel and flex plate assembliesare not backward compatible
with the older crankshaft. However, the older flywheel and flex plate can be made interchangeable
by mounting a crankshaft spacer (P/N 23112-23900) onto the new style crankshaft.
A. The flywheel and flex plate assembly pilot bore diameter has been reduced from 41 mm to 35 mm.
B. The flywheel pilot bore depth has been increased from 5.0 mm to 7.5 mm. Dimension B is recessed.
MOUNTING HARDWARE: FLYWHEEL AND FLEXPLATE
Each crankshaft and flywheel / flexplate combination necessitates that specific mounting bolts to the crankshaft are used. Tables 1 and 2 identify the different combinations for manual and automatic tranaxles.
NOTE
Crankshaft P/N 23110-23710 for the 2.0L is part of Short Block Sub-Assembly P/N 21102-23C01. Also, crankshaft P/N 23110-23510 for the 1.8L is part of Short Block Sub-Assembly P/N 21102-23B01. These short blocks also require the use of Tables 1 and 2.
Table 1: Manual Transaxle
Table 1: Manual Transaxle
Crankshaft / Flywheel / Spacer / Flywheel Mounting Bolt
New / Old / New / Old
23110-23510 (1.8L) / 23200-23010 (1.8L) / 23112-23900 / 23311-23000
23110-23710 (2.0L) / 23200-23210 (2.0L) / 23112-23900 / 23311-23000
Old / Old / N/A / Old
23110-23030 (1.8L) / 23200-23010 (1.8L) / N/A / 23311-23000
23110-23220 (2.0L) / 23200-23210 (2.0L) / N/A / 23311-23000
New / New / N/A / New
23110-23510 (1.8L) / UNAVAILABLE / N/A / UNAVAILABLE
23110-23710 (2.0L) / 23200-23700 (2.0L) / N/A / 23311-23000
Table 2: Automatic Transaxle
Crankshaft / Drive Plate (Flexplate) / Spacer / Adapter Plate (2) / Drive Plate Mounting Bolts
New / Old / New / Old / Old
23110-23510 (1.8L) / 23211-32650 / 23112-23900 / 23226-32600 / 23311-26050
23110-23710 (2.0L) / 23211-32650 / 23112-23900 / 23226-32600 / 23311-26050
Old / Old / N/A / Old / Old
23110-23030 (1.8L) / 23211-32650 / N/A / 23226-32600 / 23311-26050
23110-23220 (2.0L) / 23211-32650 / N/A / 23226-32600 / 23311-26050
New / New / N/A / New / New
23110-23510 (1.8L) / 23211-23060 / N/A / 23226-23550 / 23311-23550
23110-23710 (2.0L) / 23211-23060 / N/A / 23226-23550 / 23311-23550
INTERCHANGEABILITY: See Below
Old to New = NO
New to Old = Only with spacer/adapter! See tables for details.
Note: Sorry about the tables. It all lined up on my screen when I typed it up.
It's WAY past my bedtime, but I think this means they machined the A/B dimension part to be narrower and longer, the C/D part to be thinner, and the resulting crank needs an adapter to use with the old flywheel. If I can order this part from the dealer for a reasonable number of dollars I will be thanking Jesus (again)
08-13-2008, 09:34 PM
#33
Super Moderator
Thread Starter
Not really an update, but some good news for me.
It looks like Valeo might make this adapter if I can't get one from HMA
and I scored a right-angle drill from work that was too grubby to sell, that I'm hoping to be able to use for the firewall holes.
It looks like Valeo might make this adapter if I can't get one from HMA
and I scored a right-angle drill from work that was too grubby to sell, that I'm hoping to be able to use for the firewall holes.
08-25-2008, 10:06 PM
#34
Super Moderator
Thread Starter
My driver's transaxle has started making noise, and now Something Must Be DONE!
The adapter is a special order part, $25 from HMA
What did you guys do to get the battery charging properly?
The adapter is a special order part, $25 from HMA
What did you guys do to get the battery charging properly?
08-26-2008, 04:54 AM
#35
Moderator


out of curiosity, has your engine ever overheated? Some cam housings are silverish. It seems after overheating mine turned bronze in color. I'm just wondering. I never checked mine before it overheated. It could just be that they turn after a while. I always change my oil at 3,000 miles and I'm wondering what causes the color.
08-26-2008, 07:35 AM
#36
Administrator

Join Date: Oct 2002
Location: ɯooɹpǝq ɹnoʎ
Posts: 13,943
Likes: 0
Received 0 Likes
on
0 Posts
Vehicle: ǝdnoɔ sısǝuǝƃ
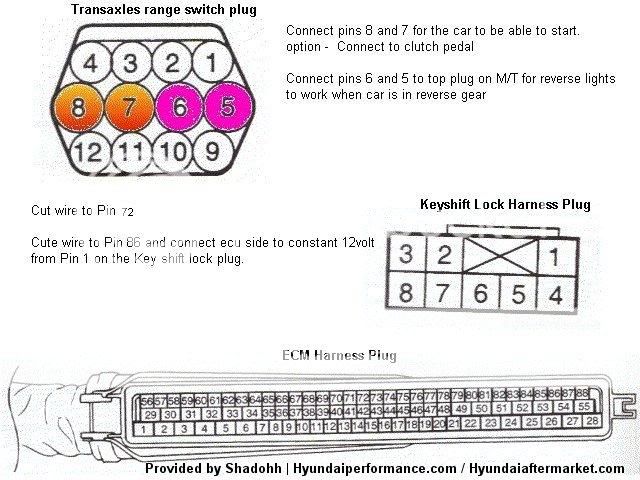
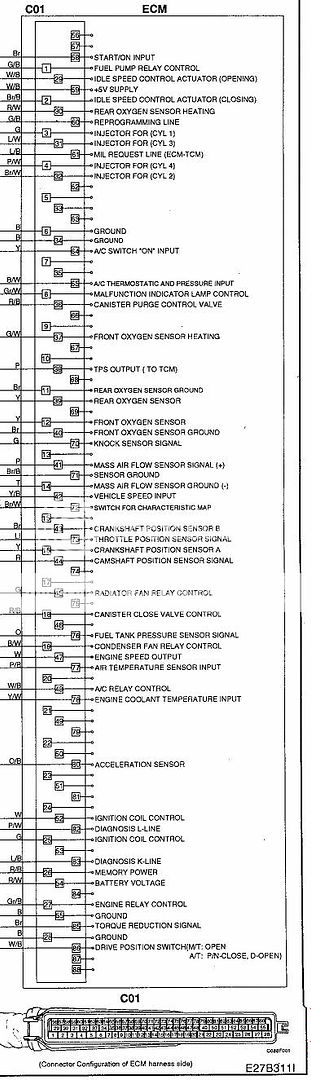
There's a wire on the ECU that you need to run a constant 12v source to. You'll have to pull the ECU off, find out which wire it is, and tap into it. Then plug the ECU back in.
People in the past have said that this wiring prevents the battery from being overcharged, because it tells the system that it's a manual now instead of an automatic. It's all over these forums, in the DIY section as well as others. Not sure where you looked for your information.
My problem came when a bolt on the block came loose, and wasn't grounding properly to the battery. I followed the cable from the negative terminal of the battery and it attached to the engine block, where I could finger-turn the bolt. No charging problems after that. Not sure which idiot loosened that bolt
http://www.rdtiburon.com/index.php?showtopic=282
Pin-86
I wouldn't cut it, just tap into it. See if that fixes it.
08-26-2008, 08:16 AM
#37
Super Moderator
Thread Starter
The wiring isn't much of a challenge, aside from finding the correct pins to cut/splice. I was trained as an electronics tech., so it's like 1+1=2 for me thank God. I was actually thinking of seeing if I can use the connector from the automatic and make a pigtail to plug into the reverse switch on the standard, so it looks like it is supposed to be there. The clutch pedal wiring will be a hassle I think, but it shouldn't be too hard. The really ugly part is going to be the holes for the clutch and shifter cables, in that order.
I have studied the charging system wiring diagram a LOT, and wondered where a charging problem might come from... a bad ground would certainly explain it! I guess it was your report I had read, I had forgotten who mentioned having a charging problem.
The rest of the wiring changes (all 3 of the wires) are fairly straightforward and I'm pretty sure I'll post up about whatever gets done in this thread.
My car has been run hot once when the thermostat failed, but never had a prolonged stay in the high temperature range. I used the heater and idling on the side of the road (repeatedly) w/ the hood up to reduce the temperature until I got to work... and then again till I got to the dealership. If you use regular oil, that might explain the orange. My car has had a steady diet of the same brand of synthetic with occasional flushes since she was new. I was unreasonably pleased to see it such a pleasantly new-looking color when I opened it the first time. The 1.8L cam was orange when I put it in, and it got rinsed off and is now the same color as the rest of the valvetrain after running for a few hundred miles, so I'm thinking the color may be removable if you use the right fluids in the crankcase.
09-01-2008, 08:37 PM
#38
Super Moderator
Thread Starter
It was a little more dramatic than I had hoped it might be, when the transmission finally released, but the thing is out of the parts car. The engine is standing on the oil pan and an engine mount bracket in the otherwise empty engine bay, and the car looks like a 4-wheeler with the suspension unloaded and the bumper 6" higher than it used to be.
I was using some strong strapping as a lifting sling over my shoulders, and the plan was to lift up, have my son pull out the jack that was the only thing holding up the transaxle, and then I would have the thing well in hand. . . . Well . . . The main problem with that idea is that I forgot that I had unbolted the lower part of the only engine mount that is actually on the engine. So the transaxle separated from the engine, the engine was suddenly unloaded and jumped, and then all of a sudden one jack was insufficient to hold the engine balanced in the air. Down came the engine, slowly, and I lowered the transaxle to try to avoid side-loading the input shaft. Then the input shaft pulled out all the way, and the engine fell that last 6" or so in slow motion, coming to rest on the oil pan rail (I think) and maybe the clutch but it looked like the clutch didn't get so much as a scuff on it. The surprise and large-falling-stuff-by-my-feet-action made me lower the transaxle to the ground.
So there I was, standing in the engine bay, with the engine all caddywompus on one side, the transaxle almost 45 degrees sideways on the other side, and me standing in the corner where the battery tray and a corner of the radiator used to live, processing what had just happened, and thankful to God that I was unhurt.
When I figure out how to get the throwout bearing off, the clutch and flywheel will come off too, and without that 40lbs the engine will be much less of a hazard to my back to remove from the engine bay. It's not that heavy, but it's heavy enough not to want to heft it by my lonesome with the flywheel mounted.
Note: the exhaust flange mounting bolts are FROZEN on there by rust. Also, the flex pipe took the brunt of the engine's fall to the driveway so I guess it was good I hadn't managed to get it unbolted. The A/C compressor lines also helped slow the engine's fall. The transaxle really isn't all that heavy by itself. And I am glad I could remove the transaxle without having to come up with a big socket for the axleshaft nut, by separating the knuckle from the shock absorber.
Time to remove the transaxle and clean up my tools, including removing the radiator, the battery tray, A/C compressor, and my futile attempts to remove the flex-pipe section of the exhaust: about 3 hours by myself, with a couple of minutes of help from my son.
09-05-2008, 08:09 AM
#39
Super Moderator
Thread Starter
A drop of penetrating oil on each of the dowel pins and a little gentle prying was all it took to get my pressure plate off. Duh. Did you know the stock clutch was made by Valero? I didn't either. I guess their stock replacement clutches are just that! smile.gif
Bear in mind, there are 165,000 miles on this stock clutch
Anyhow, I showed my dad these photos via the Intarw3bz and he agrees: The clutch plate looks kindof ok, just a lot of wear
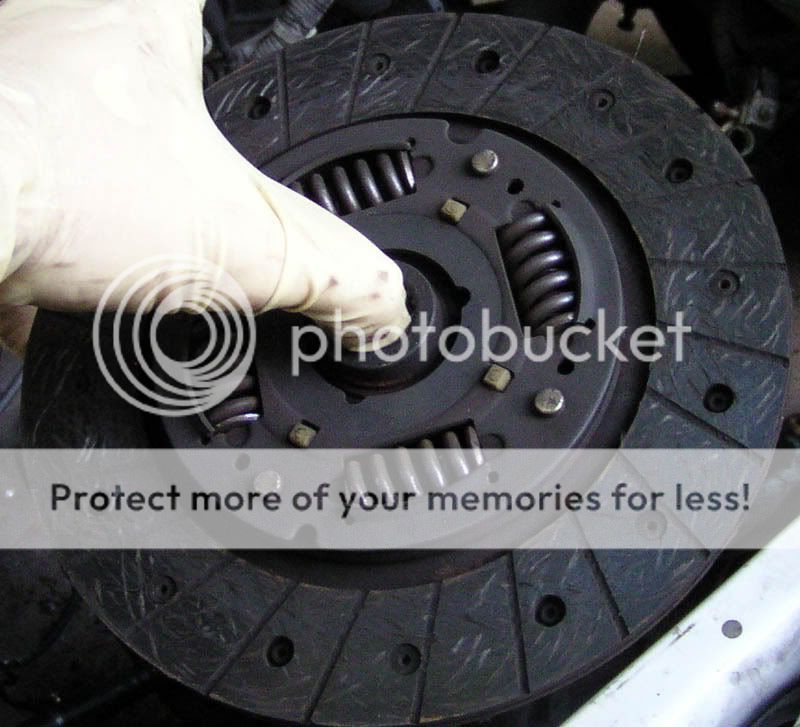
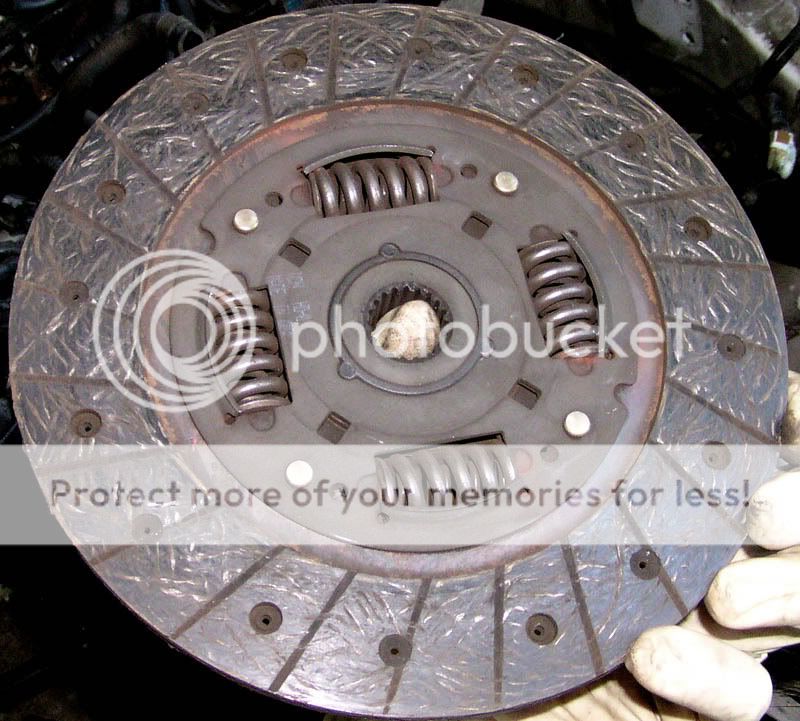
Until you look a little closer
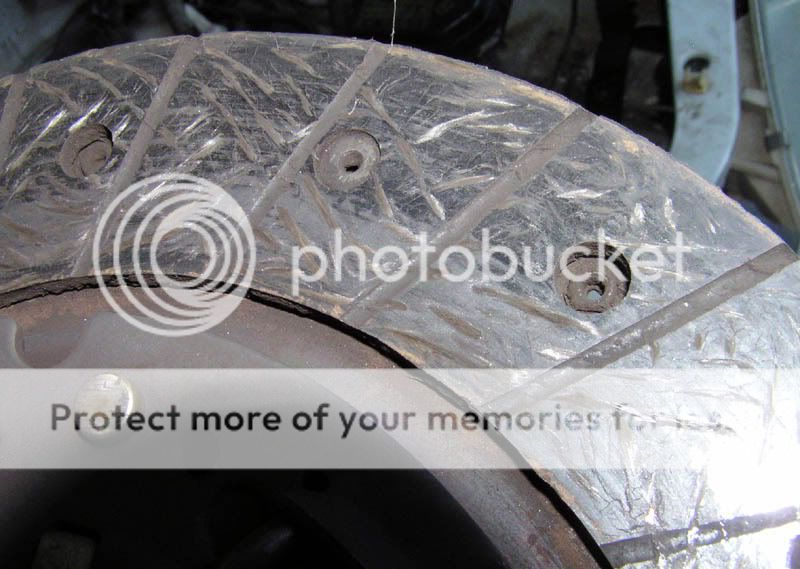
Yeah, that's a bit glazed and nearly worn out. Next up:
Pressure plate: glazed, with hot spots.

Flywheel, the same.
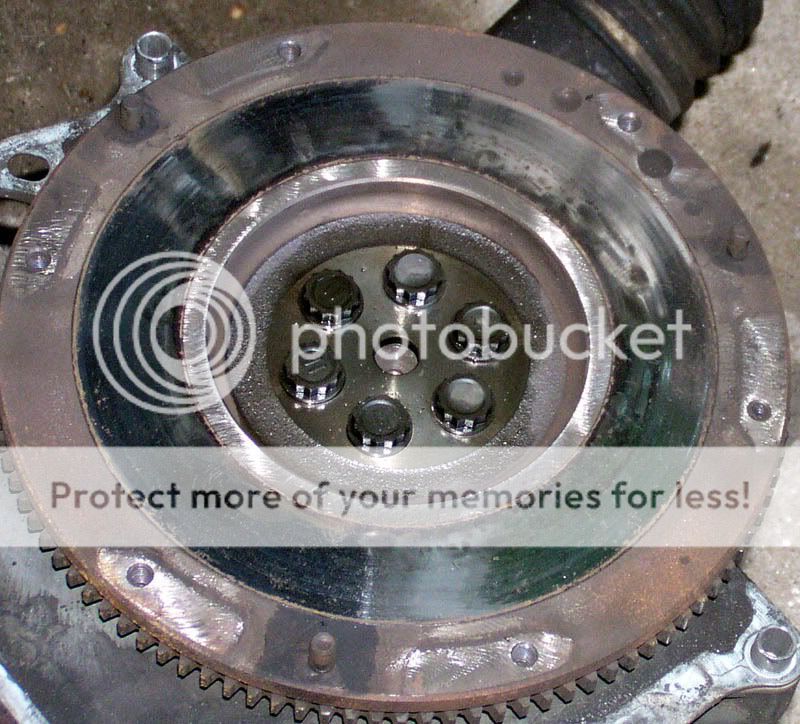
Looks like it's time for a clutch kit. I wonder if those Valeo stock replacement ones are any good? lmao.gif
Bear in mind, there are 165,000 miles on this stock clutch
Anyhow, I showed my dad these photos via the Intarw3bz and he agrees: The clutch plate looks kindof ok, just a lot of wear
Until you look a little closer
Yeah, that's a bit glazed and nearly worn out. Next up:
Pressure plate: glazed, with hot spots.
Flywheel, the same.
Looks like it's time for a clutch kit. I wonder if those Valeo stock replacement ones are any good? lmao.gif
09-06-2008, 07:58 PM
#40
Super Moderator
Thread Starter
I spent some more quality time with my parts car today. Pulled a couple of components to try to resell (gauges, airbags, more) and I think I have it to the point where whatever is left on the car except for (maybe) one of the doors, is now for sale. Or the car, if somebody wants it.
To remove the flywheel, I borrowed my boss's electric impact gun and mounted my non-impact socket on it, with zip-ties around the socket to contain the shrapnel if the socket shattered. It's a Craftsman so I was planning on going to Sears to get a free replacement and an impact socket in the same trip if it went. Thank God, it held up just fine. The impact has enough, er, impact, that I didn't even have to worry about holding the crank steady. It hardly turned at all, before the bolts came loose. I can state with authority that it is *just BARELY* a one-man lift to get the engine out of the engine bay with the flywheel off. I rested the engine on the passenger engine-mount bracket and strut tower when I needed to crawl out of the bay. It was steady enough but the thought of dropping it on my foot. . . 02.gif
I cut into the harness as far as the fender to get the reverse switch connector and wiring, and I went all the way up to the main harness behind the gauge cluster to get the connector and wiring for the clutch pedal switch. All I need off the car now is some bolts I left in their places so I'd know where they go.
I pulled the crank and rods/pistons after getting the engine into my garage so I could at least move it more easily. I set it up where I wanted it with the engine upside-down on a piece of cardboard and reassembled it, less the pistons/rods. The pistons look in great shape, almost zero wear on the skirts. I'm looking forward to putting them in when my reworked head goes on. laugh.gif
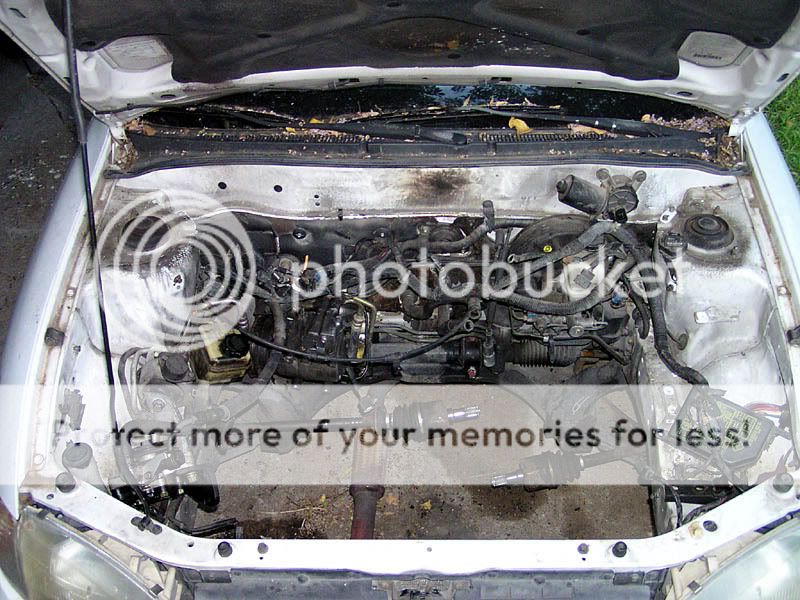
The donor engine bay: Something is missing, but I can't quite put my finger on it . . . fing02.gif
All I need now: clutch, pressure plate, flywheel resurface or replace (read: money), and time.
To remove the flywheel, I borrowed my boss's electric impact gun and mounted my non-impact socket on it, with zip-ties around the socket to contain the shrapnel if the socket shattered. It's a Craftsman so I was planning on going to Sears to get a free replacement and an impact socket in the same trip if it went. Thank God, it held up just fine. The impact has enough, er, impact, that I didn't even have to worry about holding the crank steady. It hardly turned at all, before the bolts came loose. I can state with authority that it is *just BARELY* a one-man lift to get the engine out of the engine bay with the flywheel off. I rested the engine on the passenger engine-mount bracket and strut tower when I needed to crawl out of the bay. It was steady enough but the thought of dropping it on my foot. . . 02.gif
I cut into the harness as far as the fender to get the reverse switch connector and wiring, and I went all the way up to the main harness behind the gauge cluster to get the connector and wiring for the clutch pedal switch. All I need off the car now is some bolts I left in their places so I'd know where they go.
I pulled the crank and rods/pistons after getting the engine into my garage so I could at least move it more easily. I set it up where I wanted it with the engine upside-down on a piece of cardboard and reassembled it, less the pistons/rods. The pistons look in great shape, almost zero wear on the skirts. I'm looking forward to putting them in when my reworked head goes on. laugh.gif
The donor engine bay: Something is missing, but I can't quite put my finger on it . . . fing02.gif
All I need now: clutch, pressure plate, flywheel resurface or replace (read: money), and time.