Diy = Changing Fuel Filter
 06-21-2007, 11:19 AM
#1
Senior Member

Thread Starter
Join Date: Mar 2002
Location: Los Lunas, New Mexico, USA.
Posts: 34,642
Likes: 0
Received 0 Likes
on
0 Posts
Vehicle: 2001 Hyundai Tiburon, 2004 Kia Sorento, 2010 Kia Soul
In the spirit of making things easy for DIY users I modified the first post instead of burying my additional photos and tips 3 pages deep in the thread. I'm pretty sure REDz wouldn't mind too much. -Stocker
********
Well, I avoided doing my fuel filter for a LONG time because of the supposed PITA it is to do.
Took me 45 minutes to do, and that was with taking pictures and notes.
(took me 2 hours+, because my lower line was borked and had to be SUPER tightened to stop leaking, plus I had to remove air filtration parts to gain access from above -Stocker)
Anyways, what you need....
1. Replacement Fuel Filter.
2. Rags, gasoline-proof bucket/bowl to catch spilt fuel.
3. 10MM Socket with Extension and ratchet.
4. 14MM and 19MM OPEN ended wrenches.
5. Jack and a Jackstand, wheel chock.
6. PPE: gloves and goggles if you value your health
7. You might use a crescent wrench instead of any of the other wrenches, but it is less easy than wrenches
8. Vise grip wrench for lower fitting nut if you are as lucky as Stocker
With a stock air filter setup you will also need:
9. Flat head screwdriver for air hose clamps
What you do...
REMOVE FUEL PRESSURE FROM YOUR FUEL LINES BEFORE YOU TURN ANY WRENCHES!
To do this, get inside the rear passenger area of your car. Pull up on the edge of your seat till it pops out. Under the center of your rear bench seat, you'll find a plastic cover with 2 wiring harnesses going into it. Pull this cover off. The fuel tank and pump are right under it. Unplug the plug that is attached to the top of the fuel pump.
Then get in the front, start the car, and run it till it stalls.
FUEL PRESSURE IS NOW REMOVED.
Jack up the drivers corner of the car, put it on a jack stand, and put a wheel chock behind the rear wheels so the car doesn't have the chance of rolling.
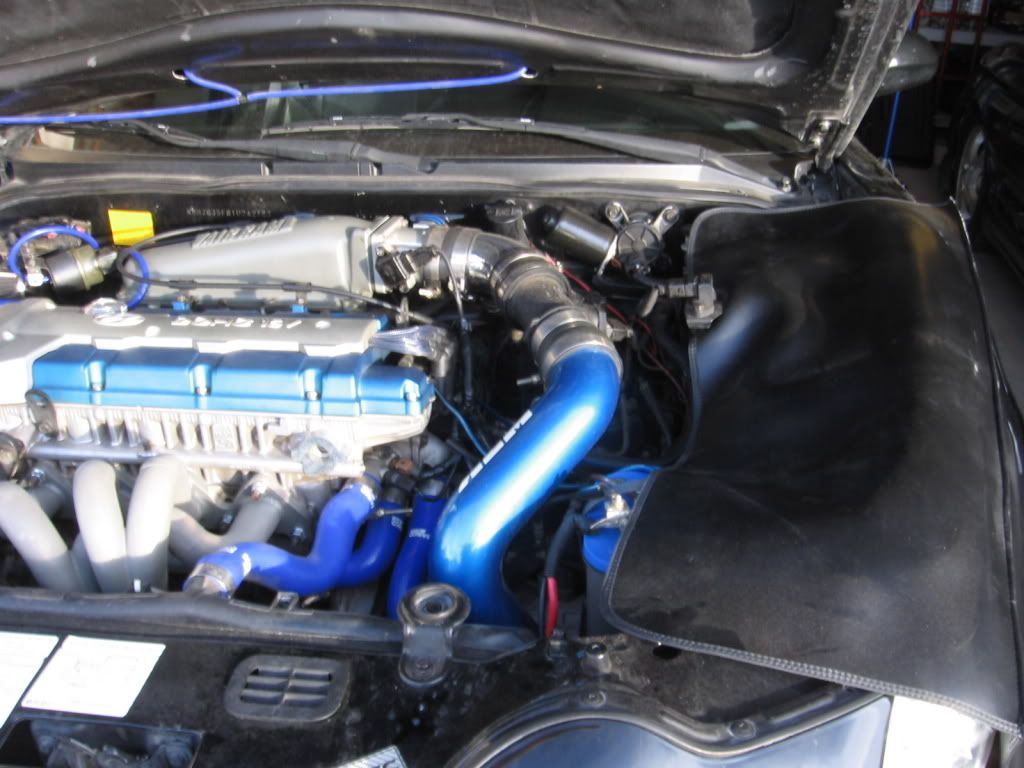
In order to fit my arm in to where I could work in there, including being able to reach the bottom fitting from the top side of the car, I pulled the air filter box. This is not a problem for those with cold air intakes, but if you have the stock filter setup still: Unscrew the jubilee clamp holding the flex coupling on to the Mass AirFlow sensor, and unclip the four clips around the filter box. Lift the air filter lid, realize when the wires jerk that they are still connected, and remove the Intake Air Temperature sensor from the air box or rotate the top of the airbox over onto the top of the engine. Pull the air filter (now is probably a good time to replace the air filter by the way). Three bolts hold the bottom of the filter box to the car. If the rest of the intake piping from the air filter to the front of the car is still installed, remove and discard it. Your car sounds better without all that plastic maze to breathe through! -Stocker
First off, find your fuel filter. First, look here...
^^^
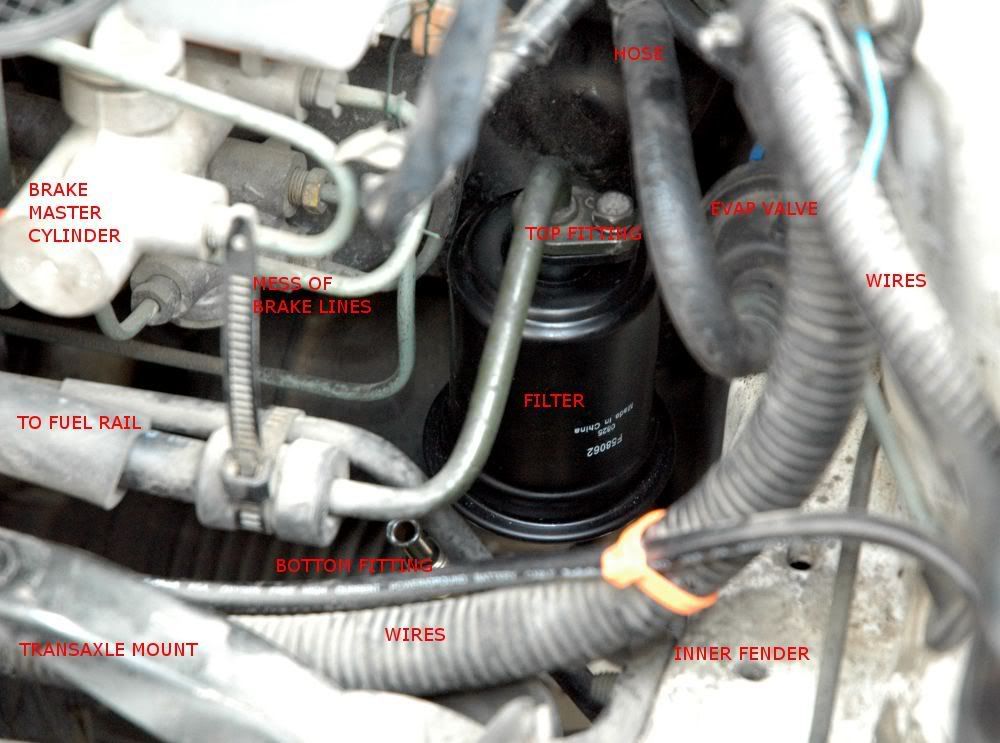
On the drivers side of the car, somewhat under the master cylinder...
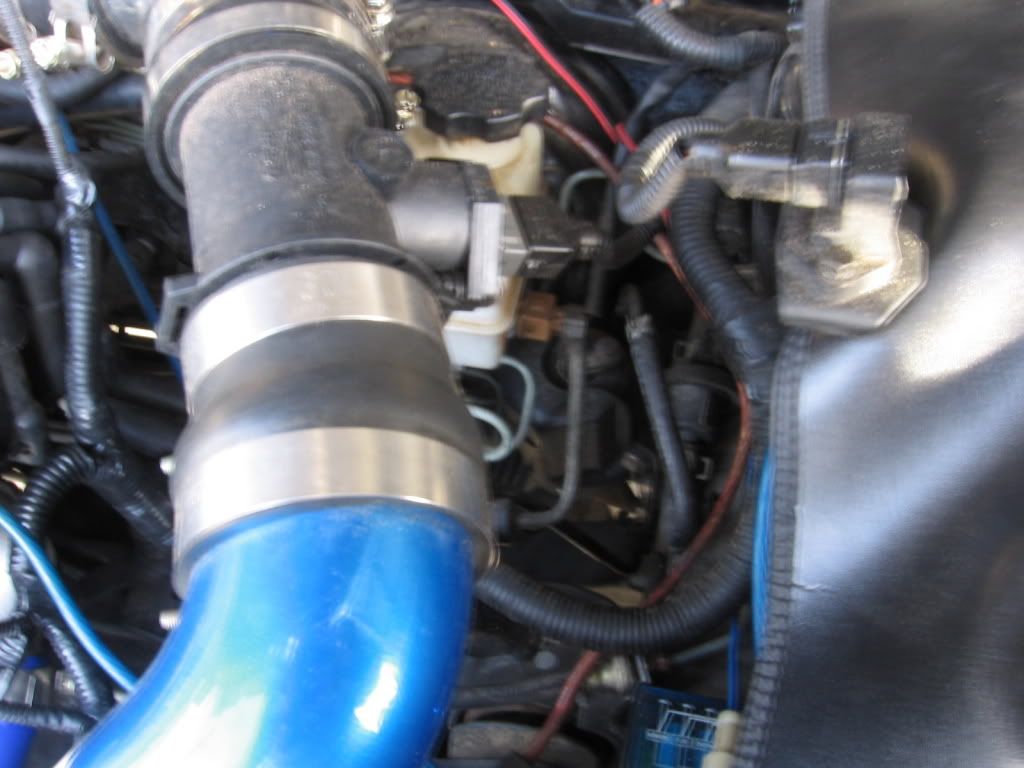
For those without a cold air intake, AFTER you remove the air filter box and the flex coupler to the MAFs, you will see:
Yes the lower fitting is already disconnected. This is an "after reinstallation" photo, so sue me!
^^^
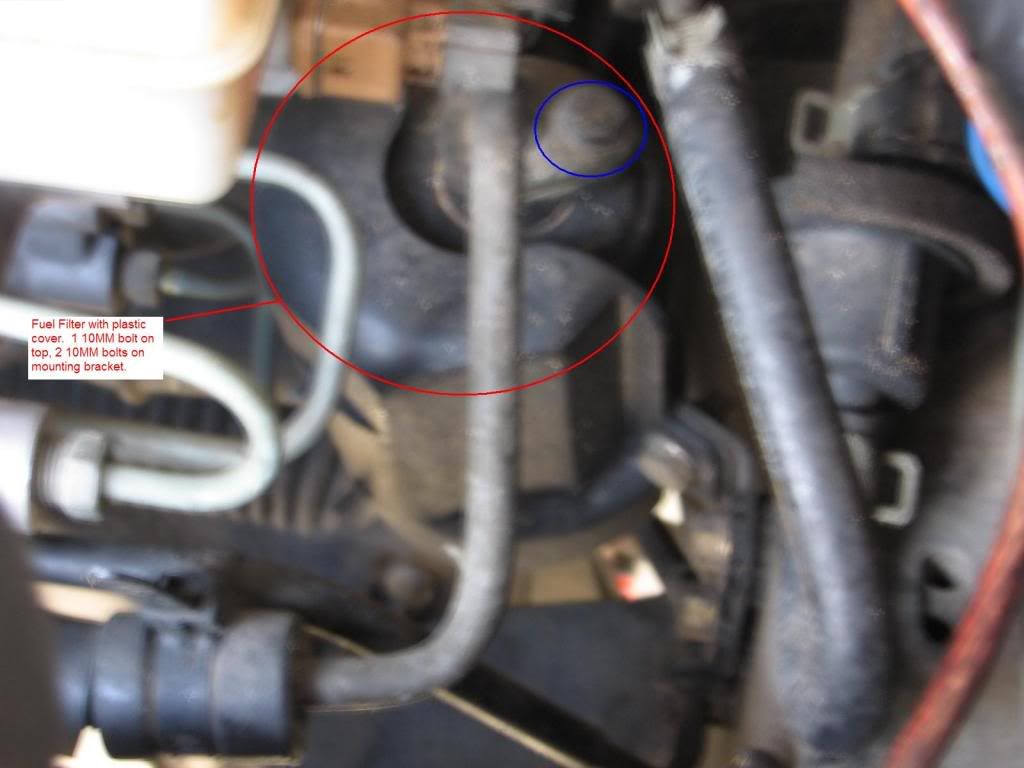
You'll find this. Circled in RED is the fuel filter. Mine had some wierd plastic cover on it, that I promptly threw away when I was finished. You'll find a small brass colored 10MM bolt that holds the cover onto the bracket. Remove it. Use the 10MM socket with extension to remove the upper bolt on the fuel filter. Remove the fuel line/fitting from the top, a bit of fuel will spill, be ready and clean it up with rags. Do not smoke in the area or cause sparks.
^^^
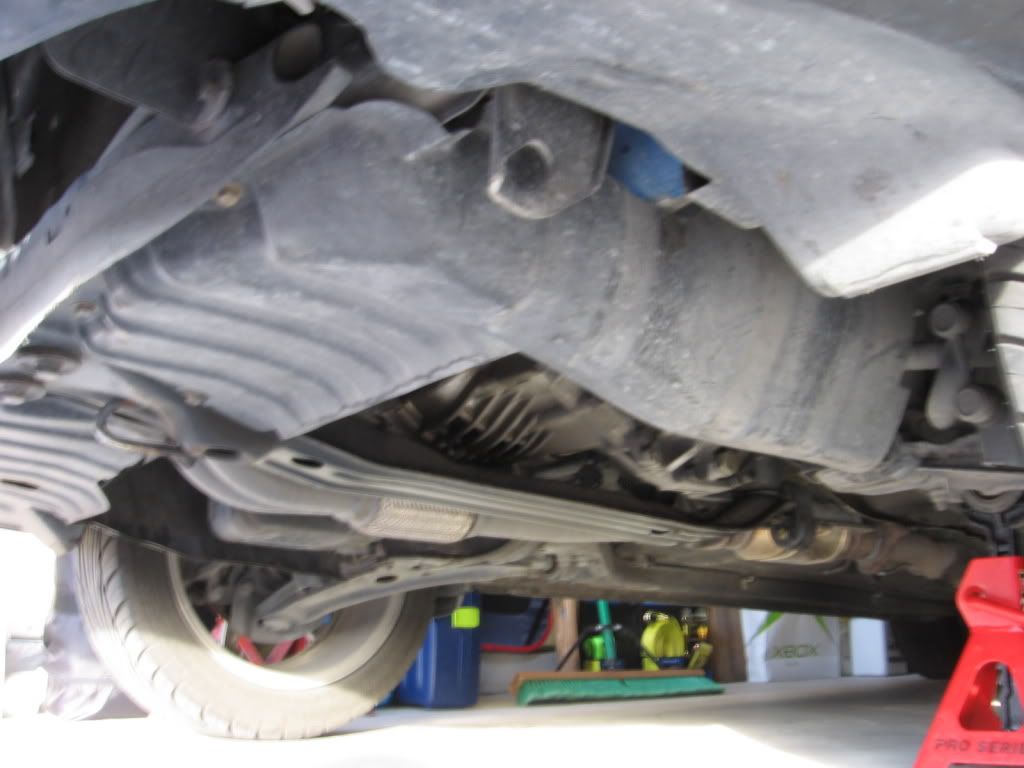
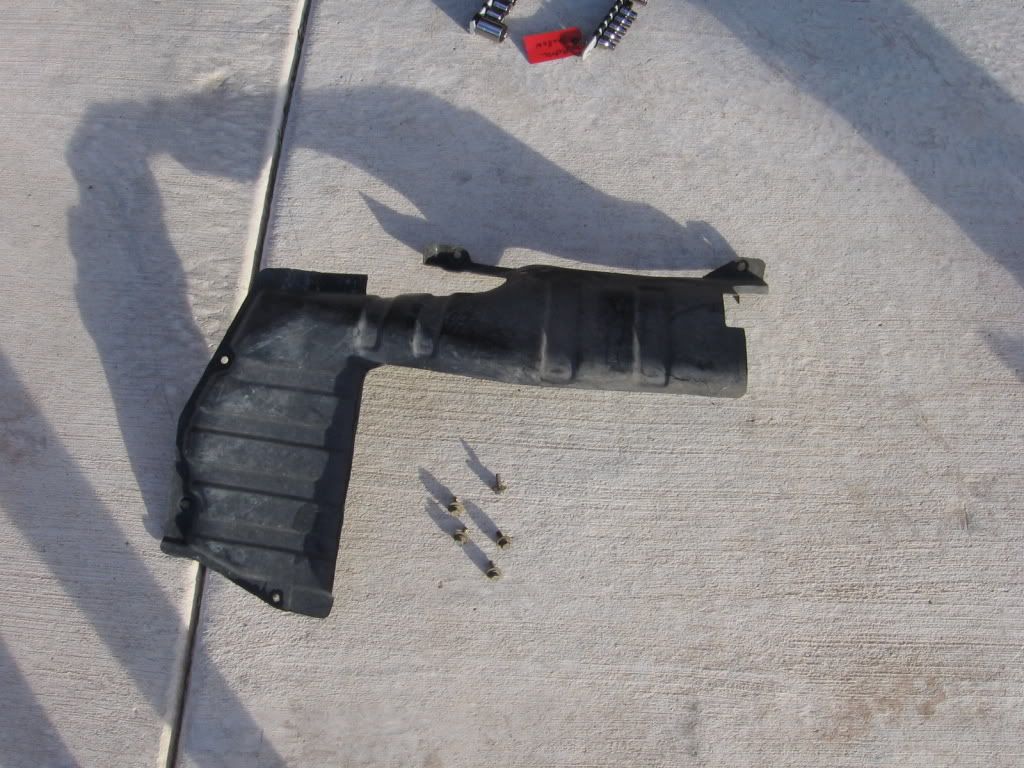
Get under the car on the driver's side, and remove the splash guard.
^^^
5 Bolts, 10MM, and the top two are harder to reach unless your wheel is off - but you can reach them.
Added for clarity of focus, refer to next image for practical information
^^^
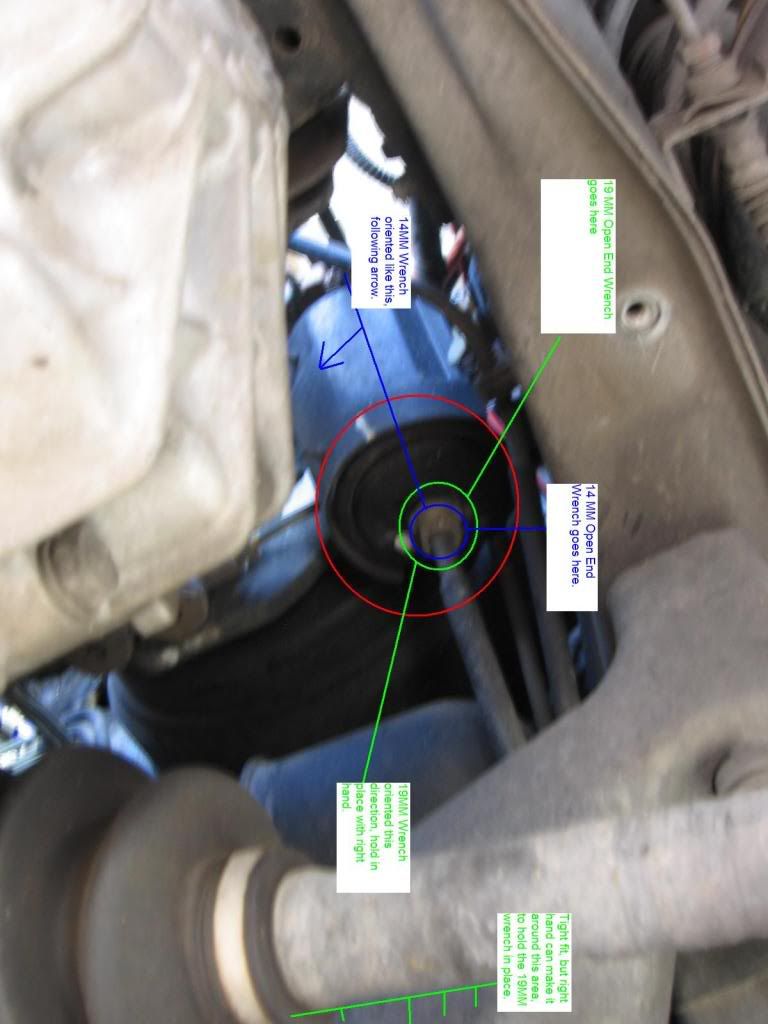
Get under the car in that corner, and, as shown in the picture above, put your 19MM and 14MM open end wrenches on the parts shown, at the orientations shown, and hold the filter in place with the 19MM wrench (Right hand), while turning the 14MM towards it. ALL YOU NEED TO DO IS TO GET THE FITTING LOOSE, it may take one or two good pushes to get it, but once it goes, you'll know it.
If you are having trouble here, refer to the picture and ensure you have your hands in the right places. The right one is a tight fit, and requires you to get your hand in between the axle and sway bar, but if my meaty ass can make it, your scrawny ass can.
I removed the top fitting and mounting bracket first because my lower fitting was so tight. I sprayed the area with penetrating oil (read: Liquid Wrench, NOT WD-40. WD-40 is lubricant, not penetrating oil!) and let it sit for a little while. I put my right hand down by the strut tower and reached around the transaxle mount with the left hand, under all those lines, to grab the wrenches. I arranged the wrenches so they were only maybe 20-30 degrees separated and squeezed the wrenches together with both hands to break this seal. It is stupid tight, and some weaker individuals might not be able to get it to break loose. Instead of letting it rain gasoline on me, I decided to loosen this fitting from the top of the car. I undid the top fitting and removed the mount bolts, and bent the lower fuel line a little to get a better angle on the wrenches.-Stocker
Push some towels up under the fuel filter to catch any spilling fuel and finish removing the brass fitting by hand. Pull the fuel line out from the filter and clean up the spilled fuel.
Get back up in the engine bay and remove the 2 LONG ASS 10MM bolts that hold the filter bracket to the strut wall.
^^^
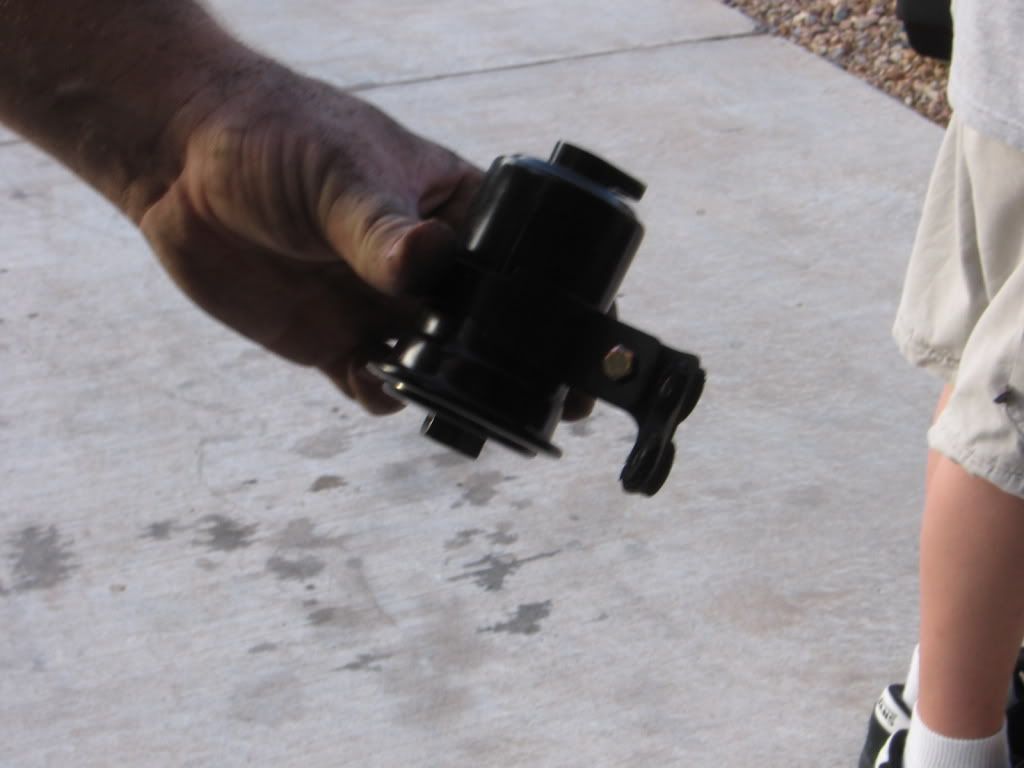
Removed fuel filter with bracket.
^^^
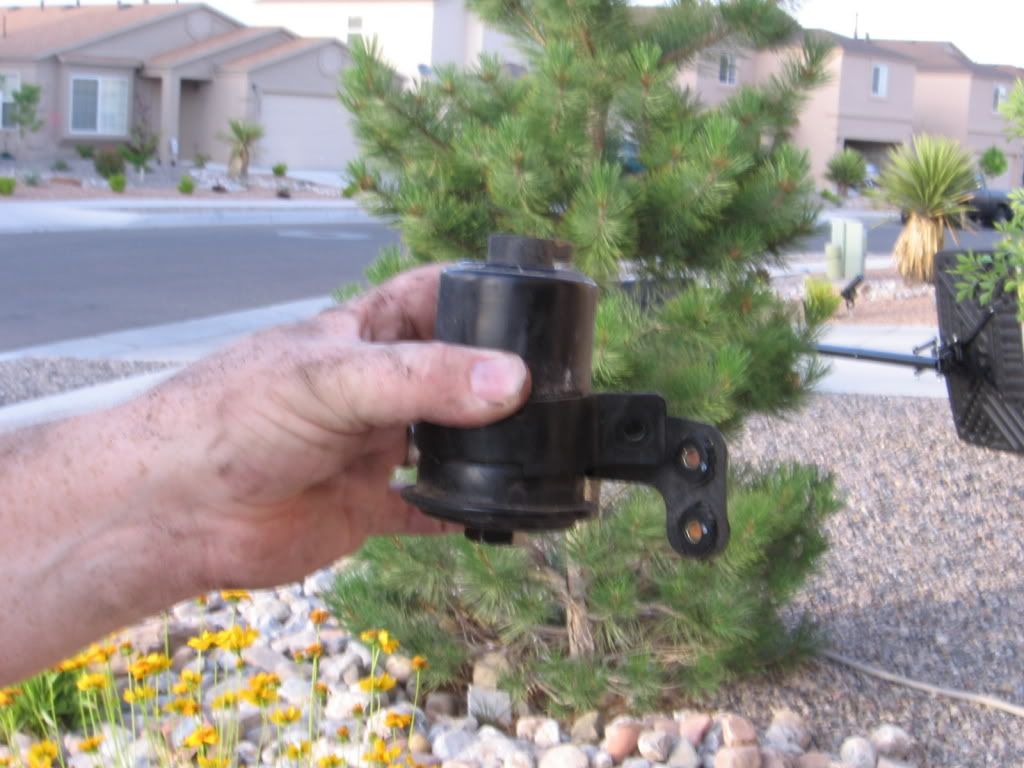
Swap your filter in the bracket and tighten it in place with the brass bolt from earlier. You'll note there is a little divot in the bracket that lines up with a bump on the filter housing to ensure you put it back with the proper orientation.
Put the filter/bracket assembly back in the car, and mount it.
Re attach the lower fuel line, being careful not to cross thread it. Don't tighten it fully yet, it is just holding the filter up for now.
Re attach the upper line. You may need to rotate the filter a few degrees to get the bolt holes to line up, that's why the lower line is not fully tightened - it would prevent alignment rotati.
Tighten the lower fitting fully using the same method as you did to loosen it. (my lower fitting sucked and I had to change angles to get more strength on it -Stocker)
Double check all fittings. DRY THE FILTER and both fittings thoroughly to help with the next step.
Plug in your fuel pump and start the car. It will be hard to start until you build up pressure. Do NOT run the starter for more than 10 to 15 seconds at a time. Be patient, the car WILL start again. Give it a 20 to 30 second break between starting attempts.
When the car eventually starts, shut it off after several seconds and go check for fuel leaks around the filter. Check carefully by both fittings. They should be exactly as dry as when you last saw them. Feel around the lower fitting, if checking from above, that will tell you if you have a smallish leak you can't see.
If leaking, tighten the connectors and/or check to see if you mounted everything right.
If not leaking, put splash guard back on and lower car.
Dispose of old filter correctly.
Note by Stocker from here to the end:
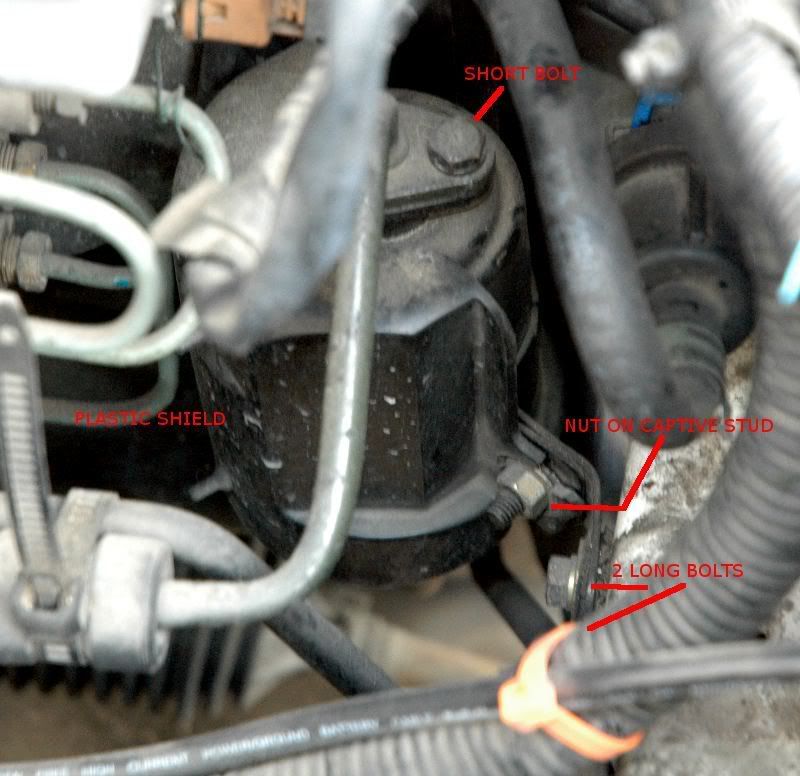
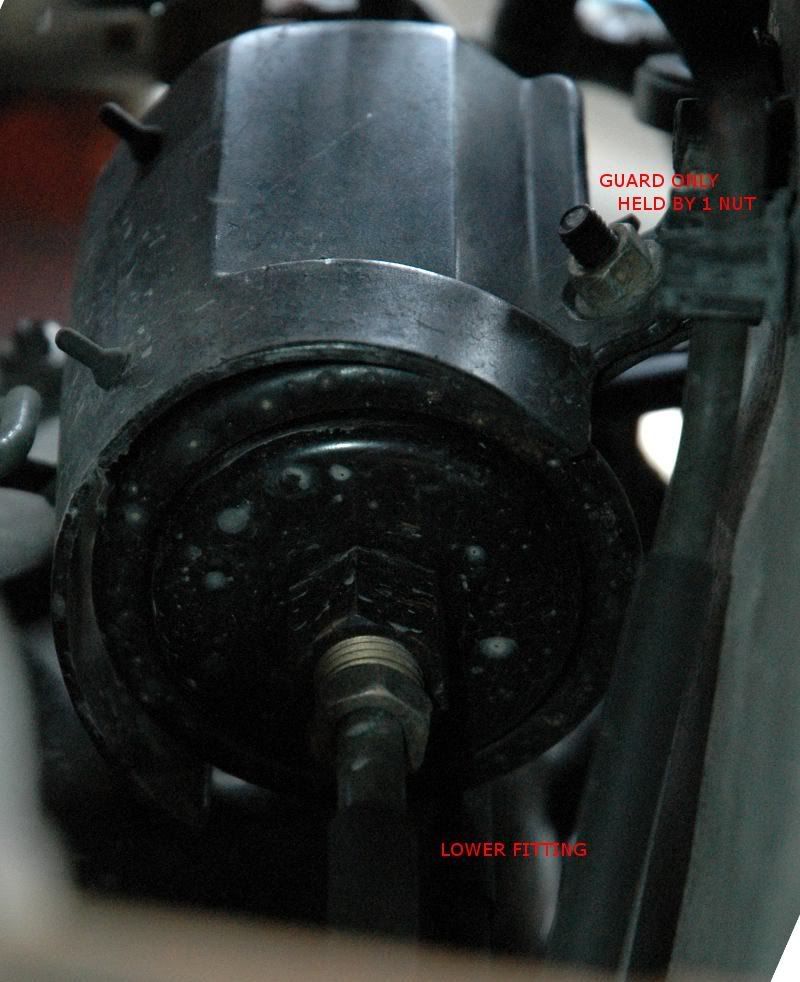
about the plastic thing on the fuel filter: I have put mine back, both times I changed the filter. It is pretty clearly there for a reason because it must have cost a couple of bucks per car for Hyundai to install this:
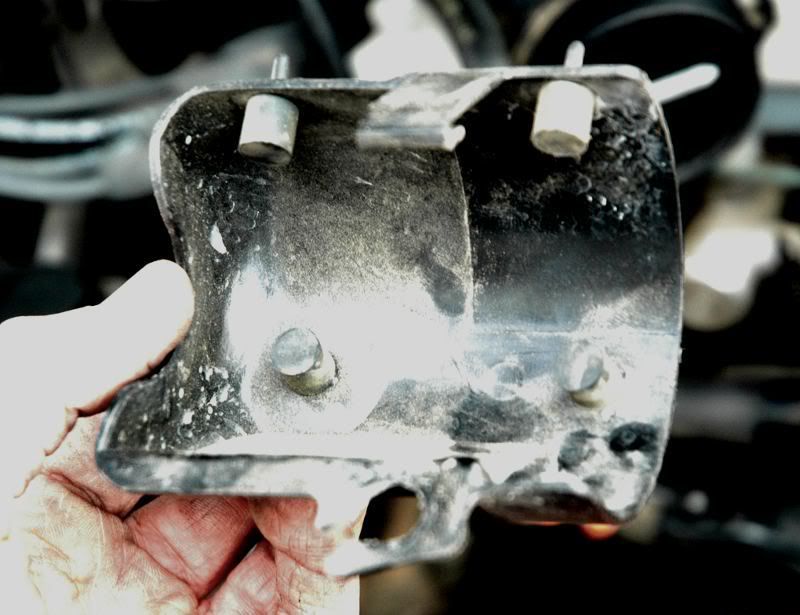
Seems to me it is either to keep engine heat off the fuel filter (notice how the fuel lines are insulated near the engine also) and/or it could be to keep anything from damaging the filter. The first reason seems more likely to me than the second. Anyway, it is SUPER easy to install at this point. Even with the filter bolted into the car and the lines tight, I was able to squeeze this (I'll call it a) heat shield into position and there's only the one nut to hold it on the bracket. I used a big washer between the shield and the nut, because the bolt hole on the shield tore first time I replaced the filter.
When you are confident nothing is leaking, put the air filter box back on. Three long 10mm bolts, four clips. One intake air temperature sensor and one air filter.
Most of my fuel pressure had bled off overnight when I went to do this work. Unbolting the top fitting resulted in a drop or ten seeping out, vs. the spray I expected. I thought I was going to get off light in the spilled fuel department, until I removed the bottom line and took the old filter out. About a cup of fuel was spilled EVERYWHERE. If you are doing this work from under the car it will be spilling on YOU, causing at best a stanky you and at worst blindness. Goggles and gloves.
More spilled fuel came out when I started the car to check for leaks. My bottom fitting is messed up somehow. I put it "goodNtight" and when I started the car it was RUNNING with gasoline from that fitting. By this point, the nut on the lower fuel line was getting pretty well rounded, so I grabbed my vise grips pliers and smashed them tight on that nut. It took literally all the strength I could muster, to get the line tight enough to seal. JUST turning that nut would have twisted the bracket and twisted the line. I used a crescent wrench jammed against the transmission mount as a solid third-hand instead of twisting the filter mount and fuel lines.
The top fitting on this filter has an o-ring. Do yourself a favor: if, when you remove the top fitting, you see the o-ring is damaged, get a new one. Mine was damaged and seeped fuel when reassembled. It was cut all the way around from the last time I inserted the line into the previous replacement filter. This is a standard-size o-ring so finding a replacement shouldn't be hard but if yours is damaged it may seep or leak gasoline. I thought my seal was good even though I knew the o-ring was in bad shape, but by the next morning the top of the filter was wet with fresh gas. This is not enough to keep you from driving to the parts store (hopefully) but leaving it like that is wasting money AND risking an engine fire. Take a bike or a 2nd car if you have to, to get the replacement o-ring - it's that important. Take the old o-ring with you when you go to get the new one.
If you are jacking the car up to work underneath, it cannot be overemphasized: USE A JACK STAND and SET THE HAND BRAKE. I know (knew) a guy who DIED (leaving a wife and two kids), because his truck fell on top of him. Jack. Stand.
********
Well, I avoided doing my fuel filter for a LONG time because of the supposed PITA it is to do.
Took me 45 minutes to do, and that was with taking pictures and notes.
(took me 2 hours+, because my lower line was borked and had to be SUPER tightened to stop leaking, plus I had to remove air filtration parts to gain access from above -Stocker)
Anyways, what you need....
1. Replacement Fuel Filter.
2. Rags, gasoline-proof bucket/bowl to catch spilt fuel.
3. 10MM Socket with Extension and ratchet.
4. 14MM and 19MM OPEN ended wrenches.
5. Jack and a Jackstand, wheel chock.
6. PPE: gloves and goggles if you value your health
7. You might use a crescent wrench instead of any of the other wrenches, but it is less easy than wrenches
8. Vise grip wrench for lower fitting nut if you are as lucky as Stocker
With a stock air filter setup you will also need:
9. Flat head screwdriver for air hose clamps
What you do...
REMOVE FUEL PRESSURE FROM YOUR FUEL LINES BEFORE YOU TURN ANY WRENCHES!
To do this, get inside the rear passenger area of your car. Pull up on the edge of your seat till it pops out. Under the center of your rear bench seat, you'll find a plastic cover with 2 wiring harnesses going into it. Pull this cover off. The fuel tank and pump are right under it. Unplug the plug that is attached to the top of the fuel pump.
Then get in the front, start the car, and run it till it stalls.
FUEL PRESSURE IS NOW REMOVED.
Jack up the drivers corner of the car, put it on a jack stand, and put a wheel chock behind the rear wheels so the car doesn't have the chance of rolling.
In order to fit my arm in to where I could work in there, including being able to reach the bottom fitting from the top side of the car, I pulled the air filter box. This is not a problem for those with cold air intakes, but if you have the stock filter setup still: Unscrew the jubilee clamp holding the flex coupling on to the Mass AirFlow sensor, and unclip the four clips around the filter box. Lift the air filter lid, realize when the wires jerk that they are still connected, and remove the Intake Air Temperature sensor from the air box or rotate the top of the airbox over onto the top of the engine. Pull the air filter (now is probably a good time to replace the air filter by the way). Three bolts hold the bottom of the filter box to the car. If the rest of the intake piping from the air filter to the front of the car is still installed, remove and discard it. Your car sounds better without all that plastic maze to breathe through! -Stocker
First off, find your fuel filter. First, look here...
^^^
On the drivers side of the car, somewhat under the master cylinder...
For those without a cold air intake, AFTER you remove the air filter box and the flex coupler to the MAFs, you will see:
Yes the lower fitting is already disconnected. This is an "after reinstallation" photo, so sue me!
^^^
You'll find this. Circled in RED is the fuel filter. Mine had some wierd plastic cover on it, that I promptly threw away when I was finished. You'll find a small brass colored 10MM bolt that holds the cover onto the bracket. Remove it. Use the 10MM socket with extension to remove the upper bolt on the fuel filter. Remove the fuel line/fitting from the top, a bit of fuel will spill, be ready and clean it up with rags. Do not smoke in the area or cause sparks.
^^^
Get under the car on the driver's side, and remove the splash guard.
^^^
5 Bolts, 10MM, and the top two are harder to reach unless your wheel is off - but you can reach them.
Added for clarity of focus, refer to next image for practical information
^^^
Get under the car in that corner, and, as shown in the picture above, put your 19MM and 14MM open end wrenches on the parts shown, at the orientations shown, and hold the filter in place with the 19MM wrench (Right hand), while turning the 14MM towards it. ALL YOU NEED TO DO IS TO GET THE FITTING LOOSE, it may take one or two good pushes to get it, but once it goes, you'll know it.
If you are having trouble here, refer to the picture and ensure you have your hands in the right places. The right one is a tight fit, and requires you to get your hand in between the axle and sway bar, but if my meaty ass can make it, your scrawny ass can.
I removed the top fitting and mounting bracket first because my lower fitting was so tight. I sprayed the area with penetrating oil (read: Liquid Wrench, NOT WD-40. WD-40 is lubricant, not penetrating oil!) and let it sit for a little while. I put my right hand down by the strut tower and reached around the transaxle mount with the left hand, under all those lines, to grab the wrenches. I arranged the wrenches so they were only maybe 20-30 degrees separated and squeezed the wrenches together with both hands to break this seal. It is stupid tight, and some weaker individuals might not be able to get it to break loose. Instead of letting it rain gasoline on me, I decided to loosen this fitting from the top of the car. I undid the top fitting and removed the mount bolts, and bent the lower fuel line a little to get a better angle on the wrenches.-Stocker
Push some towels up under the fuel filter to catch any spilling fuel and finish removing the brass fitting by hand. Pull the fuel line out from the filter and clean up the spilled fuel.
Get back up in the engine bay and remove the 2 LONG ASS 10MM bolts that hold the filter bracket to the strut wall.
^^^
Removed fuel filter with bracket.
^^^
Swap your filter in the bracket and tighten it in place with the brass bolt from earlier. You'll note there is a little divot in the bracket that lines up with a bump on the filter housing to ensure you put it back with the proper orientation.
Put the filter/bracket assembly back in the car, and mount it.
Re attach the lower fuel line, being careful not to cross thread it. Don't tighten it fully yet, it is just holding the filter up for now.
Re attach the upper line. You may need to rotate the filter a few degrees to get the bolt holes to line up, that's why the lower line is not fully tightened - it would prevent alignment rotati.
Tighten the lower fitting fully using the same method as you did to loosen it. (my lower fitting sucked and I had to change angles to get more strength on it -Stocker)
Double check all fittings. DRY THE FILTER and both fittings thoroughly to help with the next step.
Plug in your fuel pump and start the car. It will be hard to start until you build up pressure. Do NOT run the starter for more than 10 to 15 seconds at a time. Be patient, the car WILL start again. Give it a 20 to 30 second break between starting attempts.
When the car eventually starts, shut it off after several seconds and go check for fuel leaks around the filter. Check carefully by both fittings. They should be exactly as dry as when you last saw them. Feel around the lower fitting, if checking from above, that will tell you if you have a smallish leak you can't see.
If leaking, tighten the connectors and/or check to see if you mounted everything right.
If not leaking, put splash guard back on and lower car.
Dispose of old filter correctly.
Note by Stocker from here to the end:
about the plastic thing on the fuel filter: I have put mine back, both times I changed the filter. It is pretty clearly there for a reason because it must have cost a couple of bucks per car for Hyundai to install this:
Seems to me it is either to keep engine heat off the fuel filter (notice how the fuel lines are insulated near the engine also) and/or it could be to keep anything from damaging the filter. The first reason seems more likely to me than the second. Anyway, it is SUPER easy to install at this point. Even with the filter bolted into the car and the lines tight, I was able to squeeze this (I'll call it a) heat shield into position and there's only the one nut to hold it on the bracket. I used a big washer between the shield and the nut, because the bolt hole on the shield tore first time I replaced the filter.
When you are confident nothing is leaking, put the air filter box back on. Three long 10mm bolts, four clips. One intake air temperature sensor and one air filter.
Most of my fuel pressure had bled off overnight when I went to do this work. Unbolting the top fitting resulted in a drop or ten seeping out, vs. the spray I expected. I thought I was going to get off light in the spilled fuel department, until I removed the bottom line and took the old filter out. About a cup of fuel was spilled EVERYWHERE. If you are doing this work from under the car it will be spilling on YOU, causing at best a stanky you and at worst blindness. Goggles and gloves.
More spilled fuel came out when I started the car to check for leaks. My bottom fitting is messed up somehow. I put it "goodNtight" and when I started the car it was RUNNING with gasoline from that fitting. By this point, the nut on the lower fuel line was getting pretty well rounded, so I grabbed my vise grips pliers and smashed them tight on that nut. It took literally all the strength I could muster, to get the line tight enough to seal. JUST turning that nut would have twisted the bracket and twisted the line. I used a crescent wrench jammed against the transmission mount as a solid third-hand instead of twisting the filter mount and fuel lines.
The top fitting on this filter has an o-ring. Do yourself a favor: if, when you remove the top fitting, you see the o-ring is damaged, get a new one. Mine was damaged and seeped fuel when reassembled. It was cut all the way around from the last time I inserted the line into the previous replacement filter. This is a standard-size o-ring so finding a replacement shouldn't be hard but if yours is damaged it may seep or leak gasoline. I thought my seal was good even though I knew the o-ring was in bad shape, but by the next morning the top of the filter was wet with fresh gas. This is not enough to keep you from driving to the parts store (hopefully) but leaving it like that is wasting money AND risking an engine fire. Take a bike or a 2nd car if you have to, to get the replacement o-ring - it's that important. Take the old o-ring with you when you go to get the new one.
If you are jacking the car up to work underneath, it cannot be overemphasized: USE A JACK STAND and SET THE HAND BRAKE. I know (knew) a guy who DIED (leaving a wife and two kids), because his truck fell on top of him. Jack. Stand.
 06-28-2007, 05:33 PM
#2
Moderator


^^ I did mine without removing the splash gaurd which eliminates the sockets. I'm pretty sure you could use an adjustable wrench to undo the lines as well, which should put everyone in the has the tools for the job catagory.
06-28-2007, 05:36 PM
#3
Senior Member

Join Date: Sep 2002
Posts: 2,236
Likes: 0
Received 0 Likes
on
0 Posts
ive never had one issue removing them. and i never remove the splash gaurd either.
hell, pile_of_rd1 couldnt do it, a shop he went to couldnt do it, he paid me 25 bux, and it took me about 10 minutes in my driveway to knock out. anyone who's somewhat handy with working on a car can do it, and in a decently short time.
hell, pile_of_rd1 couldnt do it, a shop he went to couldnt do it, he paid me 25 bux, and it took me about 10 minutes in my driveway to knock out. anyone who's somewhat handy with working on a car can do it, and in a decently short time.
06-28-2007, 05:54 PM
#4
Senior Member
Thread Starter
Join Date: Mar 2002
Location: Los Lunas, New Mexico, USA.
Posts: 34,642
Likes: 0
Received 0 Likes
on
0 Posts
Vehicle: 2001 Hyundai Tiburon, 2004 Kia Sorento, 2010 Kia Soul
Only reason I took it off is I thought it had to come off. Bah, doesn't really matter.
06-28-2007, 07:10 PM
#5
Senior Member
Join Date: Sep 2002
Posts: 2,236
Likes: 0
Received 0 Likes
on
0 Posts
id say the one thing to be careful for, is the line on the bottom allways wants to kink up, so keep a good grip on that so it does not happen. a 10mm line wrench makes a very simple job out of it. i also leav the little plastic cover off every time i change them, make's it an even easier job if i have to bother with it again.
06-28-2007, 08:45 PM
#6
Moderator
<div class='quotetop'>QUOTE (REDZMAN @ Jun 28 2007, 07:54 PM) <{POST_SNAPBACK}></div><div class='quotemain'>Only reason I took it off is I thought it had to come off. Bah, doesn't really matter.</div>
That could have been why it was so much easier for you then it was for me. I changed my fuel filter with all the room in the world under the car, but it was still a tight fit and i had gas dripping on me. When I did it, i remember it sucked and I could bearly move my wrenches around. I remember it well and have a pic.....

Maybe your way is the correct and easier way of doing it?
Did you have your wheel off as well?
I bet that would clear up alot of room and make the job easier.
That could have been why it was so much easier for you then it was for me. I changed my fuel filter with all the room in the world under the car, but it was still a tight fit and i had gas dripping on me. When I did it, i remember it sucked and I could bearly move my wrenches around. I remember it well and have a pic.....
Maybe your way is the correct and easier way of doing it?
Did you have your wheel off as well?
I bet that would clear up alot of room and make the job easier.
06-28-2007, 10:35 PM
#7
Senior Member
Thread Starter
Join Date: Mar 2002
Location: Los Lunas, New Mexico, USA.
Posts: 34,642
Likes: 0
Received 0 Likes
on
0 Posts
Vehicle: 2001 Hyundai Tiburon, 2004 Kia Sorento, 2010 Kia Soul
No wheels taken off, I just saw where to put my arms through and did it. THe 19MM doesn't move, you just have to hold it in place and the way I did it put it against some support, so the 14MM just broke the seal of the connection.
If you remove the fuel pressure, you should barely get any gas leaked.
If you remove the fuel pressure, you should barely get any gas leaked.
06-29-2007, 05:01 AM
#8
Moderator
Well, i guess that's another cool thing about using a wet nitrous kit with this car. The fuel pump dosn't kick on automatically, so next time I'll be able to remove fuel pressure by shooting while the car is off.
07-16-2007, 03:16 AM
#9
Senior Member
Join Date: Apr 2006
Location: Albertville Insane Asylum
Posts: 1,654
Likes: 0
Received 0 Likes
on
0 Posts
Vehicle: 1999/Hyundai/Tiburon
You're the freakin' man.
When my mechanic was changing my fuel filter, he said all he had to do is relieve the fuel pressure by taking out the gas cap. Do you think this is possible?
When my mechanic was changing my fuel filter, he said all he had to do is relieve the fuel pressure by taking out the gas cap. Do you think this is possible?
07-16-2007, 03:24 AM
#10
Senior Member

Join Date: Apr 2006
Posts: 1,401
Likes: 0
Received 0 Likes
on
0 Posts
Vehicle: 2000 Tiburon
I think in older cars that was true but in cars from the last decade or 2 I think their is somethng built into the portion where the fuel goes into that it doesn't work/work as well. Correct me people if I'm wrong.
In his garage he probably isn't worried about some gas spillage so it wouldn't matter to him. However, in your garage at home while your in there working you would/should care.
In his garage he probably isn't worried about some gas spillage so it wouldn't matter to him. However, in your garage at home while your in there working you would/should care.