Diy Rear Brake Pads
 05-25-2007, 09:42 AM
#1
Senior Member

Thread Starter
Join Date: Feb 2007
Location: London, Ontario
Posts: 898
Likes: 0
Received 0 Likes
on
0 Posts
Vehicle: 2011 Kawasaki ZX6R
Changing your rear brake pads:
Tools needed:
Tire iron
Jack (and jack stands for saftey)
1/2" Ratchet
2-3" socket extension
14mm(9/16) Socket
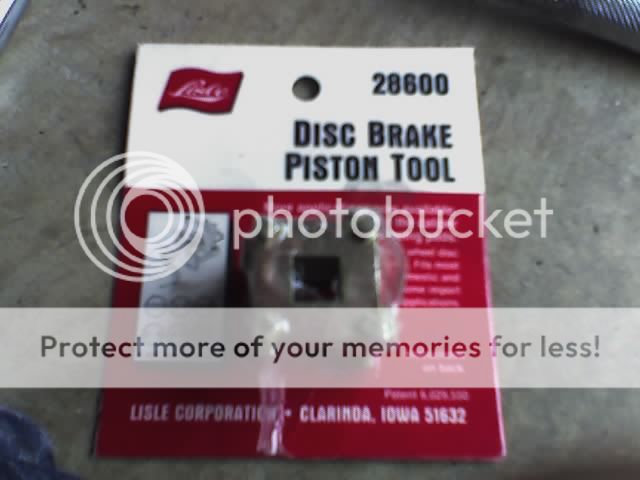
Disk brake piston tool
Brake pads
First off you need the disk brake piston tool. Certain stores carry different ones. There are 2 main ones from what I've seen. There is a set with round disks that look pretty flimsy, and there is the cube that everyone talks about on rdtiburon.com. The tool runs about $11 at O'reilys.
This DIY will use the cube:
Move your car to a level area to lower the risk of it rolling on you. You can't have the E-brake on because you wont be able to remove the calipers so for Autos put it in park, Manuals throw it in 1st. Both should put some blocks around atleast one side of the front trires.
Loosen the lug nuts while the car is still on the ground and then procede to jack up the car. You can jack it up from the thin metal section just in front of the rear tires but then you probably wont be able to fit the jackstand in there. There is a jack point under the rear of the car that will raise both sides at once, refer here: How to Jack your car
Once jacked up remove the tire and set it aside. Needless to say but becareful not to put the rim side down, some of you have pretty nice rims lol.
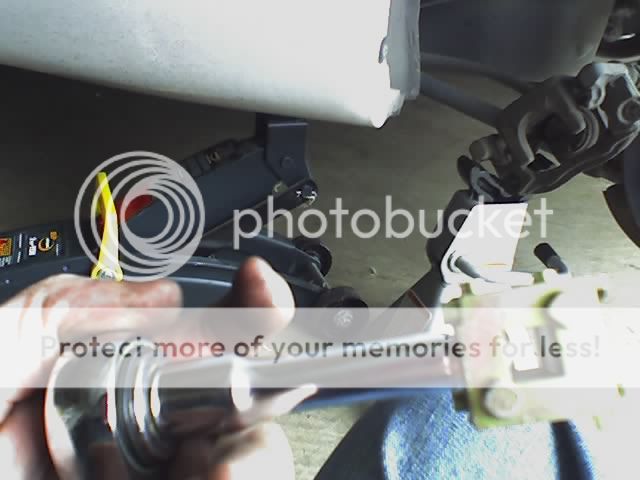
Now you need to remove the caliper. You will need a 14mm socket. 9/16 will work but its a little loose and could possibly strip the bolt. Remember, our cars are made in korea where the metric system is used so the bolts are in metric sizes. There are 2 bolts holding the caliper on. One at the top and one towards the bottom.
These 2 images show the bolts on the front caliper, but are pretty much the same on the rear:
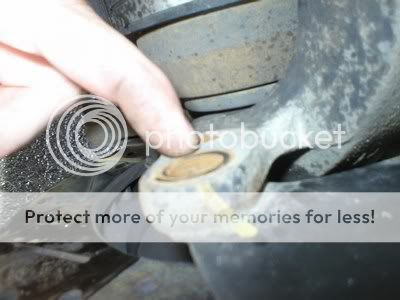
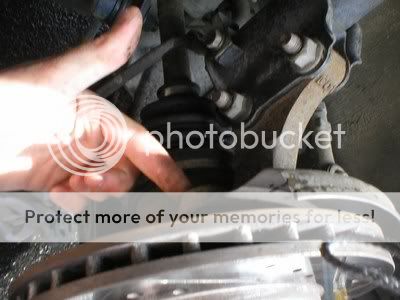
tibby01 Has credit for the above pics, I stole them from his wheel stud replacement DIY.
Grab something high enough to set the caliper on for support. It isnt good to leave it hanging by the brake lines. Most people have more then 1 jack stand so I just used a 2nd one to support the caliper. Now just slide the caliper off the rotor and set it on your support. You may have to lean it up against the metal bars of the knuckle.
Once its off just use your fingers and pop out the old pads. I dont have pictures but my pads were really thin and both sides were cracked right down the middle.
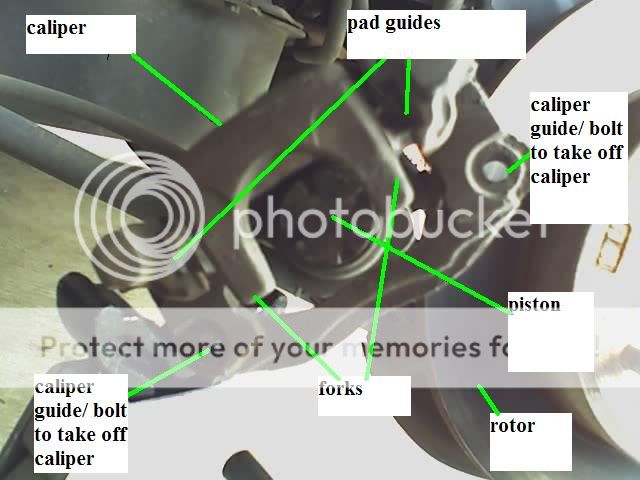
Looks like this once the pads are removed:
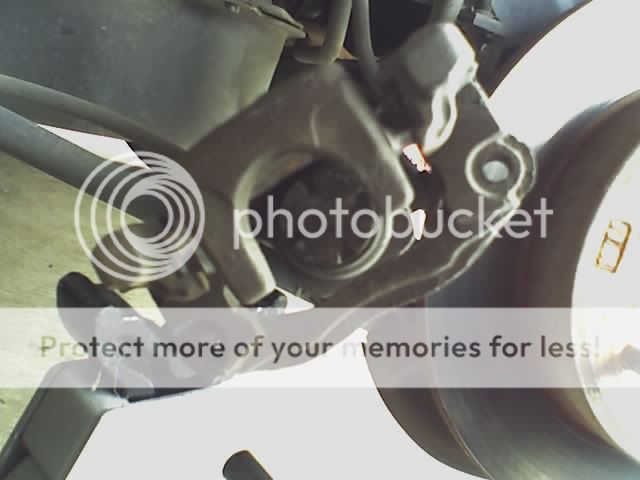
The round object in the center is the piston. The holes around the edge are where the disk brake tool goes. You have to match up the right side of the cube. Once you know which side to use, put the rachet in the opposite end.
Now the fun part. Hold the pistol tool agaisnt the piston tight because it likes to slip and bash your knuckles >.<
Turn it to the left to create more distance between the caliper. This helps in putting the pads in and also is a must if you want the caliper to fit on with the new thicker pads.
Now while putting the pads in it gets very tricky for the one further out from the wheel. But with a little luck you'll get it in there eventually. I don't have any real tips for putting the pads in other than the one with the metal stub on it goes in the inner pad slot.
Becareful not to push in on the top of the caliper because the pistons will tighten up and you'll have to remove the pads again. Happened to me 3 times before I got the caliper back on.
Once the pads are in just slide it back on the rotor and put the bolts back in. Put the tire back on and hand tighten the lug-nuts in a star pattern. Or any order you like I guess. Now tighten them a little more with the tire iron.
Lower the car back down and tighten the lugs-nuts the rest of the way. You have now just replaced your brake pads and saved some money at the shop!
Tools needed:
Tire iron
Jack (and jack stands for saftey)
1/2" Ratchet
2-3" socket extension
14mm(9/16) Socket
Disk brake piston tool
Brake pads
First off you need the disk brake piston tool. Certain stores carry different ones. There are 2 main ones from what I've seen. There is a set with round disks that look pretty flimsy, and there is the cube that everyone talks about on rdtiburon.com. The tool runs about $11 at O'reilys.
This DIY will use the cube:
Move your car to a level area to lower the risk of it rolling on you. You can't have the E-brake on because you wont be able to remove the calipers so for Autos put it in park, Manuals throw it in 1st. Both should put some blocks around atleast one side of the front trires.
Loosen the lug nuts while the car is still on the ground and then procede to jack up the car. You can jack it up from the thin metal section just in front of the rear tires but then you probably wont be able to fit the jackstand in there. There is a jack point under the rear of the car that will raise both sides at once, refer here: How to Jack your car
Once jacked up remove the tire and set it aside. Needless to say but becareful not to put the rim side down, some of you have pretty nice rims lol.
Now you need to remove the caliper. You will need a 14mm socket. 9/16 will work but its a little loose and could possibly strip the bolt. Remember, our cars are made in korea where the metric system is used so the bolts are in metric sizes. There are 2 bolts holding the caliper on. One at the top and one towards the bottom.
These 2 images show the bolts on the front caliper, but are pretty much the same on the rear:
tibby01 Has credit for the above pics, I stole them from his wheel stud replacement DIY.
Grab something high enough to set the caliper on for support. It isnt good to leave it hanging by the brake lines. Most people have more then 1 jack stand so I just used a 2nd one to support the caliper. Now just slide the caliper off the rotor and set it on your support. You may have to lean it up against the metal bars of the knuckle.
Once its off just use your fingers and pop out the old pads. I dont have pictures but my pads were really thin and both sides were cracked right down the middle.
Looks like this once the pads are removed:
The round object in the center is the piston. The holes around the edge are where the disk brake tool goes. You have to match up the right side of the cube. Once you know which side to use, put the rachet in the opposite end.
Now the fun part. Hold the pistol tool agaisnt the piston tight because it likes to slip and bash your knuckles >.<
Turn it to the left to create more distance between the caliper. This helps in putting the pads in and also is a must if you want the caliper to fit on with the new thicker pads.
Now while putting the pads in it gets very tricky for the one further out from the wheel. But with a little luck you'll get it in there eventually. I don't have any real tips for putting the pads in other than the one with the metal stub on it goes in the inner pad slot.
Becareful not to push in on the top of the caliper because the pistons will tighten up and you'll have to remove the pads again. Happened to me 3 times before I got the caliper back on.
Once the pads are in just slide it back on the rotor and put the bolts back in. Put the tire back on and hand tighten the lug-nuts in a star pattern. Or any order you like I guess. Now tighten them a little more with the tire iron.
Lower the car back down and tighten the lugs-nuts the rest of the way. You have now just replaced your brake pads and saved some money at the shop!
 05-25-2007, 10:50 AM
#2
Moderator


I've heard people say it's best to re-align the twisting caliper with the caliper tool to match the new distance between the brake pad and the rotor... any pros have advice on this?
Is it necessary to manually adjust the rear brakes back to match the new clearance or will they self adjust?
OH, BTW!!! You don't need to remove the top caliper bolt. It will flip up and you can drop out your old pads. If you remove the upper caliper bolt, you risk the chance of breaking your brake lines.
05-25-2007, 11:04 AM
#3
Senior Member
Thread Starter
Join Date: Feb 2007
Location: London, Ontario
Posts: 898
Likes: 0
Received 0 Likes
on
0 Posts
Vehicle: 2011 Kawasaki ZX6R
^^^ exactly right about the bolts. I forgot to mention that. I took both off because I was having trouble getting the pads in with one hand. Although you can loosen the top bolt to rotate the caliper, and tighten it again so it doesnt fall back into place.
I took these pics a long time ago when I cahnged the pads and just recently decided to write up a DIY since I saw some new threads on the rear calipers.
I took these pics a long time ago when I cahnged the pads and just recently decided to write up a DIY since I saw some new threads on the rear calipers.
05-25-2007, 05:25 PM
#4
Moderator
Just to cover some general brake tips:
It should be mentioned that you just need a C-Clamp to compress the front calipers, no other special tools.
Also, if you're changing your rear brakes and not your fronts, then you probly drove with the e-brake on for a bit and the rear rotors are worn. If your car is shimmying or kinda lumpy when you apply your brakes, the rotor is probly warped. If it is warped, then you should look at getting your rear rotors "turned". When rotors are turned, they are put on a machine which hones them flat again.
If your car brakes and then stops, then brakes and stops, your caliper guides are stuck, "binding". When you pull out the bolts for your calipers it's always best to lube the large, flat area of them to make sure they won't bind inside, as they are also the caliper guides. This will ensure a nice free moving brake caliper and it will always match the movement of the rotor, which shouldn't be much until they warp again.
You should make sure all the origonal hardware goes back on. There should be a metal brake pad guide on top, a guide on bottom and the factory installs metal silencer shims which will reduce squeeking noises on the brakes.
You may replace them with the gooey disk brake silencer stuff from your auto parts store, or you can put the silencer stuff on the brakes. Just remember that they'll squeek if you don't put something between the piston and the pad also the caliper and the pad. You can also put the disk brake silencer goo between the pad guides and the forks, but don't put it between the pad and the pad guides.
05-25-2007, 07:45 PM
#5
Senior Member

Join Date: Mar 2006
Location: Mass
Posts: 6,341
Likes: 0
Received 0 Likes
on
0 Posts
Vehicle: 97 Tiburon
basically you just told everyone how to "pad whack" their vehicle.
you should for one apply some Molly-lube to the backing of the pad. also, have a die grinder and clean up all rust on parts such as the caliper. also you should take the caliper slide bolt and lube that up.
if you pad whack your car, you could see some very uneven wear, and also the backing can come separated from the pad.
05-25-2007, 08:59 PM
#6
Senior Member
Thread Starter
Join Date: Feb 2007
Location: London, Ontario
Posts: 898
Likes: 0
Received 0 Likes
on
0 Posts
Vehicle: 2011 Kawasaki ZX6R
Wow, I didnt know about all the guiding bolts thanks for sharing. I forgot to mention the gels >.<. Like I said I did this a long time ago and was trying to recall Every step taken lol. I suppose I should have Taken a little more time to ensure I remembered every detail before posting a diy. None the less the basics have been covered and everyone now has a general idea of how to do it. Along with the above tips and corrections this turned out to be an ok DIY lol.
Thanks for setting things straight guys hail.gif
Thanks for setting things straight guys hail.gif
05-26-2007, 09:38 PM
#7
Moderator
<div class='quotetop'>QUOTE (Sparticus @ May 25 2007, 09:45 PM) <{POST_SNAPBACK}></div><div class='quotemain'>basically you just told everyone how to "pad whack" their vehicle.
you should for one apply some Molly-lube to the backing of the pad. also, have a die grinder and clean up all rust on parts such as the caliper. also you should take the caliper slide bolt and lube that up.
if you pad whack your car, you could see some very uneven wear, and also the backing can come separated from the pad.</div>
Were you talking about me or the DIY? I think I said to resurface the rotor and lube the bolts.
is molly-lube a brand name? I always use generic disk brake silencer
You don't need a die grinder to clean up rust. A wire brush will take the rust off and painting the caliper will make sure it dosn't rust in the future.
05-27-2007, 04:54 PM
#8
Moderator

Join Date: Mar 2009
Location: wamego, kansas
Posts: 5,280
Likes: 0
Received 0 Likes
on
0 Posts
Vehicle: 2001 hyundai tiburon
not for sure if you guys do it or not but when i start breaking into nuts and bolts or tapped places on my car i chase all threads with a tap and die set. the reason for this is rust can build up in tapped holes(especially brake assemblies) and you might have a hole stripped out like i did on DWEET's red tib when i went to go get it. had to buy a whole new caliper in dayton cause the whole had rust buildup which in turn ruined the threads.
do you need a die grinder...no but if you have a wire wheel attachment for it it will be faster and clean alot better than you could ever do with a plain ole wire brush scrubbing away.
do you need a die grinder...no but if you have a wire wheel attachment for it it will be faster and clean alot better than you could ever do with a plain ole wire brush scrubbing away.
05-27-2007, 05:12 PM
#9
Senior Member
Join Date: Mar 2006
Location: Mass
Posts: 6,341
Likes: 0
Received 0 Likes
on
0 Posts
Vehicle: 97 Tiburon
<div class='quotetop'>QUOTE (DrivingTibNaked @ May 26 2007, 11:38 PM) <{POST_SNAPBACK}></div><div class='quotemain'>Were you talking about me or the DIY?</div>
no
no
