Diy: Window Regulator Replacement
 02-14-2007, 05:59 AM
#1
Senior Member

Thread Starter

Join Date: Apr 2006
Posts: 1,401
Likes: 0
Received 0 Likes
on
0 Posts
Vehicle: 2000 Tiburon
My first attempt at a DIY writeup... here goes. This is actually fairly easy to do overall. If you can change your own oil then you can do this.
Supplies/Tools needed:
2 Phillips screwdrivers (1 with fine point tip and 1 with flat tip)
1 Flathead screwdriver
Ratchet
12mm Socket(small extension helps)
Scissors
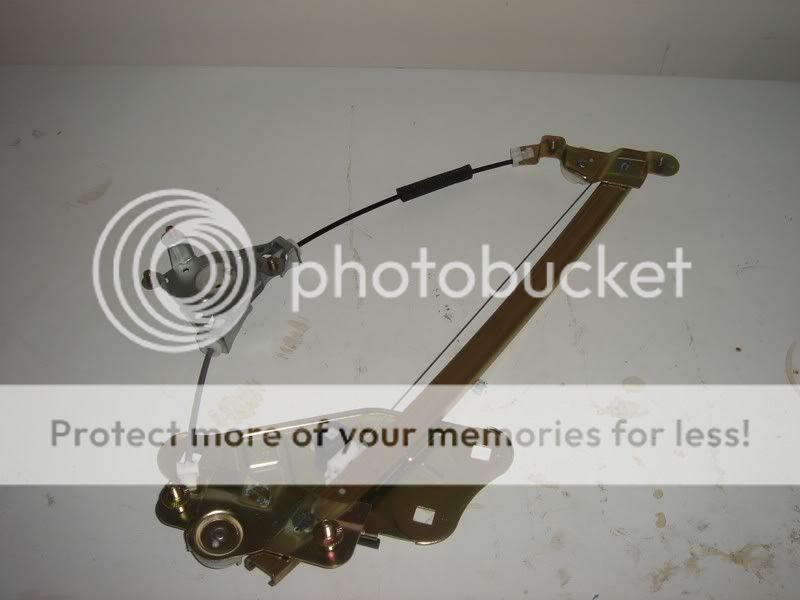
New Window Regulator(I got mine for $109 shipped on ebay from FourGreenAutoParts)
Time:1.5-2 hours
*It does not matter where you left the window at so don't bother going and hitting the window switch to "roll the window down all the way."
Removing old regulator...
First, disconnect the battery.
Then, remove your door panel. There are 7 screws. 2 on each side. 2 in the door handle behind the little caps and 1 in the inside door opener(remove the cup around the door opener). Using flathead screwdriver pop triangle covering side mirror harness. Pry from the bottom and sides until the panel is just hanging and proceed to lift the whole panel up and away. Remember that you will have to disconnect the window switch and the courtesy door light if your car is equiped with one.
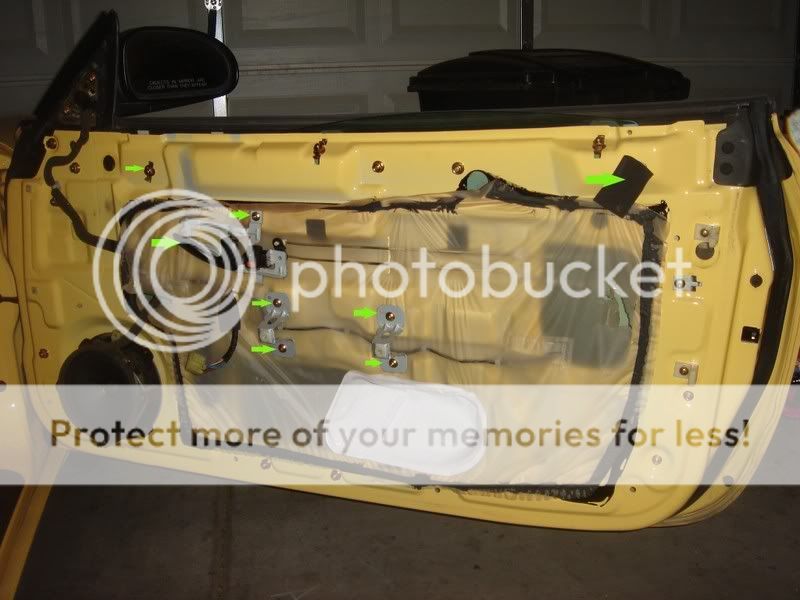
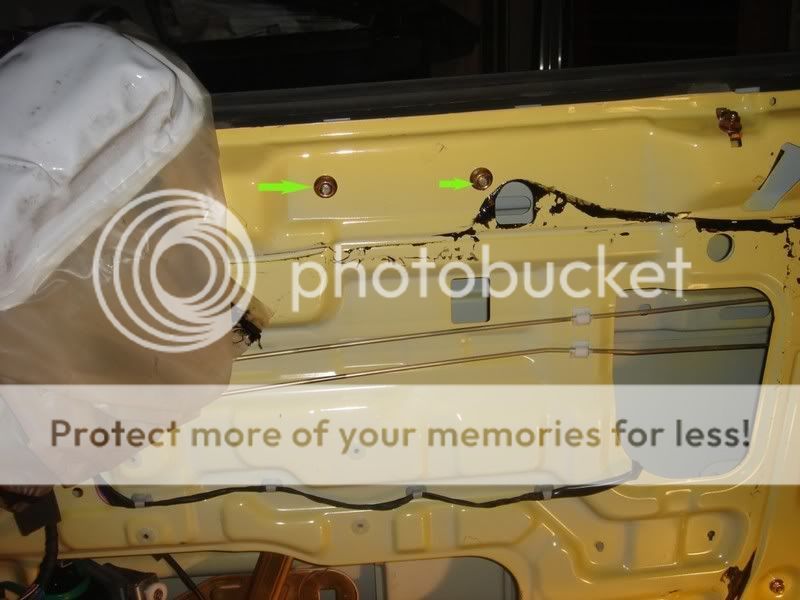
You will then end up with what I have shown below. Proceed to disconnect your power mirror and speaker(not necessary but I do so the wires can be moved freely). Then remove the 8 nuts that I point out in the picture. <u>The top 2 nuts release stoppers that will fit interchangeably but need to go back in the correct spots that they were removed from so take note of this.</u> The nut on the upper right is just covered with an easily removed little cloth patch.
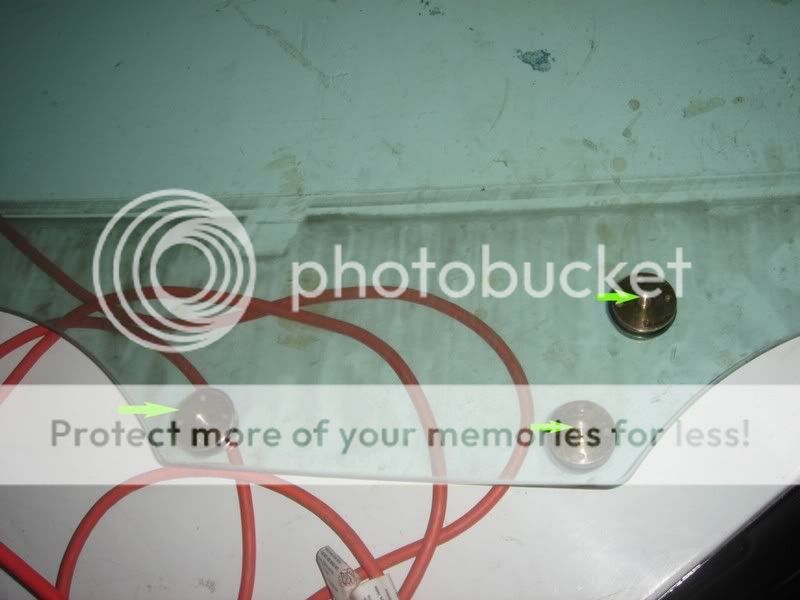
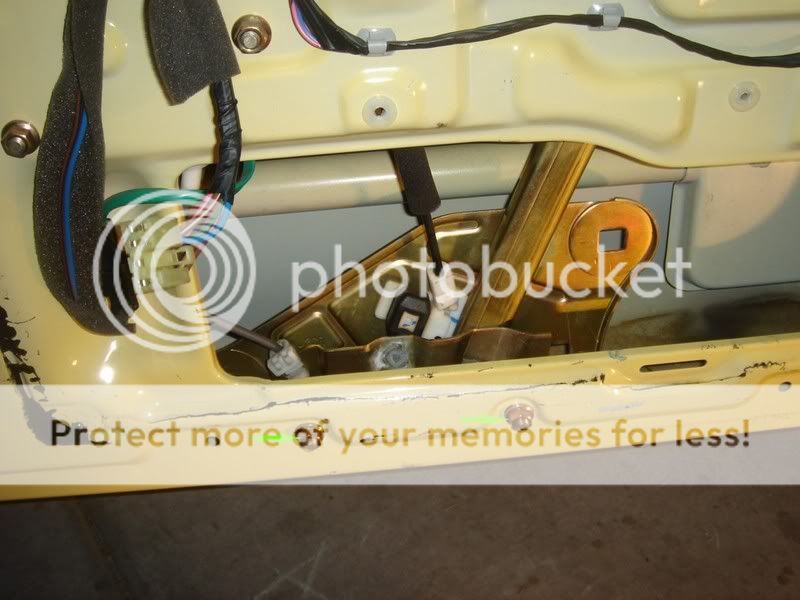
I chose to leave the paper on and simply moved it around. You'll need to go around the edges and peel it away from the door. The black glue is very sticky and you will rip the paper so becareful. You can see in the next picture how I leave the paper hanging from the door opener. I also have pointed to 3 screws to remove. I did it by using one hand to hold the window up from the bottom and unscrewing the screws with the other. If you look at the top picture of the new regulator you will see 3 squares that is where these 3 screws are. I took a picture of the bottom of the window for you to also be able to match up against. See below.
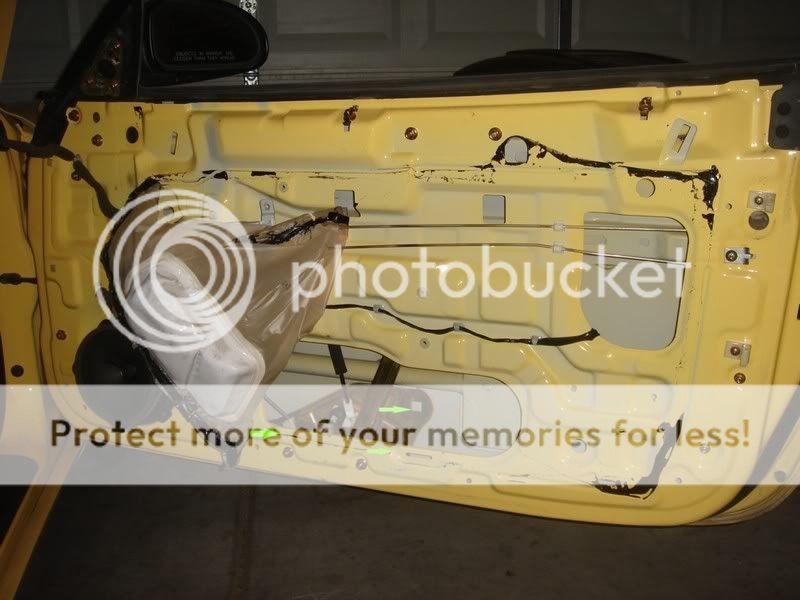
<span style="color:#FF0000">At this point you grab the window from the top and pull it all the way out. It is heavier than you'd think and a bit slippery even when dry so becareful. Grabbing the window from the sides is recommended once your able to do this.</span>
Now is the time to remove the old regulator. You will have 7 nuts to remove. See the next 3 pictures below.
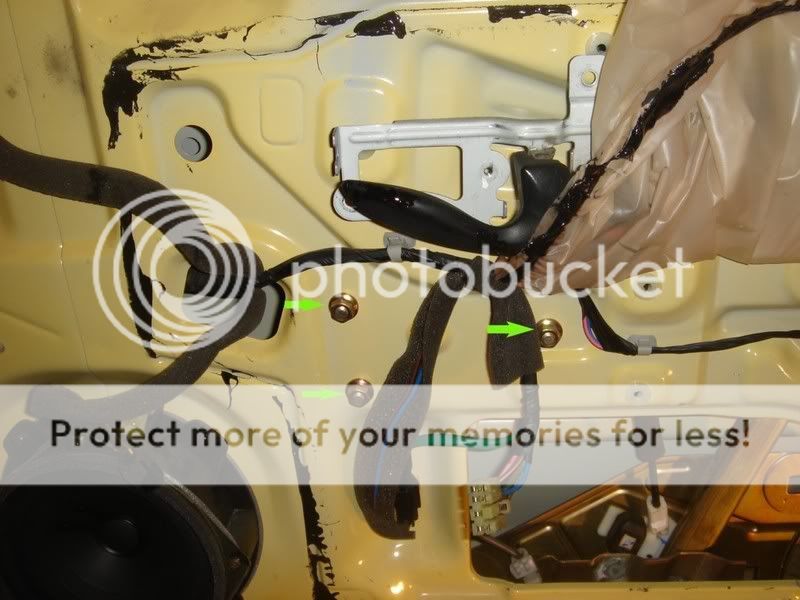
In the last picture above you can see a green wire going into the opening... this wire is attached to the window motor which is attached to a part of the regulator so be ready with your scissors to cut the zip tie off.
Pulling out and reinstalling the regulator through the opening at the bottom is how you will need to do it. It gets a little tricky and it gets caught up a lot because of the studs on the regulator. Just remember the window motor is still attached to the regulator and if you look at the picture below you will see where 3 more screws will need to be removed to seperate the power window motor. The black piece is your power window motor.

Installing new regulator...
Attach motor to new regulator with 3 screws.
Squeeze new regulator into opening.
Attach 7 nuts for new regulator.
Slide window back in.
Attach window to regulator with 3 screws.
Replace 2 top stoppers back to where they belong.
Test window.
Replace paper over door.
Replace 6 remaining nuts for door opener and door handle.
Put panel and triangle back on.
When putting everything back together a few things for you to note are...
1. You will literally just do everything in reverse.
2. The hardest parts of the whole ordeal is putting the new regulator in and replacing the window.
3. When putting the screw back in to attach the window to the regulator you will notice small lines on the sides of the square holes. This is so that you can center the screw and get the window back in just right so use these small lines as guides to center your 3 screws.
4. To test your handy work reattach the battery and plug the window switch back in. If your working on the passenger side like I was don't try to roll it down from the drivers side without reattaching the plug on the passenger window switch because it won't work.
5. You should be able to replace the paper and put everything back so that it looks like you haven't done a thing.
Have fun!
Supplies/Tools needed:
2 Phillips screwdrivers (1 with fine point tip and 1 with flat tip)
1 Flathead screwdriver
Ratchet
12mm Socket(small extension helps)
Scissors
New Window Regulator(I got mine for $109 shipped on ebay from FourGreenAutoParts)
Time:1.5-2 hours
*It does not matter where you left the window at so don't bother going and hitting the window switch to "roll the window down all the way."
Removing old regulator...
First, disconnect the battery.
Then, remove your door panel. There are 7 screws. 2 on each side. 2 in the door handle behind the little caps and 1 in the inside door opener(remove the cup around the door opener). Using flathead screwdriver pop triangle covering side mirror harness. Pry from the bottom and sides until the panel is just hanging and proceed to lift the whole panel up and away. Remember that you will have to disconnect the window switch and the courtesy door light if your car is equiped with one.
You will then end up with what I have shown below. Proceed to disconnect your power mirror and speaker(not necessary but I do so the wires can be moved freely). Then remove the 8 nuts that I point out in the picture. <u>The top 2 nuts release stoppers that will fit interchangeably but need to go back in the correct spots that they were removed from so take note of this.</u> The nut on the upper right is just covered with an easily removed little cloth patch.
I chose to leave the paper on and simply moved it around. You'll need to go around the edges and peel it away from the door. The black glue is very sticky and you will rip the paper so becareful. You can see in the next picture how I leave the paper hanging from the door opener. I also have pointed to 3 screws to remove. I did it by using one hand to hold the window up from the bottom and unscrewing the screws with the other. If you look at the top picture of the new regulator you will see 3 squares that is where these 3 screws are. I took a picture of the bottom of the window for you to also be able to match up against. See below.
<span style="color:#FF0000">At this point you grab the window from the top and pull it all the way out. It is heavier than you'd think and a bit slippery even when dry so becareful. Grabbing the window from the sides is recommended once your able to do this.</span>
Now is the time to remove the old regulator. You will have 7 nuts to remove. See the next 3 pictures below.
In the last picture above you can see a green wire going into the opening... this wire is attached to the window motor which is attached to a part of the regulator so be ready with your scissors to cut the zip tie off.
Pulling out and reinstalling the regulator through the opening at the bottom is how you will need to do it. It gets a little tricky and it gets caught up a lot because of the studs on the regulator. Just remember the window motor is still attached to the regulator and if you look at the picture below you will see where 3 more screws will need to be removed to seperate the power window motor. The black piece is your power window motor.
Installing new regulator...
Attach motor to new regulator with 3 screws.
Squeeze new regulator into opening.
Attach 7 nuts for new regulator.
Slide window back in.
Attach window to regulator with 3 screws.
Replace 2 top stoppers back to where they belong.
Test window.
Replace paper over door.
Replace 6 remaining nuts for door opener and door handle.
Put panel and triangle back on.
When putting everything back together a few things for you to note are...
1. You will literally just do everything in reverse.
2. The hardest parts of the whole ordeal is putting the new regulator in and replacing the window.
3. When putting the screw back in to attach the window to the regulator you will notice small lines on the sides of the square holes. This is so that you can center the screw and get the window back in just right so use these small lines as guides to center your 3 screws.
4. To test your handy work reattach the battery and plug the window switch back in. If your working on the passenger side like I was don't try to roll it down from the drivers side without reattaching the plug on the passenger window switch because it won't work.
5. You should be able to replace the paper and put everything back so that it looks like you haven't done a thing.
Have fun!
 02-14-2007, 10:11 AM
#2
Senior Member
Join Date: Mar 2002
Location: Los Lunas, New Mexico, USA.
Posts: 34,642
Likes: 0
Received 0 Likes
on
0 Posts
Vehicle: 2001 Hyundai Tiburon, 2004 Kia Sorento, 2010 Kia Soul
Not bad at all man, I was very suprised when I did mine at how easy it was. Everyone said it was a Royal PITA, but I thought it was easy.
As for your DIY, good, but you don't need to take off the door handle or the mounts for the door panel, just tear the plastic off (I've NEVER seen anyone actually keep it on like you did), and do the nuts/bolts that hold teh regulator in place.
Nice to have it fixed eh?
As for your DIY, good, but you don't need to take off the door handle or the mounts for the door panel, just tear the plastic off (I've NEVER seen anyone actually keep it on like you did), and do the nuts/bolts that hold teh regulator in place.
Nice to have it fixed eh?
 02-18-2007, 09:06 AM
#5
Senior Member

Join Date: Mar 2006
Posts: 1,864
Likes: 0
Received 0 Likes
on
0 Posts
Vehicle: 2001/Hyundai/Tiburon
I can hear the window trying to go up and down, but it just stays down (happened last night). Will this need a new regulator or do you think I can reattach something?
Thanks
Thanks
02-19-2007, 01:46 AM
#7
Senior Member
Thread Starter
Join Date: Apr 2006
Posts: 1,401
Likes: 0
Received 0 Likes
on
0 Posts
Vehicle: 2000 Tiburon
Brian, your stuck. You need a new regulator. As you can see it's pretty easy to do and those people on ebay that I listed at the top got it to me in 2 business days from Korea. So, check them out.
06-15-2007, 10:09 PM
#8
Junior Member

Join Date: May 2007
Location: Miami, FL USA
Posts: 5
Likes: 0
Received 0 Likes
on
0 Posts
this diy saved me a ton of time/money, thank you so much!
the dealer by my house wanted 166 for the regulator and like 350 for the piece and labor. Ended up buying the part from fourgreen for about 90 shipped. Now I'm enjoying my working driver's window! Hell, it goes up faster than my passenger window.
Good temporary fix that worked for me while i was waiting for the regulator was putting a piece of 2x4 in the door the keep the window up. Better off having your window kept up all the time instead of in your door..
p.s. sorry for bumpin up an old post, just wanted to thank the OP


